background image

- 15 -

ROTOR SPEEDS

The 

EL 131

 must only be driven at 

1000 rpm PTO speed.

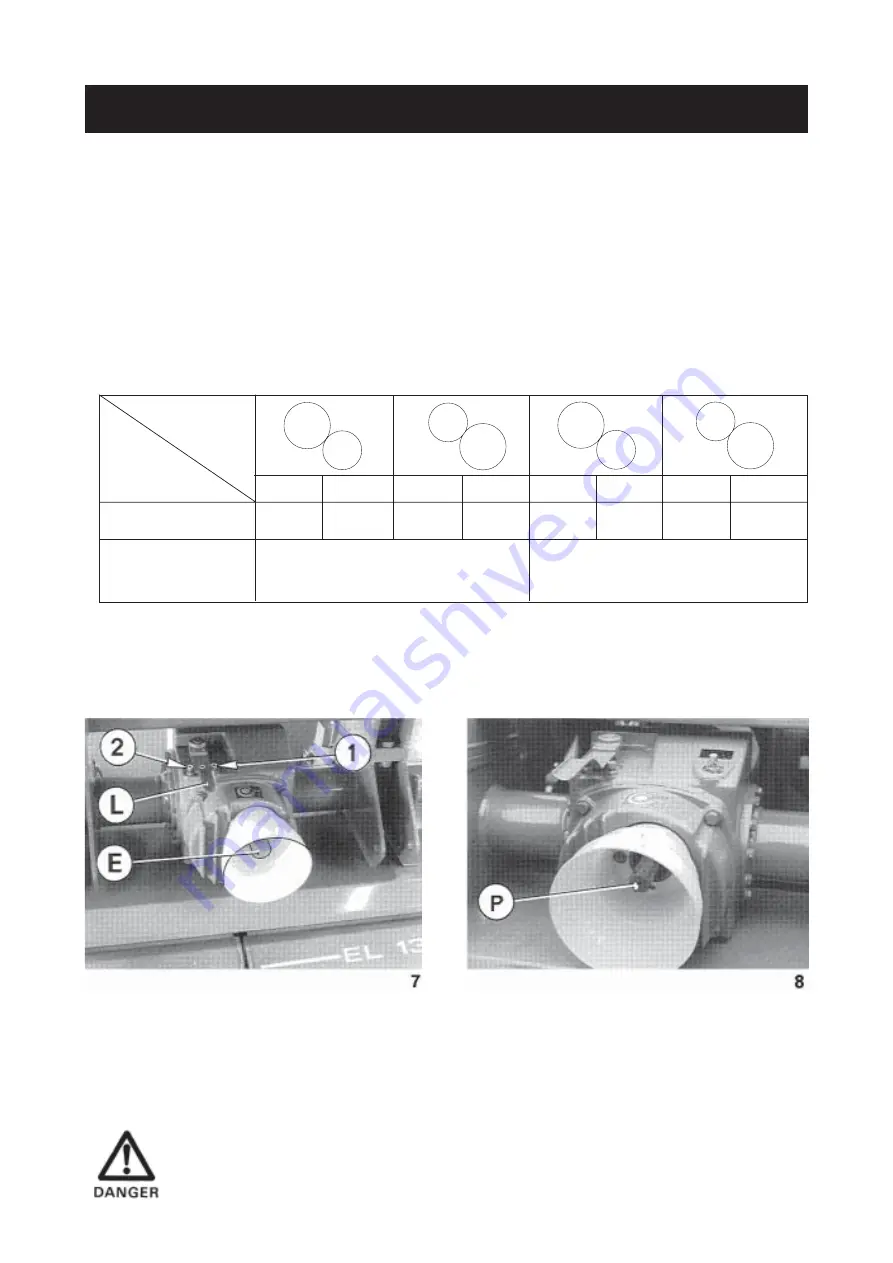
The selector lever (L) (shown in the neutral position on photo 7) associated with invertable gearwheels enables

4 different rotor speeds to be selected (see table 6).

To invert the two gearwheels the machine must be tilted forwards, thus avoiding oil loss.

To do this, proceed as follows :

- Uncouple the PTO shaft.

- Reduce top link length to the minimum.

- Lift the machine to the maximum.

- Remove the gearbox rear cover.

- Invert gearwheels.

POSITION OF

PINIONS

1st

2nd

1st

2nd

1st

2nd

1st

2nd

1 000 rpm

221

269

289

351

187

225

350

422

  24    21

     26

        19

        21

  24  19

      26

Set installed at factory

PTO SPEED

Optional 19/26 teeth

(Set no 123 7420)

6

B

A

= Recommended speeds and fitted as standard  for 

EL 131 POWER TILLER

 with curved blades or with

mulch blades

= Recommended speeds and fitted as standard  for 

EL 131 CULTITILLER 

or 

CULTIPLOW.

A

SET OF PINIONS

The gearbox is factory fitted with a rear PTO shaft  (P) which rotates at the same speed as the tractor PTO shaft

(photo 8). An extra implement can be driven by a secondary PTO shaft which should be assembled and used

according to the legislation in force at the time.

The rear PTO shaft

 is 1 3/8" 6 spline profile, and 

must not be used to transmit more than 37 kW (50 hp. 

It

should not be used with the gears disengaged (neutral) when driving a secondary implement (seed-drill etc.) 

as

this  could  damage  the  gearbox  due  to  a  lack  of  lubrication.

If  the  rear  PTO  shaft  is  not  used,  always  put  cover  (E)  in  place  (photo  7).

Summary of Contents for EL 131

Page 1: ...ASSEMBLY OPERATOR S MANUAL EL 131 POWER TILLER CULTITILLER CULTIPLOW N 95454 GB 06 06 96...

Page 2: ...instruct you on the general operation of your machine He is interested that you get the best performance possible and will be glad to answer any special questions that may arise regarding the operati...

Page 3: ...linkage 24 9 A frame kit for VENTA AL integrated seeder attachment 27 10 A frame kit for ACCORD DA integrated seeder attachment 27 11 Semi automatic hitch 28 12 Lengthened lower link brackets 28 13 Cr...

Page 4: ...other than the designated operation is at the risk and responsibility of the operator Designated use of the machine also means following operation maintenance and repair recommendations given by the...

Page 5: ...ck the surrounding area beware of children Make sure there is sufficient visibility Keep all people and animals away from the danger zone of the machine risk of projection 8 Carrying people or animals...

Page 6: ...ng can exist when components are operated by hydraulic or pneumatic controls 25 Before leaving the tractor or before adjusting maintaining or repairing the machine turn off the engine remove ignition...

Page 7: ...to place 7 Make sure guards are correctly in place and secured with the safety chains provided 8 Before engaging PTO ensure that PTO speed and direction are in accordance with manufacturer s recommend...

Page 8: ...t lower the machine depressurize the circuit turn off the engine and remove ignition key MAINTENANCE 1 Before checking any machine malfunction and before adjusting maintaining or repairing the machine...

Page 9: ...UR PERSONAL SAFETY AND FOR THE SAFETY OF THE PEOPLE WORKING WITH YOU THE TEXT SHOWN ON THEM GIVES THEIR PRECISE MEANING KEEP THE PICTORIALS LEGIBLE IF THEY ARE NOT REPLACE THEM NOTE Illustrations in t...

Page 10: ...8...

Page 11: ...it P T O shaft with friction slip clutch Attachment Cat 2 and 3 Overall machine width m ft 2 74 9 3 24 10 5 Weight with packer roller kg lbs Power Tiller version 1502 3304 1652 3634 Cultitiller versio...

Page 12: ...have to be moved laterally in order to clear space for attaching certain accesso ries side separating discs front wheels Whatever the accessories the machine is equipped with the guards must remain f...

Page 13: ...r seed drill combinations see fig B FITTING TO THE TRACTOR TheEL131canbefittedtoalltractorsequippedwithastandardCat 2or3three pointhitch Thelowerattachment yokes are locked in a fixed position factory...

Page 14: ...ink P length to a position where the tractor PTO stub and the tiller input shaft are parallel In working position The 2 angles K formed by the centre lines of the yoke and the sliding tubes must be eq...

Page 15: ...th the ground Attach chain C in the hole provided as shown in photo 4 To avoid accidents which could be serious make sure that the guards are always correctly in place and secured with the safety chai...

Page 16: ...lutch slips excessively too light a spring pressure obstacles etc readjust if necessary and wait until the temperature of the clutch drops to a normal work temperature of approximately 40 C 104 F befo...

Page 17: ...tional 19 26 teeth Set no 123 7420 6 B A Recommended speeds and fitted as standard for EL 131 POWER TILLER with curved blades or with mulch blades B Recommended speeds and fitted as standard for EL 13...

Page 18: ...M 20 on the multi hole arms C and plate A Height adjustment The roller height is adjusted at P To adjust proceed as follows Lift the machine behind the tractor Place pin T in the hole corresponding t...

Page 19: ...bolts Q Remove the two lower bolts R one on left hand side of scraper assembly and the other on the right To facilitate pivoting the scraper assembly use a lever in each of the two holes L situated at...

Page 20: ...held in place by round support rings photo 12 With removable bars in place Recommended in dry conditions for fine tillage and levelling with good ground packing Without removable bars in place Recomm...

Page 21: ...speed Number of passes To obtain fine clods High rotor speed Hood Q lowered Low forward speed Choice of the rotor in accordance with given work conditions CULTITILLER rotor with angled blades CULTITI...

Page 22: ...soil Gradually lower the machine while pulling forward with the tractor Always work in a straight line When turning lift machine out of work Never work in reverse otherwise damage could occur to some...

Page 23: ...d with a gauge wheel kit Wheels R are fitted on cross tube T in front of the machine and can easily be adjusted in height inside their supports using pins S To avoid any risk of accident don t forget...

Page 24: ...means of 8 hexagon bolts H M 20 x 70 and 8 self locking nuts M 20 Next fit cross bar Q on the fixed arms U of the rear wheels using 2 hexagon bolts V M 16 x 55 2 hexagon bolts W M 16 x 55 2 flat wash...

Page 25: ...acks track eradicators available as optional equipment can be fitted to cross tubes T photo 21 These can be fitted in different ways with or without supports S depending on the type of tractor and the...

Page 26: ...n zone avoiding formation of ridges and limiting projection of earth onto a worked or already seeded area Install the side deflectors S on each side of the machine using 3 cup square bolts W M 12 x 35...

Page 27: ...to the inside or to the outside of rear frame C to obtain desired span The hooks A can also be adjusted in height two positions The locks D are used to secure the secondary implement s lower link pin...

Page 28: ...ar PTO shaft mustbedisconnectedandchainstrokelimiters E photo26 removed Thiswillallowlowerliftarmstorestagainst the bump stops preventing accidental over raising and damping vibrations which reduces l...

Page 29: ...nd legible replace them if they are not 9 A FRAME KIT FOR VENTA AL INTEGRATED SEEDER ATTACHMENT There are two kits for EL 131 3 00 m Floating adapter code 128 6089 Fixed adapter code 128 6080 For asse...

Page 30: ...s using the same fixing elements They are designed to provide a bigger space between the tractor rear wheels and the machine to make the fixing of accessories such as front caster wheels levelling bar...

Page 31: ...Rotate the roller one complete turn to check that there is no gap between roller and nylon cleaning plate Re adjust the plate if this is not the case Also check that the upper carrier plate is set pa...

Page 32: ...and on the rear left plate using 4 bolts S M 16 x 80 and nuts M 16 torque 16 daNm see photos 33 35 and 35 A Fix the four reflector boards D onto the four supports A and B with 12 bolts T M 10 torque...

Page 33: ...31...

Page 34: ...after the first 10 hours and thereafter every 100 hours Check oil level regu larly at least once a week Lubricate all pivot joints regularly with SHELL oil Before carrying out any operation such as ma...

Page 35: ...n of their curved portion A machine forward direction To fit blades helicoidally proceed as follows Always start fitting each flange with the same type of blade placing it opposite mark R shown by a c...

Page 36: ...ndividually welded on the rotor tube The cutting edge of the forged points should face the direction of rotor rotation Tighten the nuts to a torque of 24 daNm 177 ft lbs Outer blades 2 outer left blad...

Page 37: ...the ground Remove the 3 hexagonal bolts M20 x 45 at F photo 47 Remove the 2 hexagonal bolts T M20 x 70 photo 48 Lift the machine The complete rotor with housing H now separates from drive flange E an...

Page 38: ...e sure it is set no deeper than necessary Blades points too worn Change the complete set of blades points so that the rotor stays balanced Rotor speed is too high Reduce rotor speed see page 15 Choose...

Page 39: ...bed ground is Not enough pressure on the Lengthen the top link over aerated roller Soil is too fine due to rotor Reduce rotor speed over working the soil see page 15 Increase forward speed Choose appr...

Page 40: ...raper bar incorrectly Make sure that the scraper bar positioned is in its furthest forward position Plates must only be slid forward one at a time Plugging from ground build Sandy soil Close the hoods...

Page 41: ...ance on methods of testing Annex to AIC 1896 117 REV February 1988 Health and Safety Executive The method employed corresponds to the method No 4 in this document Unspecified testing conditions comply...

Page 42: ...it has been misused neglected or damaged by accident or let out on hire Nor can claims be accepted if parts other than those manufactured by us have been incorporated in any of our equipment Furtherm...

Page 43: ...ions on all questions as to defect and to the exchange of any part or parts That all safety instructions in the Operator s Manual shall be followed and all safety guards regularly inspected and replac...

Page 44: ...N O T E S...

Page 45: ......

Page 46: ......

Page 47: ...tive The Operator should respect all Health and Safety regulations as well as the Highway Code For your own safety use only genuine KUHN spare parts The manufacturer disclaims all responsibilities due...

Page 48: ...abriques F 67706 SAVERNE CEDEX FRANCE T l 33 0 3 88 01 81 00 Fax 33 0 3 88 01 81 03 www kuhnsa com E mail info kuhnsa com Soci t Anonyme au Capital de 19 488 000 Euros For your safety and to get the b...

Reviews: