background image

Krueger | 1401 N Plano Rd | Richardson, TX 75081 | 972.680.9136 | [email protected] | www.krueger-hvac.com

Installation, Operation, & Maintenance for CRFF-E Series


Page: 4 of 

2

6

Installation

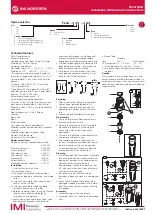
The CRFF-E Series Critical Room Fan Filter Units are completely assembled at the factory with the exception of the 

optional ¼” (0.64 cm)-20 eyebolts, which can be used when hanging the unit from an overhead structure.

1.

Carefully remove the unit from the shipping carton and inspect for any damage that may have occurred during

transportation. (See Figure 1)

Note: When ordering CRFF-ARS and CRFF-ARSM units, the HEPA filters may  be shipped separately to be

installed into units after the fan box has  been installed.

Recommendation: Review mode settings at this time as specified for installation (see page 

7

 for controls).

2.

If using rigidly supported grid (usually 2” or wider), raise unit through ceiling and lower onto the gasketed grid. If

using a flexible grid (typically supported with wires) the unit must be secured to an overhead structure with

eyebolts, s-hooks and chain. Screw the four eyebolts into the nutserts on the lid assembly before lifting into an

overhead position (see Figure 2)

3.

Have an electrician wire the unit to the appropriate voltage (115V, 220V, 277V AC), according to the wiring

diagram and all national and local electric codes. All units are equipped with a three position terminal block for

field connection.  Verify correct single phase power, before energizing units.

4.

Turn on the power using the two position rocker switch (ON/OFF) located on the electrical box. For the CRFF-

ARS and CRFF-ARSM units, let the unit fur for a few hours to purge off particulate (if filters are shipped loose)

that may adhere to the inside of the unit before installing the filters. Do not run fan at full speed as this may cause

overload condition.

Note: Your fan filter may have been shipped separate. Controls have been shipped separately.

EYEBOLT

FAN FILTER

UNIT

FIGURE 1 - UNBOXING

FIGURE 2 - HANGAR SUPPORTS

Summary of Contents for CRFF-E

Page 1: ...INSTALLATION OPERATION MAINTENANCE Fan Filter Units CRFF E CRFF E ARS CRFF E ARSM ECM Motors Revision 02 01 17...

Page 2: ...m 13 Service Removal and Replacement of CRFF E filters 14 Service Removal and Replacement of Roomside Replaceable Filters 15 Service CRFF E CRFF E ARS Motor Removal and Installation 16 Service CRFF E...

Page 3: ...on is located on the product and serial number labels located adjacent to the electrical box If you cannot locate the FO please contact Krueger for this information Read and Save These Instructions To...

Page 4: ...onto the gasketed grid If using a flexible grid typically supported with wires the unit must be secured to an overhead structure with eyebolts s hooks and chain Screw the four eyebolts into the nutser...

Page 5: ...ed between 0 50 in wc and 3 00 in wc by turning the set screw accessible for the front of the control enclosure Counterclockwise rotation will increase the set point differential for switching clockwi...

Page 6: ...Consoles using MODBUS RTU Additional details of the controls modes are provided on page 7 FEATURES Networkable Via MODBUS RTU 0 10 VDC Analog Control Manual Control Via Onboard Potentiometer Simple C...

Page 7: ...band S2 A maximum of 200 ENV1028 devices is recommended per local area network LAN NetworkkControl Mode cont If a Krueger ACC Control Console is the MODBUS master then addresses should be assigned wi...

Page 8: ...fo krueger hvac com www krueger hvac com Control Modes continued Example of binary S2 switch settings 5 6 1 2 3 4 8 7 ON DIP 1 1 2 3 4 5 6 7 8 ON DIP 11 1 2 4 3 5 6 8 7 ON DIP 21 3 1 2 4 5 6 7 8 ON DI...

Page 9: ...S Test Probe Jack Points The test probe jacks may be used to measure the motor rpm or the PWM signal that is being output to the motor In Manual or Analog Control Mode with an Address setting of 1 or...

Page 10: ...eset non volatile registers to factory default values write 170 AA hex to Register 14 then cycle power Note Register 24 may be read in network mode to determine the value of 0 10VDC signal that may be...

Page 11: ...e Contamination Warranty Please reference the Krueger website for Warranty information located in the Terms and Conditions of Sales document or click on the following link http www krueger hvac com pd...

Page 12: ...lashes 3 longs then an extra lon A flow index of 04 flashes an extra long then 4 shor A flow index of 100 flashes 10 longs then an extra lon Use the ON OFF button to turn the motor on or off Point the...

Page 13: ...lte remove the ceiling panel next to the unit if applicable Switch the ON OFF switch to the OFF position Remove the prefilter from the snap in frame See Figure 1 Clean the prefilter by hand washing in...

Page 14: ...ly off the HEPA ULPA filter See Figure 1 Remove filter deflectors using 5 32 drill bit Keep filter deflectors to install in new filter Discard the used filter as per requirements of the applicable reg...

Page 15: ...ll the filter slowly away from the seal so that the gel remains in the filter gel track 3 Carefully clean plenum assembly knife edge surface of residual gel material 4 Inspect filter for visible damag...

Page 16: ...ter 6 Disconnect 5 pin and 16 pin wire harnesses from the electrical box housing and remove tubing for test port if installed 7 Remove the eight mounting screws to free the motor blower assembly from...

Page 17: ...ews that secure the venturi ring to the bottom face of the lid 4 Using a 5 32 0 40 cm Allen wrench remove the blower wheel from the motor shaft Remove motor from the venturi ring by removing the three...

Page 18: ...dec PerfectSpeed When you order a replacement motor they will be a form and fit replacement except for the cable that connects to the control board and the motor The new Nidec motor will require you t...

Page 19: ...the potential to starve or over feed the fan with air causing the motor to stall which can damage the fan motor This also can be minimized by notifying Titus beforehand for assistance The ECM motors...

Page 20: ...age 20 of 26 Krueger 1401 N Plano Rd Richardson TX 75081 972 680 9136 kruegerinfo krueger hvac com www krueger hvac com Universal Card Wiring Diagram 4 pin Control Cable 5 pin Power Cable 4 Pin MTA Mo...

Page 21: ...com Wiring Diagrams continued Universal Card Wiring Diagram w Continous Filter Monitoring 4 pin Control Cable 5 pin Power Cable 4 Pin MTA Motor Connector Remote Run Indicator LED Note Register 24 may...

Page 22: ...nance for CRFF E Series Page 22 of 26 Krueger 1401 N Plano Rd Richardson TX 75081 972 680 9136 kruegerinfo krueger hvac com www krueger hvac com Wiring Diagrams continued Infrared Speed Control Remote...

Page 23: ...64 N A Universal Control Card CRFF E CRFF E ARS CRFF E ARSM 265888 N A Visual Speed Control Card CRFF E CRFF E ARS CRFF E ARSM 63951 002 N A IR Sensor Harness 63759 001 N A IR Sensor without Harness 6...

Page 24: ...Installation Operation Maintenance for CRFF E Series Page 24 of 26 Krueger 1401 N Plano Rd Richardson TX 75081 972 680 9136 kruegerinfo krueger hvac com www krueger hvac com CRFF E Filter Drawing...

Page 25: ...tion Operation Maintenance for CRFF E Series Page 25 of 26 Krueger 1401 N Plano Rd Richardson TX 75081 972 680 9136 kruegerinfo krueger hvac com www krueger hvac com CRFF E ARS and CRFF E ARSM Filter...

Page 26: ...specified performance along with air velocity measurement and adjustment tests No DOP is used on CRFF E series filters unless requested Recommended Testing All units that are airflow tested at Krueger...

Page 27: ......

Reviews: