background image


ADSL2/2+ Modem Router


                                                                                  www.kraun.it 

37 

UPnP is a kind of architecture of common network connection between the 
computer and intelligent devices/instruments. It is especially common in the 
family application. Based on the Internet standards and technologies (such 
as TCP/IP, HTTP and XML), UPnP enables automatic connection and 
cooperation between such devices, thus to make more people can access 
the network (especially the family network). 
 
Click “Save/Apply” to activate the settings. 
 
5.2.4. Security 
 
5.2.4.1. IP Filtering 
 
Click “Security” 

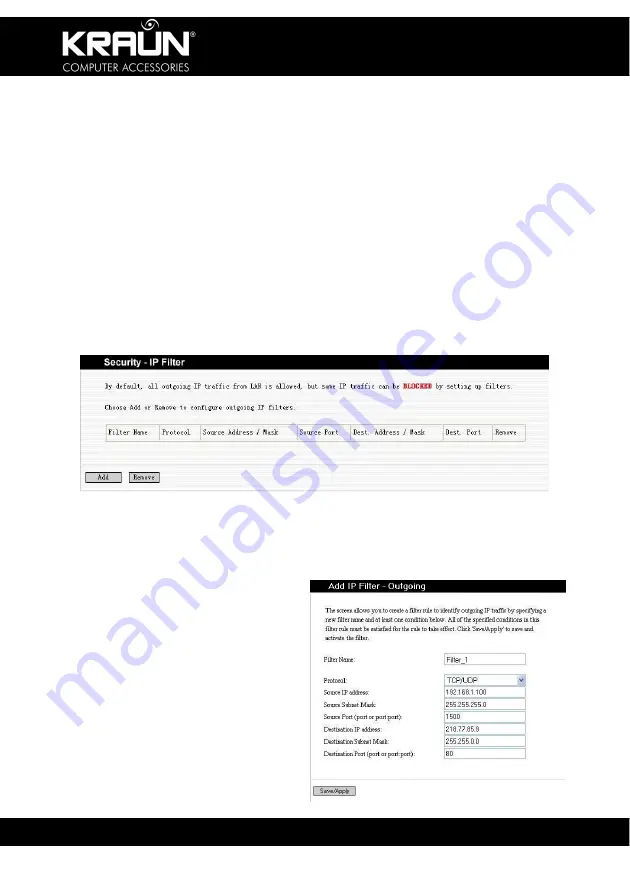
 “IP Filtering” to display the window here: 


By default, all outgoing traffic is allowed. However, you may set IP filtering 
to restrict external network access by some computers in the internal 
network. 
 
Click “Add” to enter details for a 
new filter in the following screen: 
 

a.  Filter Name: Set the filter 

name to help identification. 

b.  Protocol: Select one from 

four available protocols: 
TCP/UDP, TCP, UDP, 
ICMP. 

c.  Source IP Address: Enter 

the internal network IP 
Address to be filtered. 

Summary of Contents for KR.KA

Page 1: ...ADSL2 2 Modem Router ADSL2 2 Modem Router ADSL2 2 Modem Router ADSL2 2 Modem Router Guida d utente User Guide Cod KR KA ...

Page 2: ...gittimi proprietari Le immagini del prodotto sono indicative e non vincolanti Dichiarazione di conformità sintetica Ai sensi dell art 2 comma 3 del D M 275 del 30 10 2002 Si dichiara che questo prodotto è conforme alle normative vigenti e soddisfa i requisiti essenziali richiesti dalle direttive 2004 108 CE 2006 95 CE e 1999 05 CE quando ad esso applicabili Short Declaration of conformity We decla...

Page 3: ...the Connection 9 3 3 Logging in to the Router 10 Chapter 4 Quick Installation 12 4 1 Configure PPPoE 12 4 2 Configure PPPoA 14 4 3 Configure MER 15 4 4 Configure IPoA 18 Chapter 5 Configuration 20 5 1Device Information 20 5 2Advanced Settings 21 5 2 1 WAN 21 5 2 2 LAN 29 5 2 3 NAT 29 5 2 4 Security 37 5 2 5 Routing 41 5 2 6 DNS 43 5 2 7 DSL 45 5 3 DHCP 46 5 4 System Tool 47 5 4 1 Settings 47 5 4 2...

Page 4: ...Switch connectivity One RJ 11 port and Voice Splitter included One USB port for easy configuration Provides Web based management and firmware upgrade Complies with ADSL ADSL2 and ADSL2 standards Provides NAT Router and Bridge functions Compatible with all mainstream DSLAM CO Provides PPPOE PPPOA CLIP protocols Supports firewall and hacker attack prevention Supports Internet Multimedia Provides sta...

Page 5: ...Connection 1 Connect one end of the telephone line to the LINE port of the KR KA modem Router and the other end to the MODEM port of the voice splitter 2 Connect the power adapter to the PWR port of the KR KA 3 Use an Ethernet cable to connect the LAN port with the NIC of your computer ...

Page 6: ...he steps below 1 Connect to the USB port of the KR KA through a USB cable 2 Connect the other end of the cable to the USB port of your PC 3 Insert the CD ROM into the CD ROM drive of your PC If the Installer does not start automatically navigate to the Setup program and double click the Setup Icon Follow the on screen instructions ...

Page 7: ...t Configuration 3 1 Network Configuration of Your Computer 1 On the desktop of your computer right click My Network Places and then select Properties in the shortcut menu 2 In the window that appears right click Local Area Connection and then select Properties ...

Page 8: ...in an IP Address automatically O is selected the window is as shown in the right figure 6 b Use the following IP Address IP Address 192 168 1 XXX XXX range 2 254 Subnet Mask 255 255 255 0 Default gateway 192 168 1 1 DNS server Enter the local DNS server address if you don t know check with your ISP or the router IP Address as the DNS server Click OK to submit the settings And then click OK in the ...

Page 9: ... 2 Verifying the Connection Select Start Programs Accessories Command Prompt Enter at the Command Prompt ping 192 168 1 1 If the resulting screen shows a result similar to the above the connection between your computer and the router is OK ...

Page 10: ...g in to the Router 1 Open the web browser and enter http 192 168 1 1 in the address field and then press Enter 2 In the pop up login window enter the user name admin and password admin and click OK Note Factory default User name admin Password admin ...

Page 11: ...ADSL2 2 Modem Router www kraun it 11 3 If User name and Password are entered correctly the browser displays the administrator window shown below ...

Page 12: ... Area Provider from the drop down list This will automatically set the VPI VCI values appropriate for your connection If your country and or provider are not listed please contact your ISP for the correct values Click Next to configure the connection details 4 1 Configure PPPoE 1 Select PPP over Ethernet PPPoE Click Next ...

Page 13: ...ep this field blank Use the default values for other options For more settings refer to the detailed description in the Configuration section 3 Click Next and check to enable the WAN service enabled by default 4 Click Next to display the window shown the summary of your settings 5 Click Save Reboot to activate your settings The system automatically establishes connection in a few minutes ...

Page 14: ...d provided by the ISP If the ISP also provides the PPPoA service name you can enter the corresponding value otherwise keep this field null Use the default values for other options For their more settings refer to the detailed description in the Configuration section 3 Click Next and check to enable the WAN service enabled by default ...

Page 15: ...ck Next to display the window shown the summary of your settings 5 Click Save Reboot to activate your settings The system automatically establishes connection in a few minutes 4 3 Configure MER 1 Select MAC Encapsulation Routing MER Click Next ...

Page 16: ...t 16 2 If your ISP provides a fixed or static IP Address you should enter the corresponding values in WAN IP Address and WAN Subnet Mask 3 If your ISP provides a dynamic IP Address you should select Obtain an IP Address automatically ...

Page 17: ...le computers share the Internet access service it is recommended to enable NAT and firewall 5 Click Next to display the window shown the summary of your settings 6 Click Save Reboot to activate your settings The system automatically establishes connection in a few minutes ...

Page 18: ...gure the IPoA 1 Select IP over ATM IPoA Click Next 2 Enter the fixed IP Address and Subnet Mask in corresponding fields 3 Click Next It is recommended to enable NAT and firewall 4 Click Next to display the window shown the summary of your settings ...

Page 19: ...ADSL2 2 Modem Router www kraun it 19 5 Click Save Reboot to activate your settings The system automatically establishes connection in a few minutes ...

Page 20: ...ime g System time 3 The DSL Information covers a Upstream link rate b Downstream link rate c LAN IP Address d Default Gateway In the Bridge mode there is no Gateway In other modes such as PPPoE and PPPoA the gateway address is the IP Address of the upstream device e Primary DNS server In the PPPoA PPPoE mode the DNS address is obtained from the upstream device In Bridge mode it is not required to ...

Page 21: ...Advanced Settings WAN Edit WAN information in this window Note After modifying adding new information you need to reboot the device to activate the settings 1 VPI Virtual Path Identifier Virtual Path between two points in the ATM network 0 255 2 VCI Virtual Channel Identifier Virtual channel between two points in the ATM network Its value ranges 32 65535 1 31 are reserved 3 Service category Select...

Page 22: ...l on demand a If you check this option you need to manually enter the timeout time If no flow is detected when the timeout time is up the device will disconnect the network connection automatically And when a flow is detected the device automatically makes dial up connection again b If you disable this option the device is always in online status until device power off connection failure or other ...

Page 23: ... Retry PPP password on authentication error 7 Enable PPP debugging mode 8 Click Next to display the window shown here a Enable IGMP Multicast IGMP agent For example to enable the IPTV in the PPPoE mode you need to check this option b Enabled WAN Service Checked by default It is recommended to keep this default setting unless you do not need to activate your WAN 9 Click Next to display the window s...

Page 24: ...y AUTO is selected 3 Dial on demand a If you check this option you need to manually enter the timeout time If no flow is detected when the timeout time is up the device will disconnect the network connection automatically And when a flow is detected the device automatically makes dial up connection again b If you disable this option the device is always in online status until device power off conn...

Page 25: ...ough the upstream link 6 Retry PPP password on authentication error 7 Enable PPP debugging mode 8 Click Next to display the window shown here a Enable IGMP Multicast IGMP agent For example to enable the IPTV in the PPPoE mode you need to check this option b Enabled WAN Service Checked by default It is recommended to keep this default setting unless you do not need to activate your WAN 9 Click Next...

Page 26: ...f your device automatically obtains the IP Address the IP Address and other parameters will be from your ISP automatically b Use the following IP Address To manually specify an address you need to check this option and enter your static IP Address and Subnet Mask 3 Gateway Address a Obtain default gateway automatically If this option is checked the device automatically obtains the default gateway ...

Page 27: ...server address To manually enter a DNS address check this option 1 Primary DNS server Enter the primary DNS server 2 Secondary DNS server Enter the secondary DNS server 5 Click Next a Enable IGMP Multicast IGMP agent For example to enable the IPTV in the PPPoE mode you need to check this option b Enable WAN Service Checked by default It is recommended to keep this default setting unless you do not...

Page 28: ...your ISP 3 Gateway Address Use the following default gateway You may check this option a Use IP Address Enter the IP Address provided by your ISP b Use WAN Interface For the broadband access device you need to enter the IP Address of the downstream link interface 4 Use the following DNS server address You may check this option and enter the IP Addresses provide by your ISP a Primary DNS server b S...

Page 29: ...rewall It is recommended to check this option to prevent some attacks 7 Enable IGMP Multicast IGMP agent For example to enable the IPTV in the PPPoE mode you need to check this option 8 Enable WAN Service Checked by default It is recommended to keep this default setting unless you do not need to activate your WAN 9 Click Next to display your current settings 10 Click Save Reboot to activate your s...

Page 30: ...automatically changes the encapsulation mode to the one matching your setting Therefore it is recommended to keep the default setting unchanged 2 Enable Bridge Service To select the bridge mode you need to check this option By default this option is checked 3 Click Next to display your current settings 4 Click Save Reboot to activate your settings ...

Page 31: ... the Web management interface upon next login to the router In addition you must set the default gateway in each computer in your LAN to this IP Address to ensure normal Internet access 2 Subnet Mask Enter your Subnet Mask 3 Enable IGMP Snooping Used in the bridge mode 4 Standard Mode 5 Blocking Mode 6 Configure the second IP Address and Subnet Mask for LAN interface Click Save Reboot 5 2 3 NAT 5 ...

Page 32: ...uch access by the external networks for example you need to set up the server or support some special applications you should enable this function to allow the access from external networks Click Add to display the window shown in the right figure a Select a Service Select a common service to be enabled b Custom Server Manually enter a server name c Server IP Address LAN IP Address for the server ...

Page 33: ...to manually enter the port to be opened Example MySQL Port 5038 or a 2 nd Web Server port WebCam 8080 d Click Save Apply to display the service added as shown here e Select System Tools Reboot to save and activate your new settings 5 2 3 2 Port Triggering 1 Click Port Triggering to display the window shown here Here you may add or delete your port triggering service settings ...

Page 34: ...raun it 34 For some special applications you need to enable some application ports Through port triggering these ports may be opened automatically by the requesting application program Click Add to display the window shown here ...

Page 35: ... a service is selected the system automatically sets the corresponding port If you manually enter a customized service you also need to manually enter the port to be triggered c Click Save Apply to display the service added as shown here d Select System Tools Reboot to save and activate your new settings 5 2 3 3 DMZ Host Click DMZ Host to display the window shown here ...

Page 36: ...n this case your computer is totally exposed to the public network We do not recommend this unless you have alternative security precautions such as a separate firewall for the computer in place Click Save Apply to activate the settings 5 2 3 4 UPNP Click UPNP to display the window shown here Enable UPnP Check to Enable the UPnP Universal Plug and Play function ...

Page 37: ...etwork especially the family network Click Save Apply to activate the settings 5 2 4 Security 5 2 4 1 IP Filtering Click Security IP Filtering to display the window here By default all outgoing traffic is allowed However you may set IP filtering to restrict external network access by some computers in the internal network Click Add to enter details for a new filter in the following screen a Filter...

Page 38: ...sk corresponding to the external network IP Address to be filtered h Destination Port Enter the port number of the external network IP Address to be filtered Based on the above settings you may add your filtering rules You may also select your WAN interface However it is recommended keeping the default setting unchanged Click Save Apply to save and activate the filter Click Incoming to display the...

Page 39: ... to be filtered e Source Port Enter the port number of the external network IP Address to be filtered f Destination IP Address Enter the internal network IP Address to be filtered h Destination Subnet Mask Enter the Subnet Mask corresponding to the internal network IP Address to be filtered i Destination Port Enter the port number of the internal network IP Address to be filtered Based on the abov...

Page 40: ...ww kraun it 40 5 2 4 2 Parent Control Click Time of Day Restriction to display the window shown here Click Add to display the window shown below Here you may set a specific period to restrict Internet access of a MAC address ...

Page 41: ...fault Gateway Click Routing Default Gateway to display the window shown here Enable Automatic Assigned Default Gateway You may check uncheck this option If you uncheck this option you need to manually enter the default gateway address and WAN service It is recommended keeping the default setting unchanged Click Save Apply ...

Page 42: ...te to display the window shown here Here you may add delete static routing entries Click Add to display the following window Destination Network Address Enter the network or host for the route Subnet Mask Enter the Subnet Mask corresponding to the network or host for the route ...

Page 43: ...rver Click DNS Server to display the window shown here Enable Automatic Assigned DNS After verifying availability the DNS settings are activated The DHCP server of the router allocates the added DNS address to the client submitting the request If disabled you need to manually enter the DNS Server s IP Addresses Primary DNS server Enter the DNS address provided by the ISP Secondary DNS server If yo...

Page 44: ...olve your domain name to the IP Address assigned by your ISP You need to register your domain first with the Dynamic DNS provider Click Add to display the window shown here D DNS provider Select a specific provider of Dynamic DNS Hostname Domain name applied by you Interface Select one from two available interface modes Username Your user name registered with the Dynamic DNS provider Password Pass...

Page 45: ...w shown here Here you may enable a service as required By default the system checks the status of G Dmt G lite T1 413 ADSL2 ADSL2 AnnexL Inner pair and Bitswap The device will automatically negotiate with the upstream device If in doubt consult your ISP for the correct settings ...

Page 46: ...make sure there is no other DHCP server active in your network and enter the following details Start IP Address Start address of the DHCP server IP pool End IP Address End address of the DHCP server IP pool Lease Time Validity period of the IP Address obtained Click Save Click DHCP Client List to view the list of the clients with allocated DHCP service ...

Page 47: ...settings of the router Save the file in a folder on your PC that will allow you to find it in case you need to restore the settings 5 4 1 2 Update Click Update to display the window shown here Here you may restore the router settings from a backup file or update to new firmware when available 5 4 1 3 Restore Click Restore Default to display the window shown here ...

Page 48: ...his modification 5 4 2 System Log Click System Log to display the window shown here Click View System Log to display the system log If enabled it will show the system messages Click Refresh for updated readings Click Configure System Log to display the window shown in the right figure Here you may enable or disable the System log set the reporting level and register the device with a remote Syslog...

Page 49: ...Select the required level Debugging by default Display Level Error by default Mode Local by default If you select Remote or Local Remote the system transmits the log UDP packets to your log server Click Save Apply to activate the settings and start stop the System log ...

Page 50: ...ere If enabled the system will automatically synchronize the time when accessing the Internet 5 4 4 Access Control 5 4 4 1 Service Click Access Control to display the window shown here You may enable or disable FTP HTTP ICMP SNMP SSH TELNET TFTP services as required Click Save Apply to activate the settings ...

Page 51: ... Configuration Interface from the local network and to enable or disable this function Access Control Mode Enable Disable When enabled the IP Address allowed can access the management page Click Add to display the window shown here Please enter an IP Address permitted by the system to access the Configuration Interface Click Save Apply to activate the settings ...

Page 52: ...ogin password and then the new login password in the New Password and Confirm Password fields If the old login password is correctly entered you may click Save Apply to modify the login password Note For the sake of security we highly recommend you to change the initial user name and password Factory Default Settings User Name admin Password admin Click Save Apply to activate the changes ...

Page 53: ...or will appear DO NOT SWITCH OFF the device while an update is in progress An automatic Reboot will be initiated once the update is complete 5 4 6 Save Reboot Click Save Reboot whenever required such as after updating settings or if the Internet connection has become unstable or unresponsive Note that the DSL connection will be cut during reboot and will automatically re connect unless the connect...

Page 54: ...ke sure the user name and password are correct If the dial up is OK please make sure the network settings of client devices such as PC s Web Cam s VoIP Phones etc are configured correctly Please try opening different web pages See if you can Ping external addresses FAQ Q What are VPI VCI A VPI Virtual Path Identifier and VCI Virtual Channel Identifier are to identify ATM terminal ADSL for DSLAM us...

Page 55: ...ADSL2 2 Modem Router www kraun it 55 ...

Page 56: ...ADSL2 2 Modem Router www kraun it 56 ADSL2 2 Modem Ro ADSL2 2 Modem Ro ADSL2 2 Modem Ro ADSL2 2 Modem Router uter uter uter UG_v1 0_10 09_KR KA Copyright 2009 CDC S p A ...

Reviews: