background image


16 

VP-437N - Controlling the VP-437N 


6.5 

Controlling via the Infrared Remote Control Transmitter 

You can control the 

VP-437N 

from the infrared remote control transmitter: 


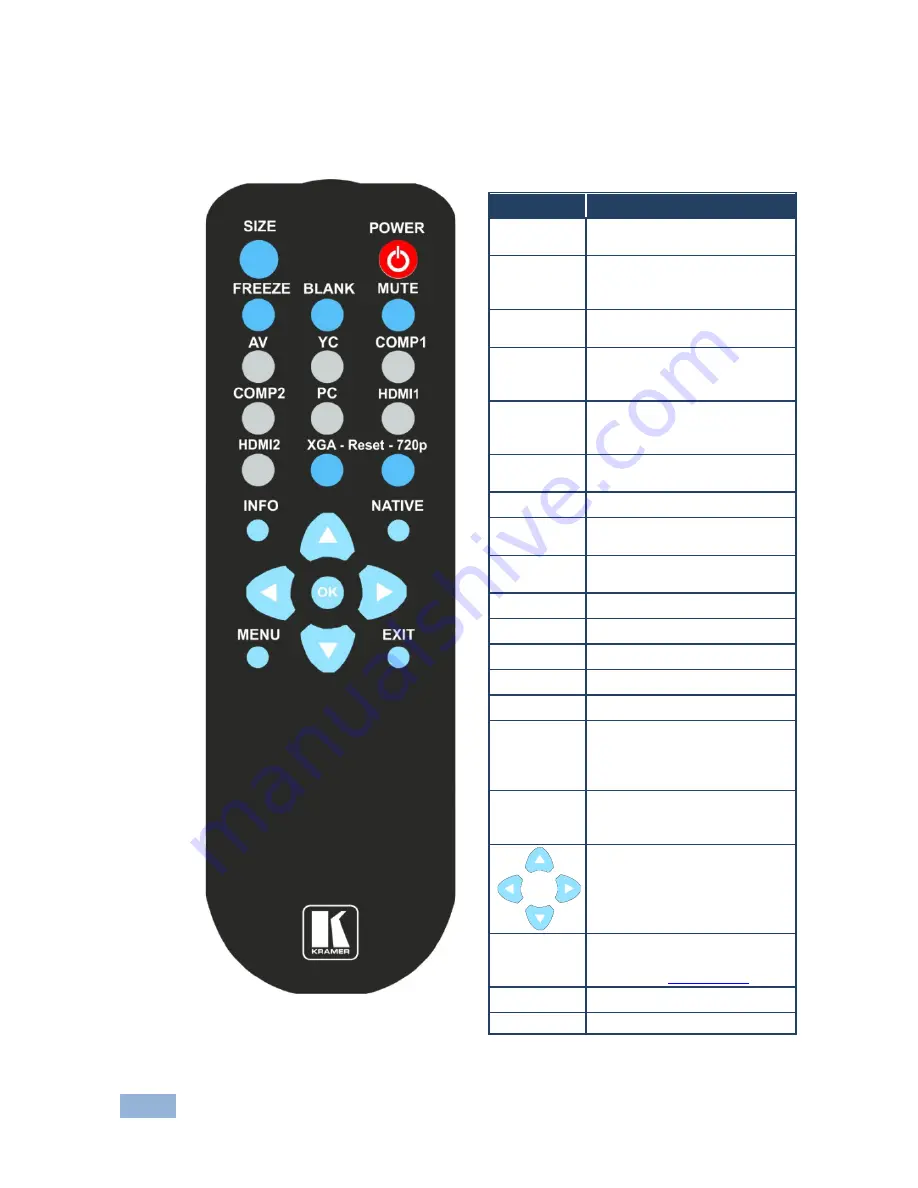
Figure 4: Infrared Remote Control 

Transmitter 


Keys 

Function 


SIZE 

Set the size of the image 

displayed 


POWER 

Turn the 

VP-437N

 ON or OFF 

(the outputs and the front-panel 

are disabled) 


FREEZE 

Freeze/unfreeze the output 

video image 


BLANK 

Toggle between a blank screen 

(blue or black screen) and the 

display 


MUTE 

Toggle between muting 

(blocking out the sound) and 

enabling the audio output 


AV 

Select the composite video 

input 


YC 

Select the s-Video input 


COMP1 

Select the component video 1 

input 


COMP2 

Select the component video 2 

input 


PC 

Select the UXGA input 


HDMI1 

Select the HDMI1 input 


HDMI2 

Select the HDMI2 input 


XGA Reset 

Reset the resolution to XGA 


720p Reset 

Reset the resolution to 720p 


INFO 

Displays the selected input, the 

input and output resolutions and 

the firmware versions on the 

OSD 


NATIVE 

Select the output resolution via 

the EDID of the connected 

HDMI monitor 


Four navigation keys 


OK 

Press to accept changes  

Press also to auto adjust the 

picture (see 

Section  6.1.1


MENU 

Enter the OSD menu 


EXIT 

EXIT the menu 


Summary of Contents for VP-437N

Page 1: ...KRAMER ELECTRONICS LTD USER MANUAL MODEL VP 437N Presentation Switcher Scaler P N 2900 300156 Rev 2...

Page 2: ......

Page 3: ......

Page 4: ...sing the OSD Menu 11 6 3 Connecting the VP 437N via the ETHERNET Port 14 6 4 Connecting to the VP 437N via RS 232 15 6 5 Controlling via the Infrared Remote Control Transmitter 16 7 Technical Specific...

Page 5: ...ups that are clearly defined by function GROUP 1 Distribution Amplifiers GROUP 2 Switchers and Routers GROUP 3 Control Systems GROUP 4 Format Standards Converters GROUP 5 Range Extenders and Repeaters...

Page 6: ...als application programs and to check if firmware upgrades are available where appropriate 2 1 Achieving the Best Performance To achieve the best performance Use only good quality connection cables to...

Page 7: ...XGA SXGA UXGA 480i 480p 576i 576p 720p 50 and 60Hz 1080i 50 and 60Hz 1080p 50 and 60Hz WXGA WSXGA WUXGA 1280x800 1440x900 1400x1050 and 1600x900 The VP 437N Presentation Switcher Scaler Has an improve...

Page 8: ...HDCP Licensee HDMI the HDMI logo and High Definition Multimedia Interface are trademarks or registered trademarks of HDMI licensing LLC In particular HDMI Provides a simple interface between any audio...

Page 9: ...play Has the capacity to support existing high definition video formats 720p 1080i and 1080p standard definition formats such as NTSC or PAL as well as 480p and 576p 3 2 10BAbout HDCP General Descrip...

Page 10: ...ed to follow MUTE 11 MENU Button Displays the OSD menu see Section 6 2 12 ENTER Button Press to accept changes change the SETUP parameters see Section 6 2 and to auto adjust the image when not within...

Page 11: ...Connector 31 HDMI Connector Connect to the HDMI acceptor 32 VGA 15 pin HD Connector Connect to a VGA acceptor 33 IN Unbalanced Stereo Audio Terminal Block Connectors HDMI Connect to the analog audio H...

Page 12: ...8 VP 437N Installing in a Rack 4 Installing in a Rack This section provides instructions for rack mounting the unit...

Page 13: ...adapter When using this adapter you can connect the audio signal via the terminal block connector 2 Connect a computer graphics source to the VGA 15 pin HD VIDEO INPUT connector 3 Connect a composite...

Page 14: ...ect the audio output signals to the OUT stereo analog audio acceptor and or the digital audio acceptor as required not shown in Figure 3 11 Connect the power cord not shown in Figure 3 12 If required...

Page 15: ...nd FREEZE buttons MENU ENTER and up down left and right arrow buttons RESET TO XGA 720p and PANEL LOCK buttons 6 1 1 The Auto Adjust Auto Tune Feature The auto adjust feature which applies only to the...

Page 16: ...refers to an underscan of 6 UNDER2 refers to an underscan of 9 SOURCE Select the source VGA is the default Appears as Source input Appears as Source input CVBS CV PC VGA SVIDEO YC HDMI1 HDMI 1 YPBPR1...

Page 17: ...reset to XGA or continuously for 5 seconds to reset to 720p INFORMATION Displays the source the input resolution the output resolution and the software version AUTO SYNC OFF Turn ON OFF When ON a sho...

Page 18: ...selected for an HDMI signal or the analog audio input is selected if the input is not HDMI for example for a DVI input signal EMBEDDED the embedded audio in the HDMI signal is selected ANALOG the anal...

Page 19: ...using for example a PC Note that a null modem adapter connection is not required To connect to the VP 437N via RS 232 Connect the RS 232 9 pin D sub rear panel port on the VP 437N unit via a 9 wire s...

Page 20: ...g blocking out the sound and enabling the audio output AV Select the composite video input YC Select the s Video input COMP1 Select the component video 1 input COMP2 Select the component video 2 input...

Page 21: ...55Vpp constant POWER SOURCE 100 240V AC 33VA max OPERATING TEMPERATURE 0 to 55 C 32 to 131 F STORAGE TEMPERATURE 45 to 72 C 49 to 162 F HUMIDITY 10 to 90 RHL non condensing OUTPUT RESOLUTIONS Native...

Page 22: ...Yes Yes Yes 1080P 24 30 No Yes No Yes VGA 60 72 75 85 No No Yes Yes SVGA 56 60 72 75 85 No No Yes Yes XGA 60 70 75 85 No No Yes Yes SXGA 60 75 85 No No Yes Yes UXGA 60 No No Yes Yes WXGA 60 1366x768 N...

Page 23: ...code 0x0D LF or Line Feed ASCII code 0x0A Set and Get Command Set Command Type in Y Control_Type Function Param CR Reply Z Control_Type Function Param CR LF Get Command Type in Y Control_Type Functio...

Page 24: ...control 0 14 N A INFO button on remote control 0 15 N A UP button on remote control 0 16 N A NATIVE button on remote control 0 17 N A LEFT button on remote control 0 18 N A OK button on remote control...

Page 25: ...1 0 100 OSD Setting H Position 1 Set 2 Get 42 0 100 OSD Setting V Position 1 Set 2 Get 43 0 100 OSD Timeout 1 Set 2 Get 44 0 8 OSD Background 1 Set 2 Get 50 0 3 NR Noise Reduction 0 Off 1 Low 2 Mid 3...

Page 26: ...8 720p60 9 1080i60 10 1080p60 11 576i 12 576p 13 720p50 14 1080i50 15 1080p50 16 WXGA 17 WSXGA 18 WUXGA 19 1280x800 20 WXGA 1440X900 21 SXGA 1400X1050 22 1600x900 F W 1 32 3 Set 23 1 Factory Reset 6...

Page 27: ......

Page 28: ...sit our Web site where updates to this user manual may be found We welcome your questions comments and feedback Web site E mail www kramerelectronics com info kramerel com P N 2900 300156 Rev 2 SAFETY...

Reviews: