background image

KRAMER:  SIMPLE CREATIVE TECHNOLOGY


Your Scaler 


4.2  Your VP-414 Video to WXGA / HD Scaler 

Figure 2 and Table 3 define the 

VP-414


Video to WXGA / HD Scaler


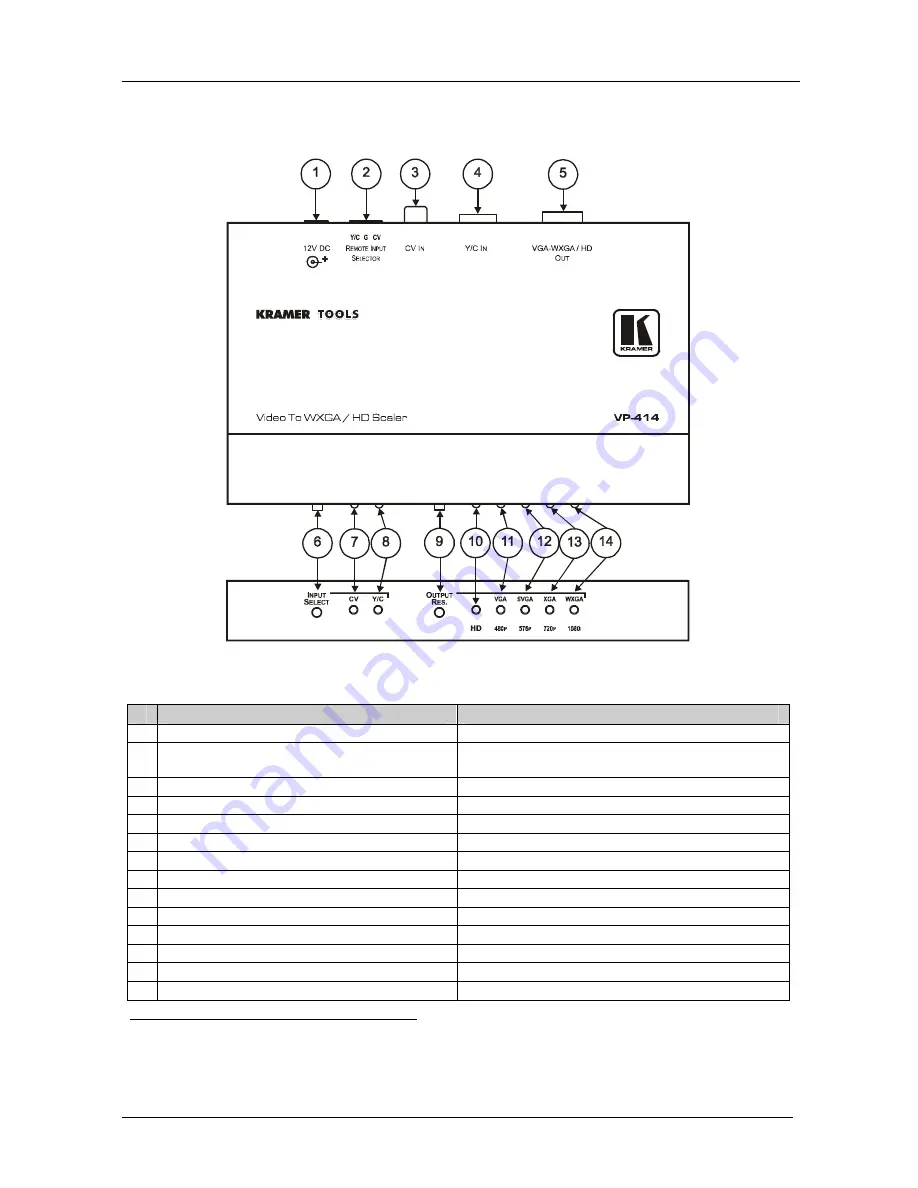
Figure 2: VP-414 Video to WXGA / HD Scaler 

Table 3: VP-414 Video to WXGA / HD Scaler Features 

Feature 

Function 

12V DC


+12V DC connector for powering the unit 

REMOTE INPUT SELECTOR 

Terminal Block 

Connector


Connects to a dry contact switch for remote 

selection between Y/C and CV (see section 5.5) 

CV IN 

RCA Input Connector 

Connects to a composite video source 

Y/C IN 

4p


Input


Connector 

Connects to an s-Video source 

VGA-WXGA / HD OUT 

HD15F Output Connector  Connects to the VGA-WXGA / HD acceptor 

INPUT SELECT

 Button 

Press to select between inputs 

CV

 LED 

Illuminates when CV input is selected 

Y/C 

LED


Illuminates when Y/C input is selected 

OUTPUT RES. 

Button


Press to select desired output resolution 

10 

HD 

LED


Illuminates when HD

1

 output resolutions are selected 

11 

VGA / 480p 

LED


Illuminates when VGA or 480p resolution is selected 

12 

SVGA / 576p 

LED


Illuminates when SVGA or 576p resolution is selected 

13 

XGA / 720p 

LED


Illuminates when XGA or 720p resolution is selected 

14 

WXGA / 1080i 

LED


Illuminates when WXGA or 1080i resolution is selected

2


1 480p, 576p, 720p or 1080i 
2 A pseudo 1080i format is used in this case, such as a progressive scan 540p. Note that in the case that the DVI output is 
connected to an HDMI monitor, make sure that the monitor can accept 540p 

Summary of Contents for VP-413

Page 1: ...Kramer Electronics Ltd USER MANUAL Models VP 413 Video to WXGA Scaler VP 414 Video to WXGA HD Scaler VP 415 Video to WXGA DVI Scaler VP 416 Video to DVI I HD Scaler...

Page 2: ...Figures Figure 1 VP 413 Video to WXGA Scaler 5 Figure 2 VP 414 Video to WXGA HD Scaler 6 Figure 3 VP 415 Video to WXGA Scaler 7 Figure 4 VP 416 Video to DVI I HD Scaler 8 Figure 5 Connecting the VP 41...

Page 3: ...includes the following items VP 413 Video to WXGA Scaler and or VP 414 Video to WXGA HD Scaler and or VP 415 Video to WXGA DVI I Scaler and or VP 416 Video to WXGA HD DVI I Scaler Power adapter 5V DC...

Page 4: ...KRAMER SIMPLE CREATIVE TECHNOLOGY Getting Started 2...

Page 5: ...Getting Started 3 1 2 1 2 1 s Video Player Plasma Display Composite Video Player PIN 1 Pr Y Pb 2 3 Signal...

Page 6: ...A DVI VGA WXGA2 RGBHV VP 416 CV or Y C VGA DVI HD DVI I Connector VGA WXGA2 HD3 RGBHV YPbPr4 To achieve the best performance Connect only good quality connection cables thus avoiding interference dete...

Page 7: ...powering the unit 2 CV IN RCA Input Connector Connects to a composite video source 3 Y C IN 4p Input Connector Connects to an s Video source 4 VGA WXGA OUT HD15F Output Connector Connects to the VGA W...

Page 8: ...nects to the VGA WXGA HD acceptor 6 INPUT SELECT Button Press to select between inputs 7 CV LED Illuminates when CV input is selected 8 Y C LED Illuminates when Y C input is selected 9 OUTPUT RES Butt...

Page 9: ...or Connects to an s Video source 4 DVI I OUT DVI Connector Connects to the DVI graphics acceptor analog digital or both 5 INPUT SELECT Button Press to select between inputs 6 CV LED Illuminates when C...

Page 10: ...the VGA WXGA HD acceptor analog digital or both 6 INPUT SELECT Button Press to select between inputs 7 CV LED Illuminates when CV input is selected 8 Y C LED Illuminates when Y C input is selected 9 O...

Page 11: ...ctor 2 Connect the VGA WXGA OUT HD15F connector to an acceptor for example a plasma display 3 Connect the 5V DC power adapter to the power socket and connect the adapter to the mains electricity not s...

Page 12: ...ess the INPUT SELECT button to select the desired input2 5 Press the OUTPUT RES button to select the desired resolution3 6 If required connect4 the contact closure remote control PINS see section 5 5...

Page 13: ...igital signals are available on this output 3 Connect the 5V DC power adapter to the power socket and connect the adapter to the mains electricity not shown in Figure 7 4 Press the INPUT SELECT button...

Page 14: ...the mains electricity not shown in Figure 8 4 Press the INPUT SELECT button to select the desired input2 5 Press the OUTPUT RES button to select the desired resolution3 6 If required connect4 the cont...

Page 15: ...remote control contact closure To do so connect momentarily the appropriate input1 pin on the REMOTE terminal block connector to the G Ground pin as Figure 9 illustrates DO NOT Connect more than one P...

Page 16: ...ignal has a bi level SYNC OUTPUT REFRESH RATE 60Hz CONTROLS Pushbuttons and LEDs for selection of Input Source and Output Resolution VP 414 VP 416 also YC CV dry contact input selector external wires...

Page 17: ...htning orother acts of nature ii Product modification or failure tofollowinstructions suppliedwith theproduct iii Repairorattemptedrepairby anyonenot authorized byKramer iv Anyshipment ofthe product c...

Page 18: ...or the latest information on our products and a list of Kramer distributors visit our Web site www kramerelectronics com where updates to this user manual may be found We welcome your questions commen...

Reviews: