5
EN
OPERATION
• Protect the laser device against moisture and direct
sun light.
• Do not subject the laser device to extreme tempe-
ratures or variations in temperature.
As an example,
do not leave it in vehicles for longer periods. In case of
large variations in temperature, allow the laser device to
adjust to the ambient temperature before putting it into
operation.
• Avoid heavy impact to or falling down of the laser
device.
Damage to the laser device can impair its accu-
racy. After heavy impact or shock, compare the laser line
with a known horizontal or vertical reference line.
• Switch the laser device off before transport.
When
switching off, the levelling unit, which can be damaged in
case of intense movement, is locked.
1. Switching On and Off
To
switch on
the laser device, slide the On/Off switch to
the “
on
” position.
Immediately after switching on, the laser device sends
laser beams out of the exit openings.
• Do not point the laser beam at persons or animals
and do not look into the laser beam yourself, not
even from a large distance.
To
switch off
the laser device, slide the On/Off switch to
the “
off
” position.
2. Operating modes
The laser device has several operating modes between
which you can switch at any time. These are for:
– Generating a horizontal laser plan and two vertical
laser planes,
– Generating a horizontal laser plane,
– Generating a vertical laser plane,
– Generating another vertical laser plane.
After switching on, the laser device generates a horizon-
tal laser plan and two vertical laser planes.
To change the operating mode, press the operating
mode button.
All operating modes can be selected both with and wit-
hout automatic levelling.
3. Automatic levelling
•
Working with automatic levelling
Position the laser device on a level and firm support,
attach it to an holder (ref. 9504107) or to a tripod (ref.
9504105 or ref. 9504106).
When working with automatic levelling, push the On/Off
switch to the “on” position.
After switching on, the levelling function automatically
compensates irregularities within the self-levelling range
of ±4°. The levelling is finished as soon as the laser
beams do not move any more.
If automatic levelling is not possible, e.g. because the
surface on which the laser device stands deviates by
more than 4° from the horizontal plane, the laser lines
begin to flash rapidly.
In case of ground vibrations or position changes during
operation, the laser device is automatically levelled in
again. To avoid errors, check the position of the hori-
zontal and vertical laser line with regard to the reference
points upon relevelling.
•
Working without automatic levelling
For working without automatic levelling, slide the On/Off
switch to the “off” position.
When automatic levelling is switched off, you can hold
the laser device freely in your hand or place it on an
inclined surface. The laser lines no longer necessarily
run perpendicular to each other.
This mode cannot be used to perform horizontal or ver-
tical levelling, because the laser lines are no longer self-
balancing. In this mode, the LED indicator will always
shine red.
4. Working advice
•
Always use the centre of the laser line for marking.
The width of the laser line changes with the distance.
•
Working with a tripod (accessory)
A tripod offers a stable, height-adjustable support.
Position the measuring tool with the 1/4’’ tripod mount
onto the thread of the tripod or a commercially available
camera tripod. Tighten the laser device with the tripod
mounting.
•
Laser viewing glasses (accessory)
The laser viewing glasses filter out the ambient light.
This makes the green light of the laser appear brighter
for the eyes.
•
Do not use the laser viewing glasses as safety go-
ggles.
The laser viewing glasses are used for improved
visualisation of the laser beam, but they do not protect
against laser radiation.
• Do not use the laser viewing glasses as sun
glasses or in traffic.
The laser viewing glasses do not
afford complete UV protection and reduce colour per
-
ception.
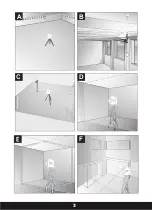
5. Work examples (see figures A–F)
Applicational examples for the laser device for refe-
rence.
MAINTENANCE
Maintenance and cleaning
Keep the laser device clean at all times.
Do not immerse the laser device in water or other fluids.
Wipe off debris using a soft cloth. Do not use any clea
-
ning agents or solvents.
Regularly clean the surfaces at the exit opening of the
laser in particular, and pay attention to any fluff of fibres.
Summary of Contents for 504114
Page 2: ...2 1 1 2 3 4 1 1 1 5 6 7 8 10 9...
Page 3: ...3 D C B A F...
Page 22: ......
Page 23: ......
Page 24: ......


