


RK-100S Owner’s manual
76
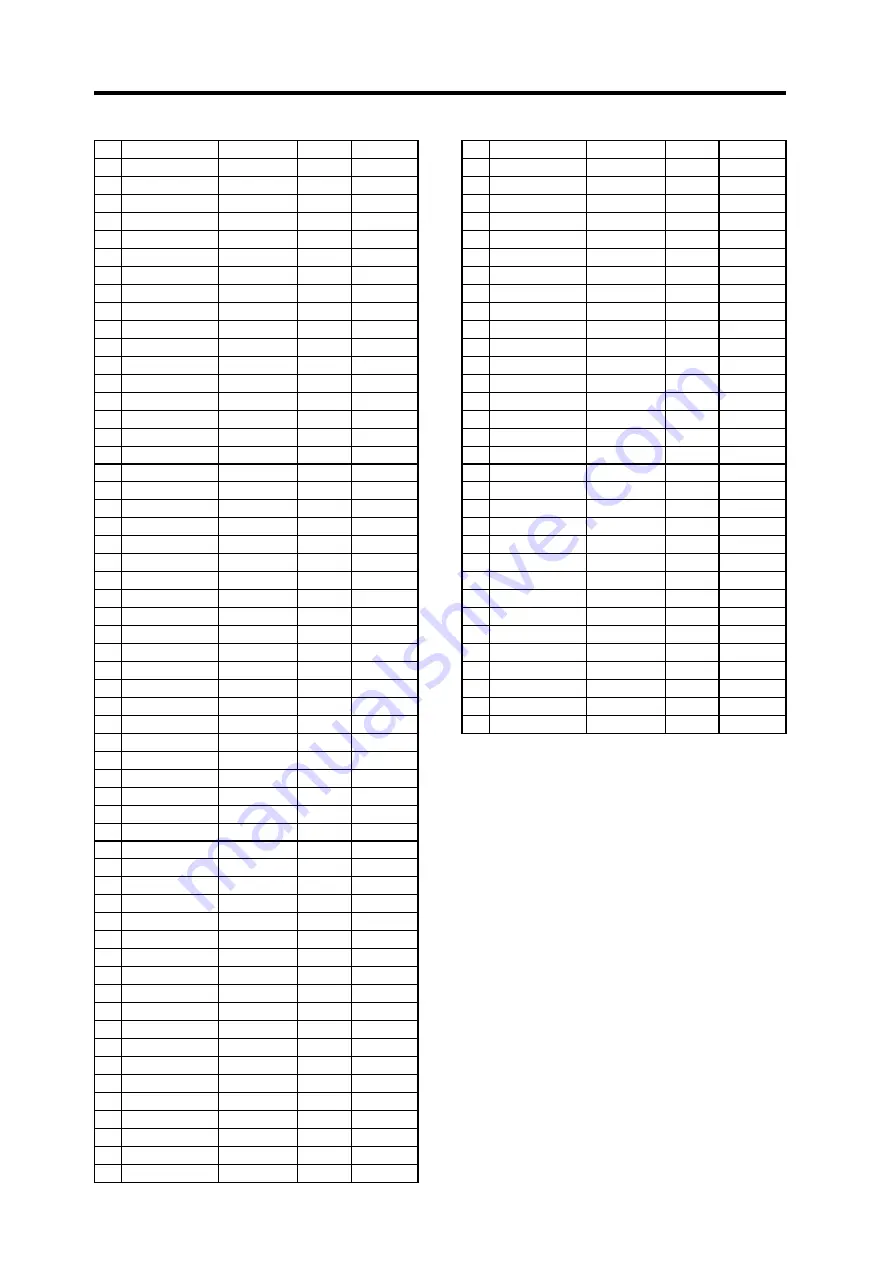
110 BPF Sweep
Synth Soft
Off
Single
111 Tremolos
Synth Soft
Off
Single
112 Arp Pad
Synth Soft
On
Layer
113 Ambi Pad
Synth Soft
Off
Single
114 Syn Choir
Synth Soft
Off
Single
115 Voice /A/
Synth Soft
Off
Single
116 Ens Bell
Bell/Decay
Off
Layer
117 VPM Bell
Bell/Decay
Off
Layer
118 Magic Bell
Bell/Decay
Off
Layer
119 Syn Bell
Bell/Decay
Off
Layer
120 M1 Bell
Bell/Decay
Off
Layer
121 Ice Field
Bell/Decay
Off
Single
122 IDM 5100
Bell/Decay
Off
Single
123 Deep Bell
Bell/Decay
Off
Single
124 EL Pizzo
Bell/Decay
Off
Single
125 Poly Shot
Bell/Decay
Off
Single
126 Pizz Corn
Bell/Decay
Off
Single
127 Dry Plan
Bell/Decay
Off
Single
128 JPT8 DCY
Bell/Decay
Off
Multi
129 Synth Pizz
Bell/Decay
Off
Layer
130 Brett Piano
Bell/Decay
On
Single
131 M1 Piano
Keyboard
Off
Single
132 Toy Piano
Keyboard
Off
Single
133 Synth E.Piano1
Keyboard
Off
Single
134 Synth E.Piano2
Keyboard
Off
Single
135 P5 Clav
Keyboard
Off
Single
136 PW Clav
Keyboard
Off
Single
137 HARPSIN
Keyboard
Off
Single
138 M1 Organ
Keyboard
Off
Single
139 DW Organ
Keyboard
Off
Single
140 VOX Organ 1
Keyboard
Off
Single
141 VOX Organ 2
Keyboard
Off
Single
142 Wet Reed
Keyboard
Off
Single
143 Key Flute
Keyboard
Off
Single
144 Reed Key 1
Keyboard
Off
Single
145 Reed Key 2
Keyboard
Off
Single
146 Z-Field
Arp/Seq
On
Single
147 Analog Bell
Arp/Seq
On
Single
148 Pop Pizz
Arp/Seq
On
Layer
149 Tiny Mallet
Arp/Seq
On
Layer
150 Synth Harp
Arp/Seq
On
Single
151 Auto Bass
Arp/Seq
On
Layer
152 Time Line
Arp/Seq
On
Single
153 RHYZMICA
Arp/Seq
On
Single
154 Builder
Arp/Seq
Off
Single
155 Min.Deal
Arp/Seq
On
Layer
156 S&H Sign
Arp/Seq
On
Single
157 TLKVOXER
Arp/Seq
On
Single
158 Move Pad
Arp/Seq
On
Layer
159 RIBBON 1
Arp/Seq
On
Layer
160 RIBBON 2
Arp/Seq
On
Layer
161 PHAZKIT
Arp/Seq
On
Multi
162 Eskay Two
Arp/Seq
On
Single
163 Chip Tune
Arp/Seq
On
Layer
164 Filter House
Arp/Seq
Off
Layer
165 SPUTNIK
Arp/Seq
Off
Layer
166 Sweeping
Motion
Off
Layer
167 Water Edge
Motion
On
Layer
168 Stairs Pad
Motion
On
Layer
169 Blue & White
Motion
On
Layer
170 S&H Pad
Motion
Off
Multi
171 TRIPCYCL
Motion
Off
Single
172 DWGS Wave
Motion
Off
Single
173 IZDISA
Motion
Off
Single
174 CPU Talk
Motion
Off
Single
175 PSYCHETR
Motion
On
Layer
176 DJ Horn
Hit/Drum
Off
Layer
177 2 Many OSC
Hit/Drum
Off
Layer
178 Domin8or
Hit/Drum
Off
Single
179 Major Chord
Hit/Drum
Off
Layer
180 Artcore Chord
Hit/Drum
Off
Layer
181 4OSC m7
Hit/Drum
Off
Layer
182 Sweep Chord
Hit/Drum
Off
Single
183 Noisy Hit
Hit/Drum
Off
Layer
184 Chord Hit
Hit/Drum
Off
Layer
185 P6 Chord
Hit/Drum
Off
Layer
186 Gated Chord
S.E
Off
Single
187 8bit Gal
S.E
Off
Split
188 Invaders
S.E
On
Single
189 Growl FX
S.E
Off
Single
190 Windstorm
S.E
Off
Single
191 Thunder
S.E
Off
Single
192 Jungle
S.E
On
Layer
193 Siren 1
S.E
Off
Single
194 Siren 2
S.E
Off
Single
195 Bomb Drop
S.E
Off
Split
196 Vocoder Pulse
Vocoder
Off
Single
197 Vocoder Ensemble Vocoder
Off
Multi
198 Robot Vocoder
Vocoder
Off
Single
199 Voice Changer
Vocoder
Off
Single
200 Audio In
Audio In
On
Single
Note:
The sounds 196-200 are programs that use the mic input
(audio input). In order to play these sounds, you must connect a
mic or external audio device to the RK-100S and play the keyboard
while sound is being input.
Note:
With the factory settings, the Timbre 2 MIDI channel is set
to “9” for programs whose Voice Mode is set to Multi.
Demo songs
S001: Asteroid belt
S002: Let’s go RK
S003: Science payload
S001 and S003: Composed and performed by Yasushi.K
S002: Composed and performed by KORG Inc.
All demo songs © 2014 KORG Inc. all rights reserved.
For more information about Yasushi.K visit
http://www.net-yk.org
https://www.facebook.com/yasushik1977


