background image

Introduction

8

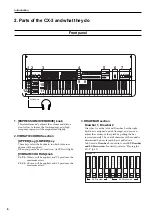
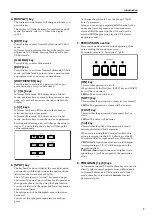
9. [EX MODE] key

Press this key to enter EX mode.

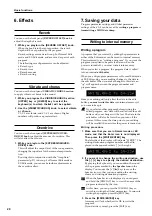
10. DRAWBAR SELECT section

The upper three drawbar select keys are for the upper
keyboard, and the lower three are for the lower
keyboard. When you press a key to turn it on, its LED
will light.

Use these keys to select the drawbar settings that will
be played by the upper or lower keyboards.
If you select 

the [DRAWBAR 1] key

, the keyboard will

play the settings of the front panel Drawbar 1 section.
The Drawbar 2 settings will be used if you select 

the

[DRAWBAR 2] key

, and the drawbar parameters

specified by the program will be used if you select 

the

[PRESET DRAWBAR] key

.

If you press 

the [PRESET DRAWBAR] key

 when its

LED is blinking or dark, the drawbar parameter
settings will be shown in the display for approxi-
mately 1 second.

In EX mode, 

the [PRESET DRAWBAR] key

 will

automatically be selected for the lower keyboard
(neither of the other Drawbar settings can be selected).

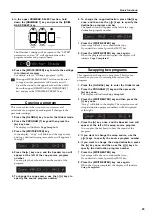
11. ROTARY section

Here you can control the rotary effect.
For details, refer to “5. Rotary” (p.19).

[ON] key

This key turns the rotary speaker effect on or off.
When this is off, pressing the [FAST] or [STOP] keys
will have no effect.

LED lit:

 The rotary speaker effect is on.

[STOP] key, [FAST] key

These keys control the rotary speaker.

When the [STOP] key LED is dark

: The [FAST] key

will switch the rotary speaker between fast and slow.
The rotary speaker will turn rapidly when you make
the [FAST] key LED light.
The rotary speaker will turn slowly when you make
the [FAST] key LED go dark.

When the [STOP] key LED is lit:

 The [FAST] key will

switch the rotary speaker between fast and stopped.
The rotary speaker will turn rapidly when you make
the [FAST] key LED light.
The rotary speaker will stop turning when you make
the [FAST] key LED go dark.

When the [FAST] key LED is dark:

 The [STOP] key

will switch the rotary speaker between slow and
stopped.
The rotary speaker will stop turning when you make
the [STOP] key LED light.
The rotary speaker will turn slowly when you make
the [STOP] key go dark.

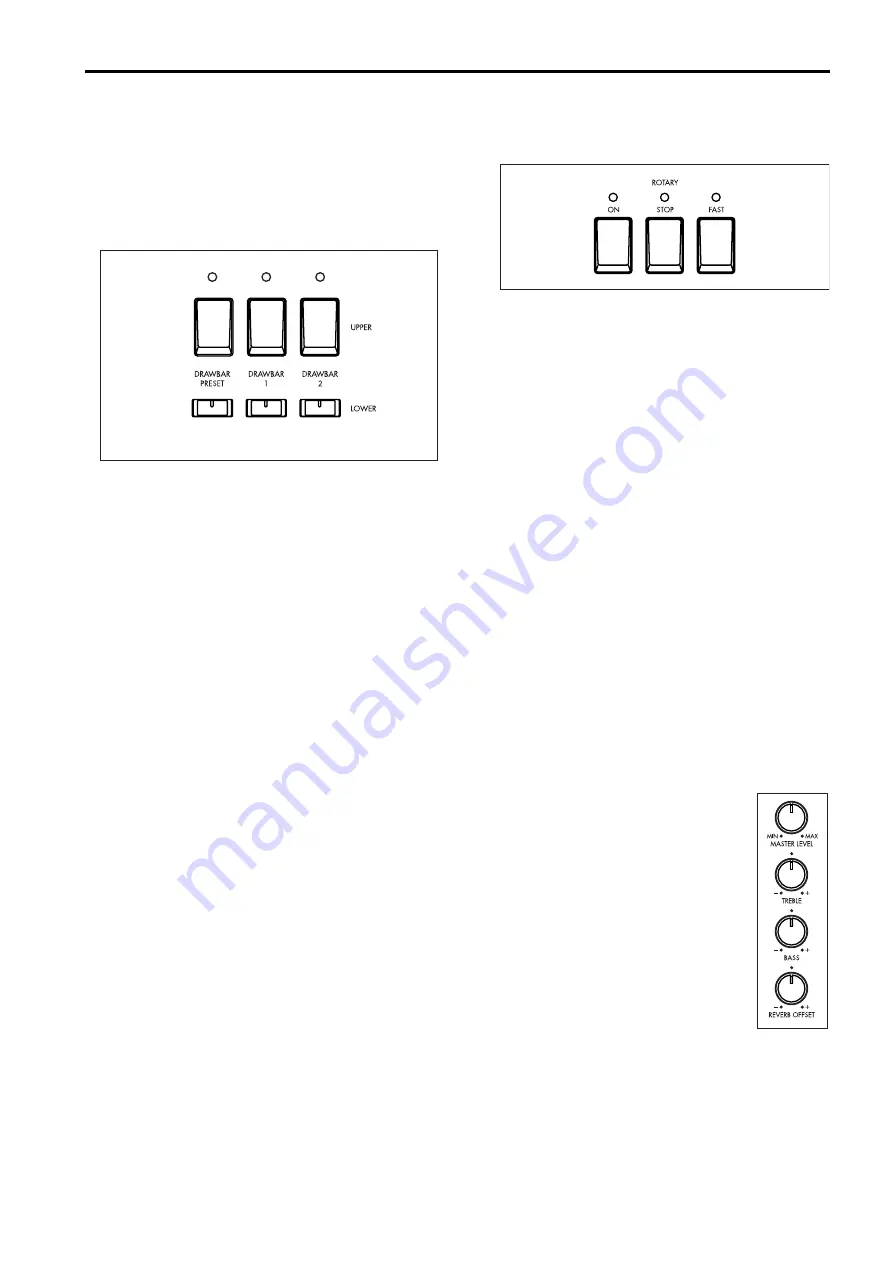
12. AMP section

[MASTER LEVEL] knob

Use this knob to adjust the volume as
appropriate for the equipment to which
the CX-3 is connected.
Use the [EXPRESSION/OVERDRIVE]
knob and a connected expression pedal
to adjust the volume and distortion of
the sound, and then use this knob to set
the final output level.

[TREBLE] knob

Adjusts the high-frequency level.

[BASS] knob

Adjusts the low-frequency level.

[REVERB OFFSET] knob

Adjust the reverb depth.
When this knob is at the center position, the reverb
will be the depth specified by the program. When this
knob is turned to the far left there will be no reverb,
and when turned to the far right the reverb will be
deeper.

Summary of Contents for CX-3 Combo Organ

Page 1: ...Owner s Manual 4 E...

Page 2: ...arrowhead symbol within an equilateral triangle is intended to alert the user to the presence of uninsulated dangerous voltage within the product s enclosure that may be of sufficient magnitude to co...

Page 3: ...about a function Appendix explains how to connect a MIDI sequencer or computer or perform a data dump A list of the built in sounds of the CX 3 and specifications etc are also provided Printing conven...

Page 4: ...n 5 1 About the CX 3 5 Main features 5 The modes of the CX 3 5 2 Parts of the CX 3 and what they do 6 Front panel 6 Rear panel 9 Connections 10 1 Power cable connections 10 2 OUTPUT jack connections 1...

Page 5: ...r and horn the natural overdrive and chorus vibrato to produce the authentic combo organ experience The CX 3 is all you need to enjoy real organ sound By operating the two sets of drawbars you can mod...

Page 6: ...used to control EX Drawbar and EX Percussion For details refer to Playing the CX 3 p 13 EX Percussion EX Drawbar Drawbar 2 1 EXPRESSION OVERDRIVE knob This simultaneously adjusts the volume and distor...

Page 7: ...function you can divide it into the upper and lower keyboards at any desired point The split point will be the highest note in the lower keyboard You can set the split point separately for each pro g...

Page 8: ...ntrol the rotary speaker When the STOP key LED is dark The FAST key will switch the rotary speaker between fast and slow The rotary speaker will turn rapidly when you make the FAST key LED light The r...

Page 9: ...IDI devices 2 EXPRESSION PEDAL jack Connect the included expression pedal to this jack For details on the function of the expression pedal refer to 5 Operation of included Expression pedal p 44 3 ASSI...

Page 10: ...ode Exp Ctrl parameter setting specifies whether the volume will be controlled by the EXPRESSION OVERDRIVE knob the expression pedal or both Alternatively you can connect a separately sold EXP 2 foot...

Page 11: ...678901234567890123456789012123 12345678901234567890123456789012123456789012345678901234567890121234567890123456789012345678901212345678901234567890123456789012123 1234567890123456789012345678901212345...

Page 12: ...drawbars work p 36 4 In the upper DRA WBAR SELECT section press the DRA WBAR 1 key The key LED will light Now you can use the front panel Drawbar 1 bars to adjust the sound played by the keyboard 5 W...

Page 13: ...uding the split point will be the lower keyboard The DRAWBAR PRESET key will automatically be selected for the lower keyboard and the lower keyboard will play the EX LOWER parameter settings of the pr...

Page 14: ...l need to create several different programs with the desired drawbar settings before hand and switch these programs while you play If you want to change the preset drawbar settings edit the parameters...

Page 15: ...123456789012345678901234567890121234567890123456789012345678901212345678901234567890123456789012123 1234567890123456789012345678901212345678901234567890123456789012123456789012345678901234567890121234...

Page 16: ...edal and adjust the settings for the wheel break function Group 8 Use this parameter to play the demo songs Normal Edit mode EX Edit mode The contents of the display will depend on which param eters o...

Page 17: ...riginal factory settings Use this procedure if you have accidentally overwritten a preset program or want to return to the original factory settings Initialization can be performed on the following fo...

Page 18: ...ing the upper keyboard you can use the front panel PERCUSSION keys and drawbars to add percus sion Percussion adds an attack to the beginning of the note making the sound more crisp However when you p...

Page 19: ...e wheel organ Controls are available to simulate different amplification and microphone place ment 1 In the front panel ROT ARY section press the ON key The key LED will light If when you press the RO...

Page 20: ...m If you want the program you edited to be preserved even when the power is turned off you must write it into memory When you select a program the program data is called into an internal edit buffer W...

Page 21: ...imple ways to edit If you select another program or turn off the power before writing your edited settings the changes will be lost For details refer to Writing a program p 20 Editing the sound The CX...

Page 22: ...r settings will be displayed If you are unable to adjust the UPPER parameter settings make sure that the DRAWBAR SELECT section DRAWBAR PRESET key is selected If the DRAWBAR PRESET key is not selected...

Page 23: ...e the copy destination press the key once and then use the keys to specify the destination program number The Speaker icon will appear at the left of the copy destination program number 7 Press the WR...

Page 24: ...he left of the display and the program name will be displayed in square brack ets 3 Use the keys to select the character that you want to change 4 Use the keys to specify the desired charac ter You ca...

Page 25: ...67890123456789012123456789012345678901234567890121234567890123456789012345678901212345678901234567890123456789012123 12345678901234567890123456789012123456789012345678901234567890121234567890123456789...

Page 26: ...me is displayed will display the current Drawbar 1 and EX Drawbar Drawbar 2 values If you then press the DISPLAY key once again the EX Percussion Drawbar 2 values will be displayed EX LOWER EX Lower L...

Page 27: ...b Group 5 Rev Routing Speaker Group 4 Spkr Simulator Group 5 Reverb Reverb Type Room Hall Plate Dark Selects the type of reverb Reverb Time 00 25 16 00 Sec Specifies the reverb time The range in which...

Page 28: ...you specify here will be the highest note of the lower keyboard Split Upper Octave Upper Octave Shift 2 1 0 Lowers the pitch of the upper keyboard when split is used in steps of one octave Split Lowe...

Page 29: ...l 1 Pdl 1 Pedal 2 Pdl 2 Pedal 1 An expression pedal etc connected to the rear panel ASSIGNABLE PEDAL SW 1 jack will control the Group 4 Amp Gain parameter of Normal Edit mode and EX Edit mode Pedal 2...

Page 30: ...Wheel parameter to other than No Assign Rtry FAST or Wheel Brake incoming MIDI Modulation Wheel control change messages will control the specified effect over a maximum range between 0 and 99 When the...

Page 31: ...l connected to the EXPRESSION PEDAL jack will both control the volume These two will function simultaneously Knob Only The EXPRESSION OVERDRIVE knob will control the volume Pedal Only The expression p...

Page 32: ...ch MIDI Upper Transmit Channel 1 16 Off Specifies the channel on which the UPPER keyboard will transmit MIDI note messages with a fixed velocity value The factory setting is channel 1 The velocity val...

Page 33: ...Drawbar 1 16 1 31 33 95 Off Specifies the MIDI control change number that will be used to transmit and receive the 16 setting of Drawbar 1 The factory setting is 16 CC Drawbar 1 51 3 MIDI CC Drawbar 1...

Page 34: ...receive the setting of the VIBRATO CHORUS section VIBRATO CHORUS knob The factory setting is 84 CC V C UPPER MIDI CC V C Upper 1 31 33 95 Off Specifies the MIDI control change number that will be used...

Page 35: ...wbar Type 4 1 Ex Drawbar Type 4 4 5 24 Specifies the pitches in semitone steps that will be assigned to the EX Drawbars Drawbar 2 used by an EX program These settings will be used if the EX Edit mode...

Page 36: ...icate Default DB Select Exp Pdl Calibration Expression Pedal Calibration If operating the expression pedal connected to the rear panel EXPRESSION PEDAL jack does not produce the appropriate result use...

Page 37: ...34567890123456789012123456789012345678901234567890121234567890123456789012345678901212345678901234567890123456789012123 12345678901234567890123456789012123456789012345678901234567890121234567890123456...

Page 38: ...h you will start your performance Then execute the Global mode Group 7 Drawbar Scan parameter to transmit the state of Drawbar 1 and 2 Immediately after you begin recording select the pro gram that yo...

Page 39: ...the PROGRAM 7 key and then press the key twice The display will indicateDump 4 Press the WRITE ENTER key The display will indicateDump Program and Program will blink 5 Select the data that you want t...

Page 40: ...anufacturer as they wish these messages are used mainly to transmit or receive sound data or editing data for parameters that are specific to a particular device The system exclusive message format fo...

Page 41: ...are displayed A data dump will also be transmitted when a dump request is received if the MIDI Rx Sys Exc parameter is set to Ena Data that is received by Dump Program can be written into internal me...

Page 42: ...Perc Combo Standerd 2 Bank No 1 2 3 4 5 6 7 8 Name Pedal1 2 Name Pedal1 2 Name Pedal1 2 Name Pedal1 2 Name Pedal1 2 Name Pedal1 2 Name Pedal1 2 Name Pedal1 2 A I Gota EX RF Pipe Organ 1 EX Perky 2 RF...

Page 43: ...tary speaker will not be used if you select Pre Amp seep 19 The CX 3 does not response to incoming MIDI messages Is the MIDI cable connected correctly Check the connection seep 10 Does the MIDI channe...

Page 44: ...return to standard position when you take your foot off Also by adjusting the screw on the bottom you may adjust the spring return range from 0 10 30 20 0 10 Standard position Spring return range Ran...

Page 45: ...ection UPPER key LOWER key VIBRATO CHORUS knob AMP section MASTER LEVEL knob TREBLE knob BASS knob REVERB OFFSET knob Other EXPRESSION OVERDRIVE knob DIS PLAY key EX MODE key EDIT key GLOBAL key WRITE...

Page 46: ...Ena are respectively ENA 2 Factory setting User editable 3 Received when Global mode MIDI Rx Prg Chng parameter is set to Ena 4 Received when Global mode MIDI Rx Sys Exc parameter is set to Ena 5 In...

Page 47: ...Percussion 14 Expression Pedal 10 44 Exp Minimum Level 31 Exp Pdl Calibration 36 F Front panel 6 G Global mode 31 I Icons 15 Initialize 17 35 M Master Tune 31 MIDI 32 37 46 AboutMIDI 37 MIDI Channel...

Page 48: ...l order and or via a telephone sale you must verify that this product is intended to be used in the country in which you reside WARNING Use of this product in any country other than that for which it...

Reviews: