background image

- 5 -

Installation procedure

Installation procedure

3

Distance between neighboring wall brackets

Determine the wall bracket installation  height (C)

by the formula

A is the preferred height of front profile

H is the maximum projection lenght of shade (H) ,obtainable

from specification of the awning

0.17 is the adjustment figure at our recommended angle of

inclination of 80°.(If you prefer using the awning with smaller

inclination angle ,you can replace the figure with 0.5 for

inclination angle of 60° and with 0.71 for the maximum

inclination angle of 45°)

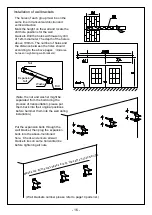
Installation height of wall brackets

As shown in the figure, we recommend making the awning surface to form an angle of

about 80 degrees with the wall when it is open.

C=A+0.17*H

Carefully unpack and release the bindings. Need two persons to handle the product.

Remove and store the hardware in a safe place to avoid losing.

Beware of the sudden unfolding of any parts, especially the folding arms.

Read the assembly instructions carefully before installation.

Check for missing components and damaged parts. Do not install the product if any

parts are missing or damaged. Return to the store for free replacement.

Never modify the construction or the design of the awning. Fail to follow the instruction

can lead to personal injury or death.

The awning can be installed by non-profession provided the instructions are followed.

Make sure the wall is strong enough and is suitable for the installation of the awning. We

will not be responsible for any damage to the property and the awning due to the weak

support of installation wall.

Prior to installation

3.3m

4.3m:

<3.3m:

4.5m

6m:

Seitenansicht

Vor dem Einbau

Packen Sie die Artikel vorsichtig aus und lösen Sie die Verschnürungen. Es werden zwei Personen benötigt, um 

das Produkt zu verarbeiten.

Entnehmen Sie die Zubehörteile und verwahren Sie diese an einem sicheren Ort auf, um sie nicht zu verlieren.

Vermeiden Sie das plötzliche Ausklappen von Teilen, vor allem der Faltarme.

Lesen Sie sich die Montageanweisungen gründlich durch, bevor Sie mit dem Einbau beginnen. Überprüfen Sie 

auf fehlende Komponenten und beschädigte Teile. Beginnen Sie nicht mit dem Einbau, falls Teile fehlen oder 

beschädigt sind. Bringen Sie das Produkt für einen kostenfreien Umtausch zum Händler zurück.

Vermeiden Sie die Modifikation der Konstruktion oder des Designs der Markise. Falls die Anweisungen nicht 

befolgt werden, kann dies zu Personenschäden oder zum Tod führen.

Die Markise kann auch durch interessierte Laien eingebaut werden, sofern die Anweisungen befolgt werden.

Vergewissern Sie sich, dass die Wand stabil genug ist und sich für den Einbau der Markise eignet. Wir über-

nehmen keine Haftung für Schäden am Gebäude und der Markise, die aufgrund mangelnder Tragfähigkeit der 

Einbauwand entstehen.

Einbauvorgang

Abstand zwischen benachbarten Wandhalterungen

Einbauhöhe der Wandhalterungen

Wie in der Abbildung gezeigt, empfehlen wir, dass die Oberfläche der Markise einen Winkel von 80 Grad 

mit der Wand bildet, wenn sie ausgefahren ist.

Bestimmen Sie die Einbauhöhe (C) der Wandhalterung anhand der Formel:

A ist die bevorzugte Höhe des Frontprofils. 

H ist die maximale Überstandslänge (H), die aus den Spezifikationen der 

Markise ermittelt werden kann

0,17 ist der Anpassungswert bei unserem empfohlenen Neigungswinkel von 

80° (Falls Sie einen kleineren Neigungswinkel für Ihre Markise bevorzugen, 

können Sie den Anpassungswert durch 0,5 bei einem Neigungswinkel von 

60 ° und durch 0,71 bei einem maximalen Neigungswinkel von 45 ° ersetzen)

Summary of Contents for BW13000

Page 1: ...ehbare Markise BW23000 Gebrauchsanleitung Installation Instruction Contents Specifications Precautions and safety warnings for installation and operation Accessories and required tools Installation procedure Operation instructions Maintenance Name list of parts WARNING IT IS IMPORTANT FOR SAFETY OF PERSONS TO FOLLOW THESE INSTRUCTIONS SAVE THESE INSTRUCTIONS FOR FUTURE REFERENCE ...

Page 2: ...schreibung Instandhaltung 8 Liste der Bauteilbezeichnungen 9 Spezifikation Artikelnummer Neigungswinkel Tuch Windwiderstandsklasse BW23000 0 45 Polyester Klasse 1 28Km h WARNUNG DIESE BEDIENUNGSANLEITUNG SOLL VOR BENUTZUNG UND DEM EINBAU DES PRODUKTS GELESEN WERDEN WARNUNG FÜR DIE SICHERHEIT VON PERSONEN IST ES WICHTIG DIESE ANWEISUNGEN ZU BEFOLGEN BEWAHREN SIE DIESE ANLEITUNG ZUM SPÄTEREN NACHSCH...

Page 3: ...d rainy days No modification of the awning in any kind is allowed Artical number BW13000 Inclination angle Wind resistance class Class 1 28Km h 0 45 Fabric Polyester Do not open the awning when maintenance such as window cleaning is being carried out in the vicinity READ THE INSTRUCTION BEFORE USING THE PRODUCT Check the awning every 3 months to ensure all fixing are tightened and no damage on the...

Page 4: ...Number of Wall brackets Number of Expansion bolt Product model 2 4 3 3m 4 3m 3 4 5m 6m 4 6 8 3 3m Markise Stückzahl 1 Anleitung Stückzahl 1 Dehnschraube Wandhalterungen Schlagbohrmaschine mit einer φ12 Bohrspitze Klebeband Holzhammer Schraubenschlüssel M10 und M12 Bitte legen Sie sich vor der Installation die folgenden Werkzeuge bereit sie sind nicht im Lieferumfang enthalten Produktmodell Stückza...

Page 5: ...u Packen Sie die Artikel vorsichtig aus und lösen Sie die Verschnürungen Es werden zwei Personen benötigt um das Produkt zu verarbeiten Entnehmen Sie die Zubehörteile und verwahren Sie diese an einem sicheren Ort auf um sie nicht zu verlieren Vermeiden Sie das plötzliche Ausklappen von Teilen vor allem der Faltarme Lesen Sie sich die Montageanweisungen gründlich durch bevor Sie mit dem Einbau begi...

Page 6: ... list Einbau der Wandhalterungen Die Löcher jeder Gruppe müssen in transversaler und in vertikaler Richtung auf derselben Linie sein Markieren Sie die Höhe an der Wand und ermitteln Sie die Lage der Bohrlöcher für die Wandhalterun gen Bohren Sie die Löcher mit einem Steinbohrer von 12 mm Durchmesser Die Tiefe des Lochs beträgt mehr als 100 mm Die Anzahl der Löcher und der Abstand zwischen ihnen so...

Page 7: ...hrauben an der Vorderseite der Wandhalterungen Bringen Sie die Markise an den Wand halterungen an indem Sie den quadratischen Drehstab an den Wandhalterungen anbringen Befestigen Sie die Markise indem Sie die Wandhalterungen wieder mit den Schrauben und Muttern verschrauben Ziehen Sie die Muttern fest um einen sicheren Halt der Markise an den Wandhalterungen zu gewährleisten Überprüfen Sie die waa...

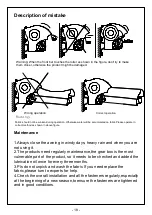
Page 8: ...of mistake Fehlerbeschreibung Warnung Wenn die Fallstange wie angezeigt den Rollkasten berührt versuchen Sie nicht sie näher zueinander zu bringen da es sonst zu Schäden am Produkt kommen könnte Warnung Das Tuch sollte im ausgefahrenen Zustand nicht durchhängen Es könnte andernfalls zur Ansammlung von Wasser auf dem Tuch kommen Bitte bedienen Sie das Produkt auf ordnungsgemäße Weise wie abgebildet...

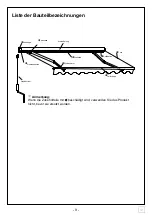
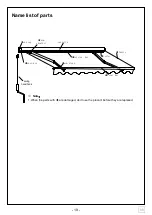
Page 9: ...ar box arm shoulder arm stand roller cassette torsion bar front bar fabric Name list of parts Liste der Bauteilbezeichnungen Endkappe Kassette Armhalterung Drehstab Rollkasten Fallstange Tuch Schwenkarm Getriebekasten Handkurbel Anmerkung Wenn die Zubehörteile mit beschädigt sind verwenden Sie das Produkt nicht bevor sie ersetzt wurden ...

Page 10: ...en zum Festnetztarif je nach Betreiber NL call center telefoonnummer 0900 1901 15 ct min Name Nome Nom Naam Nr No n Typ Type Tipo Service Servizio Imported by baumarkt direkt GmbH Co KG Alter Teichweg 25 22081 Hamburg Germany Produktberatung 01806 63 06 30 Festnetz 20 Cent Anruf Mobilfunk max 60 Cent Anruf Quelle D Fachberatung 01806 111 100 Festnetz 20 Cent Anruf Mobilfunk max 60 Cent Anruf D CH ...

Page 11: ...ractable Awning BW23000 Gebrauchsanleitung Installation Instruction Contents Specifications Precautions and safety warnings for installation and operation Accessories and required tools Installation procedure Operation instructions Maintenance Name list of parts WARNING IT IS IMPORTANT FOR SAFETY OF PERSONS TO FOLLOW THESE INSTRUCTIONS SAVE THESE INSTRUCTIONS FOR FUTURE REFERENCE ...

Page 12: ...TALLATION OF THE PRODUCT WARNING IT IS IMPORTANT FOR SAFETY OF PERSONS TO FOLLOW THESE INSTRUCTIONS SAVE THESE INSTRUCTIONS FOR FUTURE REFERENCE Specification Artical number Inclination angle Fabric Wind resistance class BW23000 0 45 Polyester Class 1 28Km h Specification Precautions and safety warning for installation and operation 12 13 Accessories and required tools 14 Installation procedure 15...

Page 13: ...rms as the awning may fall down and cause damage or personal injury Never use it in rainy and windy days Never use it for other purposes Be careful with your finger during installation When you are ready to unpack and assemble the awning make sure that you have the appropriate tools sufficient operators 2 persons are suggested and space and a clean and dry area to perform the installation Please u...

Page 14: ... hand hook amount 1 Instruction amount 1 Wall brackets Mallet Expansion bolt Attention The expansion bolts provided in the product is for concrete or brick wall If you are installing the awning on support other than for concrete or brick wall please make sure the wall is of sufficient support and use the correct hardware to secure the awning on the support Number of Wall brackets Number of Expansi...

Page 15: ... is open C A 0 17 H Carefully unpack and release the bindings Need two persons to handle the product Remove and store the hardware in a safe place to avoid losing Beware of the sudden unfolding of any parts especially the folding arms Read the assembly instructions carefully before installation Check for missing components and damaged parts Do not install the product if any parts are missing or da...

Page 16: ...Distance between neighboring wall brackets Put the expansion bolts through the wall bracket then plug the expansion bolts into the above mentioned hole Check and ensure all wall brackets lies on same horizontal line before tightening all nuts Note the nut and washer might be separated from the bolt during the process of transportation please put them back into their original positions before hamme...

Page 17: ...ngle adjuster on both arm shoulders to achieve the desired inclinaton Fix the locking nuts when the awning is level Operation instructions Installation of awning to wall brackets Attach the swing handhook to the gear box swirl the handle to roll and unroll the awning Remove the bolts on the front of the wall brackets Install the awning to the wall brackets by attaching the square torsion bar to th...

Page 18: ...t of the product so it needs to be checked and added the lubrication oil once for every three months 3 Pls do not unpick and wash the fabric If you need replace the fabric please turn to experts for help 4 Check the overall installation and all the fasteners regularly especially at the beginning of a new season to ensure the fasteners are tightened and in good conditions Fabric should not be sunke...

Page 19: ...n the parts with are damaged don t use the product before they are replaced Name list of parts 7 swing handhook end cap gear box arm shoulder arm stand roller cassette torsion bar front bar fabric Name list of parts ...

Page 20: ...ken zum Festnetztarif je nach Betreiber NL call center telefoonnummer 0900 1901 15 ct min Name Nome Nom Naam Nr No n Typ Type Tipo Service Servizio Imported by baumarkt direkt GmbH Co KG Alter Teichweg 25 22081 Hamburg Germany Produktberatung 01806 63 06 30 Festnetz 20 Cent Anruf Mobilfunk max 60 Cent Anruf Quelle D Fachberatung 01806 111 100 Festnetz 20 Cent Anruf Mobilfunk max 60 Cent Anruf D CH...

Reviews: