- 15 -
Installation procedure
Installation procedure
3
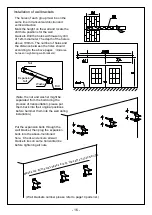
Distance between neighboring wall brackets
Determine the wall bracket installation height (C)
by the formula
A is the preferred height of front profile
H is the maximum projection lenght of shade (H) ,obtainable
from specification of the awning
0.17 is the adjustment figure at our recommended angle of
inclination of 80°.(If you prefer using the awning with smaller
inclination angle ,you can replace the figure with 0.5 for
inclination angle of 60° and with 0.71 for the maximum
inclination angle of 45°)
Installation height of wall brackets
As shown in the figure, we recommend making the awning surface to form an angle of
about 80 degrees with the wall when it is open.
C=A+0.17*H
Carefully unpack and release the bindings. Need two persons to handle the product.
Remove and store the hardware in a safe place to avoid losing.
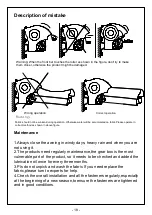
Beware of the sudden unfolding of any parts, especially the folding arms.
Read the assembly instructions carefully before installation.
Check for missing components and damaged parts. Do not install the product if any
parts are missing or damaged. Return to the store for free replacement.
Never modify the construction or the design of the awning. Fail to follow the instruction
can lead to personal injury or death.
The awning can be installed by non-profession provided the instructions are followed.
Make sure the wall is strong enough and is suitable for the installation of the awning. We
will not be responsible for any damage to the property and the awning due to the weak
support of installation wall.
Prior to installation
3.3m
~
4.3m:
<3.3m:
4.5m
~
6m:


