13
10.
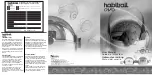
The case has thinned sections that can
be removed to allow entry of the supply
pipe and electrical cables. Remove the
top thinned section of the case for a
falling supply, or remove the bottom
thinned section of the service tunnel
for a rising supply.
11.
Do not remove any case if the
electrical cables enter from the back.
12.
Secure the shower to the wall
loosely
through the top two fixing holes, using
the supplied screws.
13.
Mark the position of the bottom fixing
hole.
14.
Remove the shower from the wall. Drill
the bottom fixing hole and insert the
supplied wall plug.
15.
Thoroughly flush the mains-fed cold
water supply pipe.
Caution!
The supply must be clean
and free from debris BEFORE
connecting the appliance.
16.
Replace the shower on the wall and
secure through the three fixing holes,
using the supplied screws.
17.
Connect the inlet supply pipe to the
inlet connector using a 1/2” BSP nipple
with compression nuts and olives
(shown) or a push-fit connector.
Thinned
Section
Thinned
Section
Service Tunnel
Screws
Inlet
Connector
Compression
Nut
Olive
1/2” BSP Nipple
Olive
Compression
Nut
Inlet Supply Pipe