56
Electrical System
KohlerEngines.com
66 690 14 Rev. A
Fuses
This engine has 4 blade type automotive fuses.
Replacement fuses must have same rating as blown
fuse. Use fuse chart below to determine correct fuse.
Wire Color
Fuse Rating
2 Red Wires
10-amp Fuse
1 Red Wire w/Black Stripe
1 Red Wire w/White Stripe
10-amp Fuse
2 Purple Wires
30-amp Fuse
2 Red Wires
10-amp Fuse
Fuse Replacement
1. Shut engine o
ff
and remove key.
2. Locate fuse holders.
3. Remove fuse cover and pull out fuse holder. Inspect
condition of fuse holder.
4. Inspect fuse for a solid fusible link or a broken
fusible link. Replace fuse if fusible link is broken. If
you are not sure if fusible link is broken, replace
fuse.
5. Insert fuse into fuse holder until it is seated properly.
Install fuse cover.
6. If replacement fuse fails, there is a problem within
circuit. Diagnostics are required. Identify which
circuit is a
ff
ected (see EFI System for Wiring
Diagram) by identifying failed fuse/circuit. Perform
troubleshooting procedures appropriate for circuit
fuse that failed.
Troubleshooting Guide
25 Amp Battery Charging System
NOTE: Always zero meter on each scale before testing
to ensure accurate readings. Voltage tests
should be made with engine running at 3600
RPM - no load. Battery must be good and fully
charged.
When problems occur in keeping battery charged or
battery charges at too high a rate, problem can usually
be found somewhere in charging system or with battery.
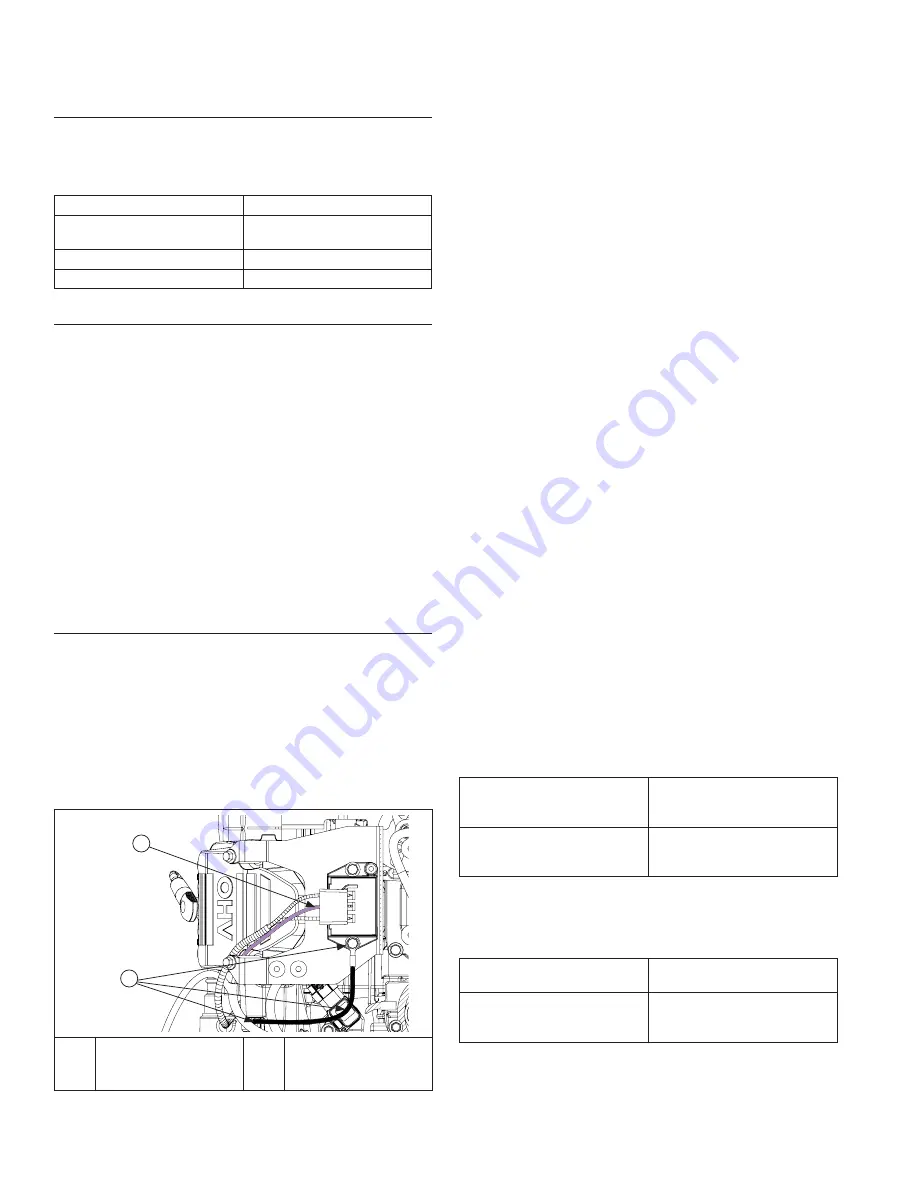
Test Charging System for No Charge to Battery
B
A
A
Purple B+ Charge
Wire
B
Recti
fi
er-Regulator
Ground Wire with 2
Eyelets
1. With engine o
ff
, test and record battery voltage.
Voltage should be above 12 volts to proceed. With
voltmeter attached to battery, start engine. Set
engine speed to high RPM position, battery voltage
should increase (for example: 12.6 volts engine o
ff
;
13.4 volts engine running). Actual voltage increase
will di
ff
er depending on state of charge in battery.
2. If no voltage increase is seen at battery, turn engine
o
ff
and move voltmeter red lead to purple B+ lead on
recti
fi
er-regulator and black ground meter lead to
ground eyelets. Recorded battery voltage from step
1 should be seen. If battery voltage is not seen, a
blown fuse or bad connection may be at fault.
Inspect (green 30 amp) charging system fuse for
blown fuse and/or corroded fuse terminals. Inspect
recti
fi
er-regulator ground wire and eyelets for a
proper connection and ensure mounting screws are
secure.
3. If recorded battery voltage is seen, but no increase
while running engine, proceed to step 2 of Test
Charging System Output, for component diagnostic
testing.
4. If a slight voltage increase is seen, but system
output may be in question, proceed to step 1 of Test
Charging System Output.
Test Charging System Output
1. Perform test a or b.
a. Insert an ammeter in purple B+ lead at recti
fi
er-
regulator connector. With engine running at 3600
RPM and B+ (at terminal on recti
fi
er-regulator) to
ground using a DC voltmeter. If voltage is 13.8
volts or more, place a minimum load of 5 amps
(turn on lights if 60 watts or more, or place a 2.5
ohm, 100 watt resistor across battery terminals)
on battery to reduce voltage. Observe ammeter.
b. If a carbon pile test tool is available, temporarily
set carbon pile load near or at charging system
maximum output and observe output voltage.
(Follow tool directions for carbon pile test
procedures.)
Condition
Conclusion
Charge rate increases
when load is applied.
Charging system is OK
and battery was fully
charged.
Charge rate does not
increase when load is
applied.
Test stator and recti
fi
er-
regulator (steps 2 and 3).
2. Remove connector from recti
fi
er-regulator. With
engine running at 3600 RPM, measure AC voltage
across stator leads using an AC voltmeter.
Condition
Conclusion
Voltage is 28 volts or
more.
Stator is OK. Test recti
fi
er-
regulator.
Voltage is less than 28
volts.
Stator is faulty; replace.
Test stator further using an
ohmmeter (steps 3 and 4).


