background image

2

8.  Do not install near any heat sources such as radiators, heat registers, stoves, 
     or other apparatus (including amplifiers) that produce heat.
9.  Do not defeat  the safety purpose of  the polarized or grounding-type plug. 
     A polarized plug has two blades with one wider than the other. A 
     grounding-type plug has two blades and a third grounding prong. The wide 
     blade or  the  third prong are provided  for your safety. When  the provided 
     plug does not fit  into your outlet, consult an electrician  for replacement of 
     the obsolete outlet.
10.  Protect the power cord from being walked on or pinched particularly at plugs, 
     convenience receptacles, and the point where they exit from the apparatus.
11.  Only use attachments/accessories specified by the manufacturer.
12.  Use only with a cart, stand,  tripod, bracket, or  table specified by  
     themanufacturer,  or  sold with  the  apparatus. When a cart is used, use caution
     when moving the cart/apparatus combination to avoid injury from tip-over.
13.  Unplug  this apparatus during  lightning storms or when unused for long 
     periods of time.
14.  Refer all servicing  to qualified service personnel. Servicing is required when 
     the apparatus has been damaged in any way, such as power-supply cord or 
     plug is damaged, liquid has been spilled or objects have fallen into the 
     apparatus, the apparatus has been exposed to rain or moisture, does not 
     operate normally, or has been dropped.
15.  WARNING: To reduce  the risk of re or electric shock, do not expose this 
     apparatus to rain or moisture. Do not place objects filled with water, such as a 
     vase, on the apparatus.
16.  The AC mains plug is used as the power disconnect device and it should 
     remain readily accessible and operable during intended use. In order to 
     completely disconnect the apparatus from power, the mains plug should be 
     completely removed from the AC outlet socket.
17.  CAUTION: To reduce the risk of fire or explosion, do not expose batteries to 
     excessive heat such as sunshine, fire or other heat sources.

1) Warning: Avoid sharp corners on the lower stand bar – corners will cut.
2) Use product when fully assembled.
3) Use of product requires adult supervision for children under the age of 7.

AC


CONNECTION

Use the unit’s AC polarized line cord for operation on AC power. Plug the AC 
cord into any convenient 120V 60Hz household outlet.

NOTES:
. Remove the AC plug to disconnect when not in use.
. The AC plug supplied with the unit is polarized to help minimize the possibility 
  of electric shock.If the AC plug does not fit into a nonpolarized AC outlet, do 
  not file or cut the wide blade. It is the user's responsibility to have an electrician 
  replace the obsolete outlet.
 

Summary of Contents for KAKAR2MICA

Page 1: ...Kogan Bluetooth Karaoke System with Dual Microphones K KAKAR2MICA ...

Page 2: ...Please handle this product with care and inspect it regularly to ensure it is in good working order If the product power supply cord or plug shows any signs of damage stop use unplug and contact Kogan com support ...

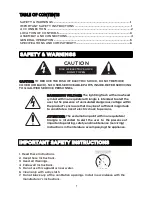
Page 3: ...TION triangle is intended to alert the user to the presence of important operating safety and maintenance servicing instructions in the literature accompanying the appliance CAUTION RISK OF ELECTRIC SHOCK DO NOT OPEN IMPORTANT SAFETY INSTRUCTIONS 1 Read these Instructions 2 Keep these Instructions 3 Heed all Warnings 4 Follow all Instructions 5 Do not use this apparatus near water 6 Clean only wit...

Page 4: ...g is damaged liquid has been spilled or objects have fallen into the apparatus the apparatus has been exposed to rain or moisture does not operate normally or has been dropped 15 WARNING To reduce the risk of re or electric shock do not expose this apparatus to rain or moisture Do not place objects filled with water such as a vase on the apparatus 16 The AC mains plug is used as the power disconnec...

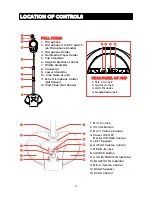
Page 5: ... 10 Amp base of unit 11 Extra Microphone Holder Not Shown 12 iPad Strap Not Shown REAR PANEL OF AMP 1 Mic 2 In Jack 2 Guitar In Jack 3 AUX IN Jacks 4 Headphone Jack 1 MIC 1 In Jack 2 VOCAL Button 3 MIC 1 Volume Control 4 Power ON OFF Master VOLUME Control 5 LEFT Speaker 6 GUITAR Volume Control 7 MEDIA IN Jack 8 SOURCE Button 9 AUX IN MEDIA IN Indicator 10 BLUETOOTH Indicator 11 MIC 2 Volume Contro...

Page 6: ...ITAR Insert a cable from the Audio Out jack on your Guitar to the Guitar In Jack on the rear of this unit USING THE SECOND MICROPHONE INCLUDED To use a second microphone included connect the Extra Microphone Holder to the bar to hold the microphone then insert the Microphone s Plug into the MIC 2 In Jack on the rear of the Amp CONNECTING AN EXTERNAL UNIT You can connect an external unit to this un...

Page 7: ...DJUSTMENT To lower or raise the Top Stand bar simple rotate the Height Adjustment Collar counter clockwise to loosen and then raise or lower the Top Stand Bar Rotate the Height Adjustment Collar clockwise to tighten GENERAL OPERATION 1 Make any desired connections as shown previously Rotate the master volume knob clockwise until a click sound heard to turn the unit on 2 Turn microphone s ON OFF Sw...

Page 8: ...ition BLUETOOTH OPERATION 1 Turn on the unit as previous procedure 2 Press the SOURCE button repeatedly until the Bluetooth indicator will light up and blink 3 Activate the external Bluetooth device to search the unit identified as select it and PAIR KAKAR2MICA 4 After successful connection the indicator will stay lit and a tone will be heard Play music as usual NOTES The unit can be automatically ...

Reviews: