background image

5

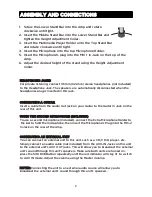
. When connecting the external unit, refer to the owner's manual of the external 
  unit, as well as this manual.
. When connecting the external unit, make sure the power is OFF and both units 
  are unplugged before making any connections.
. Connect a CD+G player to utilize the VOCAL Button, see later in this guide.

USING A MEDIA PLAYER
1.  Insert your multimedia player into the Multimedia Player Holder. 
2. Connect the Line In cable from the Line Out of your multimedia player to the 
    MEDIA In Jack on the top of the Amp. Connecting the multimedia player will 
    allow you to hear its sound through 
    this unit's speakers.
3. After connection, press the SOURCE Button repeatedly until the red indicator 
    flashing to switch to MEDIA-IN mode.

NOTES:  If using a tablet, make sure to strap the tablet in using the supplied strap.
The MEDIA In Jack should be used if multiple source inputs are used.

STAND ADJUSTMENT
To lower or raise the Top Stand bar, simple rotate the Height Adjustment Collar 
counter-clockwise to loosen and then raise or lower the Top Stand Bar. Rotate 
the Height Adjustment Collar clockwise to tighten.
 

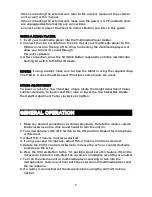
GENERAL OPERATION

1.  Make any desired connections as shown previously. Rotate the master volume 
    knob clockwise until a click sound heard to turn the unit on.
2. Turn microphone's ON/OFF Switch to the ON position. Repeat for microphone 
    2, if desired.
3. Adjust MIC-1 Volume Control as desired.
4. If using a second microphone, adjust MIC-2 Volume Control as desired.
5. Rotate the ECHO Control clockwise to increase the echo or counterclockwise 
    to decrease the echo.
6. Press the VOCAL Button to the “in” position to activate this feature. When the 
    Vocal Auto Feature is activated, the vocals on a multiplex recording are muted.
7. Turn on the external unit or multimedia player and sing or talk into the 
    microphone(s) and you will hear both the external unit/multimedia player and
    the microphone.
8. If a Guitar is connected, set the desired volume using the GUITAR Volume 
    Control.

Summary of Contents for KAKAR2MICA

Page 1: ...Kogan Bluetooth Karaoke System with Dual Microphones K KAKAR2MICA ...

Page 2: ...Please handle this product with care and inspect it regularly to ensure it is in good working order If the product power supply cord or plug shows any signs of damage stop use unplug and contact Kogan com support ...

Page 3: ...TION triangle is intended to alert the user to the presence of important operating safety and maintenance servicing instructions in the literature accompanying the appliance CAUTION RISK OF ELECTRIC SHOCK DO NOT OPEN IMPORTANT SAFETY INSTRUCTIONS 1 Read these Instructions 2 Keep these Instructions 3 Heed all Warnings 4 Follow all Instructions 5 Do not use this apparatus near water 6 Clean only wit...

Page 4: ...g is damaged liquid has been spilled or objects have fallen into the apparatus the apparatus has been exposed to rain or moisture does not operate normally or has been dropped 15 WARNING To reduce the risk of re or electric shock do not expose this apparatus to rain or moisture Do not place objects filled with water such as a vase on the apparatus 16 The AC mains plug is used as the power disconnec...

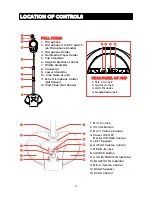
Page 5: ... 10 Amp base of unit 11 Extra Microphone Holder Not Shown 12 iPad Strap Not Shown REAR PANEL OF AMP 1 Mic 2 In Jack 2 Guitar In Jack 3 AUX IN Jacks 4 Headphone Jack 1 MIC 1 In Jack 2 VOCAL Button 3 MIC 1 Volume Control 4 Power ON OFF Master VOLUME Control 5 LEFT Speaker 6 GUITAR Volume Control 7 MEDIA IN Jack 8 SOURCE Button 9 AUX IN MEDIA IN Indicator 10 BLUETOOTH Indicator 11 MIC 2 Volume Contro...

Page 6: ...ITAR Insert a cable from the Audio Out jack on your Guitar to the Guitar In Jack on the rear of this unit USING THE SECOND MICROPHONE INCLUDED To use a second microphone included connect the Extra Microphone Holder to the bar to hold the microphone then insert the Microphone s Plug into the MIC 2 In Jack on the rear of the Amp CONNECTING AN EXTERNAL UNIT You can connect an external unit to this un...

Page 7: ...DJUSTMENT To lower or raise the Top Stand bar simple rotate the Height Adjustment Collar counter clockwise to loosen and then raise or lower the Top Stand Bar Rotate the Height Adjustment Collar clockwise to tighten GENERAL OPERATION 1 Make any desired connections as shown previously Rotate the master volume knob clockwise until a click sound heard to turn the unit on 2 Turn microphone s ON OFF Sw...

Page 8: ...ition BLUETOOTH OPERATION 1 Turn on the unit as previous procedure 2 Press the SOURCE button repeatedly until the Bluetooth indicator will light up and blink 3 Activate the external Bluetooth device to search the unit identified as select it and PAIR KAKAR2MICA 4 After successful connection the indicator will stay lit and a tone will be heard Play music as usual NOTES The unit can be automatically ...

Reviews: