


20
EN
SAFETY INSTRUCTIONS
•
This appliance, including the motor, is intended for grilling only.
•
Always use only the supplied power cord.
•
The power cord should be checked regularly for damage. If it is damaged, do not
use the appliance.
•
Children over the age of 8 years, mentally, sensorially and physically handicapped
persons may only use the appliance if they have been thoroughly familiarized
with the functions and safety precautions by a supervisor responsible for them and
understand the risks involved.
•
Keep the device and the cable out of the reach of children.
•
If the power cord or plug is damaged, it must be replaced by the manufacturer, an
authorised specialist company or a similarly qualifi ed person.
•
Never operate the device in a damp environment or in the rain.
•
Unplug the power cord before cleaning. Make sure that the plug does not get wet.
•
Check the unit and the electrical components regularly for wear. If any parts are
broken, do not use the appliance any further.
•
Never place the appliance on an uneven surface.
•
The appliance is not intended for commercial use, but only for domestic use and
similar environments. This includes kitchens in offi ces, farms, hotels, motels and
facilities that offer bed & breakfast.
•
Turn off the appliance, unplug the power cord and allow the appliance to cool
down before cleaning and storing.
•
Do not use abrasive cleaning agents.
•
Never clean the appliance under running water, this can cause a short circuit or
electric shock!
•
The grill motor may only be used outside in dry weather. Do not use it in rain or high
humidity.
CAUTION
Risk of burns! Parts of the grill become very hot when the appliance is
in operation. Be careful and use protective gloves when using the grill.
ASSEMBLY
Required for assembly:
•
M6 hexagon socket wrench
• M10 hexagon socket wrench
•
Open key
•
M6 Sleeve
•
Cross-type screwdriver
Summary of Contents for 10035373
Page 2: ......
Page 5: ...5 DE ...
Page 12: ...12 DE 7 Befestigen Sie den seitlichen Handgriff mit M6 Kreuzschrauben ...
Page 13: ...13 DE 8 Montieren Sie die Motorhalterung und die Spießhalterung in der gewünschten Höhe ...
Page 14: ...14 DE 9 Befestigen Sie den Motor ...
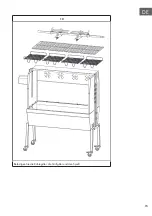
Page 15: ...15 DE 10 Befestigen Sie die Kohlegitter die Grillgitter und den Spieß ...
Page 17: ...17 DE 12 Der Zusammenbau ist jetzt beendet ...
Page 21: ...21 EN ...
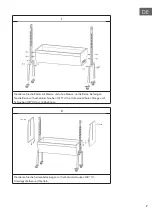
Page 24: ...24 EN 3 Secure the rear cover with M6 10 hex bolts washers and nuts ...
Page 25: ...25 EN 4 Fasten the ventilation covers with M6 cross head screws washers and nuts ...
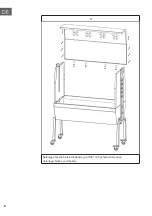
Page 28: ...28 EN 7 Fasten the side handle with M6 cross screws ...
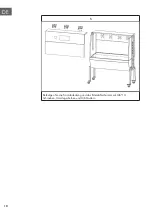
Page 29: ...29 EN 8 Mount the motor mount and the spit mount at the desired height ...
Page 30: ...30 EN 9 Mount the motor ...
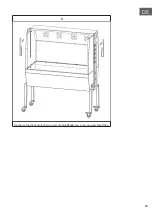
Page 31: ...31 EN 10 Fasten the coal grids the grill grids and the spit ...
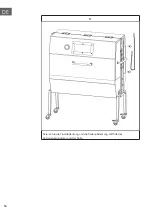
Page 32: ...32 EN 11 Secure the front cover and side cover with the locking bolt and chain ...
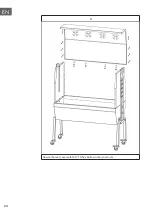
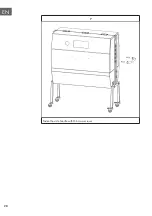
Page 33: ...33 EN 12 Assembly is now complete ...
Page 37: ...37 ES ...
Page 40: ...40 ES 3 Fije la cubierta trasera con tornillos hexagonales M6 10 arandelas y tuercas ...
Page 41: ...41 ES 4 Fije las cubiertas de ventilación con tornillos de estrella M6 arandelas y tuercas ...
Page 44: ...44 ES 7 Fije las asas laterales con tornillos de estrella M6 ...
Page 45: ...45 ES 8 Monte el soporte del motor y el soporte del espetón a la altura deseada ...
Page 46: ...46 ES 9 Fije el motor ...
Page 47: ...47 ES 10 Fije la rejilla para el carbón la rejilla de la parrilla y el espetón ...
Page 49: ...49 ES 12 Ha finalizado el montaje ...
Page 53: ...53 FR ...
Page 56: ...56 FR 3 Fixez le cache arrière avec des boulons hexagonaux M6 10 des rondelles et des écrous ...
Page 57: ...57 FR 4 Fixez les caches de ventilation avec des vis Phillips M6 des rondelles et des écrous ...
Page 60: ...60 FR 7 Fixez la poignée latérale avec des vis cruciformes M6 ...
Page 61: ...61 FR 8 Montez le support du moteur et le support de la broche à la hauteur souhaitée ...
Page 62: ...62 FR 9 Fixez le moteur ...
Page 63: ...63 FR 10 Fixez les grilles à charbon les grilles du barbecue et la broche ...
Page 65: ...65 FR 12 L assemblage est terminé ...
Page 69: ...69 IT ...
Page 72: ...72 IT 3 Fissare la copertura posteriore con le viti esagonali M6x10 le rondelle e i dadi ...
Page 73: ...73 IT 4 Fissare le coperture di scarico dell aria con le viti a croce M6 le rondelle e i dadi ...
Page 76: ...76 IT 7 Fissare l impugnatura laterale con le viti a croce M6 ...
Page 77: ...77 IT 8 Montare il supporto del motore e il supporto dello spiedo all altezza desiderata ...
Page 78: ...78 IT 9 Fissare il motore ...
Page 79: ...79 IT 10 Fissare le griglie per la carbonella le griglie di cottura e lo spiedo ...
Page 81: ...81 IT 12 L assemblaggio è concluso ...
Page 83: ......
Page 84: ......


