


19
EN
Dear Customer,
Congratulations on purchasing this device. Please read the
following instructions carefully and follow them to prevent
possible damages. We assume no liability for damage caused
by disregard of the instructions and improper use. Scan the QR
code to get access to the latest user manual and more product
information.
CONTENT
Safety Instructions 20
Assembly 20
Operation 34
Cleaning and Care 34
Hints for disposal 34
TECHNICAL DATA
Item number
10035373
Power supply
220-240 V ~ 50/60 Hz
Engine power
15 W
Maximum load
70 kg
PRODUCER
Chal-Tec GmbH, Wallstraße 16, 10179 Berlin, Germany.
Summary of Contents for 10035373
Page 2: ......
Page 5: ...5 DE ...
Page 12: ...12 DE 7 Befestigen Sie den seitlichen Handgriff mit M6 Kreuzschrauben ...
Page 13: ...13 DE 8 Montieren Sie die Motorhalterung und die Spießhalterung in der gewünschten Höhe ...
Page 14: ...14 DE 9 Befestigen Sie den Motor ...
Page 15: ...15 DE 10 Befestigen Sie die Kohlegitter die Grillgitter und den Spieß ...
Page 17: ...17 DE 12 Der Zusammenbau ist jetzt beendet ...
Page 21: ...21 EN ...
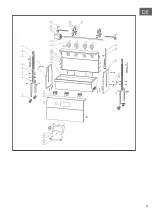
Page 24: ...24 EN 3 Secure the rear cover with M6 10 hex bolts washers and nuts ...
Page 25: ...25 EN 4 Fasten the ventilation covers with M6 cross head screws washers and nuts ...
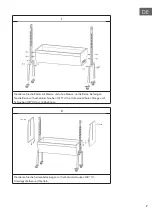
Page 28: ...28 EN 7 Fasten the side handle with M6 cross screws ...
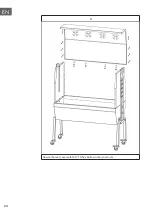
Page 29: ...29 EN 8 Mount the motor mount and the spit mount at the desired height ...
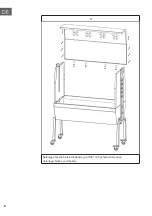
Page 30: ...30 EN 9 Mount the motor ...
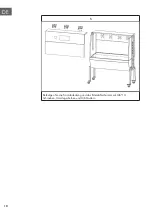
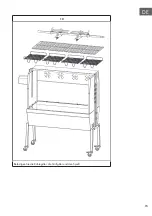
Page 31: ...31 EN 10 Fasten the coal grids the grill grids and the spit ...
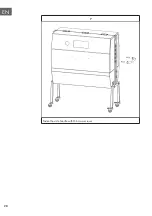
Page 32: ...32 EN 11 Secure the front cover and side cover with the locking bolt and chain ...
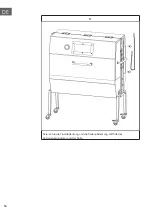
Page 33: ...33 EN 12 Assembly is now complete ...
Page 37: ...37 ES ...
Page 40: ...40 ES 3 Fije la cubierta trasera con tornillos hexagonales M6 10 arandelas y tuercas ...
Page 41: ...41 ES 4 Fije las cubiertas de ventilación con tornillos de estrella M6 arandelas y tuercas ...
Page 44: ...44 ES 7 Fije las asas laterales con tornillos de estrella M6 ...
Page 45: ...45 ES 8 Monte el soporte del motor y el soporte del espetón a la altura deseada ...
Page 46: ...46 ES 9 Fije el motor ...
Page 47: ...47 ES 10 Fije la rejilla para el carbón la rejilla de la parrilla y el espetón ...
Page 49: ...49 ES 12 Ha finalizado el montaje ...
Page 53: ...53 FR ...
Page 56: ...56 FR 3 Fixez le cache arrière avec des boulons hexagonaux M6 10 des rondelles et des écrous ...
Page 57: ...57 FR 4 Fixez les caches de ventilation avec des vis Phillips M6 des rondelles et des écrous ...
Page 60: ...60 FR 7 Fixez la poignée latérale avec des vis cruciformes M6 ...
Page 61: ...61 FR 8 Montez le support du moteur et le support de la broche à la hauteur souhaitée ...
Page 62: ...62 FR 9 Fixez le moteur ...
Page 63: ...63 FR 10 Fixez les grilles à charbon les grilles du barbecue et la broche ...
Page 65: ...65 FR 12 L assemblage est terminé ...
Page 69: ...69 IT ...
Page 72: ...72 IT 3 Fissare la copertura posteriore con le viti esagonali M6x10 le rondelle e i dadi ...
Page 73: ...73 IT 4 Fissare le coperture di scarico dell aria con le viti a croce M6 le rondelle e i dadi ...
Page 76: ...76 IT 7 Fissare l impugnatura laterale con le viti a croce M6 ...
Page 77: ...77 IT 8 Montare il supporto del motore e il supporto dello spiedo all altezza desiderata ...
Page 78: ...78 IT 9 Fissare il motore ...
Page 79: ...79 IT 10 Fissare le griglie per la carbonella le griglie di cottura e lo spiedo ...
Page 81: ...81 IT 12 L assemblaggio è concluso ...
Page 83: ......
Page 84: ......


