24
EN
BEFORE COMMISSIONING
Set up the grill
1.
Place the grill on a flat, heat-resistant surface, ideally at the front edge of the
worktop or the base.
2. Keep a minimum distance of 15 cm around the grill (50 cm at the top) from walls
and objects.
3. Remove the grill rack (11), grease drip tray (10) and grill rack holder (13).
4.
Before using the grill for the first time, clean it and the accessories as described in
the chapter „Cleaning and Maintenance“ to remove any production residues.
5. Then replace the grill rack holder (13) in the grill. Please note that each of the
2 grill rack holders (13) can only be used for a specific side. The recesses for the
grill rack holders (13), which are located on the sides of the grilling chamber (12),
have different distances between them. The recesses with the large distances point
towards the front of the grill.
6. Now insert the grill rack (11) into the upper rail of the grill rack holder (13) and the
grease drip tray (10) at the bottom of the grilling chamber (12).
The reflecting plate (14) permanently
installed in the grilling chamber (12)
serves to avoid excessive heating of
the work surface in front of the grill.
Removing/inserting the grill rack (11)
WARNING
Risk of burns! Wear oven gloves to avoid burns. Wait until the grill rack
(11) has cooled down before removing it.
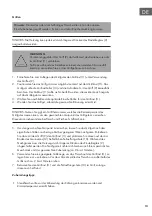
Please note that the grill rack (11)
must always be inserted in such a
way that the handle holder (arrow)
on the grill rack (11) points forward.
Only in this way is it possible to use
the handle (9).

