background image

3

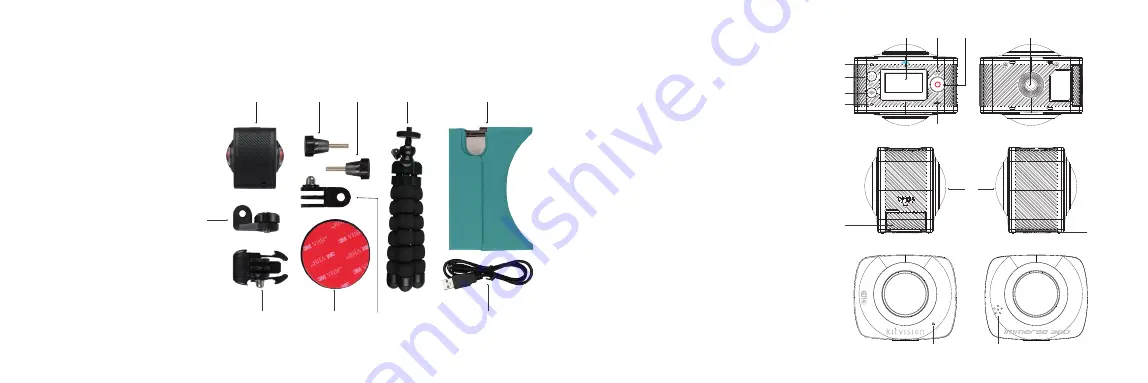
Box contents

1.  Immerse 360 Duo Camera
2.  VR Cardboard Headset
3.  Flexible Tripod
4.  USB Charging Cable
5.  Screw (x2)
6.  Camera Clip Mount
7.  Adhesive Mount
8.  90° Adaptor
9. ¼" Tripod Screw Adaptor
10. User Manual

9

4

6

7

8

1

2

3

5

5

Functions 

1.  LCD Screen
2.  Power/Mode
3.  Wi-Fi LED (red)
4.  Power LED (red)/Charging LED (blue)
5.  Wi-Fi /Menu 
6.  Operation LED (red)
7.  Shutter/OK 
8.  Lens (x2)
9. ¼" Tripod Thread Connector
10. USB/Micro SD Card Port
11. Speaker
12. Microphone
13. Leash Hole
14. Reset 

13

2
5

3

4

8

10

11

14

12

1

9

6

7

Summary of Contents for Immerse 360 Duo

Page 1: ...s otherwise stated their use does not imply that the trademark owner is affiliated with Kitvision or endorses the products herein Please recycle this packaging responsibly JB 5216 KVIM360BK Made in China Kitvision 2016 Christchurch Dorset BH23 4FL UK User Manual 3 6 0 º C A M E R A ...

Page 2: ...nt 8 90 Adaptor 9 Tripod Screw Adaptor 10 User Manual 9 4 6 7 8 1 2 3 5 5 Functions 1 LCD Screen 2 Power Mode 3 Wi Fi LED red 4 Power LED red Charging LED blue 5 Wi Fi Menu 6 Operation LED red 7 Shutter OK 8 Lens x2 9 Tripod Thread Connector 10 USB Micro SD Card Port 11 Speaker 12 Microphone 13 Leash Hole 14 Reset 13 2 5 3 4 8 10 11 14 12 1 9 6 7 ...

Page 3: ...ur memory card into the micro SD card slot You will need to format your micro SD card to FAT32 with a default file size allocation We recommend using a Class 10 micro SD memory card between a minimum of 8 GB and a maximum of 32 GB Note Always turn off the camera when removing or inserting a micro SD card Turning power ON OFF 1 To turn ON press and hold Power Mode 2 for about 2 seconds until the ca...

Page 4: ...Note The camera will stop recording and save automatically when the memory capacity is full or it has run out of battery power Using photo mode 1 Turn on the camera and press Power Mode 2 to change to Photo Mode 2 To take a photo press Shutter OK 7 The camera will beep and the Operation LED 6 will flash to indicate a photo has been taken Length of recording Video mode icon Recording time left on S...

Page 5: ...ith the best user experience so our instructions are online to make sure they re always up to date Please visit www kitvision co uk apps for app instructions or follow the in app tutorials Connecting the camera to your device 1 Turn on the camera and press Wi Fi Menu 5 The display will first show WI FI ON and then the Wi Fi name and password screen 2 Search for the camera s Wi Fi using your smartp...

Page 6: ... settings Power Save Set Power Save mode You can set the camera to enter Power Save mode after a certain period of time 1min 3min 5min OFF Date Time Manually set the date and time for the camera To select the number to change press Power Mode 2 to move the highlighter To scroll through the numbers press Wi Fi Menu 5 until you reach the number required To save the changes you have made press Shutte...

Page 7: ...able Disk will be in the drive list Double click the Removable Disk icon to view its contents Files stored on the camera are located in the folder named DCIM Specifications Display 0 96 LCD Lens 2x 220 Video resolution 1920 x 960p 30 fps Video format MOV Photo resolution 3008 x 1504 Video format JPEG Storage Micro SD 8 GB 32 GB Class 6 10 Input ports Micro USB Wi Fi Integrated Speaker Integrated M...

Page 8: ...card Camera won t turn on Charge the camera using a mains power adaptor for 1 hour and then try to turn on again Blurry photos You need to hold the camera still whilst pressing the Shutter OK 7 button We hope you ve now got all the information you need to get started but if you re having problems with anything please feel free to contact us at support kitvision co uk or visit www kitvision co uk P...

Reviews: