background image

KisanKraft

®


Agricultural Inter-Cultivator 

KK-IC-210P


This warranty is null & void, if you fail to register the warranty with KisanKraft by 

sending the KisanKraft Copy with dealer’s stamp. KisanKraft Limited  

: www.kisankraft.com 

[email protected] 

: +91.80. 6835 7800 


Page 10 of 64 

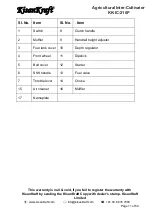
COMPONENTS 


Summary of Contents for KK-IC-210P

Page 1: ...ty shall become null and void and neither KisanKraft Limited nor any of its manufacturers nor its authorized dealers assume any responsibility if the failure was caused by the following 1 Operation of...

Page 2: ...art s to determine if the malfunction is the result of a defect covered by this warranty Please note that the decision of KisanKraft Limited with respect to any warranty claim is final After sales Ser...

Page 3: ...18 3B1 to 818 3B18 Podalakur Sangam Road Prabagiripatnam Podalakur Nellore 524345 Andhra Pradesh INDIA Head Office Sri Huchhanna Tower 4 1st Main 7 A Cross Maruthi Layout Dasarahalli HAF Post Hebbal B...

Page 4: ...kisankraft com 91 80 6835 7800 CONTENTS SAFETY LABELS 7 SAFETY INSTRUCTION 8 COMPONENTS 10 ASSEMBLY 12 CONTROLS 14 BEFORE OPERATION 16 OPERATION 16 SERVICING 22 STORAGE 28 TRANSPORTING 30 TECHNICAL SP...

Page 5: ...d by KisanKraft Limited or its manu facturers Defective items must be brought sent to our Authorized Dealer or KisanKraft Limited s office for service What is not covered The warranty shall become nul...

Page 6: ...the nearest Authorized Dealer along with proof of purchase invoice receipt KisanKraft Limited its manufacturers and its dealers reserve the right to inspect the claimed defective part s to determine i...

Page 7: ...ith KisanKraft by sending the KisanKraft Copy with dealer s stamp KisanKraft Limited www kisankraft com info kisankraft com 91 80 6835 7800 Page 7 of 64 SAFETY LABELS The following safety labels appea...

Page 8: ...ing open sandals b Thoroughly inspect the area where the equipment is to be used and remove all objects which can be thrown up by the machine c WARNING Petrol is highly flammable Store fuel in contain...

Page 9: ...not put hands or feet near or under rotating parts k Never pick up or carry a machine while the engine is running l Stop the engine i Whenever you leave the machine ii Before refueling m Reduce the th...

Page 10: ...KK IC 210P This warranty is null void if you fail to register the warranty with KisanKraft by sending the KisanKraft Copy with dealer s stamp KisanKraft Limited www kisankraft com info kisankraft com...

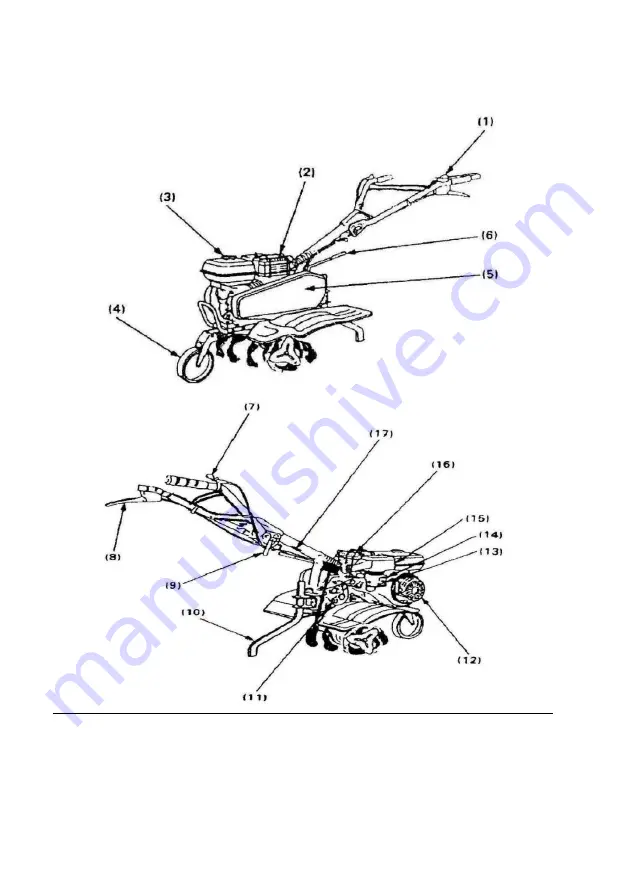
Page 11: ...dealer s stamp KisanKraft Limited www kisankraft com info kisankraft com 91 80 6835 7800 Page 11 of 64 SI No Item SI No Item 1 Switch 8 Clutch handle 2 Muffler 9 Handrail height adjustor 3 Fuel tank c...

Page 12: ...anKraft Limited www kisankraft com info kisankraft com 91 80 6835 7800 Page 12 of 64 ASSEMBLY UNPACKING 1 Remove all loose items from the carton 2 Remove the plastic bag and it s ready for assembly 3...

Page 13: ...anKraft Copy with dealer s stamp KisanKraft Limited www kisankraft com info kisankraft com 91 80 6835 7800 Page 13 of 64 2 Remove passive belt wheel 3 Assemble shift lever with pin 4 Assemble the pass...

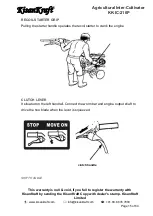
Page 14: ...ER The fuel valve opens and closes the passage between the fuel tank and the carburetor The fuel valve lever must be in the ON position for the engine to run When the engine is not in use leave the fu...

Page 15: ...dealer s stamp KisanKraft Limited www kisankraft com info kisankraft com 91 80 6835 7800 Page 15 of 64 RECOIL STARTER GRIP Pulling the starter handle operates the recoil starter to crank the engine C...

Page 16: ...ler and recoil starter Look for signs of damage Check that all shields and covers are in place and all nuts bolts and screws are tightened CHECK THE ENGINE Check the oil level See 8 5 For convenience...

Page 17: ...s stamp KisanKraft Limited www kisankraft com info kisankraft com 91 80 6835 7800 Page 17 of 64 STARTING THE ENGINE 1 Move the fuel valve lever to the ON position 1 Fuel valve 2 ON 3 Drain bolt 2 Put...

Page 18: ...switch 4 Move the throttle lever to the left 5 Make sure the shift handle is in the natural position see 7 2 2 6 Your left hand grips the handle tightly to make sure the machine is in stability Your...

Page 19: ...oreuse 2 Move the shift handle to the desired position forward backward Engine Model Shift Gear 168FB KB500 1 2 forward positions 1 neutral position KB500 2 1 forward position 1 neutral position 1back...

Page 20: ...to the low position before operating the clutch Always release the clutch lever on the STOP position before operating with the shift handle If the soil fastened on the hoe blade do not try to remove i...

Page 21: ...mp KisanKraft Limited www kisankraft com info kisankraft com 91 80 6835 7800 Page 21 of 64 2 Move the engine switch to the OFF position OFF 3 Move the fuel valve lever to the OFF position 4 Clean both...

Page 22: ...gas Burns from hot parts Let the engine cool and up to 30 minutes after use before touching Injury from moving parts Read the instructions before you begin and make sure you have the tools and skills...

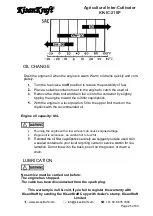
Page 23: ...requently when used in dusty areas 2 Change oil every 25 hours when used in heavy load or in high ambient temperatures 3 These items should be serviced by a technician REFUELING Use unleaded gasoline...

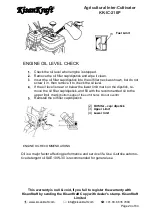
Page 24: ...sert the oil filler cap dipstick into the oil filler neck as shown but do not screw it in then remove it to check the oil level If the oil level is near or below the lower limit mark on the dipstick r...

Page 25: ...drain bolt and drain the oil into the container by slightly tipping the engine toward the oil filler cap dipstick With the engine in a level position fill to the upper limit mark on the dipstick with...

Page 26: ...mage the rubber clad friction wheel For long time storage the above mentioned parts should be lightly wiped with an oily rag to prevent rust AIR CLEANER SERVICE A dirty air filter will restrict air fl...

Page 27: ...flow through the foam element and may transfer to the 6 Wipe dirt from the inside of the air cleaner base and cover using a moist rag Be careful to prevent dirt from entering the air duct that leads...

Page 28: ...h the spark plug cap Clutch cable Check the free distance as follow If the distance is not correct loose the lock nut and ad just the bolt Next tighten the lock nut and check for a proper clutch lever...

Page 29: ...he KisanKraft Copy with dealer s stamp KisanKraft Limited www kisankraft com info kisankraft com 91 80 6835 7800 Page 29 of 64 6 Lubricate all the parts as shown in LUBRICATING above 7 Inspect the mac...

Page 30: ...y of fuel leakage Move the fuel valve lever to the OFF position TECHNICAL SPECIFICATIONS Model KK IC 210P Engine type 4 Stroke Petrol Engine OHV horizontal single cylinder Rated Power 4 2 kW 5 63 hp E...

Page 31: ...arbox Assy Series No Part Code English Name Unit Quan tity for One Unit 1 71117 T80A 1000 OIL PLUG BIG pcs 3 2 71117 T80A 2000 OIL PLUG SMALL pcs 1 3 00001 W007 0405 OIL PLUG pcs 1 4 71115 T80A 000B S...

Page 32: ...OIL SEAL 12 22 5 pcs 1 27 B3452 1 265C 0450 O RING 45 2 65 pcs 1 28 71124 T80A 400B STOP Ring pcs 1 29 71109 175H 0000 WASHER 17 5 26 1 0 pcs 1 30 B276 6203 00 Bearing 6203 pcs 1 31 71171 T80A 0000 D...

Page 33: ...0P This warranty is null void if you fail to register the warranty with KisanKraft by sending the KisanKraft Copy with dealer s stamp KisanKraft Limited www kisankraft com info kisankraft com 91 80 68...

Page 34: ...Unit 1 10000 E70F D243 GASOLINE ENGINE pcs 1 2 72101 T75A 20B5 engine support pcs 1 3 72310 T75A 40W2 front wheel Assy pcs 1 4 B6170 08LG 000C Hex nut M8 pcs 2 5 B93 080G 000C spring washer 8 pcs 2 6...

Page 35: ...08LG 020C HEX FRANGE Bolt M8 P1 25 20 pcs 4 3 B882 0050 024C B PIN 5 24 pcs 2 4 72205 T80A 000C R Pin pcs 2 5 73004 T80A 100C Gearshift Cover pcs 1 6 73001 T80A 000C Shift Lever pcs 1 7 73202 T75B 000...

Page 36: ...OF TOWED BODY pcs 3 2 B95 100G 000C FLAT WASHER 10 pcs 1 3 B6170 10MG 000C HEXAGON FLANGE NUTS M10 pcs 1 4 B93 100G 000C Spring Washer pcs 1 5 B5789 08LG 025C HEXAGON FLANGE BOLT M8 25 pcs 2 6 72204...

Page 37: ...C HEX FRANGE BOLT M6 P1 0 16 pcs 1 5 71402 T80A 3000 DRIVEN PULLEY pcs 1 6 B93 080G 000C SPRING WASHER 8 pcs 1 7 71413 T80A 000C TENSIONER SHAFT pcs 1 8 71420 T80A 000B TENSIONER ASSY pcs 1 9 71404 T8...

Page 38: ...7800 Page 38 of 64 Series No Part Code English Name Unit Quan tity for One Unit 1 B6170 10MG 000C HEXAGON FLANGE NUTSM10 pcs 16 2 B93 100G 000C WASHER SPRING 10 pcs 8 3 B95 100G 000C WASHER 10 pcs 8 4...

Page 39: ...SY Series No Part Code English Name Unit Quan tity for One Unit 1 79512 T80A 51B5 DISC pcs 2 2 B5783 10MG 030C HXAGON FLANGE BOLTM10 30 pcs 24 3 B95 100G 000C WASHER 10 pcs 24 4 B93 100G 000C WASHER S...

Page 40: ...R Indicates a hazard if not avoided can result in human injury or death WARNING Indicates a hazard if not avoided could result in human injury and or property damage CAUTION Indicates a hazard if not...

Page 41: ...m 12 If you run the engine in an area that is confined or even partially enclosed the air you breathe could contain a dangerous amount of exhaust gas Provide adequate ventila tion to keep exhaust gas...

Page 42: ...il level in the crankcase falls below the safe limit the oil alert system will automatically stop the engine even if the engine switch remains at the ON position If the en gine stops and cannot be res...

Page 43: ...type including paper element and foam element Remove the clip and dismantle the air cleaner housing or remove the wing nuts and air cleaner cover Wash the element in solution of household detergent an...

Page 44: ...he CLOSE position Adjust throttle to proper position Pull the starter grip lightly until resistance is felt then pull it rapidly 1 Fuel Valve 2 Start Level 3 Drain Plug NOTE Do not allow the starter g...

Page 45: ...arks near the places where the engine is refueled or gasoline is stored Do not add fuel over the shoulder of strainer After fueling tighten the tank cover Fuel vapors are extremely flammable and may i...

Page 46: ...eck the clearance and adjust the gap to 0 6 0 7mm see figure 4 1 Check radiator and clean fouling among radiators Drain the oil while the engine is warm to assure rapid and complete draining Remove th...

Page 47: ...condly unscrew the drain plug at the bottom of the crankcase and drain out the lubricant oil in the crankcase thoroughly then tighten the drain plug Finally clean the surface of the engine with clean...

Page 48: ...ranty with KisanKraft by sending the KisanKraft Copy with dealer s stamp KisanKraft Limited www kisankraft com info kisankraft com 91 80 6835 7800 Page 48 of 64 Check the fuel Please strain out the ga...

Page 49: ...of 64 ENGINE PARTS DIAGRAM LIST Cylinder Head SL No KK No KK Name Qty 1 E3 01 Spark plug 1 2 E3 02 Cylinder head cover 1 3 E3 03 Cylinder head Assy 1 4 E3 04 In valve guide 1 5 E3 05 Ex valve guide 1...

Page 50: ...C 210P This warranty is null void if you fail to register the warranty with KisanKraft by sending the KisanKraft Copy with dealer s stamp KisanKraft Limited www kisankraft com info kisankraft com 91 8...

Page 51: ...64 SL No KK No KK Name Qty 1 E4 01 Crankcase Body 1 2 E4 02 0 ring 14mm 1 3 E4 03 Drain bolt 2 4 E4 04 N A 1 5 E4 05 Sway bar 1 6 E4 06 N A 1 7 E4 07 Split Clip 1 8 E4 08 Washer Drain bolt 2 9 E4 09...

Page 52: ...ft Limited www kisankraft com info kisankraft com 91 80 6835 7800 Page 52 of 64 Crankcase Cover SL No KK No KK Name Qty 1 E5 01 Crankcase cover 1 2 E5 02 Oil Gauge 1 3 E5 03 Oil Plug assembly 1 4 E5 0...

Page 53: ...5 Piston Pin 1 6 E6 06 Clip Piston Pin 2 7 E6 07 Connecting rod Assy 1 8 E6 08 Timing Gear 1 9 E6 09 Bolt connecting rod M7x35 2 Camshaft SL No KK No KK Name Qty E7 1 2 3 10 Rocker Assy 1 1 E7 01 Buy...

Page 54: ...Rubber seal Fuel cup 1 2 E8 02 Needle Valve 1 3 E8 03 Fuel Floater 1 4 E8 04 Fuel cup 1 5 E8 05 Adjustment screw Idle speed 1 6 E8 06 Screw Fuel Cup 1 7 E8 07 Tighten bolt Fuel cup 1 8 E8 08 Chock Val...

Page 55: ...ff 1 21 E8 21 Fuel Valve 1 22 E8 22 Sediment cup 1 23 E8 23 Screw M3x7 2 24 E8 24 N A 1 25 E8 25 Main jet 1 26 E8 26 Measure hole Assy idle speed 1 27 E8 27 N A 1 28 E8 28 N A 1 Recoil Starter SL No K...

Page 56: ...Name Qty 1 E10 01 Fan cover 1 2 E10 02 Side Plate 1 3 E10 03 Wind guide 1 4 E10 04 Current Amplifier 1 5 E10 05 Engine switch 1 6 E10 06 N A 1 7 E10 07 Bolt M6x12 Flanged Hex 6 8 E10 08 Bolt M6 x 20...

Page 57: ...No KK No KK Name Qty 12 E11 12 Quadrate bolt M6x21 1 13 E11 13 Return Spring 1 14 E11 14 Fine Adjustment Spring 1 15 E11 15 N A 1 16 E11 16 Nut M6 Flanged Nylon 1 17 E11 17 Adjustment Screw 2 Fly Whe...

Page 58: ...91 80 6835 7800 Page 58 of 64 SL No KK No KK Name Qty E13 Air Cleaner Assy 1 1 E13 01 Seal Ring 32x47x3 1 2 E13 02 Air Filter Element 1 3 E13 03 N A 1 4 E13 04 Filter Case 1 5 E13 05 Rubber Fixer 1 6...

Page 59: ...nKraft by sending the KisanKraft Copy with dealer s stamp KisanKraft Limited www kisankraft com info kisankraft com 91 80 6835 7800 Page 59 of 64 Muffler SL No KK No KK Name Qty 1 E14 01 Muffler Assy...

Page 60: ...Qty 1 E15 01 Fuel outlet joint 1 2 E15 02 Sleeve Fuel pipe 1 3 E15 03 Fuel tank cap 1 4 E15 04 Gasket Fuel tank Cap 1 5 E15 05 Fuel tank 1 6 E15 06 Fuel Filter 1 7 E15 07 Fuel Tube M4 5 140 1 8 E15 08...

Page 61: ...per Telescopic Hedge Shear Telescopic Lopping Shear Tree Pruner Telescopic Steel Pipe Fruit Picker Bag Sheep Shear Garden Tools Electric Pressure Washer Hedge Trimmer Lawn Mower Electric Petrol Manual...

Page 62: ...fail to register the warranty with KisanKraft by sending the KisanKraft Copy with dealer s stamp KisanKraft Limited www kisankraft com info kisankraft com 91 80 6835 7800 Page 62 of 64 For more infor...

Page 63: ...to items not manufactured or sold by them No onsite warranty is provided by KisanKraft Limited or its manufacturers Defective items must be brought sent to our Au thorized Dealer or KisanKraft Limite...

Page 64: ...he applicable warranty period you must deliver the defective product to the nearest Authorized Dealer along with proof of purchase in voice receipt KisanKraft Limited its manufacturers and its dealers...

Reviews: