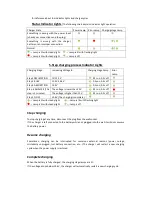
power, constant current and increasing battery voltage until almost fully charged. Absorption mode
follows and the charger emits high voltage and decreased current until fully charged then the charger
analyzes the battery to determine if there is a problem or if it should enter into float mode. The
analyze mode takes three minutes.
(If the battery voltage is lower than 12 volts at this point the error light will come on and indicate
that there is a problem with the battery (most likely it needs to be replaced). You can try the cycle
again, sometimes that can help prolong the replacement of the battery, however, it will not continue
to charge at this point if the battery is damaged and the error light is on. You will have to restart the
charge process by unplugging the charger from the wall for at least 30 seconds before plugging it back
in and starting the process over.)
If the battery voltage is above 12 volts then float mode begins and maintains the battery above 13.6
volts. If the battery drops below 13.6 volts then the charge process begins again.
**NOTE**
If a 12 volt lead-acid battery has an output voltage of less than 9 volts when it is at rest with no
external loads nor being charged, there is a good chance that the battery is defective and needs to be
replaced. A fully charged 12 volt battery lead-acid battery will have a rest state no load voltage of
about 12.9 volts; a fully discharged (same battery, same no load condition) will have about 11.4 volts.
This means that a voltage differential of only 1.5 represents the full range of charge between 0%-100%
on a12 volt lead-acid battery. Depending on a few variables these ranges will vary by a few tenths of a
point; however the 1.5 volt range is still a good indicator of charge %.
Working with a low voltage or dead battery:
When you attempt to charge a low or
dead battery with low voltage (9 volts or less), the Mini-Pro will provide full charge power to the
battery However, we make no guarantee that the recharge will be successful. There is a strong
likelihood that the battery has already been damaged and needs to be replaced instead of recharged
(remember this unit is intended for maintaining batteries). In this case you need to follow all safety
and precaution protocols from the manufacturer of the battery. Check the battery often while
charging to ensure that there is not excessive heat, a sulfur odor and/or a hissing sound. If any of
these are present, remove the AC power source immediately. Let the battery sit and increase
ventilation if possible and do not attempt to disconnect the DC connectors until the battery has
completely cooled and any odor has dissipated.
Connecting the Charger:
1.
Plug the charger into the AC power outlet. (when the charger is connected to the AC power
source but not yet connected to the battery, the error light will be illuminated because the
charger is not sensing a completed circuit, please disregard this error light if the charger is
not connected to the battery on both positive and negative terminals).
2.
Connect the charger to the battery using the alligator clips, (or attach the ring terminals to
the battery posts for a more semi-permanent connection) attach the Black clip to the
negative terminal (-) and connect the Red clip to the positive terminal (+). Then connect the
SAE connector of the alligator clips or ring terminals to the corresponding quick connect plug
from the charger and now you are charging.
3.
The green power lamp will light and indicate if the charger is connected properly. The charge
cycles will now begin if there is not an error of some kind. Please refer to the below chart

