OKN-1_OKO-1-BA-e-1510
12
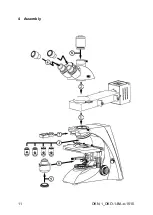
4.1
Reflected light unit
At first you have to unite the lamp housing and the reflected light unit on their
connection points. After that the connection has to be fixated by an Allen screw,
which is attached to the right-hand side of the connection point of the lamp housing.
Now the slides for analyser, polariser and colour filter can be attached to the
appropriate slots (
see page 8
).
Afterwards in order to install the reflected light unit to the microscope, you must
loosen the fixing screw on the tube connection point and remove the black protective
cover.
You can then insert the round dovetail bracket on the light unit into the round dovetail
bracket on the housing and fix it with the fixing screw. When doing this, you should
always make sure that you do not touch the lenses with your bare fingers and that no
dust enters the apertures.
Finally you must establish the electrical connection between power supply unit and
reflected light unit. The plug of the connection cable, attached to the rear of the light
unit has to be installed to the socket on the rear of the power supply unit. Please do
also use the screw lock on the plug.
4.2 Microscope head
First you must loosen the fixing screw on the tube connection point of the reflected
light unit and remove the black protective cover.
You can then insert the round dovetail bracket on the head into the round dovetail
bracket on the reflected light unit and fix it with the fixing screw. When doing this, you
should always make sure that you do not touch the lenses with your bare fingers and
that no dust enters the apertures.
4.3 Objectives
The specimen stage must be in its lowest position so that the objectives can be
screwed into the nosepiece. You can then screw the objectives into the nosepiece so
that when you turn the nosepiece in a clockwise direction, the objective with the next
strongest magnification appears. You must make sure that you do not touch the
lenses with your bare fingers and that no dust enters the apertures. For objectives
which ar
e marked “OIL”, you must use an immersion oil with the lowest level of
inherent fluorescence.
Summary of Contents for OKN 175
Page 2: ......
Page 7: ...OKN 1_OKO 1 BA e 1510 6 2 Nomenclature...
Page 8: ...7 OKN 1_OKO 1 BA e 1510 Rear view...
Page 9: ...OKN 1_OKO 1 BA e 1510 8 Reflected light unit...
Page 11: ...OKN 1_OKO 1 BA e 1510 10...


