31
OKN-1_OKO-1-BA-e-1510
The adjustment for this is carried out as follows.
a. First adjust the microscope using bright field mode.
b.
Move the hub to the required PH position (e.g. “10x”).
c. Open the aperture diaphragm on the condenser to its maximum (slider to the
left).
d. Bring the relevant PH objective (e.g. 10x) into the beam path.
e. Place the centring telescope onto one of the two tube connectors, in place of a
standard eyepiece.
f. Undo the fixing screw of the centring telescope and pull out (move) the front
part of the telescope, so that you can focus both phase rings in the field of
view. You can also use the focus wheel of the condenser holder when doing
this. Then retighten the screws.
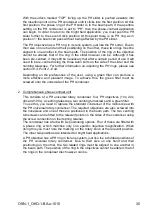
In the field of view you will now see the image of a white (condenser) and a black
(objective) ring. The black one is central and the white one possible is pushed to
one side
(see left illustration)
.
g. Now press the turnscrews fitted on the side of the condenser towards the
centre until they grip the screws. Then by turning the screws and at the same
time watching the rings through the centring telescope, move the white ring to
the centre
(see central illustration)
.
h. As soon as both the rings overlap each other
(see right illustration)
the
adjustment is successfully completed and can also be carried out for the pairs
of rings of the other magnifications.
i. After the adjustment, the centring telescope must be replaced by the standard
eyepiece, so that you are able to observe the object on the angle table in
phase contrast mode.
Depending on the preferences of the user, using a green filter can produce a
more effective and pleasant image. To achieve this, the green filter must be
screwed onto the underside of the PH condenser.
Summary of Contents for OKN 175
Page 2: ......
Page 7: ...OKN 1_OKO 1 BA e 1510 6 2 Nomenclature...
Page 8: ...7 OKN 1_OKO 1 BA e 1510 Rear view...
Page 9: ...OKN 1_OKO 1 BA e 1510 8 Reflected light unit...
Page 11: ...OKN 1_OKO 1 BA e 1510 10...


