


25
OKN-1_OKO-1-BA-e-1510
6
Changing the bulb
6.1 Transmitted light
OKO-1
You must not attempt to change the bulb immediately after the microscope has been
used, as the bulb will still be hot and so there is a risk that the user could be burnt.
Before changing the bulb the device must be switched off and unplugged.
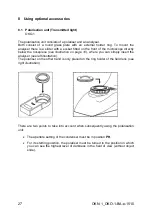
To change the bulb, tip the device carefully to the back or side. When doing this,
please make sure that all microscope components are firmly fixed. The bulb holder is
on the underside of the device. It can be opened by undoing the screws on the holder
(see illustration)
. We recommend that here you should also test again, to check that
heat is no longer being produced. The defective bulb can be pulled out of the socket
and be replaced with a new one. After the bulb holder has been replaced in the
underside of the device and the screws replaced, the bulb replacement procedure is
complete.
Important:
When fitting the new bulb into the socket, it must only be handled with sterile gloves
or using the bulb packaging film. Grease and dust residue can have a negative effect
on the light quality and service life.
Summary of Contents for OKN 175
Page 2: ......
Page 7: ...OKN 1_OKO 1 BA e 1510 6 2 Nomenclature...
Page 8: ...7 OKN 1_OKO 1 BA e 1510 Rear view...
Page 9: ...OKN 1_OKO 1 BA e 1510 8 Reflected light unit...
Page 11: ...OKN 1_OKO 1 BA e 1510 10...