TK-2317
10
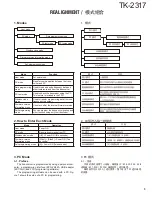
6. Self Programming Mode
Write mode for frequency data and signaling, etc. To be
used ONLY by the authorized service person maintaining the
user's equipment. After programming, reset the FPU to the
“Self- Programming” disabled mode. Transceivers CANNOT
be delivered to the end-user in the self-programming mode.
6-1. Enter to the Self Programming Mode
Press and hold the [S] key for 2 seconds while turning
the transceiver power on.
When the transceiver enters in the self programming
mode, “1- 1” is displayed 2 seconds after “SELF” is dis-
played.
Note:
This mode (self programming mode) cannot be set when
it has been disabled with the FPU.
6-2. Adding the Data Password
If the Data password is set to the transceiver, you must
enter the password to activate a self programming mode.
The maximum length of the password is 6 digits.
The following describes how to enter the password.
1. Press and hold the [S] key for 2 seconds while turning
the transceiver power on.
2. “SLF.LOCK.R” (When the Read authorization password is
set to the transceiver.) / “SLF.LOCK.W” (When the Over-
write password is set to the transceiver.) is displayed on
the LCD.
3. If the [selector] knob is rotated while “SLF.LOCK.R”/ “SLF.
LOCK.W” is displayed, the number (0 to 9) fl ashes on the
LCD.
When you press the [C>] key, the currently selected num-
ber is determined.
If you press the [A] key, the least digit of the password is
deleted.
If you press the [S] key after entering the password in this
procedure, “SELF” is displayed if the entered password is
correct.
If the password is incorrect, “SLF.LOCK.R”/ “SLF.LOCK.W”
is redisplayed.
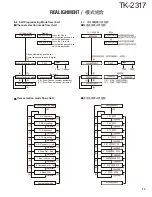
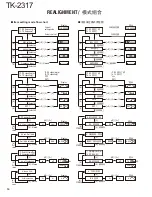
6-3. Channel Selection Mode
In this mode, the Zone or Channel can be selected.
Press and hold the [S] key for 2 seconds while turning
the transceiver power on to enter self programming mode.
When the transceiver enters in the self programming mode,
the transceiver automatically enters the Channel Selection
mode.
2 seconds after displaying “SELF", “1- 1” appears on the
LCD.
REALIGNMENT /
模式组合
6. 自台编程模式
频率数据和信令等的写入模式。只可以由负责维护用户设
备的授权服务人员使用。编程之后,复位自台编程模式为禁
用状态。手持对讲机不能以自台编程模式开启的状态交付给
最终用户。
6-1. 进入自台编程模式
打开手持对讲机电源的同时,持续按 [S] 键 2 秒。
当手持对讲机进入了自台编程模式,显示“SELF”2 秒钟,
然后显示“1-1”
。
注∶
当自台编程模式被 FPU 禁用时,此模式不能被设定。
6-2. 增加数据密码
如果数据密码被设定到手持对讲机,则您必须输入密码来
激活自台编程模式。密码的最大长度为 6 位数字。
输入密码的方法说明如下。
1. 打开手持对讲机电源的同时,持续按 [S] 键 2 秒。
2.
“SLF.LOCK.R”( 当读取授权密码被设定到手持对讲机时 )
/“SLF.LOCK.W”( 重写密码被设定到手持对讲机时 ) 被
显示在 LCD。
3. 在“SLF.LOCK.R”/“SLF.LOCK.W”被显示时,
如果 [ 选择器 ]
旋钮被转动,在 LCD 上会闪烁出数字 (0 ~ 9)。
当您按了 [C>] 键,通常被选择的数字将被确定。
如果您按了 [A] 键,密码的最小位数字将被删除。
在此程序中输入了密码,并且被输入的密码正确,如果您
按了 [S] 键,则显示出“SELF”
。
如果密码错误,
则继续显示“SLF.LOCK.R”/“SLF.LOCK.W”
。
6-3. 信道选择模式
在此模式,可以选择区域或信道。
打开手持对讲机电源的同时,持续按 [S ] 键 2 秒,则进入
自台编程模式。当手持对讲机进入自台编程模式,则手持对
讲机将自动进入信道选择模式。
显示“SELF”2 秒钟之后,在 LCD 上出现“1-1”
。
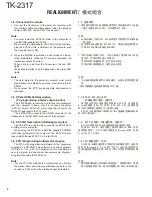
5. 固件版本信息
按下 [ 侧面 1] 和 [ 侧面 2] 键打开手持对讲机的电源。然
后按 [ 侧面 1] 和 [ 侧面 2] 键显示版本。
5. Firmware Version Information Mode
Turn the transceiver ON with the [Side1] and [Side2] keys
held down. Then, the version is displayed during holding the
[Side1] and [Side2] keys.

