background image


English     

77

Next page 

3

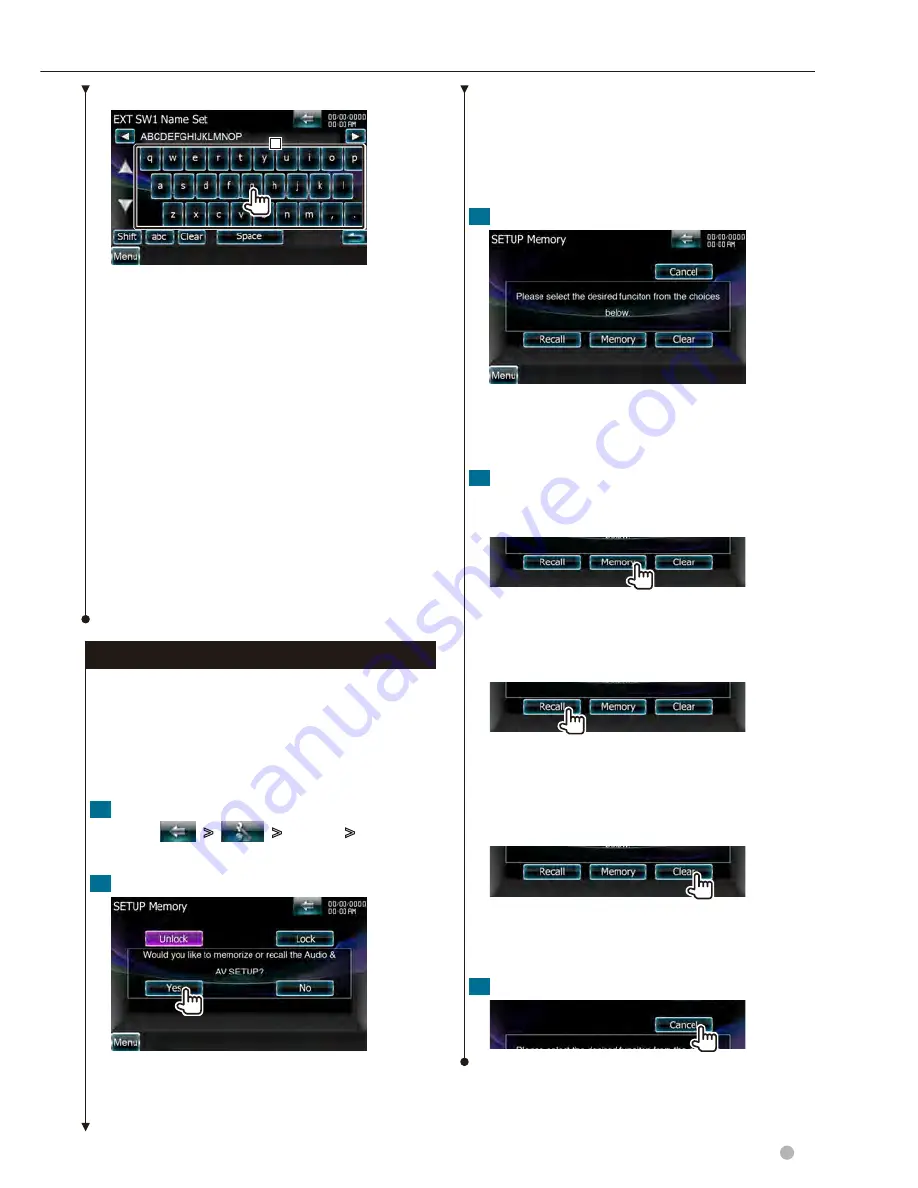
How To Use the Character Entry Screen

1

1

    Enters characters.

[

2

], [

3

]  

 Shifts the cursor.

[

5

], [

]  

 Switches between key layouts.

[Shift]  

 Toggles between uppercase and 

lowercase.

[qwe]/ [abc]  

 Sets the key layout of the character 

buttons.
abc :  Alphabetical key layout. 
qwe :  Qwerty key layout. 

[Clear]  

 Clears the character.

If you erase a character, locate the cursor on it 
and touch this button.

[Space]  

 Enters a space.

• You can enter characters only after you have applied 

the parking brake.

Setup Memory

Audio Control, AV-IN SETUP, Navigation, and 
Audio SETUP settings can be memorized. The 
memorized settings can be recalled at any time. For 
example, even when the settings are cleared due 
to replacement of the battery, the settings can be 
restored.

Display the SETUP Memory screen

Touch [

]

 > 

[

]

 > 

[System]

 > 

[SETUP 

Memory]. (page 

72

)

Start Setup Memory

[Lock]  

 Locks the AV-IN SETUP, Navigation, and 

Audio SETUP settings. When [Lock] is selected, 
you cannot change the AV-IN SETUP, Navigation, 

and Audio SETUP settings.

[Yes]  

 Memorizes or recalls the settings.

[No]  

 To cancel the function, touch [No]. To cancel 

memorization, touch [No]. 
The SETUP Menu screen appears again.

Select a desired function

[Recall]  

 Recalls the memorized settings.

[Memory]  

 Memorizes the current settings.

[Clear]  

 Clears the currently memorized settings.

Memorize or recall the settings

When memorizing the Audio Setup and AV 
Interface settings:

If settings have already been memorized, a 
confirmation message appears. Touch [Yes]. To 
cancel memorization, touch [No].

When recalling the memorized settings:

Touching the screen displays a confirmation 
message. Touch [Yes]. To cancel recalling, touch 
[No]. 

When clearing the currently memorized 
settings:

Touching the screen displays a confirmation 
message. Touch [Yes]. To cancel clearing, touch 
[No]. 

Quit memorization/recalling of settings

Summary of Contents for DNX9980HD

Page 1: ...y card and in the space provided below Refer to the model and serial numbers whenever you call upon your Kenwood dealer for information or service on the product Model DNX9980HD Serial number US Residents Only Register Online Register your Kenwood product at www Kenwoodusa com 11DNXhi_IM332_Ref_K_en_01 2010 Kenwood Corporation All Rights Reserved DNX9980HD GPS NAVIGATION SYSTEM INSTRUCTION MANUAL ...

Page 2: ...l Search 47 Channel Memory 47 Preset Select 48 Direct Channel Search 48 Bluetooth Audio Control 49 Before Use 49 Source Control Screen 49 Other Functions 50 External Device Power Supply Control 50 Muting Audio Volume upon Reception of Phone Call 50 Voice Control 51 Voice Control 51 Screen Control 52 Screen Control 52 Initial Setup 97 Precautions 4 Notes 5 How to read this manual 10 Functions of th...

Page 3: ...curity Setup 76 Monitor Angle Control 76 EXT SW Setup 76 Setup Memory 77 Changing Background image 78 Panel Color Coordinate 79 Screen Control 80 AV Input Setup 80 AV Output Interface Setup 81 Camera Setup 81 Navigation Setup 82 DVD Setup 82 DVD Language Setup 83 DVD Parental Level Setup 84 Disc Setup 84 USB Setup 85 iPod Setup 85 SIRIUS Parental Code Setup 86 SIRIUS Parental Lock Setup 87 SIRIUS ...

Page 4: ...cloth or using a volatile liquid such as thinner or alcohol may scratch the surface or erases screened print Lens Fogging When you turn on the car heater in cold weather dew or condensation may form on the lens in the disc player of the unit Called lens fogging this condensation on the lens may not allow discs to play In such a situation remove the disc and wait for the condensation to evaporate I...

Page 5: ...each time a file with the displayed Registration Code is played to protect against copying Use of DualDisc When playing a DualDisc on this unit the surface of the disc that is not played may be scratched while the disc is inserted or ejected Since the music CD surface does not conform to the CD standard playback may be impossible A DualDisc is a disc with one surface containing DVD standard signal...

Page 6: ...ge class USB device only Acceptable media CD R RW ROM DVD R RW mass storage class USB device iPod with KCA iP302 Acceptable discs disc formats USB device file system file and folder names and playing order are the same as those for audio files See About Audio files About Picture files Acceptable picture files JPEG jpg jpeg PNG png BMP bmp Acceptable media Mass storage class USB device Acceptable d...

Page 7: ...that has been played by the iPod is played first In this case Reading is displayed without displaying a folder name etc Changing the browse item will display a correct title etc When the iPod is connected to this unit KENWOOD or is displayed on the iPod to indicate that you cannot operate the iPod About PANDORA internet radio The requirements for listening to PANDORA internet radio are as follows ...

Page 8: ...lowing the procedure prescribed by Bluetooth SIG However it may be impossible for such units to communicate with your cell phone depending on its type HFP is a profile used to make a hands free call OPP is a profile used to transfer data such as a phone book between units About the Bluetooth Audio player This unit conforms to the following Bluetooth specifications Version Bluetooth StandardVer 2 1...

Page 9: ... an already expired disc you may not be able to remove it from this unit 1 2 4 1 5 4 5 2 1 2 6 3 DVD disc marks Symbol Description ALL Indicates a region number The discs with this mark can be played with any DVD player 8 Indicates the number of audio languages recorded Up to 8 languages can be recorded in a movie You can select a favorite language 32 Indicates the number of subtitled languages re...

Page 10: ... touch until the memory number appears 10 DNX9980HD How to read this manual The above operation example with the mark differs from the actual operation Short Press Press the button denoted by Change in the screen With each operation the screen changes in the order shown here Continue to the next page The instruction continues to the next page Make sure to flip the page for the rest of the instruct...

Page 11: ...nctions are shown below DVD VIDEO DVD VIDEO Function of DVD VIDEO playback VideoCD VideoCD Function of Video CD playback CD CD Function of CD CD DA playback AudioFile AudioFile Function of Audio File playback MPEG MPEG Function of MPEG file playback DivX DivX Function of DivX file playback JPEG JPEG Function of JPEG file playback Disc Disc Function of Disc DVD CD media USB USB Function of USB devi...

Page 12: ...er screen 1 page 65 1 sec Camera view display On Off 2 D Displays the navigation screen When the navigation screen has already been displayed it switches to the navigation screen with Split Screen Control window 1 sec While watching the navigation screen Picture in Picture function On Off 3 page 18 E Turns the power On 5 Displays the Source Control screen page 16 In case of visual sources the play...

Page 13: ... the buttons touch sensors on the front panel See User Interface page 74 1 The display may not switch to Graphic Equalizer screen in some conditions 2 The function of the AUD button can be changed to the display off function See User Interface page 74 3 When the Secondary window function page 19 is activated this function is disabled 4 When the Picture in Picture function page 18 is activated this...

Page 14: ...nd USB the input is switched to the source as the media or the device is set The buttons listed below are common for many screens Menu Displays Top Menu screen Opens the common menu bar The buttons shown below appear Displays the currently selected source screen The button icon to be displayed varies depending on playing source The above icon display is an example when the source is DVD Displays A...

Page 15: ...7 iPod To disconnect the iPod stop the playback by touching the 0 button on the source control screen and then disconnect the iPod See Source Control Screen page 31 7 USB device To disconnect the USB device touch the 0 button on the source control screen and then disconnect the USB device See Source Control Screen page 24 7 SD card This SD card slot is used to upgrade the Navigation System For how...

Page 16: ...ontrol Screen On the Source Control screen you can find all the control buttons for the selected source Source Control Screen For how to use each button see the operation pages of each source How to display the Source Control screen When a video screen is displayed The Source Control Screen appears While watching the navigation screen with secondary window The Source Control Screen appears The scr...

Page 17: ...al Sources While watching visual sources basic operation is possible by touching the screen The screen has 4 function areas The function of each area is different depending on the sources Some areas are unavailable for some sources Playback screen of a visual source 1 2 3 4 Basic operation of each area 1 Displays Menu control screen DVD VIDEO source Picture control buttons sources with picture fil...

Page 18: ... navigation screen and source screen are displayed When Picture in Picture function is on touching the source screen switches between the camera image and source image 1 sec Pressing the button for longer than 1 second while the navigation screen is displayed switches the Picture in Picture function on off The screen switches between visual source s playback screen and camera view screen each time...

Page 19: ...th Secondary window Navigation screen with Information window Displays the Source Control screen with navigation window Navigation screen with Easy Control window Navigation screen with Split Screen Control window Buttons on the Secondary window Displays the navigation screen with Information window Displays the navigation screen with Easy Control window Displays the navigation screen with Split S...

Page 20: ...g plays a source 2 Displays Easy Control Screen Touching this area during fast forwarding or fast backwarding plays a source 3 4 DVD VIDEO DVD VIDEO Searches for a chapter VideoCD VideoCD Selects a scene when PBC is On or a track when PBC is Off Fast Forwards Fast Backwards Easy Control Screen Displays the basic operation buttons on the screen 1 Display the Easy Control Screen 2 Operation on the E...

Page 21: ...ion display Volume Label Title Title Number Display Chap Chapter Number Display Scene Track Scene Track Number Display 3 Play Mode Display T C R P Play Time Display Use the TIME to change play time display When the text is longer the text display is scrolled by touching it Multi Function Closes the multi function bar DVD VIDEO DVD VIDEO TREP Switches the Repeat Play operations in the following seq...

Page 22: ...light control lets you control DVD Menu by touching the menu button directly on the screen To cancel Highlight Control press the TEL button for longer than 1 second The Highlight Control is cleared automatically after approximately 10 seconds 5 Operation on the Menu Control 2 screen Previous Displays the Menu Control 1 screen Angle Switches the picture angle SUB Switches the subtitle language Audi...

Page 23: ...See Operation on the Playback Screen of Visual Sources page 17 2 Display the Zoom Control screen 3 Operation on the Zoom Control screen Zoom Changes the zoom ratio at 2 levels 2 times or off each time you touch 2 3 5 Scrolls the screen in the direction you touch Exit Exits the Zoom Control screen ...

Page 24: ...Display Total number of file in the folder and the file number display 3 Play Mode Display P R Play Time Display Use the TIME to change play time display When the text is longer the text display is scrolled by touching it Slider control USB USB Use the CTRL Slider to change the control mode 3 Plays Dragging 3 left or right changes the playing position Source Control Screen Switches to the source c...

Page 25: ...e to button slider INFO AudioFile AudioFile Displays music information such as Tag of Audio file being played VideoFile VideoFile JPEG JPEG Displays information of file being played Music USB USB Displays the music list Video USB USB Displays the video list Picture USB USB Displays the Thumbnail Viewer Folder USB USB Displays the folder list Link AudioFile AudioFile in USB USB Searches for another...

Page 26: ...y touching it ROOT Moves to the top hierarchy level TOP USB USB Moves to the top folder UP Moves up a hierarchy level CUR Displays the currently playing folder category Music or video list USB USB 1 2 1 Switches to the lower level of the category 2 Returns to the Source Control screen When the text is longer the text display is scrolled by touching it ALL AudioFile AudioFile Lists all the music in...

Page 27: ...and drag it to the lower line You can change the playing order of the favorite list by dragging the artwork in the list 5 Play the album in the Playlist The favorite list is played to the right starting with the selected album The albums with no photo are not displayed The favorite list mode is canceled in the following situations Playing another album from other list folder list category list etc...

Page 28: ... Displays Easy Control Screen Touching this area during fast forwarding or fast backwarding plays a source 3 4 Searches for a file Touching these areas during the slide show of picture files searches for audio files VideoFile VideoFile Fast Forwards VideoFile VideoFile Fast Backwards Easy Control Screen Video file Picture file Displays the basic operation buttons on the screen 1 Display the Easy C...

Page 29: ...s the picture horizontally Rotates counter clockwise Rotates clockwise Exit Ends Picture Control Movie Menu Control Disc Selects an option from the Movie Menu 1 Display the playback screen See Operation on the Playback Screen of Visual Sources page 17 2 Display the Menu Control screen 3 Operation on the Menu Control screen SUB Switches the subtitle language Audio Switches the voice language Exit E...

Page 30: ...sic Video Search 38 Plays or pauses When Connecting One iPod iPod2 iPod1 USB 5V 1A 5V 1A Connect the iPod to the iPod2 terminal with a KCA iP302 When Connecting Two iPods iPod2 iPod1 USB 5V 1A 5V 1A Connect the first iPod iPod1 to the iPod1 terminal with a KCA iP302 Connect the second iPod iPod2 to the iPod2 terminal with a KCA iP102 To select the iPod you want to play press the Device button on t...

Page 31: ...e control mode 3 Plays Dragging 3 left or right changes the playing position Multi Function 1 2 Switches the multi function display Closes the multi function bar Music Displays the list of music category Video 2 Displays the list of video category Link 1 MUSIC MUSIC Searches for another song of the currently selected artist See Link search page 32 REP Repeats the present file or data RDM 1 MUSIC M...

Page 32: ...Pod List Lists and searches music video contained in the iPod 1 Display the Source Control Screen See Source Control Screen page 31 2 Display the iPod List 1 Touching 1 displays the previously used music list video list or link list 3 Select music video 2 1 1 Categories and music are listed Touch a category name to view its contents If music title is displayed the music is played by touching it 2 ...

Page 33: ...ot changed Album Favorite List You can create an original playlist of your favorite 10 albums by selecting album artworks 1 Display the Source Control Screen See Source Control Screen page 31 2 Display the Favorite List Screen 3 Display the iPod artwork Screen Touch desired artwork in the lower line 3 3 appears by touching an album artwork Touching it again plays the first track of the album Load ...

Page 34: ...ed when the PANDORA skip limitation is exceeded 2 Displays the Pandora Station list See Station List page 34 1 Information display Song title Artist Name Album Name 3 Play Mode Display P Play Time Display When the text is longer the text display is scrolled by touching it Multi Function Closes the multi function bar Thumbs down to the current song and skip to the next song Bookmark a song in the c...

Page 35: ...English 35 ...

Page 36: ...rol screen 2 1 HD FM Switches to the HD FM1 2 3 band HD AM Switches to the HD AM band 4 Tunes in a station Use the SEEK to change the frequency switching CH CH 5 Selects a channel program TI Turns the Traffic Information function On or Off See Traffic Information page 40 2 Display the HD Radio Preset List Screen See Preset Select page 38 1 Information display Selects the Station name Title Artist ...

Page 37: ...y AME Selects the Auto Memory mode See Auto Memory page 37 RCV The Receive mode switches in the following order See Receive mode page 41 PTY FM FM Searches station by program type See Search by Program Type page 40 INFO Displays HD Radio Information screen See Information page 39 CH List Display the Channel List Screen See Channel Search page 39 Auto Memory Stores stations with good reception in m...

Page 38: ...lect a station 2 1 1 Memorized stations are displayed Touch to tune in 2 Returns to the Source Control screen Manual Memory Stores the current receiving station in memory 1 Display the Source Control Screen See Source Control Screen page 36 2 Select a station you wish to store in memory 3 Store in memory 2 sec Continue to touch until the memory number appears HD Radio Listening ...

Page 39: ...xt Message or Tagging display When the text is longer the text display is scrolled by touching it Channel Search Specifying the selecting a channel 1 Display the Source Control Screen See Source Control Screen page 36 2 Display the Channel List Screen 3 Select a channel 1 1 Selects a channel Tunes in the selected channel Info Change Changes the display from Song Title Artist Name to Album Name Ret...

Page 40: ... the Traffic Information screen appear automatically During reception of traffic information the adjusted volume is automatically remembered and the next time it switches to traffic information it s automatically the remembered volume Search by Program Type A program is tuned when you set its program type Only when receiving the FM broadcast 1 Display the Source Control Screen See Source Control S...

Page 41: ... second The song s information will then be saved on this unit The saved songs will then show up in a playlist called Purchased in iTunes the very next time you sync your iPod to your computer So then you just need to click and then easily buy and download the song you were tagging directly from the Apple iTunes Music Store Registers a tag 1 sec TAG will be indicated on the display when song infor...

Page 42: ...ts a channel Various control screens appear in the TV source mode You can only operate TV with the optional accessory TV Tuner connected Easy Control Screen Displays the basic operation buttons on the screen 1 Display the Easy Control Screen 2 Operation on the Easy Control Screen 1 2 3 1 2 Switches to the TV screen 3 Displays the Source Control Screen BAND 1 Switches to TV1 or TV2 4 Selects a chan...

Page 43: ...ion display TV Band display Preset Memory Number Display ch Channel display Multi Function 1 2 Switches the multi function display Closes the multi function bar P1 P6 1 When P1 to P6 buttons appear you can recall channels on memory For memory of broadcasting stations see Auto Memory page 44 or Manual Memory page 44 SEEK 1 Switches the Seek mode The mode is switched in the following order each time...

Page 44: ...e to touch until the memory number appears Auto Memory Stores stations with good reception in memory automatically 1 Display the Source Control Screen See Source Control Screen page 43 2 Select a band you wish to store in memory 3 Select the Auto Memory mode 4 Start Auto Memory Auto Memory terminates when 6 stations are stored or when all stations are tuned in The operation ends automatically if y...

Page 45: ...rized station 1 Display the Source Control Screen See Source Control Screen page 43 2 Start Preset Select 3 Select a station 1 2 3 1 Memorized stations are displayed Touch to tune in 2 Returns to the Source Control screen 3 Switches to the TV screen ...

Page 46: ...xt display is scrolled by touching it Various control screens appear in the Satellite radio source mode Only with the optional accessory Satellite radio connected To connect the SIRIUS tuner a conversion cable CA SR20V optional accessory is necessary and to connect the XM tuner an XM interface Box KCA XM100V optional accessory is necessary This document uses the SIRIUS display as an example Multi ...

Page 47: ...all the channels 2 Returns to the Source Control screen 4 Select a channel 2 1 1 Selects a channel Tunes in the selected channel Info Change Switches the sequence of the list SIRIUS SIRIUS Changes the display from Channel Name Song Title Artist Name Composer Name to Category Name XM XM Changes the display from Channel Name Artist Name Song Title to Category Name Display the category list 2 Returns...

Page 48: ...nnel number Cancel Cancels the direct channel search Clear Clears the channel number 4 Tune in the channel The operation ends automatically if you do not operate within 10 seconds Preset Select Lists and selects memorized channel 1 Display the Source Control Screen See Source Control Screen page 36 2 Display the SIRIUS Preset List Screen 3 Select a channel 1 1 Memorized channels are displayed Touc...

Page 49: ...uetooth Unit Connection page 62 Sound output speaker can be set See Bluetooth Hands Free Audio Output Setup page 62 Source Control Screen Switches to control screen to use various functions 1 Display the Source Control Screen See How to Display the Source Control Screen page 16 2 Operation on the Source Control screen 1 3 1 Plays 7 1 Stops playing 8 1 Pauses 4 1 Selects a file 1 Information displa...

Page 50: ...r telephone using a commercial telephone accessory Refer to Quick Start Guide External Device Power Supply Control Controlling the external device power supply 1 Display the Source Select Screen 2 Display the EXT SW Control screen 3 Control the external device power supply You can turn on or off the external device power supply You must connect a commercially available relay unit in order to use t...

Page 51: ...he voice control is disabled while talking on the phone with hands free The voice control is canceled if no operation is continued for a certain period of time Voice Control The unit is equipped with Advanced Speech Recognition function which allows you to operate it with your voice The supported languages are US English UK English French German Dutch Italian and Spanish For information on the voi...

Page 52: ...tup ON The display dims OFF The display doesn t dim SYNC Turning the Dimmer function On or Off when the vehicle light control switch is turned On or Off NAV SYNC Turning the Dimmer function On or Off according to the Navigation Day Night display setting Dyn Brightness Dynamic Brightness The function compensates for Over Exposure and Under Exposure creating a clearer picture OFF OFF 1 2 Mode Select...

Page 53: ...ly for some reasons follow the procedure above to download manually For how to operate the cell phone refer to the Instruction Manual that comes with your cell phone Up to 1000 phone numbers can be registered for each registered cell phone Up to 32 digits can be registered for each phone number along with up to 50 characters representing a name 50 Number of alphabetical characters Fewer characters...

Page 54: ...ee Control screen appears the name of the connected cell phone is displayed for 5 seconds The status icons such as and displayed on the control unit may discord from those displayed on the cell phone Setting the cell phone in the private mode can disable the hands free function Call Waiting Answers another incoming call with the current call suspended Switching between the current call and waiting...

Page 55: ... the Phonebook it must have been downloaded from the cell phone For more details see the instruction manual of your cell phone Characters with no corresponding name will not be displayed During search a non accent character such as u is searched for instead of an accent character such as ü Calling by Entering a Phone Number Makes a call by entering a phone number 1 Display the Hands Free Control s...

Page 56: ... by selecting a phone number from the outgoing incoming or missed calls list 1 Display the Hands Free Control screen See Making a Call page 54 2 Display the Outgoing Calls Incoming Calls or Missed Calls screen 3 Select from calls list Example Outgoing Calls screen Calls the selected phone number 4 Make a call The Outgoing Calls list screen Incoming Calls list or Missed Calls list screen shows the ...

Page 57: ...n Use Sets whether to use cell phone phonebook outgoing calls list incoming calls list and missed calls list ON ON Yes OFF No SMS Use Sets the SMS function ON ON Use SMS function OFF SMS not available Sort Order Sorts the names in the phonebook Last Echo Cancel Level Adjust the level of echo cancellation 15 Microphone Level Adjusts the sensitivity of the microphone for a telephone call 2 Noise Red...

Page 58: ...ssed calls list Direct Number Registers by entering phone numbers Memory Registers the currently displayed phone number Delete Deletes the currently displayed phone number Touch to display the confirmation screen Touch Yes to delete or No to cancel 4 Search phone number to register with each function 5 Register phone number SMS Short Message Service Uses SMS function 1 Display the Hands Free Contr...

Page 59: ...he screen displays a confirmation message Touch Yes To cancel clearing touch No This is displayed only when the Draft message is being edited 2 Display the Create SMS Message screen 3 Create a message 1 1 Enters characters 2 3 Moves the cursor 5 Switches between key layouts Shift Toggles between uppercase and lowercase qwe abc ALT Sets the key layout of the character buttons abc Alphabetical key l...

Page 60: ...ice cannot be registered if there are 5 registered Bluetooth units Delete unnecessary registration See Bluetooth Unit Connection page 62 5 Enter PIN code 1 1 Enters a code number Enter Enter the PIN code specified for the Bluetooth unit to register This button will not be active until at least four PIN code digits have been entered Cancel Cancels registration of PIN code Clear Clears the code numb...

Page 61: ...Only models in Bluetooth unit name list can be registered 4 Go through the procedure of Registering Bluetooth Unit and complete the registration pairing Registering Bluetooth Unit PIN Code Sets the PIN code of the Bluetooth unit to enter when registering pairing from the cell phone or audio player side 1 Display the Bluetooth Setup screen 2 Display the Receiver PIN Code screen 3 Enter PIN code 1 1...

Page 62: ...isconnects Audio player to use for Bluetooth Audio Remove Deletes registration pairing Touching the screen displays a confirmation message Touch Yes To cancel clearing touch No Bluetooth Hands Free Audio Output Setup Selects speakers to output the sound of hands free phoning such as phone call voice and ringing tone and Bluetooth audio 1 Display the Bluetooth Setup screen 2 Set the item Bluetooth ...

Page 63: ...English 63 ...

Page 64: ... Touch Audio Control page 64 2 Set each item 1 1 Adjusts the front back and left right volume around the touched area 2 3 Adjusts the right and left volume balance 5 Adjusts the front and rear volume balance Volume Offset Finely adjust the volume of the current source to minimize the difference in volume between different sources If you have increased the volume first then reduced the volume using...

Page 65: ...hic Equalizer screen When iPod is selected in Equalizer Control the EQ button is deactivated iPod uses its equalizer function 3 Select the channel to be adjusted F Front speaker R Rear speaker C Center speaker 4 Set the Graphic Equalizer 1 1 Gain level can be adjusted by touching the each frequency bar 2 3 Sets a frequency 5 Sets a gain level EQ INIT Returns to the previous level which the gain le...

Page 66: ...n Touch Position page 64 2 Set the Position Control P1 P3 Stores the present adjustment setup in memory or recalls it from memory To store your adjustment in memory Continue to touch P1 to P3 more than 2 seconds To call your adjustment from memory Touch P1 to P3 of your adjustment you wish to recall from memory 2 3 Sets a listening position You can select any of Front R Right front Front L Left fr...

Page 67: ... 68 are not available Speaker Setup page 69 Car Type DTA Setup page 70 and Channel Level page 71 are not available iPod and Pandora cannot be set at the same time for the front and rear sources SRS WOW Control You can set up the SRS WOW effect 1 Display the SRS WOW Control screen Touch SRS WOW page 64 2 Set the SRS WOW Control 1 1 Selects SRS WOW setting SRS WOW User Setup 1 Display the SRS WOW Ad...

Page 68: ...you set the Dolby PL we recommend you to select the Dolby PLII Matrix mode If you select another Dolby PLII mode the sound is NOT output from rear speakers when you receive monaural broadcasting sounds Surround control can be set for each source You can set the sound field when playback of a 2 channel 2 0 source Dolby Pro Logic II Music Adjustment 1 Display the Dolby Pro Logic II Music Adjust scre...

Page 69: ...8 6x9 7x10 Subwoofer None 6 1 2 inch 8 inch 10 inch 12 inch 15 inch over Select None if you have no speakers If you set the center speaker to None even in a short time when you are setting the Surround Control to Bypass Center the Surround Control is set to Bypass automatically See Surround Control page 68 If you set the center and rear speakers to None when you are setting the Surround Control to...

Page 70: ...n SUV Minivan Long Location Sets the locations of the speakers Adjust Displays the Car Type Adjust screen You can adjust the digital time alignment that was set automatically when you selected the car type Speaker Location setup 1 Display the Speaker Location Setup screen 2 Set the speaker locations Front Speaker Sets the location of the front speaker Door On Dash Under Dash Rear Speaker Sets the ...

Page 71: ...n the front seat and set the right and left positions to the center of the vehicle interior 2 Measure the distances from the reference point to the speakers 3 Calculate the distance difference in accordance with the farthest speaker 1 6feet 2 5feet 5feet 2 5feet 0feet 3 4feet Channel Level You can set the volume at each setup position 1 Display the Car Type Setup screen Touch Audio SETUP Channel L...

Page 72: ...indicated as Touch 3 Select the setup item AV IN SETUP and Navigation options can be locked See Setup Memory page 77 You can set up various receiver parameters Item Page DivX R SETUP 73 System User Interface 74 Touch 75 Clock 75 Security 76 EXT SW 76 SETUP Memory 77 Display Screen Adjust 80 Angle 76 Color 79 Background 78 SIRIUS SETUP 86 DVD SETUP 82 iPod SETUP 85 USB SETUP 85 TV SETUP 88 AV IN SE...

Page 73: ...ing number of viewing is displayed when playing a DivX VOD file with the viewing restriction When the remaining number of viewing reached 0 a warning message appears and the file cannot be played Deactivating DivX Code 1 Display the DivX Deactivation Confirm screen 2 Cancel the registration Touching the screen displays a confirmation message Touch OK To cancel clearing touch Cancel Software Inform...

Page 74: ...xt song information American English en User Interface You can setup user interface parameters 1 Display the User Interface screen Touch System User Interface page 72 2 Set each item Beep Turns the key touch tone On or Off ON Remote Sensor Selects a remote control signal ON When turned OFF the remote control reception is rejected Language Select the language used for the control screen and setting...

Page 75: ...tatus Clock and Date Setup You can adjust the clock time 1 Display the Clock Setup screen Touch System Clock page 72 2 Setup the Clock 1 1 Adjusts month day year hours and minute Reset Sets 00 minute Setup examples 3 00 3 29 3 00 3 30 3 59 4 00 Synchronize Sets the clock time in synchronization with the time data sent from the navigation system or the Radio Data System station Navigation OFF RDS N...

Page 76: ... current monitor angle as the angle during power off EXT SW Setup Sets up the exteral switch power mode 1 Display the EXT SW screen Touch System EXT SW page 72 2 Perform EXT SW Setup SW1 Name SW2 Name Sets the name of the external device See How To Use the Character Entry Screen page 77 for information on how to enter a name Output Pattern Sets the power signal output mode EXT SW1 Pulse EXT SW2 Le...

Page 77: ... page 72 2 Start Setup Memory Lock Locks the AV IN SETUP Navigation and Audio SETUP settings When Lock is selected you cannot change the AV IN SETUP Navigation and Audio SETUP settings Yes Memorizes or recalls the settings No To cancel the function touch No To cancel memorization touch No The SETUP Menu screen appears again 3 Select a desired function Recall Recalls the memorized settings Memory M...

Page 78: ...mage for background Delete Deletes the background image Touching the screen displays a confirmation message Touch Yes To cancel clearing touch No 5 Select the image to load 6 Load the image Rotates counter clockwise Rotates clockwise 7 Select Background Change screen 8 Select an image for background 1 1 Returns to the initial background 9 Set the image as the background See About Picture files pag...

Page 79: ...ges one after another When touching SET or Initialize make sure Panel Color Scan is set to OFF 3 Select a color 1 1 Sets to the touched color Adjust Sets and registers favorite color to the preset buttons Preset1 Preset3 To register your original color 1 Start the RGB coordinate 2 Adjust each color value 1 1 Selects a preset number to register Red Value Adjusts the Red value Green Value Adjusts th...

Page 80: ...splay the AV IN Setup screen Touch AV IN SETUP page 72 2 Set each item AV IN Interruption Sets an image display of the system that is connected via the AV INPUT port OFF OFF When the image source is switched an image entered via the AV INPUT port is displayed ON When an image signal is entered via the AV INPUT port this image is displayed iPod AV Interface Use You can determine the use of iPod AV ...

Page 81: ...0 with ID 1 set is connected Other When the other camera is connected R CAM Interruption Sets a method to switch to the rear view camera video display OFF ON Switches to the rear view camera video display when engaging the shift knob of car to Reverse and then pressing the AUD button for longer than 1 second OFF Switches to the rear view camera video display press the AUD button for longer than 1 ...

Page 82: ...item Menu Language 1 Selects a disc menu language See DVD Language Setup page 83 Subtitle Language 1 Selects a subtitle language See DVD Language Setup page 83 Audio Language 1 Selects an audio language See DVD Language Setup page 83 Dynamic Range Control 1 Sets the dynamic range Dialog The dynamic range is reduced by changing from Wide to Normal and from Normal to Dialog Dialog makes the total so...

Page 83: ...ay the DVD Setup screen Touch DVD SETUP page 72 2 Select the language item to set 3 Enter a language code See DVD Language Codes page 99 and select the desired language 1 1 Enters a language code Cancel Cancels the language setup and returns to the DVD SETUP screen Enter Sets the language and returns to the DVD SETUP screen It appears after you have entered a language code Original Sets the DVD s ...

Page 84: ... The parental lock level varies depending on a loaded disc If a disc has no parental lock anybody can play it back even when you have set the parental lock Disc Setup Performs setup when using disc media 1 Display the DVD Setup screen Touch DVD SETUP page 72 2 Display the Disc Setup screen 3 Set each item CD Read Sets a music CD playback 1 1 Automatically recognizes and plays back an Audio file di...

Page 85: ...to Information is displayed for 5 seconds when updated OFF Does not display any information iPod Setup Performs setup when using iPod 1 Display the iPod Setup screen Touch iPod SETUP page 72 2 Set each item AudioBook Speed Sets the Audio book playback speed Normal Wide Screen Sets Wide Screen on or off OFF On Screen iPod Sets an on screen display of the iPod Playback screen Auto Auto Information i...

Page 86: ...o the SIRIUS Setup screen Enter Determines the code number Clear Clears the code number 4 Confirm the code number Enter the same code number as you input in step 3 SIRIUS Parental code is now set and the display returns to SIRIUS Setup screen Change the Parental Code 1 Display the Parental Code screen Clear Clears the Parental Code Pressing Clear for 5 seconds or longer deletes the code 2 Enter th...

Page 87: ...y input SIRIUS Parental Code Setup page 86 4 Display the Parental Code screen 5 Enter the code number 6 Select a category 1 1 Category list Displays all the channels in the selected category All Channel Displays all the channels 7 Set the parental lock for each channel 3 1 2 1 Channel list 2 Sets the Parental lock function on or off for each channel 3 Selects a channel Info Change Switch the seque...

Page 88: ...nction on or off for each channel 3 Selects a channel Info Change Switch the sequence of the channel list Channel name Song title Artist name Composer name and Category name UP Moves to SIRIUS Category Select screen TV Setup The TV signal receiving areas can be set with the optional accessory TV Tuner connected only 1 Display the TV SETUP screen Touch TV SETUP page 72 2 Set each item On Screen TV ...

Page 89: ...English 89 ...

Page 90: ...e Switch to this mode when controlling TV NAV mode Switch to this mode when controlling Navigation unit The position of the remote control mode switch is indicated in the title of each mode e g AUD mode When controlling a player that is not integrated in the unit select AUD mode CAUTION Put the Remote Controller in a place where it will not move during braking or other operations A dangerous situa...

Page 91: ...witches the Dual Zone function ON and OFF Rear volume control Adjusts volume at rear when the Dual Zone function is ON V SEL Switches to the navigation screen Display angle Switches the display angle each time it is pressed Hands free communication When a call comes in it answers the call Function Switches the function screen MODE Switches the screen mode Screen mode changes each time you press th...

Page 92: ... playback control on or off while playing VCD SUBTITLE Switches the subtitle language ZOOM Switches the zoom ratio each time you press this key DVD VCD DVD mode Chapter Scene Track search Selects the chapter scene or track to be played Play Pause Pauses the chapter scene or track Press again to resume playing Stop Memorizes the last point where the disc stopped When pressed again the last point is...

Page 93: ...ack or file Press again to resume playing Direct search Pressing this key switches the features that can be searched directly Music CD Track number Play time Cancel Audio Video files in DVD CD disc Folder number File number Cancel Once you have switched to the direct search feature specify the search number from the numeric keypad and then press 38 key Numeric keypad Specify the number to search i...

Page 94: ...a programmed broadcast station 1 6MNO HD Radio AUD mode FM band switching Switches to bands received by the unit AM band Station selection Switches to broadcast stations received by the unit Seek mode switching Switches the Seek mode AUTO1 AUTO2 MANU Direct tuning After pressing this keypad use the key to specify the broadcast station you wish to receive Example 92 1MHz FM 9WXYZ 2ABC 1 or Example ...

Page 95: ...ad To use preset tuning press the number of a programmed broadcast station 1 6MNO TV TV mode Switching Band It switches between the station of the TV band to receive and video input Channel Selection The TV channel to receive is selected Direct tuning Press this key first and then specify the station to receive with the numeric keypad Example In case of Channel 6 2 digit 0 6MNO or Numeric keypad T...

Page 96: ...tion ZOOM Zooms in or out the navigation map MENU Displays Main menu CANCEL Displays previous screen POSITION Displays the current position ROUTE M Displays Route Option menu VIEW Switches between 2D and 3D map displays VOICE Plays Voice guidance MAP DIR Switches between the track up navigation and north up navigation map displays ...

Page 97: ... when connecting the iPod using the KCA iP302 for iPod AV IN3 Select to play an AV component connected to the iPod AV IN3 input terminal Color Sets the button illumination color page 79 EXT SW Set the controls for the external devices page 76 Camera Set the parameters for the Camera See Camera Setup page 81 3 End initial setup The settings above can be changed in Setup Menu page 72 When pressing t...

Page 98: ...channel 1 LL Identifies the left audio output LR Identifies the monaural audio output RR Identifies the right audio output ST Identifies the stereo audio output PBC Indicates that the PBC function is ON VER1 Indicates that theVideo CD version is 1 VER2 Indicates that theVideo CD version is 2 REP Indicates that the Repeat function is ON USB FO REP Indicates that the Folder repeat function is ON VID...

Page 99: ...ic km Cambodian kn Kannada ko Korean ks Kashmiri ku Kurdish ky Kirghiz la Latin lb Luxembourgish ln Lingala lo Laotian lt Lithuanian lv Latvian Lettish mg Malagasy mi Maori mk Macedonian ml Malayalam mn Mongolian mo Moldavian mr Marathi ms Malay mt Maltese my Burmese na Nauru ne Nepali nl Dutch no Norwegian oc Occitan om Afan Oromo or Oriya pa Punjabi pl Polish ps Pashto Pushto pt Portuguese qu Qu...

Page 100: ...one function is enabled Zone Control page 67 What might seem to be a malfunction in your unit may just be the result of slight misoperation or miswiring Before calling service first check the following table for possible problems General The Touch Sensor Tone doesn t sound The preout jack is being used The Touch Sensor Tone can t be output from the preout jack Tuner source Radio reception is poor ...

Page 101: ...USB iPod Connect an USB device and change the source to USB again Disconnected iPod Bluetooth audio player The iPod Bluetooth audio player is selected as a source although no iPod Bluetooth audio player is connected Change the source to any source other than iPod Bluetooth Connect an iPod Bluetooth audio player and change the source to iPod Bluetooth again No Music The connected USB device contain...

Page 102: ...UPDATED Updating the subscription information Operation is invalid until the update is completed INVALID CHANNEL The selected channel is invalid Select a different channel CALL 888 539 SIRIUS TO SUBSCRIBE The selected channel is not subscribed Call the displayed number for subscription Check XM Tuner The unit cannot recognize the connected XM Tuner Check the connection of the XM Tuner No Signal Th...

Page 103: ...D Video 96 kHz Dynamic Range 98 dB DVD Video 96 kHz Disc Format DVD Video VIDEO CD CD DA Sampling Frequency 44 1 48 96 kHz Quantifying Bit Number 16 20 24 bit USB interface section USB Standard iPod1 USB USB 2 0 High speed iPod2 USB 1 1 Full speed File System FAT 16 32 Maximum Power Supply Current DC 5 V 1 A D A Converter 24 Bit Video Decoder MPEG1 MPEG2 MPEG4 H 264 WMV Audio Decoder MP3 WMA AAC W...

Page 104: ...ar view of the sky Accuracy Position 10 meters typical Velocity 0 05 m sec RMS Position Method GPS Antenna External GPS antenna FM tuner section Frequency Range 200 kHz space 87 9 MHz 107 9 MHz Usable Sensitivity S N 30 dB 9 3 dBf 0 8 μV 75 Ω Quieting Sensitivity S N 50 dB 15 2 dBf 1 6 μV 75 Ω Frequency Response 3 0 dB Digital 20 Hz 20 kHz Analog 30 Hz 15 kHz S N Ratio dB Digital 70 dB STEREO Anal...

Page 105: ...mensions W H D 181 7 100 0 180 mm 7 3 16 x 3 15 16 x 7 1 8 inch Operational Temperature Range 10 C 60 C Storage Temperature Range 20 C 85 C Weight 2 60 kg 5 7 lbs Although the effective pixels for the liquid crystal panel is given as 99 99 or more 0 01 of pixels may not light or may light incorrectly Specifications subject to change without notice ...

Page 106: ...o iPod or iPhone respectively and has been certified by the developer to meet Apple performance standards Apple is not responsible for the operation of this device or its compliance with safety and regulatory standards Please note that the use of this accessory with iPod or iPhone may affect wireless performance iPhone iPod iPod classic iPod nano and iPod touch are trademarks of Apple Inc register...

Page 107: ...nly signifies that the Industry Canada technical specification were met This device complies with RSS 310 of Industry Canada Operation is subject to the condition that this device does not cause harmful interference 2CAUTION This equipment complies with FCC IC radiation exposure limits set forth for an uncontrolled environment and meets the FCC radio frequency RF Exposure Guidelines in Supplement ...

Page 108: ......

Page 109: ...ion and operation procedures will help you obtain the best performance from your new GPS Navigation System For your records Record the serial number found on the back of the unit in the spaces designated on the warranty card and in the space provided below Refer to the model and serial numbers whenever you call upon your Kenwood dealer for information or service on the product Model DNX9980HD Seri...

Page 110: ...6 Installing the Escutcheon 27 Installation for Monitor Player Unit 28 Installation on Toyota Nissan or Mitsubishi Car using Brackets 28 Removing Monitor Player Unit 29 This Quick Start Guide explains the basic functions of this unit For functions not covered in this Guide refer to the Instruction Manual PDF file contained in the included CD ROM Instruction Manual To refer to the Instruction Manua...

Page 111: ... the lens in the disc player of the unit Called lens fogging this condensation on the lens may not allow discs to play In such a situation remove the disc and wait for the condensation to evaporate If the unit still does not operate normally after a while consult your Kenwood dealer Cleaning the Unit If the faceplate of this unit is stained wipe it with a dry soft cloth such as a silicon cloth If ...

Page 112: ...he correct current position of the vehicle the first time it is used after purchase or if the vehicle battery is disconnected GPS satellite signals will soon be received however and the correct position will be displayed Be careful of the ambient temperature Using the navigation system at extreme temperatures can lead to malfunction or damage Also note that the unit can be damaged by strong vibrat...

Page 113: ...s at a reasonable cost We use a combination of governmental and private data sources which we identify in product literature and copyright messages displayed to the consumer Virtually all data sources contain some inaccurate or incomplete data In some countries complete and accurate map information is either not available or is prohibitively expensive ...

Page 114: ...he controls for the external devices Camera Set the parameters for the Camera 3 Touch Finish Language Setting ASR Selects whether to use the voice control function Preset Enabled Touching Disabled allows you to select languages for respective items Enabled Voice control is activated Disabled Voice control is deactivated Language Select Selects a language Enter Determines the selected language Canc...

Page 115: ...the Pulse signal output time Outputs 500ms when 1 is set Increases by 200 ms with each step Up to 100 steps can be set Returns to the previous screen Camera Setup Rear Camera Selects the type of rear camera to use Preset Other CMOS 300 When the CMOS 300 with ID 1 set is connected When setting to CMOS 300 camera adjustment screen appears For the adjustment method refer to the manual of CMOS 300 Oth...

Page 116: ... Control screen 1 sec While watching the Source Control screen Secondary window function On Off 1 sec While watching the navigation screen Displays the Screen Control screen 1 sec While watching the playback screen of a visual source Displays the Easy Control screen Notes You can adjust the sensitivity of the buttons touch sensors on the front panel 1 Touch on common menu bar 2 Touch System User I...

Page 117: ...en the source is DVD Displays Audio Control Menu screen Displays SETUP Menu screen Displays the EXT SW External Switch Control screen Closes the common menu bar Flick scrolling You can scroll the list screen by flicking the screen up down or right left How to Clear the Message on the Rear View Camera Screen A caution message is displayed on the rear view camera screen when you put the gearshift le...

Page 118: ...P1 P6 To recall the memorized station SEEK Switches the Seek mode AME Selects the Auto Memory mode RCV Switches the Receive mode PTY Searches station by program type INFO Displays HD Radio Information screen CH List Display the Channel List Screen Closes the multi function bar Station Preset Memory 1 Touch 4 to select the station you want to store in memory 2 Touch to open the multi function bar 3...

Page 119: ...deo files MPEG1 mpg mpeg m1v MPEG2 mpg mpeg m2v H 264 MPEG 4 AVC mp4 m4v WMV 9 wmv m2ts iPod To disconnect the iPod stop the playback by touching 0 on the source control screen and then disconnect the iPod Notes When Connecting Two iPods When iPod1 is disconnected you cannot listen to the iPod2 s music Connect iPod2 to the iPod1 terminal SD card This SD card slot is used to upgrade the Navigation ...

Page 120: ... stops Album Random Play TIME Switches the play time display PBC Turns the PBC On or Off INFO Displays music information CTRL Slider Switches control mode to button or slider Hand Allows you to operate iPod with the control of the iPod When two iPods are connected iPod2 cannot be selected Device Switches between the two iPods connected Closes the multi function bar Search the file you want to list...

Page 121: ... selected category TOP Moves to the top category UP Moves to the upper level of the category CUR Displays the currently playing category Thumbnail Viewer 2 2 2 1 1 1 1 Touching a thumbnail image displays it in full screen view 2 Returns to the Source Control screen Music or Video list of iPod 2 2 2 1 1 1 1 Categories and music are listed Touch a category name to view its contents If music title is...

Page 122: ...ays a source 2 Displays Easy Control Screen Touching this area during fast forwarding or fast backwarding plays a source 3 Reverse search 4 Forward search Fast Forwards when flicked from 1 to 4 Fast Backwards when flicked from 1 to 3 Easy Control Screen 1 Press SRC to display the playback screen 2 Touch the 2 area on playback screen 3 Touch any button or area on the screen 1 1 1 2 2 2 3 3 3 Button...

Page 123: ...Phone Call Touch Disconnecting a Call Touch Calling a number in the Phone Book To use the phone book it must have been downloaded from the cell phone in advance 1 Press TEL to display the Hands Free Control screen 2 Touch Phonebook 3 Touch 1 Z to select initial of name 4 Touch Name to select phone number 5 Touch Type phone number 6 Touch to dial Calling by Entering a Phone Number 1 Press TEL to di...

Page 124: ... limit signs and to use safe driving judgment at all times Garmin and Kenwood will not be responsible for any traffic fines or citations that you may receive for failing to follow all applicable traffic laws and signs Your route is marked with a magenta line As you travel your navigation system guides you to your destination with voice prompts arrows on the map and directions at the top of the map...

Page 125: ...ing the Traffic Map The traffic map shows color coded traffic flow and delays on nearby roads 1 From the map touch 2 Touch Traffic Map to view the traffic incidents on a map More Information For more information about your navigation system select Tools Help Download the latest version of the instruction manual from manual kenwood com edition im332 Updating the Software To update the navigation sy...

Page 126: ...is mode when controlling TV NAV mode Switch to this mode when controlling Navigation unit Notes When controlling a player that is not integrated in the unit select AUD mode CAUTION Put the Remote Controller in a place where it will not move during braking or other operations A dangerous situation could result if the Remote Controller falls down and gets wedged under the pedals while driving Do not...

Page 127: ...E M DVD Menu 7 VOICE In CD DVD media USB source AUD mode Music select 9 4 Folder select 8 FM AM Pause Play 38 POSITION In iPod source AUD mode Music select 9 4 Pause Play 38 POSITION In TV source TV mode Band select 8 FM Channel select 9 4 Recall preset stations 0 1 6 In Navigation NAV mode Scrolls the map or moves the cursor 4 Cursor key 5 2 3 Performs the selected function 5 ENTER Zooms in or ou...

Page 128: ... connect those wires to the power source running through the fuse box Do not cut out the fuse from the ignition wire red and the battery wire yellow The power supply must be connected to the wires via the fuse Acquiring GPS Signals The first time you turn on DNX9980HD you must wait while the system acquires satellite signals for the first time This process could take up to several minutes Make sur...

Page 129: ...th the same rating Insulate unconnected wires with vinyl tape or other similar material To prevent a short circuit do not remove the caps on the ends of the unconnected wires or the terminals Connect the speaker wires correctly to the terminals to which they correspond The unit may be damaged or fail to work if you share the wires or ground them to any metal part in the car When only two speakers ...

Page 130: ...ck Ground wire To car chassis Red Ignition wire To steering remote If no connections are made do not let the cable come out from the tab Connect to the terminal that is grounded when either the telephone rings or during conversation Depending on what antenna you are using connect either to the control terminal of the motor antenna or to the power terminal for the booster amplifier of the film type...

Page 131: ...ck White Gray Black Gray Green Black Green Purple Purple Black Accessory 1 Cooling fan FUSE 15A GPS Antenna Accessory see page 26 Light Blue Yellow Steering remote control wire Brown Mute control wire Blue Antenna control wire Blue White Power control wire Orange White Dimmer control wire Purple White Reverse sensor wire Bluetooth Microphone Accessory see page 26 Voice Control Switch Accessory see...

Page 132: ...isual input Yellow Audio left input White Audio right input Red Audio Visual Output Visual output Yellow Audio left output White Audio right output Red To Relay Box Accessory 2 iPod USB device commercially available Visual input iPod AV Input 3 switchable Resistance free mini plug 3 5φ Audio input iPod AV Input 3 switchable Resistance free stereo type mini plug 3 5φ Accessory 3 Accessory 4 USB ter...

Page 133: ...ially available Audio Output Black Visual Output Yellow To SIRIUS Satellite Radio tuner XM Satellite Radio tuner Optional Accessory Conversion adapter optional accessory may be necessary for connection of optional accessory Contact your Kenwood dealer for details USB terminal USB terminal TV Tuner Optional Accessory Connection cable Included in the TV tuner USB device commercially available KCA iP...

Page 134: ...PS satellite signals might not be possible with an inside installation The GPS antenna should be installed at a position that is spaced at least 12 inch 30 cm from cellular phone or other transmitting antennas Signals from the GPS satellite may be interfered with by these types of communication Painting the GPS antenna with metallic paint may cause a drop in performance 1 Check the installation po...

Page 135: ... out against the center rib as illustrated Use 2 pieces of accessory 7 for 1 accessory 6 cut out 3 Attach accessory 6 cut out to the unit Accessory 7 For General Motors 1 Cut out accessory 6 to meet the shape of the opening of the center console 2 Attach accessory 6 to the unit Accessory 6 Cut out to meet the shape of the opening in the vehicle For Volkswagen 1 Attach accessory 0 to the unit Acces...

Page 136: ...ackets Bend the tabs of the mounting sleeve with a screwdriver or similar tool and attach it in place Make sure that the unit is installed securely in place If the unit is unstable it may malfunction eg the sound may skip Car Bracket Accessory 8 M5x6mm or Accessory 9 M5x7mm Accessory 8 M5x6mm or Accessory 9 M5x7mm ...

Page 137: ... lower level is removed remove the upper two locations Removing the Unit 1 Remove the hard rubber frame by referring to the removal procedure in the section Removing the Hard Rubber Frame 2 Insert the two removal tools 5 deeply into the slots on each side as shown Accessory 5 3 Lower the removal tool toward the bottom and pull out the unit halfway while pressing towards the inside Be careful to av...

Page 138: ...s not responsible for the operation of this device or its compliance with safety and regulatory standards Please note that the use of this accessory with iPod or iPhone may affect wireless performance iPhone iPod iPod classic iPod nano and iPod touch are trademarks of Apple Inc registered in the U S and other countries iTunes is a trademark of Apple Inc ABOUT DIVX VIDEO DivX is a digital video for...

Page 139: ...ate the receiving antenna Increase the separation between the equipment and receiver Connect the equipment into an outlet on a circuit different from that to which the receiver is connected Consult the dealer or an experienced radio TV technician for help IC Industry Canada Notice Operation is subject to the following two conditions 1 This device may not cause interference and 2 this device must a...

Page 140: ......

Page 141: ...ME DE NAVIGATION GPS SISTEMA DE NAVEGACIÓN GPS DNX9980HD DNX7180 DNX6980 DNX6180 DNX6040EX DNX5180 GPS NAVIGATION INSTRUCTION MANUAL MANUEL D INSTRUCTIONS DE NAVIGATION DU GPS MANUAL DE INSTRUCCIONES DE NAVEGACIÓN GPS B64 4843 08 ...

Page 142: ... Route 18 Navigating a Saved Route 18 Deleting All Saved Routes 18 Stopping Your Route 18 Adding a Detour to a Route 19 Using Multiple Route Preview 19 Where To 12 Searching Near Another Location 12 Go Page Options 12 Finding an Address 12 Finding a Place by Spelling the Name 13 Using the On Screen Keyboard 13 Finding Places in a Different Area 13 Narrowing Your Search 13 Using ecoRoute 20 About e...

Page 143: ...Special instructions supplementary explanations limitations and reference pages are described Using Speech Recognition DNX9980HD 23 Voice Commands 23 Search Methods 23 Speaking Text on the Screen 23 Speaking Shortcut Commands 23 Find Nearest Shortcut Command 23 Speaking the Name of a Popular Place 24 Speaking an Address 24 Manual Conventions When you are instructed to touch something use your fing...

Page 144: ... THE COMPLETE PRODUCT WITHIN 10 DAYS OF THE DATE YOU ACQUIRED IT IF PURCHASED NEW FOR A FULL REFUND TO ONE OF THE FOLLOWING 1 THE DEALER FROM WHICH YOU PURCHASED THIS PRODUCT 2 Garmin INTERNATIONAL INC CUSTOMER SERVICE 1200 EAST 151st STREET OLATHE KS 66062 USA 3 Garmin EUROPE LTD LIBERTY HOUSE HOUNSDOWN BUSINESS PARK SOUTHAMPTON SO40 9LR UNITED KINGDOM OR 4 Garmin CORPORATION CUSTOMER SERVICE No ...

Page 145: ...ducts services processes hypertext links to third parties or other Data by trade name trademark manufacturer supplier or otherwise does not necessarily constitute or imply its endorsement sponsorship or recommendation by Garmin or its licensors Product and service information are the sole responsibility of each individual vendor The NAVTEQ name and logo the NAVTEQ and NAVTEQ ON BOARD trademarks an...

Page 146: ...ht treaties THIS is a legal Agreement between you the end user and DMTI Spatial Inc BY LOADING THE PRODUCT S WITH THIS AGREEMENT YOU ARE AGREEING TO BE BOUND BY THE TERMS OF THIS AGREEMENT IF YOU DO NOT AGREE TO THE TERMS OF THIS AGREEMENT PROMPTLY within 7 days of purchase RETURN THE PRODUCTS AND ANY ACCOMPANYING ITEMS including written materials TO Garmin INTERNATIONAL INC CUSTOMER SERVICE 1200 ...

Page 147: ...SS ACCURACY MERCHANTABILITY OR FITNESS FOR A PARTICULAR PURPOSE THE ENTIRE RISK AS TO THE QUALITY AND PERFORMANCE OF THE LICENSED PRODUCT S IS WITH YOU THE END USER NO ORAL OR WRITTEN ADVICE GIVEN BY DMTI SPATIAL OR ITS DEALERS DISTRIBUTORS AGENTS OR EMPLOYEES CREATES A WARRANTY OR IN NAY WAY INCREASES DMTI SPATIAL S LIABILITY AND YOU MAY NOT RELY ON ANY SUCH INFORMATION OR ADVICE No statement or ...

Page 148: ...ent permitted by applicable law any and all warranties of any kind whatsoever with regard to the traffic data are hereby expressly waived and excluded including but not limited to those of merchantability fitness for a particular purpose accuracy or completeness of the traffic data and or a lack of viruses Garmin and its Traffic Service Provider s disclaim all liability for any loss injury or dama...

Page 149: ...lays Kenwood audio When using audio this displays navigation information The hands free phone feature is only available if your mobile phone has Bluetooth wireless technology and has been paired to the navigation system See the other Kenwood manuals and your phone manual for setup and pairing instructions DNX5180 does not have Bluetooth functionality Help When You Need It Touch Tools Help to get m...

Page 150: ...addresses cities and other locations The detailed map loaded in your navigation system contains millions of points of interest such as restaurants hotels and auto services Finding a Restaurant 1 Touch Where To 2 Select a category 3 Select a subcategory 4 Select a type 5 Select a place 6 Select Press for More to see the Review page 7 Touch Go ...

Page 151: ... add a stop Via Point to your route The navigation system gives you directions to the stop and to your final destination 1 With a route active touch back icon Where To 2 Search for the extra stop 3 Touch Go 4 Touch Add As a Via Point to add this stop before your destination If you want to add more than one stop to the route edit the current route See page 18 Taking a Detour If a road on your route...

Page 152: ...Touch to create a turn by turn route to this location Touch to return to the previous page DNX5180 does not have Bluetooth functionality Touch to view more information about the location Touch to switch between a 3D three dimensional map and a 2D two dimensional map Touch to rotate the viewing angle in 3D view Finding an Address The steps to find an address can vary depending on the maps that are ...

Page 153: ...Touch to add a space Touch and to move the cursor Touch to delete the character or touch and hold to delete the entire entry Touch to select words you have recently typed and selected Touch Mode to change the keyboard language mode Touch to enter special characters Finding Places in a Different Area You can search for locations in a different area such as a different city or near your destination ...

Page 154: ...set a Home Location for the place you return to most often 1 Touch Where To Go Home 2 Select an option Enter My Address enter an address for the location using the on screen keyboard Use My current location set your current location as your Home Location Choose from Recently Found select a location from your recently found locations After you set your Home Location touch Where To Go Home Favorites...

Page 155: ... 4 Touch Edit 5 Touch the item you want to edit Change Name enter a new name for the location using the on screen keyboard Change Map Symbol touch a new symbol Change Phone Number enter a phone number Change Categories create or change the category in which this location is saved Deleting a Favorite 1 Touch Tools My Data 2 Touch Delete Favorite s 3 Select the Favorite to delete 4 Touch Delete ...

Page 156: ...e text bar to open the Turn List See page 17 Touch to zoom in Touch to zoom out Touch to change the data field Touch to view the Where Am I page Touch the Speed data field to open the Trip Computer A speed limit icon may appear as you travel on major roadways This icon displays the current speed limit of the roadway Trip Computer The Trip Computer displays your current speed and provides helpful s...

Page 157: ...r left corner of the Map page or touch any turn on the Turn List page About Junction View When available the Lane Assist page may display a view of the upcoming junction and in which lane you should be driving You must be navigating a route before you can view the junction You can also view junctions from the Turn List page The Lane Assist page with Junction View is available on the DNX9980HD DNX7...

Page 158: ...ove points from the route Manually Reorder Points change the order of points along your route Optimally Reorder Points automatically order the points Recalculate recalculate the route Delete remove this route Your changes are saved automatically when you exit any of the route edit pages Saving and Modifying the Active Route 1 Touch Where To or Tools Routes 2 Touch Active Route 3 Touch Add or Remov...

Page 159: ...ute as quickly as possible If the route you are currently taking is the only reasonable option the navigation system might not calculate a detour Using Multiple Route Preview See page 26 to enable multiple route preview with Route Preferences Multiple Route Preview is not available on the DNX9980HD 1 Select a point of interest page 10 A map appears with Faster Time Shorter Distance and Less Fuel r...

Page 160: ...her your ecoChallenge scores the more fuel you save The ecoChallenge collects data and calculates a score whenever you are moving The ecoChallenge icon displays your current score on the map Touch Tools ecoRoute ecoChallenge To view detailed ecoChallenge scores touch the icon The leaf color on the driving challenge icon changes depending on your performance in the challenge About ecoChallenge Scor...

Page 161: ... the distance the time the average fuel economy and the fuel cost of navigating to a destination A mileage report is created for every route that you drive If you stop a route on the device a mileage report is created for the distance you traveled Mileage reports are created automatically when you stop or complete routes Viewing a Mileage Report You can view the 20 most recent mileage reports 1 To...

Page 162: ...ithout repairing the source of the erro may result in a return of the check engine light Consult your vehicle repair technician for additional details Gauges ecoRoute HD View real time information about your vehicle such as RPM and battery voltage Touch Tools ecoRoute Gauges The information displayed on the gauges page is collected from your vehicle Garmin is not responsible for the content displa...

Page 163: ...mpt before speaking your next command Speaking Shortcut Commands 1 Speak any shortcut command from the Shortcut Commands list You can use shortcut commands from any screen 2 Listen for the voice prompt before speaking your next command Shortcut Commands Cancel Route Go Home Detour Help Find Address Stop Listening Find City Tools Menu Find Favorite Trip Computer Find Place by Category View Map Find...

Page 164: ...ak Yes to navigate to the place or speak No to go back to the list of found places Yes Speaking an Address 1 Speak Find Address from any screen 2 Respond to the prompts to speak or spell the city name the house number and the street 3 Listen for the voice prompt and speak the name of the place The navigation system repeats the name of the place as it is searching A list of places appears 4 Speak t...

Page 165: ...or stopped Gray No data Traffic data has not updated Traffic on Your Route When calculating your route the navigation system examines the current traffic and automatically optimizes the route for the shortest time If a severe traffic delay occurs on your route while you are navigating the navigation system automatically recalculates the route You might still be routed through traffic if no better ...

Page 166: ...view the maps loaded on your navigation system and their version Touch a map to enable check mark or disable no check mark that map Restore restore the original map settings Changing the Navigation Settings Touch Settings Navigation Route Preference select a preference for calculating your route Avoidances select the road types you want to avoid or you would prefer to use on your routes Restore re...

Page 167: ...ge Voice Language select a voice Keyboard select the keyboard for your language You can also change the keyboard language mode from any keyboard by touching the Mode button Recognition Prompt turn speech recognition prompts on or off Restore restore the original languages Adding Security Touch Settings Security Safe Mode turn safe mode on or off When your vehicle is moving safe mode disables all f...

Page 168: ... you insert a memory card 1 Go to www garmin com Kenwood 2 Find your model and select Software Updates Download 3 Read and accept the terms of the Software License Agreement 4 Follow the instructions on the Web site to complete the installation of the software update Updating the Map Data You can purchase updated map data from Garmin or ask your Kenwood dealer or Kenwood service center for details...

Page 169: ... POI Loader is available at www garmin com products poiloader Refer to the POI Loader Help file for more information click Help to open the Help file The unit may restart when you insert a memory card Each time you load custom POIs to the navigation system any other custom POIs already saved in the system will be overwritten Finding Custom POIs To view a list of the custom POIs loaded in your navi...

Page 170: ......

Page 171: ......

Page 172: ...01307 90 Rev A Garmin and the Garmin logo are trademarks of Garmin Ltd or its subsidiaries registered in the USA and other countries ecoRoute is a trademark of Garmin Ltd or its subsidiaries These trademarks may not be used without the express permission of Garmin NAVTEQ is a trademark of NAVTEQ Inc or its affiliates and is registered in one or more countries including the U S The Bluetooth word m...

Page 173: ... GPS NAVIGATIONSSYSTEM Tabelle mit Sprachbefehlen GPS NAVIGATIESYSTEEM Tabel met spraakopdrachten SISTEMA DI NAVIGAZIONE GPS Tabella comandi vocali SISTEMA DE NAVEGACIÓN GPS Tabla de comandos de voz SISTEMA DE NAVEGAÇÃO GPS Tabela de comandos de voz B59 2067 00 00 KW EW 2010 Kenwood Corporation All Rights Reserved ...

Page 174: ...te EM ESPERA Standby Standby Veille Switches toTuner source Bascule en sourceTuner syntoniseur Umschalten aufTuner Betrieb Schakelt over naar tuner als bron Passa alla sorgente sintonizzatore Cambia a la fuente de sintonizador Comuta para a fonte Sintonizador Tuner Tuner Tuner Switches to HD Radio source Bascule en source HD Radio Umschalten auf HD Radio Betrieb Schakelt over naar HD radio als bro...

Page 175: ...dio SIRIUS XM TV 8 DVD iPod USB Bluetooth 10 Sprachbefehle für den Listenbildschirm 16 Wiedergabebildschirm einer Bild Videoquelle 18 Bildschirm zur Steuerung der Freisprecheinrichtung 20 Inhoudsopgave Algemene werking 2 Hoofdmenuscherm 6 Bronregelscherm Radio HD Radio SIRIUS XM TV 8 DVD iPod USB Bluetooth 10 Spraakopdracht voor lijstscherm 16 Afspeelscherm van een visuele bron 18 Scherm voor hand...

Page 176: ...la sorgente XM Cambia a la fuente de XM Comuta para a fonte XM XM XM XM Switches to Pandora source Bascule en source Pandora Umschalten auf Pandora Betrieb Schakelt over naar Pandora als bron Passa alla sorgente Pandora Cambia a la fuente de Pandora Comuta para a fonte Pandora Pandora Pandora Pandora Switches to Bluetooth Audio source Bascule en source audio Bluetooth Umschalten auf Bluetooth Audi...

Page 177: ...P Pour des informations relatives a aux commandes vocales du s système de navigation veuillez v vous reporter au manuel d d instructions de ce dernier W Wissenswertes über d die Sprachbefehle des N Navigationssystems erfahren S Sie in der Bedienungsanleitung d des Navigationssystems R Raadpleeg de i instructiehandleiding v van het navigatiesysteem v voor informatie over de s spraakopdrachten voor ...

Page 178: ...ntale Muestra la vista desde la cámara de vista frontal Apresenta a visão a partir da câmara de visão dianteira Front Camera Front camera Caméra avant Switches the AV OUT source Bascule en source AV OUT Umschalten auf die Quelle AV OUT Schakelt over naar AV OUT als bron Passa alla sorgente AV OUT Cambia a la fuente de AV OUT Comuta a fonte AV OUT AV OUT AV OUT SORTIE AV Canceling the voice control...

Page 179: ...ncella Cancelar Commandevocale Sprachbefehl Spraakopdracht Comandovocale Comandodevoz Comandodevoz French Français Französisch Frans Francese Francés Francês German Allemand Deutsch Duits Tedesco Alemán Alemão Dutch Néerlandais Niederländisch Nederlands Olandese Holandés Holandês Italian Italien Italienisch Italiaans Italiano Italiano Italiano Spanish Espagnol Spanisch Spaans Spagnolo Español Espa...

Page 180: ...e commande de la source Quellensteuerungsbildschirm Bronregelscherm Schermata di controllo sorgente Pantalla de control de fuente Ecrã de controlo da fonte Radio HD Radio SIRIUS XM TV Screen Écran Bildschirm Scherm Schermata Pantalla Ecrã Name of the button Nom de la touche Taste Naam van toets Nome del tasto Nombre del botón Nome do botão VoiceCommand US English Anglais USA Englisch USA Amerikaan...

Page 181: ...t de fond Menüdesign Skin aanpassen Cambia skin Cambio de aspecto Commandevocale Sprachbefehl Spraakopdracht Comandovocale Comandodevoz Comandodevoz French Français Französisch Frans Francese Francés Francês German Allemand Deutsch Duits Tedesco Alemán Alemão Dutch Néerlandais Niederländisch Nederlands Olandese Holandés Holandês Italian Italien Italienisch Italiaans Italiano Italiano Italiano Span...

Page 182: ...hannels All Channels Sirius XM HD Radio Channel List Info Change Info Change Info Change DVD iPod USB Bluetooth Screen Écran Bildschirm Scherm Schermata Pantalla Ecrã Name of the button Nom de la touche Taste Naam van toets Nome del tasto Nombre del botón Nome do botão VoiceCommand US English Anglais USA Englisch USA Amerikaans Engels Inglese USA Inglés EE UU Inglês americano UK English Anglais GB...

Page 183: ...ag Etiqueta Tous les canaux Alle Kanäle Alle kanalen Tutti i canali Todos los canales Changement d informations Info ändern Wijzig Modifica info Cambio de información Commandevocale Sprachbefehl Spraakopdracht Comandovocale Comandodevoz Comandodevoz French Français Französisch Frans Francese Francés Francês German Allemand Deutsch Duits Tedesco Alemán Alemão Dutch Néerlandais Niederländisch Nederl...

Page 184: ...d Sucht ein Musikvideo auf iPod Zoekt een muziekvideo op de iPod Ricerca un video musicale sull iPod Busca un vídeo musical en el iPod Procura um vídeo de música no iPod Search MusicVideo Search music video Searches aTV show on iPod Cherche un programmeTV sur l iPod Sucht eineTV Sendung auf iPod Zoekt een tv show op de iPod Ricerca uno spettacolo televisivo sull iPod Busca un programa deTV en el i...

Page 185: ...ca genere Buscar Género Recherche de playlist Suche Play Liste Zoek op afspeellijst Cerca Playlist Buscar Lista de Reproducción Recherche de clips vidéos Suche musikvideo Zoek muziek video Ricerca video musicale Buscar vídeo musical Recherche de programmeTV SucheTV show ZoekTV show Ricerca spettacoloTV Buscar programa deTV Recherche de film Suche film Zoek film Ricerca video Buscar película Recher...

Page 186: ...n iPod USB MUSIC Music Music VIDEO Video Video LINK Link Link iPod Device Device Device USB Picture Picture Picture Folder Folder List Folder List iPod List USB List A Search A Search A B Search B Search B C Search C Search C Z Search Z Search Z Search Mark Search Mark Search Other Search Other 1 Search Number Search Number DVD MEDIA List ROOT Root Root UP Folder Up Folder Up CUR Current Current O...

Page 187: ... por C Recherche Z Suche Z Z zoeken Ricerca Z Buscar por Z Recherche de marque Suche Markierung Markering zoeken Ricerca marcata Buscar por marca Autre recherche Suche andere Andere zoeken Ricerca altro Buscar otros Recherche numéro Suche Nummer Zoeknummer Numero ricerca Buscar número Racine Root Hoofd Princ Raíz Dossier sup Ordner nach oben Map omhoog Cartella su Carpeta siguiente Actuel Aktuell ...

Page 188: ... Ecrã da lista de qualquer fonte Control Screen Control Screen Return Return Scrollbarup Barre de défilement vers le haut Bildlaufleiste nach oben Schuifbalk omhoog Barra di scorrimento in alto Barra de desplazamiento superior Percorrer barra para cima Page Up Page Up Scrollbardown Barre de défilement vers le bas Bildlaufleiste nach unten Schuifbalk omlaag Barra di scorrimento in basso Barra de de...

Page 189: ...pagnolo Español Espanhol Écran de commande Steuerbildschirm Scherm besturen Scherm di controllo Pantalla de control Retour Zurück Terug Indietro Retorno Haut de page Seite nach oben Pagina omhoog Pagina su Página siguiente Bas de page Seite nach unten Pagina omlaag Pagina giù Página anterior Ligne une Leitung eins Lijn één Linea uno Línea uno Nom de la liste Name der Liste Naam van de lijst Nome d...

Page 190: ... up Cursor up Moves the cursor down Déplace le curseur vers le bas Bewegt den Cursor nach unten Verplaatst de cursor omlaag Sposta il cursore in basso Mueve el cursor hacia abajo Move o cursor para baixo Cursor down Cursor down Moves the cursor right Déplace le curseur vers la droite Bewegt den Cursor nach rechts Verplaatst de cursor naar rechts Sposta il cursore a destra Mueve el cursor hacia la ...

Page 191: ...ans Spagnolo Español Espanhol Menu Menü Menu Menu Menú Entrer Eingabe Invoeren Invio Intro Retour Zurück Terug Indietro Retorno Curseur sup Cursor rauf Cursor naar boven Cursore su Cursor Arriba Curseur inf Cursor runter Cursor naar beneden Cursore giù Cursor Abajo Curseur Droite Cursor rechts Cursor naar rechts Cursore destra Cursor Derecha Curseur Gauche Cursor links Cursor naar links Cursore si...

Page 192: ...handsfreescherm weer Visualizza la schermata vivavoce Muestra la pantalla de manos libres Apresenta o ecrã mãos livres Hands Free Hands Free Displays the Phonebook Search Affichelarecherchedanslerépertoiretéléphonique Zeigt dieTelefonbuch Suche an Geeft het scherm voor het zoeken naar telefoonnummers in het telefoonboek weer Visualizza la ricerca nella rubrica Muestra la búsqueda en la agenda Apre...

Page 193: ... perse Llamadas perdidas Appeler numéro Nummer anrufen Bel nummer Chiamata verso Llamar a Número Composer un numéro Dial anzahl Nummer Componi numero Marcar el número SMS SMS SMS SMS SMS Texte Text Tekst Testo Texto Rappeler Wahlwiederholung Herh Rip Rellamada Appeler présélection une Speicher eins anrufen Bel voorkeur één Richiamo mem uno Llamar memoria Uno Appeler présélection deux Speicher zwei...

Page 194: ...ea nell elenco Seleccionar la 2ª línea de la lista Seleccionar a 2ª linha da lista LineTwo LineTwo Name of the list Name of the list Selects the 5th line in the list Sélectionner la 5e ligne de la liste Wählt die 5 Zeile der Liste aus Selecteer de vijfde regel in de lijst Selezionare la 5ª linea nell elenco Seleccionar la 5ª línea de la lista Seleccionar a 5ª linha da lista Line five Line five Nam...

Page 195: ...a cinque Línea cinco Nom de la liste Name der Liste Naam van de lijst Nome dell elenco Nombre de la lista Haut de page Seite nach oben Pagina omhoog Pagina su Página siguiente Bas de page Seite nach unten Pagina omlaag Pagina giù Página anterior Recherche A Suche A A zoeken Ricerca A Buscar por A Recherche B Suche B B zoeken Ricerca B Buscar por B Recherche C Suche C C zoeken Ricerca C Buscar por ...

Page 196: ......

Page 197: ...gurese de acoplar el nucleo ferritico suministrado con esta unidad para evitar el ruido electromagnetico Accesorios Nucleo ferritico Grande x 3 Nucleo ferritico Pequeiias x 1 USB terminal Prise USB Terminal USB Ferritic core Large Noyau de ferrite Large Nucleo ferritico Grande Ferritic core Small Noyau de ferrite Small Nucleo ferritico Pequeiias JJ GPS Antenna AntenneGPS Antena GPS 30 180 mm 1 3 1...

Page 198: ... this device does not cause harmful interference IAATTENTION I Cet equipement est conforme aux Iimites d exposition aux rayonnements enoncees pour un environnement non contr61e et respecte les regles d exposition aux frequences radioelectriques RF CNR l 02 de I IC Cet equipement emet une energie RF tres faible qui est consideree conforme sans evaluation de I exposition maximale autorisee Cependant...

Page 199: ... type de support varie d un modele aI autre Pour en savoir plus rendez vous sur Ie site Internet suivant http www garmin com kenwood Peripherique USB Peripherique USB Peripherique USB Peripherique USB 1 DNX9980HD DNX9280BT 2 DNX7180 DNX7280BT DNX6980 DNX6180 DNX6040EX DNX5180 DNX5280BT DNX4280BT DNX7380BT DNX7380BTM DNX7480BT DNX6480BT DNX5380BT DNX5380 DNX5380M DNX5580BT 3 Non applicable Informac...

Page 200: ...Ver l 0 WOl 2002 0S DNX9980HD DNX9280BT ThiS CO ROM D ta cannot be played on an audio CO player INSTRUCTION MANUAL MODE D EMPLOI KENWOOD ...

Reviews: