Kenwood DDX6703S Instruction Manual Download Page 19

ENGLISH

19

DISCS

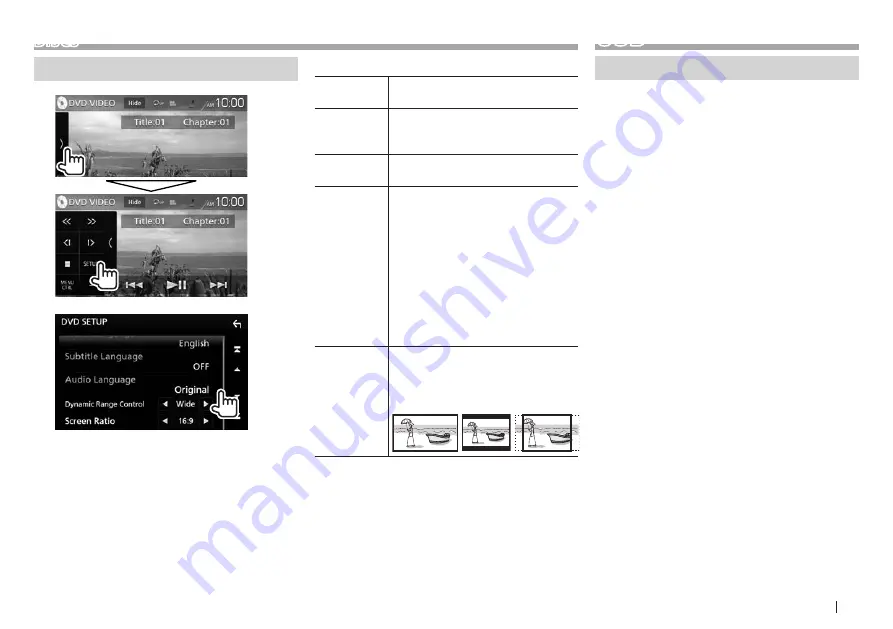
Settings for DVD playback

1


2


• 

Scroll the page to show more items.

• 

Available items shown on the <DVD SETUP> 

screen differ depending on the type of disc/file 

being played back.


Setting items

[Menu 

Language]*

Select the initial disc menu language. 

(Initial: English) (Page 88)

[Subtitle 

Language]*

Select the initial subtitle language 

or turn subtitles off (Off). (Initial: 

English) (Page 88)

[Audio 

Language]*

Select the initial audio language. 

(Initial: English) (Page 88)

[Dynamic 

Range 

Control]*

You can change the dynamic range 

while playing using Dolby Digital 

software.

• 

Wide: Select this to enjoy a 

powerful sound at a low volume 

level with its full dynamic range.

• 

Normal: Select this to reduce the 

dynamic range a little.

• 

Dialog (Initial): Select this to 

reproduce movie dialog more 

clearly.

[Screen 

Ratio]*

Select the monitor type to watch a 

wide screen picture on the external 

monitor.

16:9

4:3 LB 

4:3 PS (Initial)

*

  You can change these settings only while DVD is not inserted.

USB

Connecting a USB device

You can connect a USB mass storage class device 

such as a USB memory, Digital Audio Player, etc. to 

the unit.

• 

For details about connecting USB devices, see 

page 81.

• 

You cannot connect a computer or portable HDD 

to the USB input terminal.

• 

For playable file types and notes on using USB 

devices, see page 87.

1

  Connect the USB device to the unit with an 

USB cable.

2

  Select “USB” as the source. (Page 13)


To disconnect the USB device

1

  Select a source other than “USB”

(Page 13)

2

  Detach the USB device.

Summary of Contents for DDX6703S

Page 1: ...ou obtain the best performance from your new DVD receiver For your records Record the serial number found on the back of the unit in the spaces designated on the warranty card and in the space provided below Refer to the model and serial numbers whenever you call upon your Kenwood dealer for information or service on the product Model DDX9903S DDX9703S DDX6903S DDX6703S Serial number US Residents ...

Page 2: ...operations using the buttons on the monitor panel and touch panel For operations using the remote controller RC DV340 supplied only for DDX9716BTS DDX916WSL see page 75 indicates the various screens menus settings that appear on the touch panel indicates the buttons selectable items on the touch panel Indication language English indications are used for the purpose of explanation You can select th...

Page 3: ...pt any interference including interference that may cause undesired operation of the device The term IC before the certification registration number only signifies that the Industry Canada technical specification were met CAUTION This equipment complies with FCC IC radiation exposure limits set forth for an uncontrolled environment and meets the FCC radio frequency RF Exposure Guidelines in Supple...

Page 4: ...ed language Clock Calendar clock settings Page 6 Color Select the color of the buttons on the monitor panel Page 69 Touch Panel Color then select the desired color Camera Configure settings for the connected camera Page 45 OEM SETUP Configure settings for ADS adapter Page 73 DEMO Activate ON or deactivate OFF the display demonstration Page 74 2 Finish the procedure The Home screen is displayed Onl...

Page 5: ...security code Touch Security Code Change on the Security screen then repeat steps 5 and 6 To clear the security code Touch Security Code Cancellation on the Security screen Activating the security function Only for DDX9903S DDS9703S DDX6903S DDX6703S DDX9716BTS You can activate the security function to protect your receiver system against theft 1 Display the Security screen Page 4 2 Activate the s...

Page 6: ...ith the GPS Manual Sets the clock manually See the right column To close the window touch Close 5 Select the appropriate time zone for Time Zone To return to the Home screen press HOME on the monitor panel or touch to return to the previous screen To adjust the clock manually when selecting Manual on the Clock window 1 Display the Clock Adjust screen On the User Interface screen see the far left c...

Page 7: ...plays the App CarPlay Android Auto Mirroring screen Press Pages 25 and 27 Activates the voice control function Hold When a Bluetooth mobile phone is connected Activates the voice dialing Page 57 When an Android device compatible with Android Auto is connected Activates voice control Page 25 When iPod iPhone compatible with Apple CarPlay is connected Activates Siri Page 26 9 M Eject button Displays...

Page 8: ...age 46 2 Volume K J button Adjusts the audio volume Page 9 3 HOME B button Displays the Home screen Press Page 10 Turns on the power Press Page 9 Turns off the power Hold Page 9 4 MENU button Displays the pop up short cut menu Press Page 14 5 VOICE button Displays the App CarPlay Android Auto Mirroring screen Press Pages 25 and 27 Activates the voice control function Hold When a Bluetooth mobile p...

Page 9: ...DX6703S Turn to the right to increase and turn to the left to decrease Turning off the screen Select Display OFF on the pop up short cut menu Page 14 To turn on the screen Touch the display Monitor panel operations Angle Adjust Only for DDX9903S DDX9703S DDX9716BTS DDX916WSL 1 Display the Angle Adjust screen DDX9903S DDX9703S DDX9716BTS DDX916WSL 2 Exits the Angle Adjust screen 0 6 Selects a monit...

Page 10: ... screen to change the page Swipe Slide your finger up or down on the screen to scroll the screen Home screen descriptions You can select playback sources display setting screens or display information on the Home screen To display the Home screen press HOME on the monitor panel 5 6 7 4 3 2 1 Common operation buttons and indications 1 Displays the control screen of current source 2 Widget Touching ...

Page 11: ... the selected source 6 7 5 4 2 3 1 Common operation buttons and indications 1 Current source or media 2 Connected Bluetooth device information Page 50 3 Battery charge indication Lights up when quick charging battery of the connected iPod iPhone Smartphone 4 Displays the other operation button window 1 5 Displays the source option selection screen See the left column 6 Short cut source selection b...

Page 12: ...e of file media being played back 1 Displays list type selection window 2 Returns to the previous screen 3 Scrolls the text if not all of the text is shown 4 Searches for a folder track I Play Plays all tracks in the folder containing the current track A Z Enters the initial search mode Top Returns to the top layer Up Returns to the upper layer 5 Changes the page J K Scrolls the page You can also ...

Page 13: ...rminal Page 46 AV IN 7 or AV IN2 6 Switches to an external component connected to the AV IN 7 or AV IN2 6 input terminal Page 46 NAVI 8 Displays the navigation screen when a navigation unit is connected Page 49 Audio Displays the sound adjustment screen Page 63 STANDBY Puts the unit in standby Page 10 Displays the SETUP menu screen Page 72 Only for DDX9903S DDX9703S DDX6903S DDX6703S For sources a...

Page 14: ...ection screen You can arrange the items to display on the source option selection screen Touch and hold the item you want to move until boxes appear around the icons then drag it to the position you want to move it to Hold Using the pop up short cut menu While displaying the source control screen you can jump to another screen from the pop up short cut menu 1 Display the pop up short cut menu DDX9...

Page 15: ...st screen DDX6903S DDX6703S When removing a disc pull it horizontally You can eject a disc when playing another AV source If the ejected disc is not removed within 15 seconds the disc is automatically inserted again into the loading slot to protect it from dust To eject a disc forcibly Press and hold M on the monitor panel A confirmation message appears Touch OK To close the monitor panel Only for...

Page 16: ...ther operation button window For audio playback 5 4 6 3 2 1 Playback information The information displayed on the screen differs depending on the type of disc file being played back 1 Media type 2 Playback mode Page 18 3 Track file information Touching scrolls the text if not all of the text is shown 4 Jacket picture Shown while playing if the file has tag data that includes the jacket picture 5 F...

Page 17: ...search in the folder containing the current track Scroll the page to show more items To hide the list touch Activating PBC Playback Control function for VCD only While playing a VCD with PBC The PBC indicator lights up To select a track directly while PBC is activated operate from the remote controller Page 75 To deactivate PBC Touch PBC The PBC indicator turns off For DDX9903S DDX9703S DDX6903S D...

Page 18: ... to the playback screen Angle Selects the view angle Subtitle Selects the subtitle type Audio Selects the audio type J K H I Selects an item Selecting playback mode Selects Repeat playback mode Selects Random playback mode Available playback modes differ depending on the type of disc file being played back Each time you touch the button the playback mode changes The current playback mode is shown ...

Page 19: ...full dynamic range Normal Select this to reduce the dynamic range a little Dialog Initial Select this to reproduce movie dialog more clearly Screen Ratio Select the monitor type to watch a wide screen picture on the external monitor 16 9 4 3 LB 4 3 PS Initial You can change these settings only while DVD is not inserted USB Connecting a USB device You can connect a USB mass storage class device suc...

Page 20: ...being played back Hide Hides the indicators and buttons Displays the other operation button window To hide the window touch Displays the track list of the folder containing the current track To hide the list touch Selects Repeat playback mode Repeats the current track file Repeats all tracks files in the current folder or specified category ALL Repeats all tracks files in the USB device Randomly p...

Page 21: ...ist 2 Select the desired track Proceed until you select the desired track For details about the list operation see page 12 From Folder List Select the folder then the item in the selected folder To search in the folder containing the current track Scroll the page to show more items To hide the list touch ...

Page 22: ...input terminal using KCA HD100 optional accessory Page 81 For 30 pin connector models You cannot watch video with a Bluetooth connection Connection with KCA HD100 is available only for DDX9903S DDX9703S DDX9716BTS DDX916WSL For DDX6903S DDX6703S you cannot watch the video when connecting iPod iPhone Lightning connector models Selecting the connection method 1 Display the source option selection sc...

Page 23: ...rk 4 File type Operation buttons Available buttons on the screen and operations differ depending on the type of file being played back Displays the track list of the category containing the current track To hide the list touch Selects Repeat playback mode Functions the same as Repeat One ALL Functions the same as Repeat All Selects random playback mode Functions the same as Shuffle Songs Functions...

Page 24: ...peration see page 12 From Category List Select a category then the item in the selected category Available categories differ depending on the type of your iPod iPhone From Link Search Select the tag type to display a list of content that contains the same tag as the track file currently being played then select the item To search in the folder containing the current track Scroll the page to show m...

Page 25: ...n To use the navigation function of Google Maps connect a GPS antenna Page 84 1 Set Automotive Mirroring to ON Page 26 2 Connect an Android device using a Micro USB to USB cable commercially available Page 82 To use the hands free function connect the Android device via Bluetooth Page 50 When an Android device compatible with Android Auto is connected to the USB input terminal the device is connec...

Page 26: ... com ios featureavailability applecarplay applecarplay Preparation To use the navigation function of the maps App connect a GPS antenna Page 84 1 Configure the settings to use Apple CarPlay on the AV screen On the Home screen or the source control screen Automotive Mirroring Select ON to use Apple CarPlay CarPlay Sidebar Select the position of the control bar left or right shown on the touch panel...

Page 27: ... of the connected iPod touch iPhone Android on this unit Preparation 1 Connect the iPod touch iPhone Android For wired connection see page 81 for iPod touch iPhone or page 82 for Android To view video connect the device using KCA HD100 optional accessory For Bluetooth connection see page 50 2 Set Automotive Mirroring to OFF Page 26 3 Select the device to use and connection method on the APP Connec...

Page 28: ...ndications and buttons on the source control screen 7 8 9 6 2 1 4 5 3 HD Radio reception information 1 Picture or station logo if available 2 Seek mode Page 29 3 Text information Touching scrolls the text if not all of the text is shown Touching switches the information as follows Frequency station name song title artist name Frequency station message Radio Text Frequency PTY genre album name 4 HD...

Page 29: ...el search screen Page 30 AME Presets stations automatically Page 31 RCV Changes the HD Radio reception mode See below PTY Enters PTY search mode Page 30 Bookmarks tag information about the current track Page 32 Emergency Alerts Activates deactivates the reception of the emergency alert message Page 33 Alert Message Log Displays the received emergency alert message list Page 33 To display all avail...

Page 30: ... for a channel from the desired category on the channel list 1 Display the channel list 2 Select the desired channel Scroll the page to show more items To switch the sequence of the list between song title artist name album name touch Info Change Searching for FM HD Radio programs PTY Search You can search for your favorite programs being broadcast by selecting the PTY code 1 Display the PTY Searc...

Page 31: ...s The local stations with the strongest signals are found and stored automatically Manual presetting 1 Tune in to a station you want to preset Page 29 2 Display the preset list 3 Select a preset number to store Hold The station selected in step 1 is stored Scroll the page to show more items To hide the list touch Selecting a preset station from the list Scroll the page to show more items To hide t...

Page 32: ... a bookmarked track 1 Display the Bookmarks List screen 2 Display the information of a bookmarked track Scroll the page to show more items on the Bookmarks List screen The track information and QR cord are displayed To delete the current bookmark touch Delete Deleting a bookmark 1 Display the Bookmarks List screen 2 Display the Bookmarks Delete List screen 3 Select bookmarked tracks to delete 1 th...

Page 33: ...ceive an emergency alert message the following screen is displayed Check the message select the interval time to receive the same emergency alert message close the alert message screen Snooze The same emergency alert message will not interrupt again for 10 minutes Ignore The same emergency alert message will not interrupt again for 12 hours Displaying received emergency alert messages The received...

Page 34: ...de the window touch Displays the preset list To hide the list touch AM Selects the AM band FM Selects the FM band Displays the Graphic Equalizer screen Page 64 S T Searches for a station The search method differs according to the selected seek mode See above TI Activates deactivates TI standby reception mode Page 35 AME Presets stations automatically See the right column PTY Enters PTY search mode...

Page 35: ...is tuned in Activating deactivating TI Standby Reception You can receive traffic information even while listening to another source by activating TI Standby Reception The unit is in standby to switch to Traffic Information TI if available The TI indicator lights up in the following cases Lights in white Receives the Traffic Information Lights in orange On standby for traffic information reception ...

Page 36: ...two methods below For users in the U S A Online Visit www siriusxm com activatenow Phone Call SiriusXM Listener Care at 1 866 635 2349 For users in Canada Online Visit www siriusxm ca activatexm Phone Call XM customer Care at 1 877 438 9677 3 When a confirmation message is displayed touch Return Listening to the SiriusXM Satellite Radio Indications and buttons on the source control screen Live mod...

Page 37: ...and live mode screen Page 36 Tune Scan Starts TuneScan Page 40 Tune Mix Presets channels automatically with your favorites Page 41 To display all available operation buttons touch to display the other operation button window Selecting a channel Select a channel by specifying a channel number Direct Channel You can search for a station by entering the desired channel number 1 Display the Direct Cha...

Page 38: ...the list touch Replay You can pause rewind and replay content from the currently tuned channel The SiriusXM Connect Vehicle Tuner continually buffers up to 60 minutes of audio If you change to another channel during playback the Replay buffer content will be lost Indications on the Replay mode screen 2 1 1 Replay time bar Shows the remaining capacity gray and the amount of buffered content blue If...

Page 39: ...ng S after 2 seconds or more of the track have been replayed returns to the beginning of the current track segment To rewind fast forward touch and hold S T Replaying content from a list of recorded data on a program basis Instant Replay list 1 Display the Instant Replay List screen 2 Select the desired program Scroll the page to show more items To switch the sequence of the list between channel n...

Page 40: ...t is cleared and new channels in the current band will start buffering TuneStart When you select a SmartFavorites channel you can listen to the current song from the beginning Activating TuneStart 1 Display the SiriusXM SETUP screen 2 To deactivate TuneStart Touch TuneStart to select OFF TuneScan When you activate TuneScan you will hear 6 seconds of the songs which have not been listened to from e...

Page 41: ... band allowing you to build a custom channel from as few as 2 to as many as 6 music channels You can even skip songs you do not want to hear TuneMix is available only when you connect an SXV300 or later SiriusXM Connect Vehicle Tuner Activating TuneMix The Mix indicator lights up To deactivate TuneStart Touch Tune Mix The Mix indicator turns off ...

Page 42: ...The initial setting is 0000 Changing the code does not change the Parental Control Parental Lock Channel Selection settings 1 Display the SiriusXM SETUP screen 2 Display the Parental Code Set screen 3 Enter the four digit code 1 and then confirm 2 Touch to delete the last entry 4 Enter a new four digit code 1 and then confirm 2 Touch to delete the last entry 5 Repeat step 4 to confirm the new code...

Page 43: ...e When Parental Control is set to Mature or OFF you cannot change the Parental Lock Channel Selection setting 1 Display the SiriusXM SETUP screen Page 42 2 3 Enter the parental code The Parental Lock Category Select screen is displayed 4 Select the desired category Scroll the page to show more items 5 Select ON for channels you want to activate parental lock for Scroll the page to show more items ...

Page 44: ...for the channels you do not want to skip To switch the sequence of the list between channel name artist name song title category name content information touch Info Change Repeat steps 3 and 4 if you want to select channels to skip from other categories To clear the channel skipping for all skipped channels Touch Disable All in the Skip Category Select screen When a confirmation message appears to...

Page 45: ...ing to the size of the car parking space and so on See the right column Front Camera ON Activates the front view camera Select this to use the front view camera OFF Initial Select this when no camera is connected Front Camera Mirror Image ON Displays the picture from the front view camera horizontally reversed OFF Initial Displays the picture from the front view camera as it is Adjusting the parki...

Page 46: ...w camera Each time you touch the button the screen is switched between the rear view screen and the front view screen To exit the camera screen Using external audio video players AV IN When the operation buttons are not displayed on the screen touch the area shown on the illustration To change settings for video playback see page 68 Starting playback 1 Connect an external component to the input te...

Page 47: ...ter settings etc refer to the instructions supplied with the Wireless Display Adapter Displaying the screen of the smartphone You can display the screen of smartphones connected via the HDMI MHL input terminal 1 Connect your smartphone to the HDMI MHL input terminal Page 82 Use HDMI cable KCA HD100 optional accessory or MHL cable KCA MH100 optional accessory 2 Select HDMI MHL as the source Page 13...

Page 48: ...ome screen or the source control screen 2 Select ADS adapter features on the source option selection screen To display more items touch or flick to change the page Example when Vehicle Info is selected Available items with ADS adapter Vehicle Info Displays information about the tire pressure Radar Detector Displays information about the instruments such as the speedometer Gauges Displays the gauge...

Page 49: ...ations are available only for navigation The aspect ratio of the navigation screen is fixed to Full regardless of the Aspect setting Page 68 Checking the navigation information on the source control screen You can check the navigation information on the source control screen Touch or on the bottom of the source control screen to show navigation information Touching the information area displays th...

Page 50: ...ooth function on the unit 1 Display the source option selection screen On the Home screen or the source control screen 2 Display the SETUP screen 3 Display the Bluetooth Setup screen 4 Activate ON or deactivate OFF the Bluetooth function Registering and connecting a new Bluetooth device When you connect a Bluetooth device to the unit for the first time pair the unit and the device Pairing allows B...

Page 51: ...nitial 0000 To change PIN code see page 53 2 Determine usage as a mobile phone To use the Bluetooth device as a mobile phone select the hands free number Hands Free1 or Hands Free2 to connect the device for When you do not want to use the Bluetooth device as a mobile phone select No Connection To close the window touch Close 3 When your Bluetooth device is compatible with A2DP or SPP Determine usa...

Page 52: ... phone Connected as an audio player 6 Select the usage of the device Each time you touch the selection the usage is selected appears or deselected disappears Select to connect and deselect to disconnect the device TEL HFP 1 TEL HFP 2 Mobile phone Audio A2DP App SPP Audio player device with Apps installed To close the window touch Close Deleting a paired Bluetooth device 1 Display the Select Device...

Page 53: ...h to delete the last entry Touch H I to move the entry position Using a Bluetooth mobile phone Receiving a call When a call comes in Call information is displayed if acquired The call incoming screen is not displayed while the camera screen is displayed To display the call incoming screen shift the gear to the drive position Only for DDX6903S DDX6703S You can also display the call incoming screen ...

Page 54: ...volume level 10 to 10 initial 0 Echo Cancel Level Adjusts the echo volume 5 to 5 initial 0 Noise Reduction Level Adjusts the noise reduction volume 5 to 5 initial 0 To close the window touch Close You can also adjust these items on the TEL SETUP screen Page 59 Switching between handsfree mode and phone mode While talking Each time you touch the button the talking method is switched handsfree mode ...

Page 55: ...e Multi Frequency function 1 Display the tone input window While talking 2 Input the tone to send To close the window touch Close Making a call 1 Display the phone control screen On the Home screen or the source control screen Only for DDX6903S DDX6703S You can also display the phone control screen by pressing and holding the Volume MENU TEL knob on the monitor panel 2 Select a method to make a ca...

Page 56: ... the alphabetical order If the initial character is a number touch 1 and then select the number Touch to delete the last entry Touch to hide the keyboard 3 Select a contact to call Scroll the page to show more items 4 Select the phone number from the list to make a call Scroll the page to show more items You can select a first name or last name to use when sorting the list in alphabetical order on...

Page 57: ... Select a position to store into 4 Select a method to add a phone number to preset list then register the number to the preset list Add number from phonebook Select a phone number from the phonebook Page 56 Add number direct Enter a phone number on the direct number entry screen then touch Set to add to the preset list To close the window touch Close To display the preset list touch on the phone c...

Page 58: ...g the phonebook To close the Edit Phonebook window touch Close To cancel the transferring the phonebook touch Cancel To delete contact from the phonebook 1 Display the Edit Phonebook window See the far left column 2 Display the Delete Phonebook screen To close the window touch Close 3 Select contacts to delete 1 then delete them 2 appears beside the selected bookmarks Touch All to select all bookm...

Page 59: ...ork for some devices depending on the iOS version OFF Cancels Sort Order Select a first name or last name to use when sorting the list in alphabetical order First Sorts the list in the order of first name Last Initial Sorts the list in the order of last name Echo Cancel Level Adjusts the echo volume 5 to 5 initial 0 Noise Reduction Level Adjusts the noise reduction volume 5 to 5 initial 0 Using th...

Page 60: ...erse forward search 3 Hold I Starts playback W Pauses playback BT DEVICE CHANGE Switches the Bluetooth audio player To display all available operation buttons touch to display the other operation button window 1 To cancel random mode touch the button repeatedly until it is grayed out 2 Available only for devices compatible with AVRCP 1 5 3 Available only for devices compatible with AVRCP 1 3 Selec...

Page 61: ...ay the source option selection screen On the Home screen or the source control screen 2 Display the SETUP screen 3 Display the AV screen 4 Set Automotive Mirroring to OFF 5 Display the APP iPod SETUP screen 6 Select the device and connection method for APP Connection select Android Bluetooth Select this to use Apps with an Android device connected via Bluetooth iPhone Bluetooth Select this to use ...

Page 62: ...hts up Single Zone Selects the same source Front Source Selects the source for the front monitor Rear Source Selects the source for the rear monitor Rear VOL Adjusts the volume for the rear source When the rear speaker sound is switched the audio source that is output at the AV OUT AUDIO terminal is also switched to the same source When Zone Control is set to Dual Zone the following operations per...

Page 63: ... size of the selected speaker 2 A selection window appears for location and speaker tweeter setting Select an item then touch Close to close the window Repeat steps 1 and 2 to set all speakers When a speaker is not connected select None When setting the front speakers also select the speaker size for Tweeter 6 Display the X over screen 1 select the speaker type 2 then adjust the crossover frequenc...

Page 64: ...Display the Graphic Equalizer screen See the left column 2 Select a band and adjust the level of the selected band You can adjust the level by dragging the slider or using J K Repeat this step to adjust the level of other bands 3 Activate ON or deactivate OFF the bass Bass EXT 1 and then adjust the subwoofer level SW Level 2 Touch H I to adjust SW Level When Bass Ext is set to ON a frequency lower...

Page 65: ... speaker output to create a more suitable environment for your vehicle 1 Display the Position DTA screen See the left column 2 Display the DTA adjustment screen 3 Touch Delay 1 then adjust the Digital Time Alignment DTA value for each speaker 2 Touch H I to adjust the value To return to the initial setting of Delay and Level touch Initialize and YES in the confirmation screen 4 Touch Level 1 then ...

Page 66: ... precisely 2 Sound Image LR Front Adjusts the sound image to set on the front position Sound Image LR Rear Adjusts the sound image to set on the rear position Size of the Virtual Sound Field Adjusts the virtual sound field to the desired field size If the sound image moves out of the front position adjust Sound Image LR Front Sound Image LR Rear Subwoofer Delay Adjusts the time alignment of the su...

Page 67: ... volume output according to different sources You can adjust and store the auto adjustment volume level for each source The volume level will automatically increase or decrease when you change the source 1 Display the Audio screen Page 63 2 Display the Volume Offset screen 3 Adjust the volume output level for each source Scroll the page to show more items To initialize the setting value touch Init...

Page 68: ...nitial Small Medium Large Supreme Restores the sound lost due to audio compression to a realistic sound OFF ON Initial Realizer Virtually makes the sound more realistic using the Digital Signal Processor DSP system Select the sound level OFF Initial 1 2 3 Stage EQ You can move the center of the sound to the lower or higher point Select the height OFF Initial Low Middle High 1 You cannot change the...

Page 69: ...ully in the original aspect ratio USB Adjustable items are different depending on the current source The image quality can be set for each source Backlight and Black are common to all sources Changing the display design Customizing the panel color 1 Display the source option selection screen On the Home screen or the source control screen 2 Display the SETUP screen 3 Display the Display screen 4 D...

Page 70: ...ed on the connected USB device Use a JPEG file with a resolution of 800 x 480 pixels The color of the captured image may look different from that of the actual scene 1 Connect the USB device on which the image is stored Page 81 2 Display the Background screen See the left column 3 Select User1 Select or User2 Select to store the image for 4 Select the folder then the file for the background image ...

Page 71: ... Home screen or the source control screen 2 Display the SETUP screen 3 Display the Special screen 4 Select an option Audio SETUP Memory Memorizes the current audio setting Audio SETUP Recall Recalls the memorized audio setting Audio SETUP Clear Clears the AUDIO SETUP Memory and the currently memorized audio setting A confirmation message appears Touch Yes Locking the settings You can lock the sett...

Page 72: ...P screen 3 Display the User Interface screen 4 Display the Touch Panel Adjust screen 5 Touch the center of the marks at the lower left and at the upper right as instructed To reset the touch position press Reset To cancel the current operation press Cancel Setting menu items SETUP Displaying the SETUP menu screen 1 Display the source option selection screen On the Home screen or the source control...

Page 73: ...y the clock while watching DVD video etc ON Initial OFF Panel Color Change the panel color Page 69 Background Change the background design Page 70 1 Only for DDX9903S DDX9703S DDX6903S DDX6703S DDX9716BTS User Interface setting screen Steering Remote Controller 1 Assign functions to the keys on the remote controller of the steering wheel Contact your Kenwood dealer for details Beep ON Initial Acti...

Page 74: ...IO SETUP Memory and the currently memorized audio setting Page 71 Software Information Display the version information of the software You can update the software Open Source Licenses Show the Open Source Licenses Initialize Touch Initialize and then touch Yes to set all the settings to the initial default settings Audio SETUP Memory is not initialized Bluetooth setting screen Bluetooth ON Initial...

Page 75: ...lustration inside the case If the Remote Controller operates only over shorter distances or does not operate at all it is possible that the batteries are depleted In such instances replace both batteries with new ones Remote Controller mode switch The functions operated from the remote controller differ depending on the position of the mode switch DVD T V AUD AUD mode Switch to this mode when cont...

Page 76: ...rch mode Music Disc Audio file Video file AUD mode AM FM Selects a folder S T Selects a track file I W Starts pauses playback 0 9 Music Disc Specifies the number to search for in direct search DIRECT Music Disc Enters direct search mode See the right column Radio AUD mode AM FM Selects the band S T Searches for stations I W Changes the seek mode AUTO1 AUTO2 MANU 0 9 Specifies the frequency of the ...

Page 77: ...e wires are not touching to cause a short circuit then replace the old fuse with one with the same rating Insulate unconnected wires with vinyl tape or other similar material To prevent a short circuit do not remove the caps on the ends of the unconnected wires or the terminals Connect the speaker wires correctly to the terminals to which they correspond The unit may be damaged or fail to work if ...

Page 78: ...it is installed securely in place If the unit is unstable it may malfunction e g the sound may skip 7 Reconnect the battery 8 Configure Initial SETUP Page 4 Installing the unit Installing the unit Only for DDX9903S DDX9703S DDX6903S DDX6703S DDX9716BTS Bend the tabs of the mounting sleeve with a screwdriver or similar utensil and attach it in place Installing the unit using the mounting bracket re...

Page 79: ...l switch To car chassis Purple with white stripe Reverse sensor wire Light green Parking sensor wire To front speaker left To rear speaker right Blue Antenna control wire Blue with white stripe Power control wire Light blue with yellow stripe Steering remote control wire Orange with white stripe Dimmer control wire Red Ignition wire Yellow Battery wire Black Ground wire If no connections are made ...

Page 80: ...nector A B C and D A1 Orange White Dimmer A2 Yellow Battery A3 Blue Antenna control A4 Red Ignition ACC A5 Blue Antenna control A6 Black Ground connection A8 A7 White ª White Black Left speaker front A10 A9 Gray ª Gray Black Right speaker front B2 B1 Green ª Green Black Left speaker rear B6 B5 Purple ª Purple Black Right speaker rear C5 Blue Antenna control D21 Light green Red Input 1 D22 Purple R...

Page 81: ...e for iPod Mirroring Connect the USB extension cable 6 beforehand See the left column iPod iPhone 30 pin connector models commercially available KCA iP102 optional accessory 0 8 m 1 0 m 6 iPod iPhone Lightning connector models commercially available Lightning Digital AV adapter accessory of the iPod iPhone KCA iP103 optional accessory 0 8 m KCA iP103 optional accessory 0 8 m KCA HD100 optional acc...

Page 82: ...le commercially available KCA MH100 optional accessory 1 8 m 1 0 m When connecting to the HDMI MHL connector detach the screws and bracket from the unit connect the HDMI MHL cable then attach the bracket using the screws detached from the unit to fix the cable Bracket HDMI MHL cable 6 The HDMI MHL input terminal is equipped only for DDX9903S DDX9703S DDX9716BTS DDX916WSL For DDX6903S DDX6703S conn...

Page 83: ...io right output Red q iDatalink input for connecting ADS adapter commercially available 5 w TV tuner remote control output 4 e Steering wheel remote controller input 4 Connect to the vehicle s steering remote harness using the Steering Remote cable 0 Contact your Kenwood dealer for details r NAV I F input 4 t Expansion port for connecting SiriusXM Connect Vehicle Tuner commercially available 5 1 O...

Page 84: ...h CB radios or satellite televisions The GPS antenna should be installed at a position at least 30 cm 12 inches from mobile phone or other transmitting antennas The above types of communication may interfere with signals from the GPS satellite Painting the GPS antenna with metallic paint may cause reduced performance Removing the unit Only for DDX9903S DDX9703S DDX6903S DDX6703S DDX9716BTS Removin...

Page 85: ...fter use To keep discs clean Dirty discs may not play correctly If a disc does become dirty wipe it with a soft cloth in a straight line from the center to the edge Do not use any solvents for example conventional record cleaner spray thinner benzine etc to clean discs To play new discs New discs may have some rough spots around the inner and outer edges If such a disc is used this unit may reject...

Page 86: ...than iTunes AAC files copy protected with FairPlay except those stored on an iPod Files which have data such as AIFF ATRAC3 etc This unit can display jacket pictures that meet the conditions below Picture size 32 x 32 to 1 232 x 672 PNG 800 x 480 resolution Data size less than 650 KB File type JPEG PNG BMP Disc playback Playable disc types Disc type Recording format file type etc DVD DTS sound can...

Page 87: ...A WAV AAC FLAC H 264 WMV MKV This unit can recognize a maximum of 9 999 files and a maximum of 9 999 folders in a folder Make sure all important data has been backed up to avoid losing the data Notes on using a USB device This unit may not play back files in a USB device properly when using a USB extension cable USB devices equipped with special functions such as data security functions cannot be ...

Page 88: ...BE Byelorussian IE Interlingue NA Nauru TG Tajik BG Bulgarian IK Inupiak NE Nepali TH Thai BH Bihari IN Indonesian NO Norwegian TI Tigrinya BI Bislama IS Icelandic OC Occitan TK Turkmen BN Bengali Bangla IW Hebrew OM Afan Oromo TL Tagalog BO Tibetan JA Japanese OR Oriya TN Setswana BR Breton JI Yiddish PA Panjabi TO Tonga CA Catalan JW Javanese PL Polish TR Turkish CO Corsican KA Georgian PS Pasht...

Page 89: ...e the Bluetooth function If the message does not disappear turn off and turn on the unit then connect the device again Voice Recognition is not available The connected mobile phone does not have a voice recognition system No Contents No phone book data is contained in the connected Bluetooth phone SXM No Signal Make sure the SiriusXM Satellite Radio antenna is mounted outside the vehicle Move the ...

Page 90: ...n the external monitor Connect the video cord correctly Select the correct input on the external monitor Select the appropriate setting for AV OUT Page 73 MPEG1 MPEG2 MPEG4 WMV H 264 MKV MP3 WMA AAC WAV FLAC Vorbis discs cannot be played back Record the tracks using a compatible application on the appropriate discs Page 86 Add appropriate extension codes to the file names Tracks on the Recordable ...

Page 91: ... from Digital Analog or Auto Page 29 Android Auto Apple CarPlay Mirroring Desired source Android Auto Apple CarPlay Mirroring is not displayed on the Home screen Check whether the connected device is compatible with CarPlay or Android Auto When iPhone compatible with CarPlay is connected check the Automotive Mirroring setting Page 26 Navigation does not work for Apple CarPlay Android Auto Connect ...

Page 92: ...ideo Decoder MPEG1 MPEG2 MPEG4 WMV H 264 MKV Wow Flutter Below Measurable Limit Frequency Response 96 kHz Sampling 20 Hz to 44 000 Hz 48 kHz Sampling 20 Hz to 22 000 Hz 44 1 kHz Sampling 20 Hz to 20 000 Hz Total Harmonic Distortion 0 010 1 kHz Signal to Noise Ratio 98 dB DVD Video 96 kHz Dynamic Range 98 dB DVD Video 96 kHz Disc Format DVD Video VIDEO CD CD DA Sampling Frequency 44 1 kHz 48 kHz 96...

Page 93: ...4 dB Oct LOW PASS FILTER frequency 30 40 50 60 70 80 90 100 120 150 180 220 250 Through SLOPE 6 12 18 24 dB Oct Position Front Rear Subwoofer Delay 0 ft to 20 0 ft 0 03 ft step Gain 8 dB to 0 dB Subwoofer Level 50 dB to 10 dB FM radio section Frequency Range DDX9903S DDX9703S DDX6903S DDX6703S 87 9 MHz to 107 9 MHz 200 kHz DDX9716BTS DDX916WSL 87 5 MHz to 108 0 MHz 50 kHz Usable Sensitivity S N 30...

Page 94: ...ice Trademarks and licenses Manufactured under license from Dolby Laboratories Dolby and the double D symbol are trademarks of Dolby Laboratories DVD Logo is a trademark of DVD Format Logo Licensing Corporation registered in the US Japan and other countries The AAC logo is a trademark of Dolby Laboratories Microsoft and Windows Media are either registered trademarks or trademarks of Microsoft Corp...

Page 95: ...TAINED FROM A VIDEO PROVIDER LICENSED TO PROVIDE AVC VIDEO NO LICENSE IS GRANTED OR SHALL BE IMPLIED FOR ANY OTHER USE ADDITIONAL INFORMATION MAY BE OBTAINED FROM MPEG LA L L C SEE HTTP WWW MPEGLA COM THIS PRODUCT IS LICENSED UNDER THE VC 1 PATENT PORTFOLIO LICENSE FOR THE PERSONAL AND NONCOMMERCIAL USE OF A CONSUMER TO i ENCODE VIDEO IN COMPLIANCE WITH THE VC 1 STANDARD VC 1 VIDEO AND OR ii DECOD...

Page 96: ...RISING IN ANY WAY OUT OF THE USE OF THIS SOFTWARE EVEN IF ADVISED OF THE POSSIBILITY OF SUCH DAMAGE libogg Copyright c 2002 Xiph org Foundation Redistribution and use in source and binary forms with or without modification are permitted provided that the following conditions are met Redistributions of source code must retain the above copyright notice this list of conditions and the following disc...

Reviews: