background image

For teams

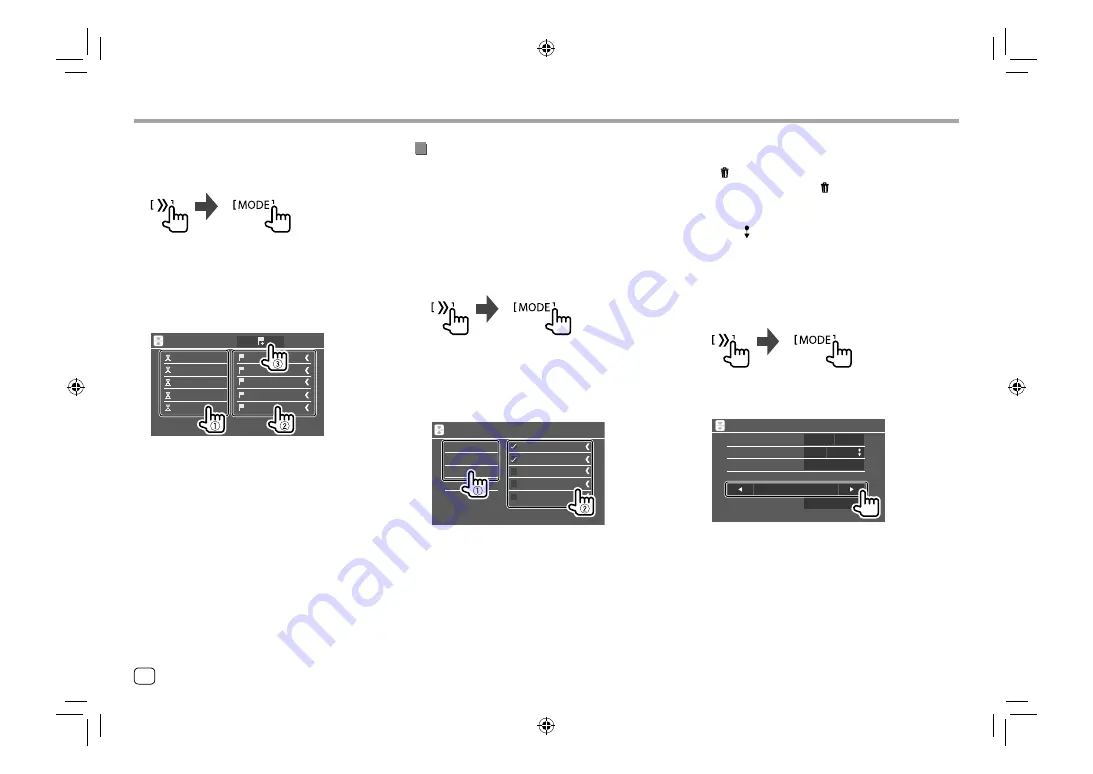
Display the <Alert Team Select> screen.

On the source control screen, touch as follows:

Then, on the 

<SiriusXM Mode>

 screen, touch as 

follows:

<Alert Team Select>


:


[Enter]

Select the league (

1

) and the team (

2

), 

then register into the content alert (

3

). 

League1

League2

League3

League4

League5

Team1

Team2

Team3

Team4

Team5

Alert Team Select

SiriusXM® Satellite Radio

SiriusXM® Satellite Radio

  Selecting items for Content Alert

You can select items (artists/songs/teams) from the 
registered items on the list to inform you once the unit 
receives the information. 

For artists/songs/teams

Display the <Content Alerts Contents Set> 
screen.

On the source control screen, touch as follows:

Then, on the 

<SiriusXM Mode>

 screen, touch as 

follows:

<Content Alerts Contents Set>

[Set]


Select the category (

1

), then the item (

2

).

Artist

Title

Team

000Ch Ch Name

000Ch Ch Name

000Ch Ch Name

000Ch Ch Name

000Ch Ch Name

Content Alerts Contents Set

A check mark appears beside the selected item.
•  To show the details of the item, touch 

[<]

.

To delete the registered items:

 Touch and hold the 

item you want to delete in step 2.
The 

[   ]

 icon and a check mark appear beside the 

selected item. Touch the 

[   ]

 icon to delete.

To delete all registered contents:

 Touch and hold 

[All Clear   ]

 for 

<Content Alerts Contents Set>

 in 

step 1.

For traffic and weather information

Display the <SiriusXM Mode> screen.

On the source control screen, touch as follows:

Select the city you desire traffic and 
weather information for.

Content Alerts

Content Alerts Contents Set

Alert Team Select

Traffic Weather Jump City Select

OFF

SiriusXM Reset

ON

All Clear 

Set

Enter

Los Angeles 

Reset

SiriusXM Mode

•  When traffic and weather broadcast is received, the 

unit automatically switches the channel.

22

ENGLISH

00_DDX_2019ST_KN_RN.indb   22

00_DDX_2019ST_KN_RN.indb   22

31/5/2018   2:44:24 PM

31/5/2018   2:44:24 PM

Summary of Contents for DDX419BT

Page 1: ...anual Familiarity with installation and operation procedures will help you obtain the best performance from your new DVD receiver For your records Record the serial number found on the back of the unit in the spaces designated on the warranty card and in the space provided below Refer to the model and serial numbers whenever you call upon your Kenwood dealer for information or service on the produ...

Page 2: ...tive Do not expose the monitor to direct sunlight Do not operate the touch panel using a ball point pen or similar tool with a sharp tip Touch the keys on the touch panel with your finger directly if you are wearing a glove take it off When the temperature is very cold or very hot Chemical changes occur inside causing malfunction Pictures may not appear clearly or may move slowly Pictures may not ...

Page 3: ... device pursuant to Part 15 of the FCC Rules These limits are designed to provide reasonable protection against harmful interference in a residential installation This equipment may cause harmful interference to radio communications if it is not installed and used in accordance with the instructions However there is no guarantee that interference will not occur in a particular installation If this...

Page 4: ... settings 5 Registering a security code 6 Clock settings 6 Various Screens and Operations 7 Home screen 7 Source control screen 8 List setting screen 9 Disc 10 Video 11 USB 13 Android 15 iPod iPhone 15 Radio 16 SiriusXM Satellite Radio 18 Pandora 25 iHeartRadio 27 Spotify 29 Other External Components 31 AV IN 31 Rear view camera 32 Using an external component via ADS adapter OEM Features 32 Blueto...

Page 5: ...M button Press Displays the picture from the connected rear view camera DDX276BT DDX26BT DDX419BT 1 Reset button Resets the unit 2 Loading slot 3 Screen touch panel 4 Monitor panel 5 HOME button Press Turns on the power Hold Turns off the power HOME Press Displays the Home screen while the power is on 6 MENU DISP OFF button MENU Press Pops up the short cut menu DISP OFF Hold Turns off the screen 7...

Page 6: ...t fails to operate properly press the reset button Turning on the power Turning off the power Hold Putting the unit in standby 1 Display the source option selection screen On the Home screen touch as follows Adjusting the volume DDX396 DDX376BT You can adjust the volume 00 to 35 by turning the knob to the right to increase and to the left to decrease DDX276BT DDX26BT DDX419BT You can adjust the vo...

Page 7: ...alian Dutch Russian Portuguese are available If another language has been selected the text language for external monitors will be set to English GUI Language Local the language selected above Initial English Selects the language used for displaying operation keys and menu items Rear Camera Page 45 Make the settings to display the picture from the connected rear view camera User Customize Page 43 ...

Page 8: ... code then touch Enter Clock settings 1 Display the Home screen 2 Display the Clock screen On the Home screen touch as follows Then on the Setup screen touch as follows System Clock Enter You can also display the Clock screen by touching the clock area on the Home screen Registering a security code Only for DDX419BT 1 Display the Home screen 2 Display the Security Code Set screen On the Home scree...

Page 9: ...ation keys performs the following actions Radio Switches to the radio broadcast SiriusXM 1 Switches to the SiriusXM radio broadcast DISC Plays a disc USB Plays files on a USB device iPod Plays an iPod iPhone Android Plays an Android device BT Audio Plays a Bluetooth audio player TEL Displays the phone control screen AV IN Switches to an external component connected to the AV IN input terminal OEM ...

Page 10: ...type See the following Common operation keys on source control screen Common operation keys on source control screen The appearance of the operation keys may differ however the similar operation keys have the same operations Available operation keys differ depends on the selected source or connected device Touching the operation keys performs the following actions 7 Displays other available operat...

Page 11: ...eration keys 3 Goes to the previous chapter track 4 Goes to the next chapter track Not available for video from an external component AV IN List setting screen Below are the common operation keys which appear on the list setting screen The appearance of the operation keys may differ however the similar operation keys have the same operations Available operation keys differ depends on the setting s...

Page 12: ...e 3 Folder Name 4 Folder Name 5 File Name 2 File Name 3 File Name 4 File Name 5 File Name 1 DISC Select an item in each layer until you reach and select the desired file Settings for disc playback Available items shown on the DISC Mode screen differ depending on the type of disc file being played back 1 Display the DISC Mode screen On the source control screen touch as follows Ejecting a disc 1 Di...

Page 13: ...Reproduces stereo playback sound Screen Ratio Select the monitor type to watch a wide screen picture on the external monitor 16 9 Initial 4 3 LB 4 3 PS File Type 2 Select the playback file type when a disc contains different types of files Audio Plays back audio files Still image Plays back still picture files Video Plays back video files Audio Video Initial Plays back audio files and video files ...

Page 14: ... signal Auto For DISC source and USB source only The aspect ratio is automatically selected to match the incoming signals Picture Adjust Displays the picture adjustment screen 1 Touch DIM ON or DIM OFF to turn on or off the dimmer 2 Touch to adjust the other items Bright Adjusts the brightness 15 to 15 Contrast Adjusts the contrast 10 to 10 Black Adjusts the blackness 10 to 10 Color Adjusts the co...

Page 15: ...available The source changes to USB and playback starts All tracks in the USB device will be played repeatedly until you change the source or disconnect the USB device Use CA U1EX for extending the cable if necessary Max 500 mA 5V Touching the operation keys performs the following actions 1 ZOOM Refer to Video playback except VCD on page 12 Aspect Picture Adjust 2 MENU Displays the disc menu Audio...

Page 16: ...3 Folder Name 4 Folder Name 5 File Name 2 File Name 3 File Name 4 File Name 5 File Name 1 USB E g USB list screen for DDX396 Select an item in each layer until you reach and select the desired file Selecting a folder track using alphabet search Applicable only for audio file type You can search for a folder or an audio file by entering the first letter you want to search for 1 Select the list fold...

Page 17: ...he operation keys performs the following actions S T Selects an audio file IW Starts pauses playback iPod iPhone iPod iPhone Connecting an iPod iPhone For playable iPod iPhone types and other information see page 60 You cannot watch video Wired connection Rear panel iPod iPhone Lightning model commercially available iPod iPhone 30 pin connector model commercially available USB Audio cable for iPod...

Page 18: ...s Select an item in each layer until you reach and select the desired file Available categories differ depending on the type of iPod iPhone Settings for iPod iPhone playback 1 Display the iPod Mode screen On the source control screen touch as follows 2 Make the settings Artwork iPod Mode ON OFF Artwork ON Initial Shows the artworks of the playing files OFF Hides the artworks of the playing files L...

Page 19: ...e adjustment for Traffic Information is automatically memorized The next time the unit switches to Traffic Information the volume is set to the memorized level To deactivate touch TI again p PTY For FM RBDS features Enters PTY search mode 1 Touch PTY 2 Touch and hold a PTY code to search for If there is a station broadcasting a program of the same PTY code as you have selected that station is tune...

Page 20: ...llation when you install the unit for the first time Antenna SiriusXM Connect Vehicle Tuner commercially available Rear panel Activating subscription 1 Check your Radio ID The SiriusXM Satellite Radio ID is required for activation and can be found by tuning to Channel 0 as well as on the label found on the SiriusXM Connect Vehicle Tuner and its packaging The Radio ID does not include the letters I...

Page 21: ...select a preset channel make sure SEEK2 is selected as the seek mode Selecting a channel on the list You can obtain information on channels or select a channel to listen to 1 Display the Channel List screen On the source control screen touch as follows 2 Select a category 1 and then select a channel 2 All Channels Category Name 1 Category Name 2 Category Name 3 Category Name 4 100Ch Channel Name 1...

Page 22: ... control screen touch as follows 2 Select a preset channel P1 SiriusXM 100Ch 105Ch 110Ch 115Ch 120Ch Channel Name Channel Name Channel Name Channel Name Channel Name You can also select a preset channel by touching P1 P5 To hide the window Touch 3 Select SEEK2 as the seek mode to jump to the selected preset channel Replaying content You can pause rewind and replay the contents from the currently t...

Page 23: ...eather and traffic information Registering items for Contents Alert You can register your favorite artists songs or teams Up to 50 contents can be registered For artists songs While listening to your favorite artist song On the source control screen touch as follows Hold Touching the operation keys performs the following actions Hold Registers the artist of the current song Hold Registers the curr...

Page 24: ...Team 000Ch Ch Name 000Ch Ch Name 000Ch Ch Name 000Ch Ch Name 000Ch Ch Name Content Alerts Contents Set A check mark appears beside the selected item To show the details of the item touch To delete the registered items Touch and hold the item you want to delete in step 2 The icon and a check mark appear beside the selected item Touch the icon to delete To delete all registered contents Touch and ho...

Page 25: ... 0000 Changing the code does not change the Parental Lock Parental Lock Channel Selection settings 1 Display the Parental Code Check screen On the source control screen touch as follows Then on the SiriusXM Mode screen touch as follows Parental Code Change 2 Enter the initial four digit code 0000 1 and then touch Enter 2 to confirm Enter Clear 1 2 3 4 5 6 7 8 0 9 Cancel Parental Code Check To clea...

Page 26: ...rs beside the selected channel All Channels Category Name 1 Category Name 2 Category Name 3 Category Name 4 100Ch Channel Name 105Ch Channel Name 110Ch Channel Name 115Ch Channel Name 120Ch Channel Name Parental Lock Channel Selection To list all the channels select All Channels 4 Repeat step 3 to set the parental lock on multiple channels To deactivate parental lock for all locked channels Select...

Page 27: ...owing profiles must be supported SPP Serial Port Profile A2DP Advanced Audio Distribution Profile Establish an Internet connection using LTE 3G EDGE or WiFi Ensure you are logged in to your smartphone application If you do not have a Pandora account you can create one for free from your smartphone or at www pandora com Install the latest version of the Pandora application on your smartphone For An...

Page 28: ...on page 8 Touching the operation keys performs the following actions 1 Adds the current artist to the station list Adds the current track to the station list Bookmarks the current track Switches the device on Smartphone Setup screen Page 46 4 Displays the list selection screen Thumbs down to the current track and skips to the next track Registers the current track as a favorite IW Starts pauses pl...

Page 29: ...cannot be operated from this unit For issues using the application contact iHeartRadio at http www iheart com Preparation Installing the application Your smartphone must has built in Bluetooth and the following profiles must be supported SPP Serial Port Profile A2DP Advanced Audio Distribution Profile Establish an Internet connection using LTE 3G EDGE or WiFi Ensure you are logged in to your smart...

Page 30: ...ion Saves the current station to the Favorites list 1 Displays the variety level selection screen Switches the device on Smartphone Setup screen Page 46 4 Displays the Station Search screen or the station list Dislikes the currently playing content Likes the currently playing content Io 2 Starts stops playback IW 1 Starts pauses playback SCAN 2 Scans stations randomly T 1 Skips the current track 1...

Page 31: ...he right music is always at your fingertips There are millions of songs on Spotify from old favorites to the latest hits Just choose the music you love or let Spotify surprise you You can stream Spotify from iPhone iPod touch or Android devices Because Spotify is a third party service the specifications are subject to change without prior notice Accordingly compatibility may be impaired or some or...

Page 32: ...icture data 3 Track information Touching scrolls the text if not all of the text is shown Touching changes the displayed information between artist and album 4 Operation keys 2 5 Playing time playback status 6 Progress bar 1 For DDX396 DDX376BT DDX276BT DDX26BT Purchase optional remote controller KNA RCDV331 2 See Operation keys on source control screen Operation keys on source control screen The ...

Page 33: ...he list type then select a desired item The list types displayed differ depending on the information sent from Spotify Spotify Your Library Browse Radio To return to the top layer touch To return to the upper layer touch Other External Other External Components Components AV IN Connecting an external component See page 57 for more information Starting playback 1 Select AV IN as the source 2 Turn o...

Page 34: ...using iDataLink commercially available this unit can access the satellite radio source provided for the vehicle and vehicle information can be displayed on this unit Displayable screens button names and screen names vary depending on the type of the connected iDataLink and the model of the vehicle For details visit www idatalink com Connecting an ADS adapter See page 57 for more information Using ...

Page 35: ...r pairing Once the connection is established it is registered in the unit even if you reset the unit Up to five devices can be registered in total Two devices for Bluetooth phone and one for Bluetooth audio can be connected at a time However when BT Audio is selected as the source you can connect up to five Bluetooth audio devices and switch between these five devices To use the Bluetooth function...

Page 36: ...IN code If you wish to skip changing the PIN code go to step 3 0000 1 2 3 4 5 6 7 8 0 Enter Clear 9 PIN Code Set To delete the last entry touch Clear To delete the PIN code touch and hold Clear 3 Search for the unit DDX3eX DDX3 DDX2 DDX4 from your Bluetooth device 4 Select the unit DDX3eX DDX3 DDX2 DDX4 on your Bluetooth device If a PIN code is required enter 0000 initial or new PIN code you have ...

Page 37: ... select the device you want to delete in step 2 then touch Remove A confirmation message appears Touch Yes Bluetooth mobile phone When a call comes in Incoming Call Name 1234XXXXXX Device Name 1 1 Device Name 2 2 Touching the operation keys performs the following actions Answers a call Rejects a call Call information is displayed if acquired Phone operation is not available while the picture from ...

Page 38: ...it cannot find the target Please speak into the microphone appears Touch Start then say the name again To cancel voice dialling touch Cancel 3 Select a contact 1 then make a call 2 When item 1 2 or 3 is selected in step 2 Device Name 1 1 Device Name 2 2 Name 1 1234XXXXXX Name 2 2345XXXXXX Name 3 3456XXXXXX Name 4 4567XXXXXX Name 5 8901XXXXXX A Z To use alphabet search in the phone book 1 Touch A Z...

Page 39: ...T Audio Presetting phone numbers You can preset up to five phone numbers 1 Display the phone control screen On the Home screen touch as follows 2 Select call history or phone book calling method 1 then select a contact 2 to preset Device Name 1 1 Device Name 2 2 Name 1 1234XXXXXX Name 2 2345XXXXXX Name 3 3456XXXXXX Name 4 4567XXXXXX Name 5 8901XXXXXX A Z 3 Select a preset number to store into Devi...

Page 40: ...ory 1 then select a desired item 2 Artist 1 BT Audio Artist 2 Artist 3 Artist 4 Artist 5 BT Audio Playlists Artist Album Songs Genre Select an item in each layer until you reach and select the desired file Bluetooth settings You can change various settings for using Bluetooth devices on the Bluetooth Setup screen 1 Display the Bluetooth Setup screen On the Home screen touch as follows Then on the ...

Page 41: ... 0 3 5 7 9 9 62 5 100 160 250 400 630 1k 1 6k 2 5k 4k 6 3k 10k 16k Hz 7 5 3 Natural Bass EXT SW LEVEL Q factor 1 5 0 ON OFF EQ INIT ALL SRC To apply the adjusted equalizer to all playback sources touch ALL SRC then touch OK to confirm Bluetooth Bluetooth Auto Connect ON Initial Automatically establishes a connection with the last connected Bluetooth device when the unit is turned on OFF Cancels Bl...

Page 42: ... as the source Fader Balance Touch J K H I or drag the mark to adjust Fader Adjusts the front and rear speaker output balance When using a two speaker system set the fader to the center 0 F15 to R15 Initial 0 Balance Adjusts the left and right speaker output balance L15 to R15 Initial 0 To clear the adjustment Touch Center Store your own sound adjustments 1 Select a preset sound mode 2 Select a ba...

Page 43: ...ropriate crossover network mode according to the speaker system 2 way speaker system or 3 way speaker system Connecting 3 way speakers with 2 way crossover network mode selected may damage the speakers 1 Display the source option selection screen On the Home screen touch as follows 2 Put the unit in standby On the source option selection screen touch as follows 3 Press the following buttons knob o...

Page 44: ...l is selectable only when X over Network is set to 2way Page 41 2 Select an item to adjust Distance Adjusts the digital time alignment value Gain Adjusts the output volume of the selected speaker 3 To determine the adjustment value see the following Determining the value for Position DTA adjustment To initialize the setting value Touch Initialize Determining the value for Position DTA adjustment I...

Page 45: ...laying a video or picture you can capture an image and use the captured image as a background You cannot capture copyrighted content and images When using a JPEG file as the background make sure that the resolution is 800 x 480 pixels The color of the captured image may look different from that of the actual scene Background Change the background design Only for DDX396 DDX376BT DDX419BT Panel Colo...

Page 46: ...ess of this setting Home Customize Arrange the items to display on the Home screen Select an item 1 to replace then select the item 2 you want to display in the selected position Repeat this step to place icons for other items Only selectable sources are shown HOME Customize Pandora iPod TEL Radio R di E g Home customize screen for DDX396 Settings Settings Screen Adjustment Adjust the brightness a...

Page 47: ...ngs screen for DDX396 Rear Camera Configure the rear view camera settings Rear Camera Interruption ON Displays the picture from the rear view camera when you shift the gear to the reverse R position A caution message appears on the screen To remove the caution message touch the screen OFF Initial Select this when no camera is connected Parking Guidelines ON Initial Displays the parking guidelines ...

Page 48: ...even when the unit is reset Available only when SETUP Memory is set to Unlock selected initially Touch Yes to display the setting screen then select an operation Recall Recalls the memorized settings Memory Memorizes the current settings Clear Clears the currently memorized settings and return to the factory initial settings Cancel Cancels A confirmation message appears Touch Yes You can also set ...

Page 49: ...not be completed and an error message may appear For connection see page 57 for more information 1 Touch Set for Steering Remote Control Setting to display the setting screen 2 Press and hold a button on the steering remote controller to register or change 3 Select a function to assign to the selected button Steering Remote Control Setting VOL Please select the function to assign to the button VOL...

Page 50: ...t For DDX396 DDX376BT DDX276BT DDX26BT Optional remote controller KNA RCDV331 is designed for controlling this unit Refer to the instruction manual that comes with the remote controller RC DV340 DO NOT expose the remote sensor to bright light direct sunlight or artificial lighting Remote sensor CAUTION Put the Remote Controller in a place where it will not move during braking or other operations A...

Page 51: ...or tuner source etc DVD mode Switch to this mode when playing DVDs or CDs etc with the player integrated in this unit TV mode Not used NAV mode Not used The position of the remote control mode switch is indicated in the title of each mode e g AUD mode When controlling a player that is not integrated in the unit select AUD mode Basic operations for RC DV340 supplied Common operations AUD mode SRC S...

Page 52: ...st forwards backwards Fast forward backward speed changes each time you press this key 4 5 Slow forwards backwards during pause MODE TOP MENU Shows the disc top menu FNC PBC MENU Shows the disc menu SUBTITLE Changes the subtitle language ZOOM Changes the zoom ratio The zoom ratio changes each time you press this key ANGLE Changes the picture angle The picture angle changes each time you press this...

Page 53: ... I Selects a track J FM K AM Selects a folder POSITION IW Starts pauses playback MENU o Stops and memorizes the point where the disc stops 0 9 Specifies the number to search for in direct search 1 2 Fast forwards backwards 4 5 Slow forwards backwards For DVD only Slow forward backward speed changes each time you press this key CLEAR Deletes a character while in direct search mode BS DIRECT Enters ...

Page 54: ...for in direct search BS DIRECT Enters direct search mode 1 Only for DDX396 DDX376BT DDX276BT DDX26BT 2 The search method differs according to the selected seek mode Searching for an item directly While listening to the radio or during disc playback you can search for a station frequency chapter title folder file track directly using the number buttons To search for a track from the VCD menu perfor...

Page 55: ...ation exposed to direct sunlight or excessive heat or humidity Also avoid places with too much dust or the possibility of water splashing Do not use your own screws Use only the screws provided If you use the wrong screws you could damage the unit After the unit is installed check whether the brake lamps blinkers wipers etc on the car are working properly Do not press hard on the panel surface whe...

Page 56: ...ither to the front output terminals or to the rear output terminals do not mix front and rear For example if you connect the ª connector of the left speaker to a front output terminal do not connect the connector to a rear output terminal Installation procedure 1 Remove the key from the ignition and disconnect the battery 2 Make the proper input and output wire connections for each unit 3 Connect ...

Page 57: ...ce Installing the trim plate Only for DDX396 DDX419BT Removing the unit Only for DDX396 1 Engage the catch pins on the extraction keys and remove the two locks on the lower part of the trim plate Catch Lock 2 Remove from the upper two catches of the trim plate The frame can be removed from the top side in the same manner 3 Remove the unit by inserting the two extraction keys then pulling them as i...

Page 58: ...speakers 4 left To front speakers mid range speakers 4 left Car battery Car fuse To the car chassis To the OE remote adapter not supplied which is compatible with your car To the power control terminal when using the optional power amplifier Or To the control terminal of the motor antenna or to the power terminal for the booster amplifier of film type antenna Extension wire ø To the car s parking ...

Page 59: ... DDX419BT to connect an external component 5 When connecting an external amplifier connect its ground wire to the chassis of the car otherwise the unit may be damaged 6 Only for DDX396 DDX419BT References References Maintenance Cleaning the unit Do not use any solvent for example thinner benzine etc detergent or insecticide This may damage the monitor or the unit Gently wipe the panel with a soft ...

Page 60: ...r 2 or Dolby Audio Video MPEG system program stream Other playable conditions Video file size Less than 2 GB DivX Bit rate 8 Mbps maximum for average video signals MPEG1 MPEG2 File format MP ML Main Profile at Main Level SP ML Simple Profile at Main Level MP LL Main Profile at Low Level This unit cannot play back the following files DivX files encoded in the interlaced scanning mode Only for DDX41...

Page 61: ...c HA Hausa AS Assamese HI Hindi AY Aymara HR Croatian AZ Azerbaijani HU Hungarian BA Bashkir HY Armenian BE Byelorussian IA Interlingua BG Bulgarian IE Interlingue BH Bihari IK Inupiak BI Bislama IN Indonesian BN Bengali Bangla IS Icelandic BO Tibetan IW Hebrew BR Breton JA Japanese CA Catalan JI Yiddish CO Corsican JW Javanese CS Czech KA Georgian CY Welsh KK Kazakh DZ Bhutani KL Greenlandic EL G...

Page 62: ...files in a USB device properly when using a USB extension cable USB devices equipped with special functions such as data security functions cannot be used with the unit Do not use a USB device with 2 or more partitions Depending on the shape of the USB devices and connection ports some USB devices may not be attached properly or the connection might be loose This unit may not recognize a memory ca...

Page 63: ...ble discs cannot be skipped Insert a finalized disc Finalize the discs with the component which you used for recording Playback does not start The format of files is not supported by the unit No picture appears on the external monitor Connect the video cord correctly Select the correct input on the external monitor DivX MPEG1 MPEG2 MP3 WMA WAV AAC discs cannot be played back Record the tracks usin...

Page 64: ... Android device via Bluetooth or through the AV IN jack on the rear panel NO DEVICE or READING keeps flashing Reconnect the Android device If USB connection does not work connect the Android device via Bluetooth or through the AV IN jack on the rear panel iPod iPhone No sound comes out of the speakers Disconnect the iPod iPhone then connect it again Select another source then reselect iPod The iPo...

Page 65: ...read only mode or when network connection is not established Only for DDX396 DDX376BT DDX276BT DDX26BT SiriusXM Satellite Radio SXM No Signal appears Make sure the SiriusXM Satellite Radio antenna is mounted outside the car Move the car to an area with a clear view of the sky SXM Check Antenna appears Check the SiriusXM Satellite Radio antenna connection and make sure the antenna is firmly attache...

Page 66: ...ialing has failed Try the operation again Specifications Specifications Monitor section Picture Size W H 6 2 inches diagonal wide 137 5 mm 77 2 mm 5 7 16 3 1 16 Display System Transparent TN LCD panel Drive System TFT active matrix system Number of Pixels 1 152 000 800H 480V RGB Effective Pixels 99 99 Pixel Arrangement RGB striped arrangement Back Lighting LED USB interface section USB Standard US...

Page 67: ...8 ft Audio Codec SBC AAC Profile HFP Hands Free Profile 1 6 A2DP Advanced Audio Distribution Profile 1 3 AVRCP Audio Video Remote Control Profile 1 5 GAP Generic Access Profile PBAP PhoneBook Access Profile 1 2 SDP Service Discovery Profile SPP Serial Port Profile 1 2 DSP section Equalizer Band 13 Band Frequency Hz BAND1 13 62 5 100 160 250 400 630 1k 1 6k 2 5k 4k 6 3k 10k 16k Gain dB 9 8 7 6 5 4 ...

Page 68: ...9BT 87 5 MHz to 108 0 MHz 50 kHz Usable Sensitivity S N 30 dB 7 2 dBf 0 63 μV 75 Ω Quieting Sensitivity DIN S N 46 dB 15 2 dBf 1 58 μV 75 Ω Frequency Response 3 0 dB 30 Hz to 15 kHz Signal to Noise Ratio 68 dB MONO Selectivity 80 dB 400 kHz Stereo Separation 40 dB 1 kHz 3 Way X Over Tweeter HPF Frequency Hz 1k 1 6k 2 5k 4k 5k 6 3k 8k 10k 12 5k Slope dB Oct 6 12 Phase Normal Reverse Gain dB 8 7 6 5...

Page 69: ...th sleeve 182 mm 111 mm 160 mm 7 3 16 4 3 8 6 5 16 Without sleeve 178 mm 100 mm 162 mm 7 3 15 16 6 3 8 DDX376BT DDX276BT DDX26BT DDX419BT 178 mm 100 mm 162 mm 7 3 15 16 6 3 8 Weight Main Unit DDX396 2 0 kg 4 4 lbs including trim plate and sleeve DDX376BT DDX276BT DDX26BT 1 7 kg 3 8 lbs DDX419BT 1 8 4 0 lbs including trim plate Design and specifications are subject to change without notice Specific...

Page 70: ...L L C SEE HTTP WWW MPEGLA COM Sirius XM and all related marks and logos are trademarks of Sirius XM Radio Inc All rights reserved Pandora the Pandora logo and the Pandora trade dress are trademarks or registered trademarks of Pandora Media Inc used with permission SPOTIFY and the Spotify logo are among the registered trademarks of Spotify AB iHeartRadio and iHeartAuto are trademarks owned by iHear...

Page 71: ...00_DDX_2019ST_KN_RN indb 69 00_DDX_2019ST_KN_RN indb 69 31 5 2018 2 44 32 PM 31 5 2018 2 44 32 PM ...

Page 72: ...n the latest Instruction Manual system updates new functions etc please visit the following website www kenwood com cs ce 05_DDX_2019ST_KNRN_REAR indd 1 05_DDX_2019ST_KNRN_REAR indd 1 5 4 2021 4 57 03 PM 5 4 2021 4 57 03 PM ...

Reviews: