background image

6

BASICS

BASICS

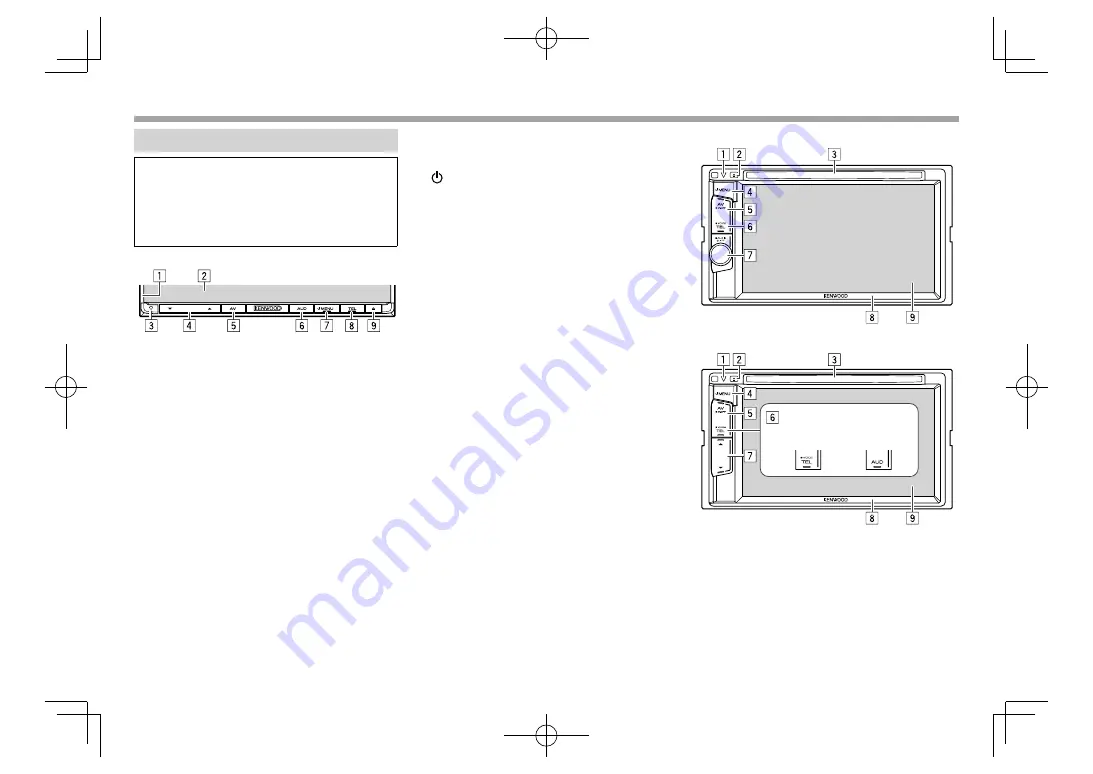
Component


names


and


functions

V


Caution


on


the


vo

l

ume


setting

:

D

igital devices produce very little noise compared 

with other sources. Lower the volume before 

playing these digital sources to avoid damaging 

the speakers by sudden increase of the output 

level.

DDX

6

015BT

1


M

onitor panel*

2

  Screen (touch panel)

3


R

eset button/Power indicator/Security indicator

• 

R

esets the unit. (Page 3)

•  Lights up while the unit is turned on.

•  Flashes when the security function is activated. 

(Page 5)

4


V

olume 

K

/

J

 button


Adjusts the audio volume. (Page 8)

5

  A

V

/

V

.

O

FF button

• 

D

isplays the current source screen. (Press)

•  The function of the button when held varies 

depending on the 

<

A

V K

ey


Long

 P

ress

>


setting. (Page 46)

6

  AU

D

 button


D

isplays the 

<Eq

ua

l

i

z

er

>

 screen. (Press) 

(Page 38)

7


MEN

U button

• 

D

isplays the 

<

TO

M

E

NU

>

 screen. (Press) 

(Page 10)

•  Turns on the power. (Press) (Page 8)

•  Turns off the power. (

H

old) (Page 8)

8

  T

E

L/

VOICE

 button

• 

D

isplays the 

<H

ands

 F

ree

>

 screen. (Press) 

(Page 33)

•  Activates voice dialing. (

H

old) (Page 35)

9


M

 (

E

ject) button

• 

E

jects the disc (Tilts the monitor panel fully). 

(Page 12)

• 

O

pens/closes the monitor panel.

You can change the color of the buttons on the monitor panel. 
(Page 41)

DDX4015BT

DDX415BT

/

DDX415BTM

/

DDX315

/

DDX315M

DDX415BT/
DDX415BTM

DDX315/
DDX315M

1


R

eset button/Power indicator/Security indicator

• 

R

esets the unit. (Page 3)

•  Lights up while the unit is turned on.

•  Flashes when the security function is activated. 

(Page 5)

2


M

 (

E

ject) button


E

jects the disc. (Page 12)

DDX̲Entry̲M.indb   6

DDX̲Entry̲M.indb   6

2014/09/01   15:11

2014/09/01   15:11

Summary of Contents for DDX315

Page 1: ...tion manual is used to describe models listed below Model availability and features functions may differ depending on the country and sales area Region 2 DVD Region Code 2 area Region 3 DVD Region Code 3 area Region 4 DVD Region Code 4 area DDX315 DDX315M DDX615WBT DDX615WBTM DDX Entry M indb 1 DDX Entry M indb 1 2014 09 01 15 11 2014 09 01 15 11 ...

Page 2: ...ious screens menus operations settings that appear on the touch panel indicates the buttons on the touch panel Indication language English indications are used for the purpose of explanation You can select the indication language from the Setup menu Page 46 Updated information the latest Instruction Manual system updates new functions etc is available from http www kenwood com cs ce BEFORE USE BEF...

Page 3: ... olarak atılamaz Eski elektrik ve elektronik ekipmanlar bu ürünleri ve ürün atıklarını geri dönüştürebilecek bir tesiste değerlendirilmelidir Yaşadığınız bölgeye en yakın geri dönüşüm tesisinin yerini öğrenmek için yerel makamlara müracaat edin Uygun geri dönüşüm ve atık imha yöntemi sağlığımız ve çevremiz üzerindeki zararlı etkileri önlerken kaynakların korunmasına da yardımcı olacaktır V Caution...

Page 4: ...Select an external component connected to the iPod Audio Video input terminal to play R CAM Interrupt Page 28 Select ON when connecting the rear view camera Panel Color Page 41 Select the color of the buttons on the monitor panel 2 Finish the procedure The TOP MENU screen is displayed Only for DDX6015BT DDX615WBT DDX615WBTM Setting the security function RRegistering the security code You can set a...

Page 5: ...atedly to change the page on the System menu screen 2 The security indicator on the monitor panel flashes when the vehicle ignition is off To deactivate the security function Select OFF for SI Clock settings 1 Display the TOP MENU screen On the source control screen 2 Display the Setup screen 3 Display the Clock screen 4 Set the clock time NAV Synchronizes the clock time with the connected navigat...

Page 6: ...g on the AV Key Long Press setting Page 46 6 AUD button Displays the Equalizer screen Press Page 38 7 MENU button Displays the TOP MENU screen Press Page 10 Turns on the power Press Page 8 Turns off the power Hold Page 8 8 TEL VOICE button Displays the Hands Free screen Press Page 33 Activates voice dialing Hold Page 35 9 M Eject button Ejects the disc Tilts the monitor panel fully Page 12 Opens c...

Page 7: ...dicator Lights up while the unit is turned on Flashes when the security function is activated Page 5 2 Monitor panel 3 Screen touch panel 4 TEL VOICE button Displays the Hands Free screen Press Page 33 Activates voice dialing Hold Page 35 5 button Displays the phone book Press Page 34 6 Volume button Adjusts the audio volume Page 8 ATT button Attenuates the sound Page 8 7 M Eject button Ejects the...

Page 8: ... J to increase and press K to decrease Holding the button increases decreases the volume continuously DDX4015BT Turn to the right to increase and turn to the left to decrease DDX615WBT DDX615WBTM Press to increase and press to decrease Holding the button increases decreases the volume continuously To attenuate the sound only for DDX4015BT DDX615WBT DDX615WBTM DDX4015BT DDX615WBT DDX615WBTM The ATT...

Page 9: ...ry for Off Position RPutting the unit in standby 1 Display all the TOP MENU items On the TOP MENU screen 2 RTurning off the screen For DDX6015BT DDX4015BT DDX415BT DDX415BTM DDX315 DDX315M This operation works only when AV Key Long Press is set to V OFF Page 46 V OFF Hold Hold DDX6015BT DDX615WBT DDX615WBTM DDX4015BT DDX415BT DDX415BTM DDX315 DDX315M To turn on the screen Press MENU on the monitor...

Page 10: ...creen Page 42 3 1 2 Common operating buttons 1 Changes the playback source Page 11 2 Displays all playback sources and items Page 11 3 Displays the Setup screen See below Setup screen Changes the detailed settings Page 44 1 2 4 3 Common operating buttons 1 Selects the menu category 2 Displays the TOP MENU screen 3 Changes the page 4 Returns to the previous screen RTouch screen operations 1 3 2 4 1...

Page 11: ...l component connected to the iPod Audio Video input terminal Page 27 1 When no navigation unit is connected No Navigation appears 2 Only for 4015BT 3 Only for DDX6015BT DDX4015BT DDX415BT DDX415BTM DDX615WBT DDX615WBTM 4 Select an appropriate input setting in AV Input Page 45 RSelecting the playback source on the TOP MENU screen You can change the items other than SETUP to display on the TOP MENU ...

Page 12: ...oving a disc pull it horizontally You can eject a disc when playing another AV source If the ejected disc is not removed within 15 seconds the disc is automatically inserted again into the loading slot to protect it from dust Closing the monitor panel only for DDX6015BT DDX615WBT DDX615WBTM After removing the disc press M on the monitor panel The monitor panel closes Playback operations When the o...

Page 13: ... file no track no 4 Playback status 5 Playing time 6 Jacket picture Shown while playing if the file has tag data that includes the jacket picture 7 Playback mode Page 15 8 File type 9 IN indicator Operation buttons Available buttons on the screen and operations differ depending on the type of disc file being played back MODE Changes the settings for disc playback on the DISC Mode screen Page 15 Se...

Page 14: ... the target item to select To restore the screen press AV on the monitor panel CUR Displays the menu scene selecting screen J K H I Selects an item For DivX H I skips back or forward by about 5 minutes Enter Confirms the selection Return Returns to the previous screen For VCD MENU Displays the disc menu Direct Displays hides the direct selecting buttons See below Audio Selects the audio channel ST...

Page 15: ... Select the initial subtitle language or turn subtitles off Off Initial English Page 58 Down Mix When playing back a multi channel disc this setting affects the signals reproduced through the front and or rear speakers Dolby Surround Select this to enjoy multi channel surround sound by connecting an amplifier compatible with Dolby Surround Stereo initial Normally select this Dynamic Range Control ...

Page 16: ...Track file information Pressing scrolls the text if not all of the text is shown 2 Current playback item information folder no file no 3 Playback status 4 Playing time 5 Jacket picture Shown while playing if the file has tag data that includes the jacket picture 6 Playback mode See the right column 7 File type Operation buttons Available buttons on the screen and operations differ depending on the...

Page 17: ...all tracks in the folder press I on the right of the desired folder You can change the page to display more items by pressing Press to return to the root folder Press to return to the upper layer iPod iPhone iPod iPhone Preparation RConnecting iPod iPhone For details about connecting iPod iPhone see page 54 For playable iPod iPhone types see page 57 Connect your iPod iPhone using the appropriate c...

Page 18: ...iP102 or KCA iP103 optional accessory iPod Select this when the iPod iPhone is connected using KCA iP202 optional accessory Playback operations When the operation buttons are not displayed on the screen touch the area shown on the illustration To change settings for video playback see page 39 RIndications and buttons on the source control screen 1 2 6 7 5 4 3 Playback information 1 Song video info...

Page 19: ...e TOP MENU screen 1 To cancel random mode press the button repeatedly until the indicator disappears 2 Resume playback is unavailable for video files RSelecting an audio video file from the menu 1 2 Select the menu audio or video 1 a category 2 then a desired item 3 Select the item in the selected layer until a desired file starts playing If you want to play all items in the layer press I on the r...

Page 20: ...an audio video file IW Starts pauses playback O N Reverse forward search MENU Displays the TOP MENU screen You can operate some functions of the App on the touch panel For some applications such as navigation applications the operation buttons and information are not shown You can perform the operations on the touch panel such as scrolling the map If appears on the screen the unit cannot accept th...

Page 21: ...onal accessory Page 54 2 Start the Pandora application on the connected iPod touch iPhone The PANDORA source control screen is displayed Playback operations You can operate Pandora using the remote controller Only playing pausing and skipping are available RIndications and buttons on the source control screen 2 1 4 3 Playback information 1 Picture data Shown if available from current content and w...

Page 22: ...tall the most recent version Connect iPod touch iPhone to this unit with KCA iP202 KCA iP102 or KCA iP103 optional accessory Android Visit Google play and search for Pandora to install Bluetooth must be built in and the following profiles must be supported SPP Serial Port Profile A2DP Advanced Audio Distribution Profile BlackBerry Visit www pandora com from the built in browser to download the Pan...

Page 23: ...ER Mode screen Page 24 TI Activates deactivates TI standby reception mode Page 25 AME Presets stations automatically Page 24 MONO Activates deactivates monaural mode for better FM reception Stereo effect will be lost The MONO indicator lights up while monaural mode is activated TEXT Changes the display information See the right column PTY Enters PTY search mode Page 25 AM Selects the AM band FM Se...

Page 24: ... this to store the antenna automatically RTuning in FM stations only with strong signals Local Seek 1 2 ON Select this to tune in only to stations with sufficient signal strength The LO S indicator lights up OFF Deactivate the function Presetting stations RStoring stations in the memory You can preset 6 stations for each band Automatic presetting AME Auto Memory Hold Local stations with the strong...

Page 25: ...nly English Spanish French German Dutch Portuguese are available for the text language here If another language has been selected in Language Page 46 the text language is set to English RActivating deactivating TI News Standby Reception TI Standby Reception The unit is in standby to switch to Traffic Information TI if available The TI indicator lights up in white If the TI indicator is lit in oran...

Page 26: ...stronger signals When shipped from the factory Network Tracking Reception is deactivated To change the Network Tracking Reception setting 1 2 AF Switch to another station The program may differ from the one currently received the AF indicator lights up AF Reg Switch to another station broadcasting the same program the AF indicator lights up OFF Deactivate the function The RDS indicator lights up w...

Page 27: ...on is required for AV IN1 You can change the setting only when STANDBY is selected on TOP MENU Page 9 1 Display the Input setting screen On the TOP MENU screen 2 RIndications and buttons on the source control screen 1 Playback information 1 AV IN name Operation buttons MODE Changes the AV IN name Press H or I to select an AV IN name This setting does not affect the source name displayed on TOP MEN...

Page 28: ...w camera The rear view screen is displayed when you shift the gear to the reverse R position To erase the caution message touch the screen You can change the setting of the picture using Zoom Aspect Picture Adjust Page 39 To display the picture from the rear view camera manually This operation works only when AV Key Long Press is set to R CAM Page 46 Hold Hold Hold DDX6015BT DDX615WBT DDX615WBTM D...

Page 29: ...ULL regardless of the Aspect setting Page 40 To exit the navigation screen DDX6015BT DDX615WBT DDX615WBTM DDX4015BT DDX415BT DDX415BTM DDX315 DDX315M RSettings for the navigation unit 1 Display the Input setting screen On the TOP MENU screen 2 Display the Navigation screen 3 Guidance Select which front speakers are used for the navigation guidance Volume Adjust the volume of the navigation guidanc...

Page 30: ... Bluetooth devices to communicate with each other The pairing method differs depending on the Bluetooth version of the device For devices with Bluetooth 2 1 You can pair the device and the unit using SSP Secure Simple Pairing which only requires confirmation For devices with Bluetooth 2 0 You need to enter a PIN code both on the device and unit for pairing Once the connection is established it is ...

Page 31: ...de is initially set to 0000 The maximum number of digits in the PIN code is 16 Press Clear to delete the last entry 3 Search the unit DDX from your Bluetooth device 4 Select the unit DDX for your Bluetooth device DDX If the PIN code is required enter 0000 initial PIN code OK 0000 When pairing is complete the device is listed on Paired Device List To use the paired device connect the device on Pair...

Page 32: ... To disconnect Select TEL HFP or Audio A2DP or PANDORA SPP to disconnect the Bluetooth device being used for that function on the Paired Device List screen see the left column PANDORA SPP appears only for DDX4015BT RDeleting a registered Bluetooth device 1 Display the Bluetooth Setup screen Page 31 2 3 Select a device to delete 1 then delete the registration 2 A confirmation message appears Press ...

Page 33: ...e mobile phone after stopping the car in a safe place You cannot read edit or send a message through the unit For some mobile phones the notification message may not be shown even if the SMS function is supported RReducing noise adjusting the echo cancel level While talking To adjust the echo volume between 1 to 10 initial 4 Adjust EC LEVEL To adjust the noise reduction volume between 5 to 20 init...

Page 34: ...al If the initial is not a letter or number press Others 3 Select a phone number from the list To display the details of an entry When the Phonebook is displayed you can display the details of an entry and select a phone number if several phone numbers are registered 1 Display the details of the desired entry 2 Select a phone number to call Direct number entry You can enter up to 32 numbers Press ...

Page 35: ...number Hold 4 Select a preset number to store into You can also preset a phone number entered on the Direct Number screen by pressing Preset Page 34 To delete the preset phone numbers Initialize the settings from Initialize in Bluetooth Setup Page 46 RCopying the phone book You can copy the phone book memory of a mobile phone into the unit up to 400 entries 1 Display the Hands Free screen Page 33 ...

Page 36: ...the unit Phone Displays the phone book call lists on the connected mobile phone System Displays the phone book call lists copied to the unit RDeleting the phone number entries in the unit 1 Display the phone book call list you want to delete Page 33 2 You cannot delete data when Phone is selected 3 Select the item you want to delete Press All to delete all the numbers names in the selected list A ...

Page 37: ...ne1 Initial Tone2 Tone3 Call Tone Selects the ring tone for phone calls Message Tone Selects the ring tone for SMS Using the Bluetooth audio player To register a new device see page 30 To connect disconnect a device see page 32 RIndications and buttons on the source control screen 1 4 2 3 The operation buttons indications and information displayed on the screen differ depending on the connected de...

Page 38: ... preset equalizer that reduces noise from the road You can also display the Equalizer screen by pressing AUD for DDX6015BT DDX315 DDX315M or AUDIO for DDX4015BT DDX615WBT DDX615WBTM on the monitor panel Storing your own adjustment Customizing preset sound mode 1 Select a sound mode See the far left column 2 Select a band and adjust the level of the selected band You can adjust the level by draggin...

Page 39: ...ssover frequency 1 Adjustable only when the subwoofer is activated Page 44 2 Not selectable when Freq is set to Through Adjustment for video playback RAdjusting the picture You can adjust the picture quality 1 Display the adjustment menu When the App or navigation screen is displayed you can press AV on the monitor panel to switch to the picture adjustment menu 2 Select DIM ON dimmer on or DIM OFF...

Page 40: ...o is automatically selected to match the incoming signals While DivX is played back with Screen Ratio set to 16 9 for DVD Page 15 for USB Page 17 the aspect ratio is not set correctly RZooming the picture You can zoom the picture FULL Zoom1 to Zoom3 When Aspect is set to JUST or Auto see the left column the picture is zoomed with the aspect ratio of the FULL setting 1 Display the adjustment menu 2...

Page 41: ...immer setting for the color 1 then adjust the color 2 RStoring your own scene for the background image While playing a video or picture you can capture an image and use the captured image as a background You cannot capture copyrighted content and images from iPod iPhone When using a JPEG file as the background make sure that the resolution is 800 x 480 pixels The color of the captured image may lo...

Page 42: ...con 1 then select the item you want to display in the selected position 2 Repeat this step to place icons for other items Customizing the system settings RMemorizing recalling the settings You can memorize the settings changed in the Setup menu and recall the memorized settings anytime The memorized settings are kept even when the unit is reset Page 3 1 Display the SETUP Memory screen On the TOP M...

Page 43: ...oth Version Updates the Bluetooth application It may take a while If the update has been completed successfully Update Completed appears Reset the unit If the update has failed turn the power off and then on and retry the update Even if you have turned off the power during the update you can restart the update after the power is turned on The update will be performed from the beginning Only for DD...

Page 44: ... Boost low and high frequencies to produce a well balanced sound at a low volume level The LOUD indicator lights up OFF Cancels X over Adjust the crossover frequency Page 39 Volume Offset Adjust and store the auto adjustment volume level for each source For discs the adjustment is stored for each of the following categories DVD VCD CD and DivX MPEG1 MPEG2 MP3 WMA WAV AAC The volume level will auto...

Page 45: ...er on DIM OFF dimmer off then change the following settings Bright Adjusts brightness 15 to 15 Initial 0 for Dimmer On 15 for Dimmer Off Black Adjusts blackness 15 to 15 Initial 0 Video Output 2 Select the color system of the external monitor NTSC PAL Initial Angle 3 Adjust the panel angle Page 9 1 Only for DDX6015BT DDX4015BT DDX415BT DDX415BTM DDX315 DDX315M 2 Please Power Off appears when the s...

Page 46: ...peakers Auto Pairing ON initial Establishes pairing automatically with the connected iOS device such as iPhone even if the Bluetooth function is deactivated on the device Auto pairing may not work for some devices depending on the iOS version OFF Cancels Initialize Hold Enter to initialize all settings you have made for using Bluetooth mobile phone and Bluetooth audio player AV Key Long Press Assi...

Page 47: ... the case If the Remote Controller operates only over shorter distances or does not operate at all it is possible that the batteries are depleted In such instances replace both batteries with new ones RRemote Controller mode switch The functions operated from the remote controller differ depending on the position of the mode switch DVDt T Vt AUDt AUD mode Switch to this mode when controlling a sel...

Page 48: ...e AUD mode AM FM Selects a folder S T Selects a track file I W Starts pauses playback 0 9 Specifies the number to search for in direct search DIRECT Enters direct search mode See the right column RRadio AUD mode AM FM Selects the band S T Searches for stations I W Changes the seek mode AUTO1 AUTO2 MANU 0 9 Specifies preset number Specifies the frequency of the station to receive to search for in d...

Page 49: ... to register change 4 Select a function to assign You can change the page to display more items by pressing 5 Repeat steps 3 and 4 as necessary 6 Finish the procedure The unit can register change all of the button s functions at the same time To do this press each button in turn and after pressing all of them press Done in the Steering Remote Control Setting screen However new functions cannot be ...

Page 50: ...urce with a constant voltage supply such as with battery wires the battery may be drained Only for DDX6015BT DDX615WBT DDX615WBTM If the console has a lid make sure to install the unit so that the monitor panel will not hit the lid when closing and opening If the fuse blows first make sure the wires are not touching to cause a short circuit then replace the old fuse with one with the same rating I...

Page 51: ...the speaker wires of the wiring harness 4 Connect the wiring harness wires in the following order ground battery ignition 5 Connect the wiring harness connector to the unit 6 Install the unit in your car Make sure that the unit is installed securely in place If the unit is unstable it may malfunction eg the sound may skip 7 Reconnect the battery 8 Press the reset button 9 Configure Initial Setup P...

Page 52: ... car is required To car light control switch To car chassis Purple with white stripe Reverse sensor wire Light green Parking sensor wire 1 White ª White with black stripe To front speaker left Gray ª Gray with black stripe To front speaker right Green ª Green with black stripe To rear speaker left Purple ª Purple with black stripe To rear speaker right Blue Antenna control wire Blue with white str...

Page 53: ...t used Connect to vehicle s harness Connect to vehicle s harness If no connections are made do not let the cable come out from the tab Blue with white stripe Power control wire Brown Mute control wire Connect to the vehicle s reverse lamp harness when using the optional rear view camera Connect to the vehicle s parking brake detection switch harness For best safety be sure to connect the parking s...

Page 54: ...d 5 Subwoofer preout monaural output 2 Subwoofer left output White Subwoofer right output Red 6 NAVI I F input 7 Rear view camera input Yellow 8 Audio Video input AV IN1 1 Visual input Yellow Audio left input White Audio right input Red 1 When connecting the component to play on AV IN1 AV IN2 use the Audio and Video cable CA C3AV optional accessory 2 When connecting the external amplifier connect ...

Page 55: ...er benzine etc to clean discs RTo play new discs New discs may have some rough spots around the inner and outer edges If such a disc is used this unit may reject the disc To remove these rough spots rub the edges with a pencil or ball point pen etc More information RFile playback Playing DivX files This unit can play back DivX files with the extension code divx div or avi regardless of the letter ...

Page 56: ...ordable Rewritable DVD R RW 2 R RW 3 DVD Video UDF bridge DivX MPEG1 MPEG2 JPEG MP3 WMA WAV AAC ISO 9660 level 1 level 2 Romeo Joliet DVD Video DivX MPEG1 MPEG2 JPEG MP3 WMA WAV AAC Dual Disc DVD side CD VCD VCD Video CD Audio CD CD Text CD DA CD Recordable Rewritable CD R RW ISO 9660 level 1 level 2 Romeo Joliet VCD Video CD CD DA MPEG1 MPEG2 JPEG MP3 WMA WAV AAC 1 DVD Region code For DDX6015BT D...

Page 57: ...characters File names 50 characters Avoid using the USB device if it might affect driving safety Do not pull out and connect the USB device repeatedly while Reading is shown on the screen Electrostatic shock when connecting a USB device may cause abnormal playback of the device In this case disconnect the USB device then reset this unit and the USB device Operation and power supply may not work as...

Page 58: ...anskrit VI Vietnamese EU Basque KU Kurdish SD Sindhi VO Volapuk FA Persian KY Kirghiz SG Sangho WO Wolof FI Finnish LA Latin SH Serbo Croatian XH Xhosa FJ Fiji LN Lingala SI Singhalese YO Yoruba FO Faroese LO Laothian SK Slovak ZU Zulu FY Frisian LT Lithuanian SL Slovenian GA Irish LV Latvian Lettish SM Samoan GD Scots Gaelic MG Malagasy SN Shona Error message list If an error occurs while using t...

Page 59: ... played Station limit reached The Station List is full and no more stations can be registered Failed to save your bookmark The unit has failed to save a bookmark Try the operation again Limited Connectivity The connection with the Pandora application cannot be established Pandora not available You cannot use the Pandora application from the area where you are currently trying to access Pandora Try...

Page 60: ...es interrupted The tracks are not properly copied onto the USB device Copy the tracks again and try again RiPod iPhone No sound comes out of the speakers Disconnect the iPod iPhone then connect it again Select another source then reselect iPod The iPod iPhone does not turn on or does not work Check the connecting cable and its connection Update the firmware version Charge the battery Reset the iPo...

Page 61: ... the unit and the Bluetooth audio player Disconnect the device connected for Bluetooth phone Turn off then turn on the unit If the sound is not yet restored connect the player again The connected audio player cannot be controlled Check whether the connected audio player supports AVRCP Audio Video Remote Control Profile Bluetooth device does not detect the unit Search from the Bluetooth device agai...

Page 62: ... 96 kHz Dynamic Range 99 dB DVD Video 96 kHz Disc Format DVD Video VIDEO CD CD DA Sampling Frequency 44 1 kHz 48 kHz 96 kHz Quantifying Bit Number 16 20 24 bit RUSB interface section USB Standard USB 2 0 Full Speed File System FAT 16 32 Maximum Power Supply Current DC 5 V 1 A D A Converter 24 bit Audio Decoder MP3 WMA AAC WAV Video Decoder MPEG1 MPEG2 DivX RBluetooth section only for DDX6015BT DDX...

Page 63: ...io section Maximum Power Front Rear 50 W 4 Full Bandwidth Power Front Rear at less than 1 THD 22 W 4 Preout Level 4 V 10 kΩ Preout Impedance 600 Ω Speaker Impedance 4 Ω 8 Ω Graphic Equalizer BAND 5 Band Frequency Hz BAND1 5 80 200 800 4k 12 5k Gain 8 7 6 5 4 3 2 1 0 1 2 3 4 5 6 7 8 dB 2Way X Over HIGH PASS FILTER frequency Through 63 100 120 150 180 Hz LOW PASS FILTER frequency 55 85 120 160 Throu...

Page 64: ...igorous testing to verify that it plays DivX video Visit divx com for more information and software tools to convert your files into DivX videos ABOUT DIVX VIDEO ON DEMAND This DivX Certified device must be registered in order to play purchased DivX Video on Demand VOD movies To obtain your registration code locate the DivX VOD section in your device setup menu Page 46 Go to vod divx com for more ...

Reviews: