background image

30

English

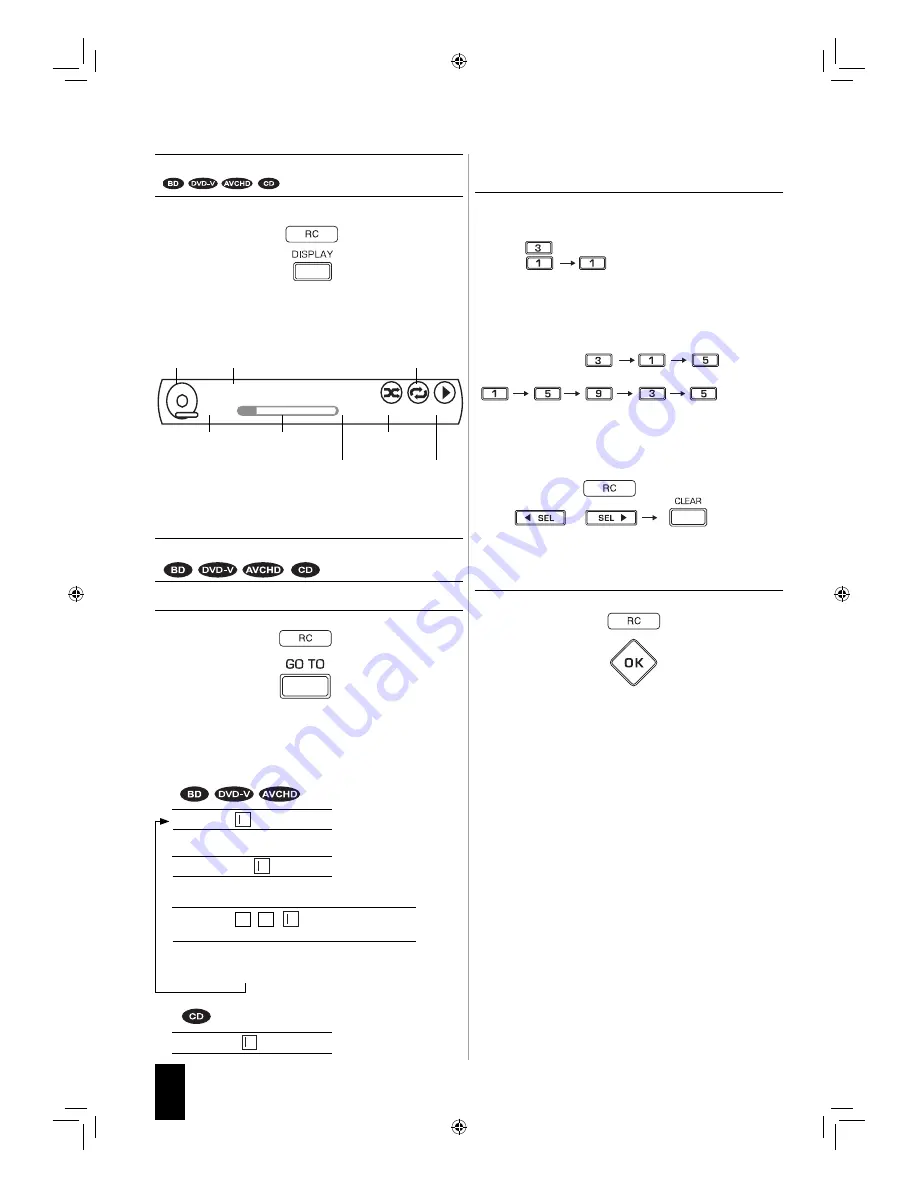
Displaying disc information 

• During playback,

• Then the disc information is displayed on the TV screen.

Example : During playback of CD

• To turn off the information, press this button.
• Depending on the disc types, the disc information differs.

Playing the desired section of disc 

1.


During playback, press the GO TO button.

• Then the search mode is displayed on the TV screen for 

several seconds.

• Each time this button is pressed, the search mode is 

changed depending on the disc types as follows :

 Goto Title : 

 / 30 (current:1)    : Title search

Goto Time :       :      : 

 /2:24:12(Current:0:15:50):

Time search   

Off 

 Goto Chapter : 

 / 16 (current: 2)    : Chapter search

 Goto Track : 

 / 11 (current: 1)    : Track search

2.

 At the desired search mode, enter the number to 

be played, pressing the NUMERIC buttons.

■ 

When entering title, chapter, track number

Examples : 
For “3” :
For “11” : 

■ 

When entering the elapsed time

You can play a disc from the desired by specifying the 
elapsed time from the beginning of the current title/disc.

Examples : 
For “3 min. 15 sec.” :
For “1 hour. 59 min. 35 sec.” :

■ 

When clearing the numbers entered

• Press the CURSOR LEFT/RIGHT buttons to select the 

number to be cleared, then press the CLEAR button.

• Then the selected number will be cleared.

3.


Press the OK button.

• Then playback will start from the selected section.

■ 

Notes:

• If the disc does not contain the number you entered, 

search playback will not work.

• Depending on the disc, search playback will not work or 

may work differently.

Track : 1 / 11

0 : 00 : 23

CD-DA

0 : 06 : 46

Off

Off

Play

Disc type Current track/total track number

Repeat playback 
mode

Elapsed time of 
the current track

Proceeding bar

Random 
playback mode

Total playing time of 
the current track

Playback 
mode

➝➝

BDR-A7_EN_CS3.indb   30

BDR-A7_EN_CS3.indb   30

11.3.10   6:59:38 PM

11.3.10   6:59:38 PM

Summary of Contents for BDR-A7

Page 1: ...gard to the EMC Directive 2004 108 EC Manufacturer Kenwood Corporation 2967 3 Ishikawa machi Hachioji shi Tokyo 192 8525 Japan EU Representative s Kenwood Electronics Europe BV Amsterdamseweg 37 1422 AC UITHOORN The Netherlands BDR A7_EN_CS3 indb 1 BDR A7_EN_CS3 indb 1 11 3 10 6 59 31 PM 11 3 10 6 59 31 PM ...

Page 2: ... outside the product Location Back panel Information on Disposal of Old Electrical and Electronic Equipment and Batteries applicable for EU countries that have adopted separate waste collection systems Products and batteries with the symbol crossed out wheeled bin cannot be disposed as household waste Old electrical and electronic equipment and batteries should be recycled at a facility capable of...

Page 3: ...ng instructions should be read before the product is operated Keep These Instructions The safety and operating instructions should be retained for future reference Heed All Warnings Allwarningsontheproductandintheoperatinginstructionsshould be adhered to Follow All Instructions All operating and use instructions should be followed 1 Clean only with dry cloth Unplugthisproductfromthewalloutletbefor...

Page 4: ...PLAYING A DISC 28 ENJOYING BONUSVIEW OR BD LIVE 34 PLAYING FILES 35 OSD Menu Settings 40 SETTING THE SYSTEM 41 SETTING THE DISPLAY 42 SETTING THE AUDIO 43 SETTING THE LANGUAGE 43 SETTING THE PARENTAL CONTROL 44 SETTING THE NETWORK 45 SETTING THE SPEAKER 46 Operation of Tuner LISTENING TO RADIO BROADCASTS 47 Radio Data System Tuner LISTENING TO Radio Data System BROADCASTS FM ONLY 49 Troubleshootin...

Page 5: ...UDIO VIDEO COMPONENTS The AUDIO IN jacks can be connected to the AUDIO OUT jacks of audio or video components A 75Ω outdoor FM antenna may be used to further improve the reception Disconnect the indoor antenna before replacing it with the outdoor one Change the position of the FM indoor antenna until you get the best reception of your favorite FM stations System Connections SAT Satellite system DV...

Page 6: ... bandwidth Digital Contents Protection technology to protect copyright of digital video signals against illegal duplication HDCP must also be supported on the components connected to this unit This unit is HDMI Ver 1 3 compatible HDMI the HDMI logo and High Definition Multimedia Interface are trademarks or registered trademarks of HDMI licensing LLC Video output resolution The video output resolut...

Page 7: ...acement on page 8 After installing the speakers first adjust the speaker settings according to your environment and speaker layout For details refer to Setting the speaker setup on page 20 Depending on whether the type of your subwoofer is the passive subwoofer or active powered subwoofer connect it as follows Connect the SUBWOOFER terminals to the passive subwoofer Connect the SUBWOOFER PREOUT ja...

Page 8: ...he main listening position Surround left and right speakers Place the surround speakers approximately 1 meter 40 inches above the ear level of a seated listener on the direct left and right of them or slightly behind Surround back left and right speakers Place the surround back speakers at the back facing the front at a narrower distance than front speakers When using a single surround back speake...

Page 9: ...0 BASE TX Some LAN cables are easily affected by noise We recommend using a shield type cable 8 COOLING FAN Cooling fan operates to prevent the temperature inside this unit from rising To allow for proper ventilation maintain a certain space behind this unit Note While the fan is operating the faint fan noise may be generated 9 AC INPUT Plug this cord into a wall AC outlet CAUTION Notes on the AC ...

Page 10: ...SVIEW OR BD LIVE on page 34 Notes Do not use a USB extension cable when connecting a USB memory device to this connector After playback of files or Virtual Package BD LIVE data remove the USB memory device in the stop mode or the standby mode Media indicators SLEEP indicator DIGITAL indicator TUNED indicator MEMORY indicator HDMI indicator STEREO indicator RDS indicator REPEAT indicators Input sig...

Page 11: ...e modes For details refer to FUNCTION TABLE of the NUMBERED BUTTONS on the next page 2 1 3 5 4 6 7 8 STANDBY button STEP button PAUSE button SLEEP button RANDOM button PIP button DIMMER button CLEAR button VOLUME fi buttons SURROUND MODE UP DOWN buttons CURSOR CONTROL OK SEARCH MODE SELECT buttons The function in are regional option for Europe etc POP UP MENU button DISPLAY button SPEAKER SETUP but...

Page 12: ...to Setup Code Table on page 54 3 Press and hold down both the OK button and the DEVICE button you want for more than 1 seconds The LED will flicker once Note The MAIN button is unavailable for the components other than this unit 4 Enter a 3 digit code Example When entering 001 If entering is performed successfully the LED will flicker twice To be sure that the setup code is correct press the ON or...

Page 13: ...te control at the REMOTE SENSOR of the component you wish to control and press the button corresponding to the operation you want OPERATING COMPONENTS WITH REMOTE CONTROL REMOTE CONTROL OPERATION RANGE LOADING BATTERIES When the remote control does not operate the old batteries should be replaced In this case load new batteries within several minutes after removing old batteries If the batteries a...

Page 14: ...r the operating mode or press the STANDBY button to enter the standby mode Standby mode This means that the unit is not disconnected from the AC mains and a small amount of current is retained to support the operation readiness 2 Select the desired input source Each time the INPUT SELECTOR button on the front panel the input source changes as follows FM SAT TV AUX BD DVD frequency display Each tim...

Page 15: ... DVD is selected as an input source see Displaying disc information on page 30 and Displaying file information on page 37 When Radio Data System tuner function is available in your country for details on the FM mode information see Displaying Radio Data System information on page 49 Operating the sleep timer Displaying the operation status Adjusting the brightness of the fluorescent display The sl...

Page 16: ...t for rotating and fly by sound effects Dolby Digital Plus Developed for use with HDTV including the new video disc formats Blu ray and HD DVD this is the latest multichannel audio format from Dolby It supports up to 7 1 channels with 48 kHz 24 bit sampling rate and signal resolution Dolby TrueHD Designed to take full advantage of the additional storage space offered by the new Blu ray and HD DVD ...

Page 17: ...hannel sources DTS ES Matrix 6 1 channel sources DTS 96 24 sources AUTO SURROUND corresponding DTS mode STEREO DTS sources AUTO SURROUND DTS PLIIx MUSIC DTS PLIIx MOVIE DTS STEREO PCM 2 channel sources PCM multi channel sources Analog stereo sources AUTO SURROUND DOLBY PLIIx MOVIE DOLBY PLIIx MUSIC DOLBY PLIIx GAME DOLBY PLII MOVIE DOLBY PLII MUSIC DOLBY PLII GAME DOLBY PRO LOGIC MOVIE DRAMA GAME ...

Page 18: ...n When the RETURN is pressed on a sub menu it will returns to the previous menu Each time these buttons are pressed the setup menu is selected as follows SOUND PRMT TONE SPK SET Sound Parameter Speaker Setup When TONE is selected see Setting the Tone on page 23 Setting the sound parameter You can adjust the different sound parameters for optimum surround effect Settings with are the default 1 Pres...

Page 19: ...olume to minimize the difference in volume between the specified and non specified parts This makes it easy to hear all of the sound track when watching movies at night at low levels OFF To turn the DRC function off MID To adjust it to MID level MAX To adjust it to MAX level Note In some Dolby Digital or DTS software the DRC setting may not be valid When selecting the LFE LFE level Some Dolby Digi...

Page 20: ...ker settings for the optimum sound acoustic according to your environment and speaker layout Even when you change speakers speaker positions or the layout of your listening environment you should adjust the speaker settings too Settings with are the default SPK CFG SPEAKER CONFIGURATION To adjust the speakers depending on whether they are connected or not X OVER CROSSOVER FREQUENCY To select the d...

Page 21: ...annels set to SMALL from the subwoofer PLUS Select this if you want the subwoofer to output bass sound continuously or you want deeper bass the bass frequencies that would normally come out the front and center speakers are also routed to the subwoofer NO Select this when the subwoofer is not connected The bass frequencies are output from other speakers Notes When speakers are set to SMALL you sho...

Page 22: ...E will be displayed 2 Press the CURSOR LEFT RIGHT buttons to select the desired mode Each time these buttons are pressed the mode changes as follows M MANUAL To move the test tone manually from speaker to speaker and to adjust the individual channel levels A AUTO To adjust the channel levels as the test tone moves from speaker to speaker automatically 3 Press the OK button to confirm your selectio...

Page 23: ...K button Then L will be displayed 2 Press the CURSOR UP DOWN buttons to select the desired speaker Note You cannot select the speakers set to NO 3 Press the CURSOR LEFT RIGHT buttons to set the selected speakers as desired You cannot set the distance within the range of 0 1 9 0 meters in 0 1 meter intervals 4 Repeat the above steps 2 and 3 until the distances are all set as desired About the speak...

Page 24: ...D Video DVD R DVD Video AVCHD DVD RW DVD Video AVCHD Audio CD Audio CD CD DA CD R Audio CD CD DA MP3 WMA JPEG AVI WMV CD RW Audio CD CD DA MP3 WMA JPEG AVI WMV Only BD RE R DVD R RW and CD R RW discs recorded with UDF or ISO9660 format can be played back This unit supports Ver 2 0 BD ROM Ver 3 0 BD RE and Ver 2 0 BD R Notes Unfinalized BD RE R DVD R RW and CD R RW discs can not be played back Some...

Page 25: ... Invalid operation may occur as expected if The region codes of the unit is different from that of the disc and playback will not be allowed The parental control works For details refer to SETTING THE PARENTAL CONTROL on page 44 BD DVD Video operations and functions may be different from the explanations in this manual and some operations may be prohibited due to disc manufacturer s settings Chara...

Page 26: ...Blu ray Disc holds up to 50 GB of data Blu ray Disc Blu ray and Blu ray Disc logo are trademarks of Blu ray Disc Association BonusView Some BD ROMs have bonus contents and other data that can be downloaded to the external memory local storage for enjoyment BONUSVIEW is trademark of Blu ray Disc Association Dolby Digital A sound system developed by Dolby Laboratories Inc that gives movie theater am...

Page 27: ...ach angle Multi Audio This is a feature of DVD and BD video discs This function makes it possible to record different audio tracks for the same video so you can enhance your enjoyment by switching the audio Pop up menu An enhanced menu operation available on BD video discs The pop up menu appears when POPUP MENU is pressed during playback and can be operated while playback is in progress Progressi...

Page 28: ...on page 40 For explanation purposes this instructions explains the OSD On Screen Display language displayed on TV in English Usable discs and files for each operation function are referred to by the icons 3 Press the CURSOR UP DOWN buttons to select the disc then press the OK button When the Optical Disc AutoPlay is set to Off Then playback will start For some discs the menu may be displayed first...

Page 29: ...nce playback Each time the STEP button is pressed the disc is advanced by one frame To return to normal playback press the PLAY PAUSE or button To skip ahead or back During playback Each time the button is pressed a chapter track is skipped When the BACKWARD SKIP 4 button is pressed once midway through a chapter track playback returns to the beginning of that chapter track When it is pressed again...

Page 30: ... chapter track number Examples For 3 For 11 When entering the elapsed time You can play a disc from the desired by specifying the elapsed time from the beginning of the current title disc Examples For 3 min 15 sec For 1 hour 59 min 35 sec When clearing the numbers entered Press the CURSOR LEFT RIGHT buttons to select the number to be cleared then press the CLEAR button Then the selected number wil...

Page 31: ... repeatedly During playback of the desired chapter track press the REPEAT button Each time this button is pressed the repeat mode changes depending on the disc types as follows Repeat Off Repeat mode off normal playback Repeat Title Title repeat Repeat Chapter Chapter repeat Repeat Off Repeat mode off normal playback Repeat All Entire disc repeat Repeat Track Track repeat Note For some BD Video di...

Page 32: ...CURSOR UP DOWN buttons to select the desired audio stream then press the OK button Then the selected audio stream will be switched Note When the primary and the secondary audio streams are all switched they will be mixed and heard together If confused set the PIP Audio to Off to switch off the secondary audio stream Switching the audio soundtrack For discs on which multiple audio streams are recor...

Page 33: ...ds 2 Press the CURSOR RIGHT button Then the angle menu is displayed 3 Press the CURSOR UP DOWN buttons to select the desired angle then press the OK button Then the scene recorded from the selected angle will be displayed Angle 01 08 Current angle total number of recorded angles 1 During playback press the SUBTITLE button Then the subtitle information is displayed for several seconds Example BD Vi...

Page 34: ...ns in the BD disc manual To enjoy BD LIVE functions perform the broadband internet connection and communication settings For details refer to CONNECTING TO NETWORK on page 9 and SETTING THE NETWORK on page 45 Regarding the setup to restrict access to BD LIVE contents refer to BD Live Internet Access on page 41 This unit is compatible with additional functions of BD Video BONUSVIEW BD ROM Profile 2...

Page 35: ... the desired file using the CURSOR buttons then press the OK button or the CURSOR RIGHT button Then the corresponding dialog box is displayed depending on whether the Playlist is selected as a media or not as follows Note When the JPEG file is selected as a type of file to be played the Play File cannot be selected 5 Press the CURSOR UP DOWN buttons to select the desired item in the dialog box the...

Page 36: ...lect the desired play mode in the play menu then press the OK button Then playback will start according to the selected play mode Notes When playing JPEG files each file is displayed for the time interval you specified The selectable play mode may vary depending on the operation status and the selected media etc When selecting the Browse Pictures or the Browse Music The JPEG file or the music file...

Page 37: ...ay is shortened as follows 5 seconds 2 1 No Delay Displaying file information During playback Then the file information is displayed on the TV screen Example During playback of video file To turn off the information press this button Depending on the file types the file information differs During playback of music files the file information is still displayed without pressing this button Playing t...

Page 38: ...intervals to display the JPEG files as follows 5 seconds 2 1 No Delay 10 15 30 When entering the elapsed time You can play from the desired by specifying the elapsed time from the beginning of the current file Examples For 3 min 15 sec For 1 hour 59 min 35 sec When clearing the number entered Press the CURSOR LEFT RIGHT buttons to select the number to be cleared then press the CLEAR button 3 Press...

Page 39: ...d play mode Then you can see the JPEG files while listening to the music files While playing both the music files and the JPEG files the playback controls are effective for the JPEG files only To control the music files 1 Press the STOP button to stop the playback of the JPEG files Then the play menu etc will be displayed 2 Press the CURSOR UP DOWN buttons to select the Now Playing in the play men...

Page 40: ...u can check the system information on this unit Display See SETTING THE DISPLAY on page 42 Audio See SETTING THE AUDIO on page 43 Language See SETTING THE LANGUAGE on page 43 Parental See SETTING THE PARENTAL CONTROL on page 44 Speaker See SETTING THE SPEAKER on page 46 Note Because the setting operation for Parental and Network differs follow their own procedures 3 Press the CURSOR UP DOWN button...

Page 41: ...ETTING THE NETWORK on page 45 BD Live Storage USB BD LIVE contents are stored into the USB memory device USB1 GB Free Displays the storable memory capacity Screen Saver Duration Set the period of time to activate screen saver function A TV screen may be burned out if a static picture is displayed for a long time in the stop mode etc To prevent this the unit automatically activate the screen saver ...

Page 42: ...3 aspect ratio 4 3 Letterbox Select this to play back the discs recorded in wide screen format with 4 3 TV in the letter box mode with black strips at the top and bottom 24P Mode Set whether to output 1080 24p video signals from HDMI OUT when playing film based materials 24 frame on BD discs On Select this to output 1080 24p video signals from HDMI OUT when playing film based materials 24 frame Of...

Page 43: ...tal Dolby Digital Plus or Dolby TrueHD audio is played back On Turns on the dynamic range compression to hear low sounds easier Off Turns it off Auto When Dolby TrueHD audio is played back the dynamic range is automatically adjusted For how to select the setting items and options refer to OSD Menu Settings on page 40 Settings with are the default Setting items Options OSD Set the language for unit...

Page 44: ...iolent scenes can be cut or replaced with other scenes depending on the disc type Notes When you set the Parental Level low some discs may not be played at all in this case set the Parental Level higher or the parental control to Off All discs may not respond to the Parental Level setting Make sure this function works with your disc Please Input 4 Digit Parental Password Parental Password OK Cance...

Page 45: ...anual You can select IP Address Subnet Mask Gateway Primary DNS and Secondary DNS to configure them manually On the IP Settings menu Link Status and Mac Address display the corresponding information merely 1 Press the CURSOR UP DOWN buttons to select the desired option then press the OK button Then the New Value entry screen will be displayed Example When selecting IP Address 2 Enter the new value...

Page 46: ...et on this receiver For details refer to When selecting the SPEAKER CONFIGURATION on page 21 Front L Center Front R Surround L Surround R Rear Surround Back L Rear Surround Back R Large Select this when connecting speakers that can fully reproduce sounds below crossover frequency Small Select this when connecting speakers that can not fully reproduce sounds below crossover frequency Off Select thi...

Page 47: ...tions are skipped during auto tuning Manual tuning Manual tuning is useful when you already know the frequency of the desired station After selecting the desired band press the TUNING buttons repeatedly until the right frequency has been reached Auto presetting Auto presetting function automatically searches for FM stations and store them in the memory While listening to FM radio broadcasts press ...

Page 48: ...When entering a number other than 1 3 with the NUMERIC buttons the station is stored automatically without pressing the OK button 4 Repeat the above steps 1 to 3 to memorize other stations MEMORY BACKUP FUNCTION The following items set before the receiver is turned off are memorized INPUT SELECTOR settings Surround mode settings Preset stations etc Tuning to preset stations After selecting the tun...

Page 49: ... M CLASSICS OTHER M WEATHER FINANCE CHILDREN SOCIAL RELIGION PHONE IN TRAVEL LEISURE JAZZ COUNTRY NATION M OLDIES FOLK M DOCUMENT If SEARCH disappears press the SEARCH MODE button again 3 While displaying the selected program type press the OK button The tuner start searching through the preset stations for a match When a station is found the search stops and the stations plays for five seconds If...

Page 50: ... too low Monaural source is used Surround speaker setting is NO Select a surround mode Adjust master volume and surround level Select a stereo or surround source Select the desired surround speaker setting No sound from the center speaker Stereo mode etc is selected Center speaker setting is NO Master volume and center level are too low Select the desired surround mode Select the desired center sp...

Page 51: ...n the disc Sometimes small amount of picture distortion may appear This is not malfunction Abnormal picture or no picture The unit is connected to a VCR directly and the copyguard function is activated The disc is dirty It is in rapid advance or reverse playback or in frame advance playback Set the resolution correctly Refer to SETTING THE DISPLAY on page 42 This unit will not transfer the video s...

Page 52: ... 2 2 kΩ 300 mV SUBWOOFER PREOUT 30 Hz 2 3 V VIDEO SECTION Output level 75 Ω Video regular COMPOSITE 1 0 Vp p Component video Y PB PR 1 0 0 7 0 7 Vp p HDMI connector 19 pin DIGITAL AUDIO SECTION Sampling frequency 32 44 1 48 96 kHz Digital input level Coaxial 75 Ω 0 5 Vp p Optical 660 nm 15 21 dBm BD PLAYER SECTION Pickup Semiconductor laser Video format NTSC PAL Frequency response BD Linear PCM Sa...

Page 53: ...y 230V 50 Hz Power consumption 110 W Operating temperature 41 F 95 F 5 C 35 C Dimensions W H D including protruding parts 435 105 5 387 mm 17 1 8 4 1 8 15 1 4 inches Weight Net 6 6 kg 14 6 Ibs Note Design and specifications are subject to change without notice for improvements BDR A7_EN_CS3 indb 53 BDR A7_EN_CS3 indb 53 11 3 10 6 59 43 PM 11 3 10 6 59 43 PM ...

Page 54: ...16 116 ELBIT 065 TV ELCIT 046 097 103 050 109 127 132 ELMAN 046 132 ELTA 090 EMERSON 158 098 050 ERRES 049 142 EUROPHON 098 046 097 099 051 115 132 FERGUSON 146 040 041 150 057 061 116 149 FIDELITY 099 149 FINLUX 034 046 053 055 057 109 113 073 074 079 FISHER 015 048 050 052 109 136 FORGESTONE 149 FORMENTI 099 053 109 111 125 FORTRESS 137 FRABA 075 FRONTECH 054 FUJITSU 025 FUNAI 054 059 GBC 109 13...

Page 55: ...8 105 109 122 123 128 148 129 130 134 135 083 089 NORDMENDE 028 032 039 043 145 131 091 081 OCEANIC 109 064 123 ONCEAS 099 OPTONICA 137 ORION 158 059 118 068 127 090 OSAKI 060 OSIO 077 OSUME 087 OTTO VERSAND 033 047 049 109 139 P T ACTTRON 065 PAEL 099 053 PANASONIC 030 042 095 104 107 109 121 126 PATHE CINEMA 099 111 116 132 PERDIO 060 PHILCO 016 030 101 050 109 124 079 132 136 PHILIPS 009 010 01...

Page 56: ... 063 065 115 118 TEC 096 099 132 TELEAVIA 028 039 040 043 145 091 081 TELEFUNKEN 028 041 145 150 086 091 TELETECH 090 TELEVIDEON 099 053 109 111 125 TENSAI 049 THOMSON 012 028 032 039 040 043 145 091 081 THORN FERGUSON 014 040 041 054 150 057 061 116 149 086 TOCOM 029 TOSHIBA 004 016 033 070 074 TRANS CONTINENTS 098 097 053 134 TRIUMPH 158 UHER 052 111 125 ULTRA VOX 098 046 099 050 109 120 UNIVERS...

Page 57: ...AMSUNG 003 022 SAT PARTNER 004 SATPORTNER 021 SCHAUB LORENZ 026 037 SCHNEIDER 005 016 SHERWOOD 000 SIEMENS 033 036 SIERA 016 SILVA 004 021 SKY 039 STARCOM 038 STARSAT 022 TECHNISAT 003 TELEFUNKEN 025 TELESYSTEM 005 THORN FERGUSON 010 014 041 016 017 018 043 TRIAD 004 UNIDEN 022 UNITED CABLE 038 VTECHNOLOGY 004 VORTEC 003 024 025 ZENDER 022 ALBA 030 AMSTRAD 008 019 027 ARCON 021 ARISTONA 016 ASTRA ...

Page 58: ...cted by law 2 The Licensor will offer no guarantee for the merchantability convertibility and consistency with certain objective of the Licensed Software Article 6 Liability toThird Party If any dispute has arisen with any third party due to an infringement upon a copyright patent or any other intellectual property right that was caused by the User s use of the Licensed Software the User shall set...

Page 59: ... the source code And you must show them these terms so they know their rights We protect your rights with two steps 1 copyright the software and 2 offer you this license which gives you legal permission to copy distribute and or modify the software Also for each author s protection and ours we want to make certain that everyone understands that there is no warranty for this free software If the so...

Page 60: ... of the Program If any portion of this section is held invalid or unenforceable under any particular circumstance the balance of the section is intended to apply and the section as a whole is intended to apply in other circumstances It is not the purpose of this section to induce you to infringe any patents or other property right claims or to contest validity of any such claims this section has t...

Page 61: ...inal version so that the original author s reputation will not be affected by problems that might be introduced by others Finally software patents pose a constant threat to the existence of any free program We wish to make sure that a company cannot effectively restrict the users of a free program by obtaining a restrictive license from a patent holder Therefore we insist that any patent license o...

Page 62: ...ions 1 and 2 above on a medium customarily used for software interchange If distribution of object code is made by offering access to copy from a designated place then offering equivalent access to copy the source code from the same place satisfies the requirement to distribute the source code even though third parties are not compelled to copy the source along with the object code 5 A program tha...

Page 63: ... add an explicit geographical distribution limitation excluding those countries so that distribution is permitted only in or among countries not thus excluded In such case this License incorporates the limitation as if written in the body of this License 13 The Free Software Foundation may publish revised and or new versions of the Lesser General Public License from time to time Such new versions ...

Page 64: ...ces designated on the warranty card and in the space provided below Refer to the model and serial numbers whenever you call upon your dealer for information or service on this product Model Serial Number BDR A7_EN_CS3 indb 2 BDR A7_EN_CS3 indb 2 11 3 10 7 01 15 PM 11 3 10 7 01 15 PM ...

Reviews: