background image

37

EN

KHF-350

A FEW STEPS TO PERFECT PREPARATION

PREPARATION OF FOOD

1. Plug the power plug into a grounded power outlet.
2. Pull the handle to open the drawer. (Fig.5)
3. Put the ingredients in the frying basket (Fig.3). Note: Never fill the basket beyond the MAX mark, and 
do not exceed the amount indicated in the table (see chapter on the preparation manual), as this may 
a

ect the quality of the result.

4. Push the frying bowl (Fig.6) back into the appliance with the handle (Fig.8).
Never use the frying bowl (Fig.6) without the frying basket (Fig.3). If you are heating the appliance 
without a frying basket, use oven gloves to open the drawer. The edges and the inside of the drawer are 
getting very hot.
CAUTION: Do not touch the frying pan during and shortly after use as it will get very hot. Hold the frying 
bowl by its handle only (Fig.5). To unscrew the basket from the frying bowl, slide the sliding closure (Fig.
4) and press the red release button (Fig.7). ATTENTION: After pressing the release button (fig. 7), the 
frying bowl separates from the frying basket. Provide a suitable base under which is heat resistant and 
the frying bowl can not fall down. Use for your own safety and to avoid scalding oven gloves!
5. Press the button to increase or decrease the time to set the required cooking time. Read the section 
in the preparation manual to determine the correct cooking time. (Fig. 19). The time setting can be set 
from 1 minute to a maximum of 30 minutes with the +/- buttons.
Tip: Press and hold the time up / down button to set the time faster. Note: If you do not set the required 
cooking time within 5 minutes, the appliance automatically switches to standby for safety reasons.
6. Set the desired temperature with the temperature buttons (Fig.17) to increase / decrease. The 
temperature can be set from 80 ° C to 200 ° C with the +/- buttons.
7. Press the Start / Pause button to start cooking. (Fig. 21). The display starts counting down the set 
cooking time. Excess fat from the food accumulates at the bottom of the frying bowl.
8. When the beep sounds, the pre-set cooking time has expired.
Note: You can also stop the cooking manually. To do this, press and hold the start button (Fig. 21) until 
you hear a beep, and the device will automatically switch to standby after 1 minute.

Follow the instructions to prepare the food.
Always make sure that the food you prepare is always fresh and of high quality.

Always ensure that, for example, meat, fish, seafood and poultry have been stored below 5 ° C before 
use. Always prepare food on clean work surfaces. Wash your hands thoroughly before preparation.
Prepare the food in the correct size (thickness) and temperature.

OPERATION

Summary of Contents for KHF-350

Page 1: ...1 DE KHF 350 INHALTSVERZEICHNIS DE EN GEBRAUCHSANLEITUNG INSTRUCTION MANUAL DIGITALE HEIßLUFTFRITTEUSE 3 5L KHF 350 ...

Page 2: ...inweise 4 2 Besondere Hinweise zum Netzkabel Elektrische Anforderungen 8 3 Vor dem ersten Gebrauch 9 4 Bezeichnung und Funktion der Teile 12 5 Kurzanleitung In wenigen Schritten zur perfekten Zubereitung 14 6 Zubereitungsleitfaden 15 7 Reinigung und Aufbewahrung 17 8 Fehlerbehebung 18 9 Kundendienst 20 ...

Page 3: ...Liebe Kundin lieber Kunde mit Ihrer neuen Heißluftfritteuse bereiten Sie im Handumdrehen köstliche Speisen zu Die Heißluftfritteuse ist einfach zu bedienen und dank seines antihaftbeschichteten Frittierkorbs leicht zu reinigen Für einen leichten Einstieg finden Sie auf unserer Webseite www kemar shop Rezeptideen und nützliche Tipps HERZLICHEN GLÜCKWUNSCH Dieser Artikel ist mit Sicherheitsvorrichtu...

Page 4: ... sicheren Umgang des Gerätes stets die in diesem Abschnitt aufgeführten Vorsichtsmaßnahmen Sie dienen zum Schutz vor Brandgefahr elektrischen Schlägen Verletzungen und Sachschäden Die Heißluftfritteuse ist ausschließlich zum frittieren ohne Fett für Pommes Frites Fisch Fleisch Gemüse Hamburger Brötchen Frühlingsrollen Fischstäbchen und vielem mehr konzipiert Er ist ausschließlich für den Privatgeb...

Page 5: ... in diesem Abschnitt aufgeführten Vorsichtsmaßnahmen Sie dienen zum Schutz vor Brandgefahr elektrischen Schlägen Verletzungen und Sachschäden Dieses Gerät ist dazu bestimmt im Haushalt und ähnlichen Anwendungen verwendet zu werden wie beispielsweise Küchen für Mitarbeiter in Läden und Büros und anderen gewerblichen Bereichen von Kunden in Hotels Motels und anderen Wohneinrichtungen in Frühstückspe...

Page 6: ...en Schlägen und Verletzungen 4 Beaufsichtigen Sie Kinder aufmerksam wenn sich Geräte in deren Nähe befinden oder von diesen bedient werden 5 Wenn das Gerät nicht verwendet wird oder wenn es gereinigt werden soll ziehen Sie den Netzstecker Lassen Sie das Gerät vor dem Reinigen und vor dem Anbringen bzw Entfernen von Teilen abkühlen 6 Betreiben Sie Geräte nicht falls Netzkabel oder Netzstecker besch...

Page 7: ...Netzstecker aus der Steckdose 15 Verwenden Sie das Gerät nur zum vorgesehenen Zweck Dieses Gerät ist nur zur Verwendung in Haushalten vorgesehen 16 Schließen Sie das Gerät nur an ein Wechselstromnnetz mit geeigneter Netzspannung an 17 Halten Sie den Netzstecker stets sauber 18 Schließen Sie das Gerät an eine gesonderte Steckdose an 19 Stecken Sie den Netzstecker stets fest in die Steckdose ein 20 ...

Page 8: ...rme ausgesetzt BESONDERE HINWEISE ZUM NETZKABEL A Das Netzkabel ist kurz um die Gefahr des Verfangens im Kabel oder des Stolperns darüber zu verringern B Verlängerungskabel können bei sachgemäßem Einsatz verwendet werden C Falls ein Verlängerungskabel verwendet wird 1 Die Strombelastbarkeit des Verlängerungskabels muss mindestens so groß sein wie die elektrische Leistungsaufnahme des Geräts 2 Das ...

Page 9: ...e Reparatur Wartungsmaßnahme oder Ersatz von Teilen ist von KeMar Kitchenware oder einer autorisierten Service Firma durchzuführen HEIßLUFTFRITTEUSE AUFSTELLEN UND ANSCHLIEßEN Nutzen Sie die Heißluftfritteuse ausschließlich mit dem mitgelieferten Zubehör Bevor Sie die Heißluftfritteuse in Betrieb nehmen folgen Sie bitte den folgenden Anweisungen Beachten Sie die folgenden Hinweise wenn Sie die Hei...

Page 10: ...ten Stellen Sie keine Gegenstände auf das Gerät Dies stört den Luftstrom und beeinträchtigt das Heißluft Bratergebnis Verbrennungsgefahr Fassen Sie das Gerät im Betrieb nicht an Das Gerät und das Gehäuse werden im Betrieb sehr heiß Fassen Sie das Gerät nur an seinen Griffen an Benutzen Sie das Gerät nur wenn der Handgriff korrekt am Frittierkorb montiert ist Lassen Sie vor dem Reinigen immer alle Te...

Page 11: ...ch hinten und drücken Sie den roten Freigabeknopf 5 Reinigen Sie den Frittierkorb und die Frittierschüssel gründlich mit heißem Wasser ein wenig Spülmittel und einem nicht kratzenden Schwamm Hinweis Diese Teile sind auch spülmaschinenfest 6 Wischen Sie die Innen und Außenseite des Geräts mit einem feuchten Tuch ab 7 Setzen Sie die Frittierschüssel in den Frittierkorb ein 8 Schieben Sie den Korb mi...

Page 12: ...12 DE KHF 350 BAUTEILE UND FUNKTIONEN Beschreibung der Komponenten der Heißluftfritteuse ...

Page 13: ...BAUTEILE UND FUNKTIONEN Das Gerät schaltet sich nach Beendigung des Kochvorgangs immer in den Standby Modus Der An Aus Schalter leuchtet 21 Um das Gerät komplett auszuschalten bitte den Netzstecker vom Strom trennen ...

Page 14: ...rkorbs aus der Frittierschüssel den Schiebeverschluss Abb 4 verschieben und den roten Freigabeknopf Abb 7 drücken ACHTUNG Nach dem Drücken des Freigabeknopfes Abb 7 löst sich die Frittierschüssel vom Frittierkorb Stellen Sie eine geeignete Unterlage darunter die Hitzebeständig ist und die Frittierschüssel nicht herunterfallen kann Benutzten Sie zu Ihrer eigenen Sicherheit und um Verbrühungen zu ve...

Page 15: ...st Frühlingsrollen Fischstäbchen gefroren Gemüse Kuchen Fisch Snacks Temperatur 170 C 200 C 170 C 200 C 170 C 200 C 170 C 200 C 170 C 200 C 170 C 200 C 180 C 180 C 180 C 180 C 180 C 180 C 160 C 160 C 190 160 C Gewicht 300 700g 300 700g 300 800g 300 800g 250g 250g 100 500g 100 500g 100 500g 100 500g 100 400g 100 400g 100 400g 300g 100 400g 400g Frittierzeit 9 16 Min 11 20 Min 10 15 MIn 18 22 Min 15...

Page 16: ...zu gewährleisten Siehe Zubereitungsleitfaden 1 Ziehen Sie die Frittierschüssel Abb 8 aus dem Gerät heraus Das Gerät unterbricht automatisch den Frittiervorgang 2 Schütteln Sie die Lebensmittel vorsichtig und schieben Sie danach die Frittierschüssel Abb 8 zurück in das Gerät Der Frittiervorgang wird automatisch fortgesetzt 3 ACHTUNG Drücken Sie nicht die Freigabetaste Abb 7 des Frittierkorbs Abb 3 ...

Page 17: ...räts mit einem feuchten Tuch Hinweis Vergewissern Sie sich dass keine Feuchtigkeit auf dem Bedienfeld zurückbleibt Trocknen Sie das Bedienfeld mit einem Tuch nachdem Sie es gereinigt haben 3 Reinigen Sie die Frittierschüssel und den Frittierkorb mit heißem Wasser ein wenig Spülmittel und einem nicht kratzenden Schwamm Sie können ein fettlösendes Reinigungsmittel verwenden um verbleibenden Schmutz ...

Page 18: ...ind Die Temperatur ist zu niedrig Die Menge ist höher wie im Kochleitfaden angegeben Die Speisen sind nicht geeignet Die Speisen sind sehr fettig Es befinden sich noch Fettrückstände in der Fritterschüssel vom letzten Vorgang Lösung Stecken Sie den Netzstecker in eine Steckdose Schieben Sie die Frittierschüssel ordnungsgemäß in das Gerät Prüfen Sie die Sicherung Verkleinern Sie die Lebensmittel Er...

Page 19: ...35 1 2010 A1 A2 EN 60335 1 2012 A11 A13 EN 60335 2 9 2003 A1 A2 A12 A13 EN 62233 2008 Verpackung mind 80 recyceltem Karton Aufdruck Mineralölfrei Der Umwelt zuliebe enthält das Produkt keine Batterie Wir lieben Tiere und unsere Umwelt und daher möchten wir nicht dass sie für unsere Produkte leiden müssen deshalb sind alle unsere Produkte 100 VEGAN Die von uns hergestellten Produkte enthalten keine...

Page 20: ...ware Produkt wurde entworfen und hergestellt mit qualitativ hochwertigen Materialien und Komponenten die recycelt und wiederhergestellt werden können In der Europäischen Union gibt es unterschiedliche Sammelsysteme für Elektrik und Elektronikgeräte Helfen Sie uns bitte die Umwelt zu erhalten in der wir leben Dieses Symbol bedeutet dass elektrische und elektronische Geräte am Ende ihrer Nutzungsdau...

Page 21: ...ndlager KeMar GmbH Service Rohlfsstr 5 D 81929 München zurückgeben Die auf den Batterien abgebildeten Symbole haben folgende Bedeutung Das Symbol der durchgekreuzten Mülltonne bedeutet dass die Batterie nicht in den Hausmüll gegeben werden darf Pb Batterie enthält mehr als 0 004 Masseprozent Blei Cd Batterie enthält mehr als 0 002 Masseprozent Cadmium Hg Batterie enthält mehr als 0 0005 Masseproze...

Page 22: ...rengen Qualitätskontrolle Sollte ein bei uns gekauftes Produkt dennoch nicht einwandfrei funktionieren bedauern wir dies sehr und bitten Sie sich an unseren nachfolgend aufgeführten Kundendienst zu wenden Gerne stehen wir Ihnen telefonisch über die genannte Service Hotline zur Verfügung Zusätzlich zur gesetzlichen Gewährleistung gewähren wir Ihnen eine Garantie auf alle bei uns gekauften Produkte ...

Page 23: ...n werden von uns getragen 5 Garantieansprüche sind ausgeschlossen bei Schäden durch missbräuchliche oder unsachgemäße Behandlung Umwelteinflüsse Feuchtigkeit Hitze Überspannung Staub etc Nichtbeachtung der für das Gerät geltenden Sicherheitsvorkehrungen Nichtbeachtung der Bedienungsanleitung Gewaltanwendung z B Schlag Stoß Fall Eingriffe die nicht von der von uns autorisierten Serviceadresse vorgen...

Page 24: ... 0 89 28857265 E Mail support kemar shop Gerät Artikelbezeichnung Kaufdatum _______________________ inkl Kaufbeleg Fehlerbeschreibung Name _________________________________________________________________ Straße ______________________________________ PLZ Ort____________________ Telefon _________________________________ Fax ___________________________ Datum ____________________ Unterschrift _______...

Page 25: ...27 2 Power cord advice electrical requirements 31 3 Before first use 32 4 Description and function of the parts 35 5 Short introduction perfect preparation in just a few steps 37 6 Preparation Guide 38 7 Care and Storage 40 8 Troubleshooting 41 9 Customer service 43 INSTRUCTION MANUAL ...

Page 26: ... can prepare many different foods in a smaller faster and easier way than in a traditional fat fryer Their ingredients are heated from all sides at the same time For most ingredients adding some oil is not necessary Please read all safety instructions warnings and instructions in this booklet carefully before you begin This item is equipped with safety devices The non stick coating of the frying ba...

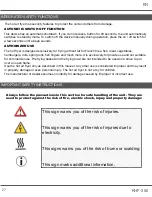
Page 27: ...be used on a stove top or over an open flame Use the hot air fryer only as described in this manual Any other use is considered improper and may result in property damage or even personal injury The hot air fryer is not a toy for children The manufacturer or dealer assumes no liability for damage caused by improper or incorrect use IMPORTANT SAFETY INSTRUCTIONS Always follow the precautions in thi...

Page 28: ...y measures provided in this list They are intended to protect you against risk of burning injury electric shock and damage to property This device is intended to be used in household and similar applications such as Kitchens for employees in shops and offices and other commercial areas from clients in hotels motels and others living facilities to bed and breakfast in agricultural estate The device m...

Page 29: ...re is a risk of fire electric shock and injury 4 Carefully supervise children when devices are in their vicinity or are operated by them 5 If the device is not being used or if it is to be cleaned disconnect the power plug Allow the unit to cool before cleaning and before attaching or removing parts 6 Do not operate equipment if power cord or power plug is damaged malfunction or damage has occurre...

Page 30: ... disconnect the power plug from the wall outlet 15 Use the device only for its intended purpose This device is intended for household use only 16 Only connect the device to an AC mains supply with suitable mains voltage 17 Always keep the power plug clean 18 Plug the device into a separate power outlet 19 Always plug the power cord firmly into the wall outlet 20 Do not handle the power plug with w...

Page 31: ...ect to residual heat after use POWER CORD ADVICE A The power cord is short in order to avoid entanglement or tripping B An extension cord can be added if used properly C If extension cord is used 1 Its power capacity must at least be the same as that of the device s power consump on 2 The extension cord must not hang over the edge of the device Ensure that children cannot pull it and that the risk...

Page 32: ...e original accessories Do not leave the device unattended when it is in operation Any repair maintenance or replacement of parts shall be performed by KeMar Kitchenware or an authorized service company Before operating the hot air fryer follow the instructions below Observe the following notes when setting up the hot air fryer Place the hot air fryer on an easily accessible level waterproof heat r...

Page 33: ... air flow and affects the hot air frying result Burns Do not touch the device during operation The device and the housing become very hot during operation Only grasp the device by its handles Only use the appliance if the handle is correctly mounted on the frying basket Always allow all parts and the contents of the unit to cool completely before cleaning Do not move the unit during operation or wh...

Page 34: ...ansparent safety cap backwards and press the red release button 5 Thoroughly clean the frying basket and the frying bowl with hot water a little detergent and a non scratching sponge Note These parts are also dishwasher safe 6 Wipe the inside and outside of the unit with a damp cloth 7 Place the frying bowl in the frying basket 8 Push the basket with the bowl with the handle back into the applianc...

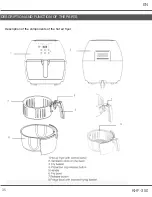
Page 35: ...35 EN KHF 350 DESCRIPTION AND FUNCTION OF THE PARTS Description of the components of the hot air fryer ...

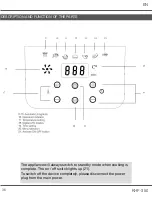
Page 36: ...TION AND FUNCTION OF THE PARTS The appliance will always switch to standby mode when cooking is complete The on off switch lights up 21 To switch off the device completely please disconnect the power plug from the main power ...

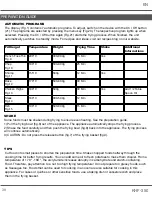
Page 37: ...ton to increase or decrease the time to set the required cooking time Read the section in the preparation manual to determine the correct cooking time Fig 19 The time setting can be set from 1 minute to a maximum of 30 minutes with the buttons Tip Press and hold the time up down button to set the time faster Note If you do not set the required cooking time within 5 minutes the appliance automatica...

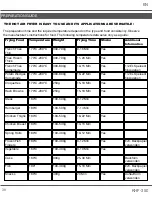
Page 38: ...s Vegetable Cake Fish Snacks Temperature 170 C 200 C 170 C 200 C 170 C 200 C 170 C 200 C 170 C 200 C 170 C 200 C 180 C 180 C 180 C 180 C 180 C 180 C 160 C 160 C 190 160 C Weight 300 700g 300 700g 300 800g 300 800g 250g 250g 100 500g 100 500g 100 500g 100 500g 100 400g 100 400g 100 400g 300g 100 400g 400g Frying Time 9 16 Min 11 20 Min 10 15 MIn 18 22 Min 15 18 MIn 15 18 MIn 8 12 Min 7 14 Min 18 22...

Page 39: ...be shaken during frying to ensure even heating See the preparation guide 1 Pull the frying bowl fig 8 out of the appliance The appliance automatically stops the frying process 2 Shake the food carefully and then push the frying bowl fig 8 back into the appliance The frying process will continue automatically 3 CAUTION Do not press the release button fig 7 of the frying basket fig 3 SHAKE TIPS Cut ...

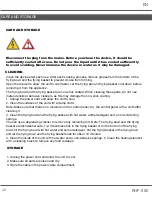
Page 40: ...to cool 2 Clean the surfaces of the unit with a damp cloth Note Make sure that there is no moisture on the control panel Dry the control panel with a cloth after cleaning it 3 Clean the frying bowl and the frying basket with hot water a little detergent and a non scratching sponge You can use a degreasing cleaner to remove any remaining dirt Note The frying bowl and the frying basket are dishwashe...

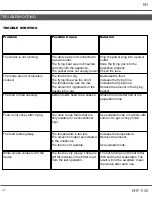
Page 41: ...itable for a conventional fryer The temperature is too low The amount is higher as indicated in the cookbook The food is not suitable The food is very greasy There are still fat residues in the fritter bowl from the last operation Solution Plug the power plug into a power outlet Slide the frying pan into the appliance properly Check the fuse Decrease the food Increase the frying time Increase the ...

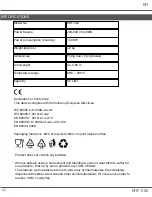
Page 42: ... 2 9 2008 A1 A2 IEC 60335 1 2010 A1 A2 EN 60335 1 2012 A11 A13 EN 60335 2 9 2003 A1 A2 A12 A13 EN 62233 2008 Packaging made min 80 of recycled carton Imprint mineral oil free Product does not contain any batterie We love animals and our environment and therefore we do not want them to suffer for our products that s why all our products are 100 VEGAN The products we manufacture do not contain any an...

Page 43: ...Your KeMar Kitchenware product has been designed and manufactured using high quality materials and components that can be recycled and recovered There are different collection systems for electrical and electronic equipment in the European Union Please help us to preserve the environment in which we live This symbol means that electrical and electronic equipment should be disposed of separately fro...

Page 44: ...ar GmbH Service Rohlfsstr 5 D 81929 Munich The symbols shown on the batteries have the following meaning The symbol of the crossed out wheelie bin means that the battery must not be disposed of with household waste Pb battery contains more than 0 004 mass percent lead Cd battery contains more than 0 002 by mass of cadmium Hg battery contains more than 0 0005 by mass of mercury Please note the abov...

Page 45: ...are subject to strict quality control If a product purchased from us does not work properly we regret this and ask you to contact our customer service listed below We are happy to help you over the phone via the mentioned service hotline In addition to the statutory warranty we provide you with a guarantee on all Products purchased in accordance with the following provisions 1 The warranty period ...

Page 46: ...claims are excluded in case of damage caused by Abusive or improper treatment Environmental influences humidity heat overvoltage dust etc Failure to observe the safety precautions applicable to the device Non compliance with the operating instructions use of force eg blow shock case Interventions that were not performed by the service address authorized by us unauthorized repair attempts Submissio...

Page 47: ...t kemar shop Device article name Date of purchase _______________________ including proof of purchase Error Description Surname _________________________________________________________________ Road ______________________________________ ZIP City ____________________ Phone _________________________________ Fax ___________________________ Date ____________________ Signature ________________________...

Page 48: ...DIGITALE TOUCH HEIßLUFTFRITEUSSE DIGITAL TOUCH AIR FRYER KHF 350 ...

Reviews: