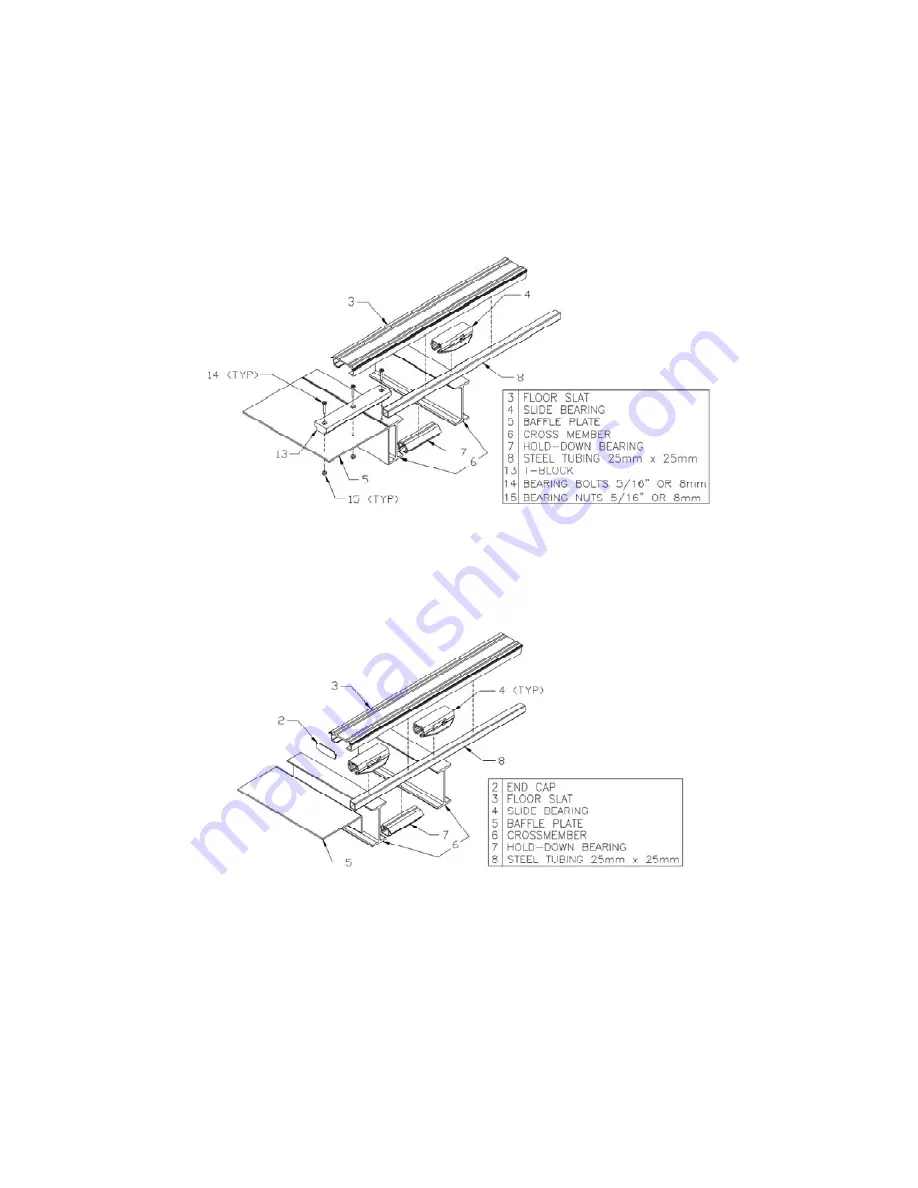
Keith Running Floor II Metric Installation Manual Download Page 16


4) T-block. 

A plastic T-block provides a sliding surface and prevents material from going 
underneath slats/planks.  T-blocks are not recommended for use with highly 
abrasive materials. 


5) NO end sub-deck 

The absence of an end sub-deck is undesirable because it leaves no support for 
ends of slats/planks. 


NOTES: 

 The first three options include a wear pad bearing in the floor slats/planks.  

The square sub-deck material can extend to 12mm from the doors for all options. 


1. Install the selected end sub-deck following these instructions: 

Summary of Contents for Running Floor II Metric

Page 1: ...KEITH Mfg Co Equipment manufactured by KEITH Mfg Co numerous patents both domestic and foreign is protected by WALKING FLOOR is a product and brand of Keith Mfg Co KEITH Running Floor II Drive Metric...

Page 2: ...pport 4 DRIVE UNIT 4 1 Center frame trailer 4 2 Frameless trailer 4 3 Painting 5 FLOORING 5 1 Slide bearings 5 2 Floor slats planks 5 3 Side seal 5 4 Front shield 6 HYDRAULIC TUBING 7 MISCELLANEOUS 7...

Page 3: ...nding upon the experience of the installer and the adaptability of the trailer If the trailer is not yet built there are some trailer preparations found Chapter 2 that will save time and effort One pe...

Page 4: ...compatibility There are two styles of Running Floor II drive units The trailer s frame determines which style should be used Check the compatibility of the drive unit with the trailer before making an...

Page 5: ...4 discusses the drive unit installation process in more detail 2 2 Trailer alignment 1 Adjust the trailer to meet these conditions A The trailer must be straight to allow for proper parallel movement...

Page 6: ...bracing as shown in Figures 5 and 6 It is best to add bracing before removing the old floor because the floor keeps the trailer straight If flat bar is used make a cross bracing because it will buckle...

Page 7: ...ng There are WKUHH options available 1 Routing the hydraulic tubing through the cross members Figure 7 Make two 35mm holes per cross member The holes should be close to the sides of the trailer to mai...

Page 8: ...ines and electrical wires will not interfere with moving parts If necessary reroute them to protect them from damage 2 5 Cross members Cross members function as support for the sub deck and the cross...

Page 9: ...rings cannot mount on the top The bearings can be specially milled to fit a 100mm maximum 25019 25042 1 Remove cross members to create an adequate gap for the drive unit Figure 11 See Chapter 4 for mo...

Page 10: ...ar the kingpin that is higher than the rest of the cross members Shimming overcomes this problem 1 Install shim material Flat bar is good shim material Weld 6mm x 50mm angle iron to existing cross mem...

Page 11: ...ckness depends on the type of load For light materials e g sawdust use 2mm plate 3mm plate is recommended for heavy abrasive materials e g solid waste The plate bends down 300mm inside the closed door...

Page 12: ...suitable for your application See section 3 3 for more information 2 Cut 25mm x 25mm tubes to proper length according to your trailer measurements and your end sub deck selection The number of tubes i...

Page 13: ...ure 16 25039 Weld or huck bolt the square tubes to the cross members between the jigs Move the jigs and make a connection at each intersection of a tube and a cross member Welds should be 3mm fillet 2...

Page 14: ...ds special attention because the area is fully exposed with the floor slats planks in the forward position There are five end sub deck options 1 Extended square tube Extend the tubes used for the rest...

Page 15: ...y abrasive materials The solid bars meet the square tubing on the last cross member 3 Solid aluminum bar A solid aluminum bar will provide a strong structure at the end when the sub deck is constructe...

Page 16: ...brasive materials 5 NO end sub deck The absence of an end sub deck is undesirable because it leaves no support for ends of slats planks NOTES The first three options include a wear pad bearing in the...

Page 17: ...rough the T blocks and baffle plates 2 Align the T blocks with installed tubing Keep the blocks 12mm away from the doors 3 Fasten T blocks to the baffle plate Self tapping screws may be necessary if a...

Page 18: ...ble use the following method a Set a sheet of plywood inside the rear of the trailer b Place blocking on the sheet to protect hydraulic tubing c Lay the drive unit on the sheet d Slide the sheet forwa...

Page 19: ...be parallel to trailer cross members Side to side alignment Recommended method After the sub deck is welded or bolted down use a straight edge to align punched holes in the drive shoes with centers o...

Page 20: ...itical Make height adjustments by shimming or grinding ears of the drive unit end plates This method gives the proper drive height as bearings are 6mm above the 25mm x 25mm tube and the drive shoes co...

Page 21: ...n be installed extend 2 87m for 255mm stroke 2 77m for 150mm stroke 1 Position drive unit in the drive gap Check to be sure drive unit dimensions fit the location The rail heights should be close Figu...

Page 22: ...t edge to align punched holes in the drive shoes with centers of respective 25mm x 25mm tubing Do this with at least two shoes on each side of the trailer Figure 26 25045 Optional method if trailer is...

Page 23: ...the 25mm x 25mm tube to the top of the drive shoe is critical Raise or lower the drive unit accordingly...

Page 24: ...s as shown in reference drawing C 10797A 4 3 Painting The factory paints drive units with gray oxide primer 1 Confirm that the drive unit is coated well with primer 2 Treat the drive unit and sub deck...

Page 25: ...ross member flange width The gap in the bearing should exceed the flange width of the cross member The standard bearing gap is 62mm Milling can enlarge the gap to 100mm 1 SUB DECK I 12 2 SLIDE BEARING...

Page 26: ...rmally performs steps 3 5 3 Install drive in wear bearing See reference drawing D 50625 A Place all slats planks on their sides The side opposite of the seal groove should be facing upward Make sure t...

Page 27: ...ing 3mm 1 8 rivets making sure the flattened face of the rivet is flush with the edge of the slat plank N Once completed remove the band from the slats planks and continue on with the seal installatio...

Page 28: ...nd of the floor seal at a 45 angle at both ends Figure 31 The angle on the seal pushes the adhesive into the seal groove Pull the floor seal into the floor slat plank The open end of the Y must be tow...

Page 29: ...END OF THE FLOOR SLAT 6 1m 470mm 178mm 229mm min 8 2m 648mm 229mm 279mm min 9 8m 775mm 279mm 330mm min 12 2m 978mm 356mm 406mm min 13 7m 1105mm 406mm 457mm min 14 6m 1181mm 432mm 483mm min 16 2m 1308m...

Page 30: ...ve Figure 36 The bead should be from the end of the seal to the end of the slat plank If using the polyethylene seal blue the bead should be 50mm long Figure 37 Hold the caulking gun at a 60 angle to...

Page 31: ...Figure 38 Figure 37 50mm...

Page 32: ...e installation of the slat plank f Apply three additional beads of adhesive The additional beads of adhesive should be 610mm long The additional beads should be located at 1 4 of the slat plank length...

Page 33: ...e floor slats planks to the right place on the cross drives Carefully tap them to this position with a dead blow hammer It is most convenient to snap the slats planks onto the bearings although it is...

Page 34: ...wing A 25167 d Bolt floor slats planks down tightly Use Countersunk Socket Head Cap Screws with Nylock nuts 8mm bolts attach 3 1 2 88 9mm flooring to the shoes 6 152 4mm flooring requires 10mm bolts R...

Page 35: ...osely as possible This is another reason trailer alignment is critical Make sure that the side with the seal groove goes to the left side of the trailer 3 Bolt side seal onto support If hydraulic tubi...

Page 36: ...43 REQUIRES ONE DOUBLE SEAL SLAT 1802 REQUIRES ONE DOUBLE SEAL SLAT REQUIRES ONE DOUBLE SEAL SLAT MAY REQUIRE SPLITTING OF TWO SLATS TO HAVE PROPER WIDTH 30mm x 30mm TUBE USED UNDER SLAT TO MAINTAIN P...

Page 37: ...F MOVING SLATS PLANKS SIDE SEAL OPTION NUMBER A MIN MAX MIN MAX 1 2 23m 55 63 mm 133 35 mm 2 339 m 2 495 m 2 2 23m 31 75 mm 44 45 mm 2 292 m 2 317 m 3 2 23m 57 15 mm 88 9 mm 2 343 m 2 406 m 24 4 2 23m...

Page 38: ...n the rear position the slide strip must still lie fully on top of the floor slats planks 2 Fabricate front shield KEITH Mfg Co supplies this in most cases Form the plate and attach angle steel for su...

Page 39: ...s through cross members Installing the tubes underneath the side seal or cross members requires fastening with clamps 25mm hoses can be used to connect the tubes to the drive unit 4 Mount quick couple...

Page 40: ...25044 Figure 45...

Page 41: ...ight and brake performance 7 2 Caution decals Affix caution decals to the side of the trailer at the location of the drive unit 7 3 Front guard A front guard should deny access to the underside of the...

Page 42: ...g the floor slat plank If there are wear strips or filler strips installed on the slat plank it is recommended to cut off the opposite end b Slide the loose end of the floor seal away from the end of...

Page 43: ...ve The bead should be from the end of the seal to the end of the slat plank Hold the caulking gun at a 60 angle to the floor slat plank Push the bead do not pull Figure 48 f Pull the seal flush with t...

Page 44: ...he seal and the floor slat plank Figure 50 Pull the seal outward to apply the adhesive Press the seal against the floor slat plank after applying the adhesive Allow the adhesive to dry before installi...

Page 45: ...6mm and or 12mm hand drill bit set 35mm hole saw Straight edges Dead blow hammer Special tools Flow meter Flaring tool for 25mm pipe 8mm drill bit 300mm long Countersink bit 82 with 12mm shank 20mm s...

Page 46: ...ont shield Caution decals NOT provided with standard kit Sub decking 25mm x 25mm steel tubing aluminum profile 25mm hydraulic tubing Hydraulic quick couplers Hydraulic hose for connecting drive unit t...

Page 47: ...tallation manual C 10797A Drive installation frame in tapered rails C 40075 Drive installation into full frame trailer D 12005 Examples of drive mounts A 25167 Application of a counter sunk bolt plate...

Page 48: ...gn with respective 25mm x 25mm tubes 6 The cylinders must be entirely collapsed before drilling boltholes through floor slats planks 7 A front guard should deny access to the underside of the front en...

Page 49: ...SS TORQUE N m M6 x 1 Tube Clamp at Ball Valve 5 8 10 M8 x 1 25 Tube Clamp to Cylinder 5 8 24 M8 x 1 25 Check Valve 5 8 24 M8 x 1 25 Flooring 10 9 32 M10 x 1 5 Flooring 10 9 60 M16 x 1 5 Barrel Clamp 5...

Reviews: