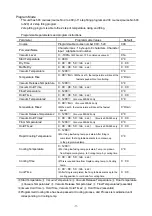


-25-
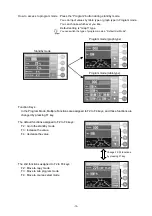
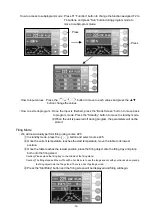
Drawing 1
Screws
Drawing 2
Nuts
Piping
Terminal
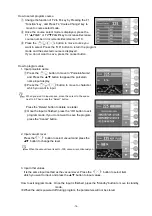
Drawing 3
Screws
Muffle
Muffle Replacement
1. Remove the temperature sensor. See the “Temperature Sensor
Replacement” for more information.
2. Remove the 2 screws shown on drawing 1 to remove the
white lines connected to the heater terminal.
3. Remove the 2 nuts shown on drawing 2 to remove the piping
terminal.
※
The replacement of piping is not required.
4. Remove the 4 screws shown on drawing 3 to remove the muffle.
5. Install the new muffle. We will complete installation by following
the previous directions in reverse order.
Caution) Be sure to plug in the line securely to the end when re-connecting
the line back to the heater terminal. If the line is not securely
plugged in, it will become hot and dangerous.
6. Once the replacement is complete, re-plug the power cord
into the electric outlet and power on the unit.
7. Check to see if the temperature rises. If the temperature lowers
or display 0
℃
, it could possibly be that the connection line to
the temperature sensor is reversed. Please re-check.
8. After replacement the new muffle, there may be instances
where there is moisture inside the muffle. Before using,
please refer and run the “Unloaded muffle firing”.
→
P7
-
The
replacement
is
complete.
-


