background image


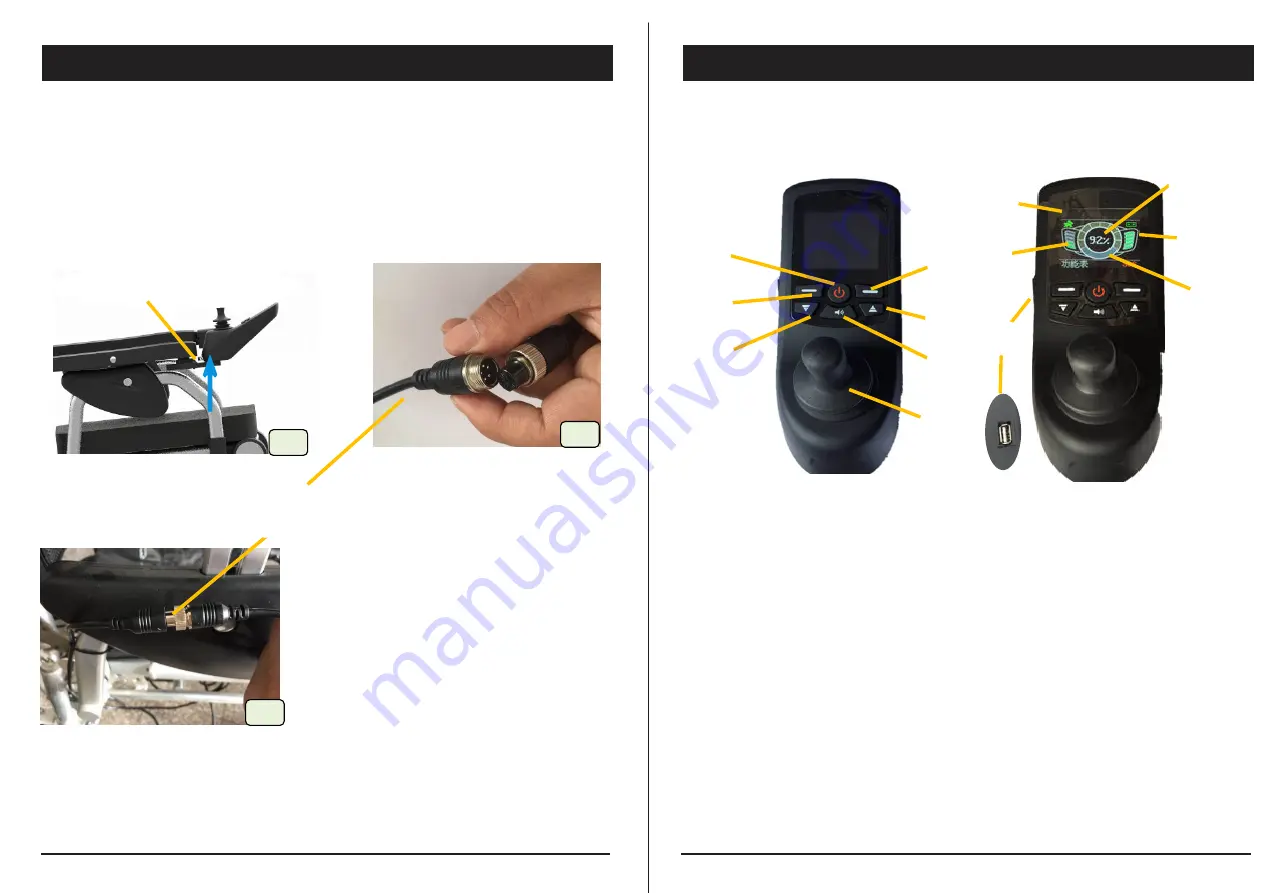
Mounting the Control Panel


Control Panel


Based on the users’ needs, the control panel can be mounted on the right or left armrest. (The control 
panel is initially mounted on the right armrest, please contact the supplier if you want to change it to 
the left side

1. 

As shown in Fig. E1, put the control panel on the right armrest and tightly fix it with the quick 

release handle.  

2. 

As shown in Fig. E2 and Fig. E3

plug the control panel cable and the extended cable together and 

rotatably fix them with the locking ring


The Control Panel comprises of the following:


OFF


ON


16 

17


Operation Guide 

Installation Guide 

E1 

E2 

11 

12 

Quick Release Handle 


13 

Extended Cable 
 

E3 

10 

1

.

 Power-On Button  

Pressing  this  button  will  power  on  the  wheelchair, 
pressing it again will power off the wheelchair.


2

.

 Menu Button: Open the menu or confirm when 

editing the menu. 
3

.

 Speed Button/ Down Button of the Menu 

Decrease the speed of the wheelchair


4

.

 SOS Button/ Back Button 

Long  pressing  this  button  can  trigger  the  SOS 
emergency  and  sound  a  continuous  alarm,  long 
pressing  it  again  will  cancel  the  emergent  situation. 
Pressing this button can exit menu-editing.


5. Speed Button/ Up Button of the Menu 
Increase the speed of the wheelchair. 
Max. speed: 6 km/hr (3.75 m/hr). 
6.


Horn Button


Make a sound to remind the people around. 
7. Control Joystick


Control the direction and speed of the chair. Push the 
joystick  towards  the  desired  direction.  (refer  to  the 
instructions on


Control Joystick)


8. Error Code Indicator 
Indicate the error code when the circuit is broken 
(please  contact  the  distributor  when  the  error 
code indicates)  
9. Speed Indicator 
There  are  5  LED  lights  in  all.  With  1  LED  light 
on,  the  wheelchair  is  at  its  lowest  speed,  5  LED 
lights on, the wheelchair is at its max. speed. 
10.  Percentage  of  Remaining  Battery/  Graphical 
Indicator in the Fault Conditions


Accurately  indicate  the  percentage  of  remaining 
battery. 
11. Battery Life Indicator 
Indicate the remaining battery. 
12. Ring-shaped Speed Indicator  
Indicate the driving speed of the wheelchair. 
13. USB Interface 
Rewrite program and modify motion parameters by 
connecting  with  PC  or  the  apps  bound  to  Mobile 

Bluetooth

。 


Summary of Contents for PL001-6001

Page 1: ...x 0512 53110099 Zip Code 215400 Portable Power Wheelchair Owner s Manual Carefully read all instructions prior to use Special attention needs to be paid on the items Portable Power Wheelchair Owner s...

Page 2: ...the power wheelchair is ultra compact light weight portable safe and comfortable Contents Guidance for Use GUIDANCE FOR USE 1 INTRODUCTION 2 PRODUCT SAFETY SYMBOLS 3 FEATURES 4 TECHNICAL SPECIFICATIO...

Page 3: ...improper use In addition you can operate the power wheelchair under the guidance of the professional technicians with vocational qualification To Distributors and Technicians Do not operate the power...

Page 4: ...It is essential that you shall fully understand and completely familiarize yourself with these symbols before operating Read and follow the instructions provided in this manual Safety warning sign or...

Page 5: ...ushion 10 Armrest Limiting Block 16 Footrest 5 Armrest 11 Storage Basket 17 Front Wheel 6 Control Panel 12 Leg Guard 18 Backrest Adjusting Traction Rope 21 Electromagnetic Unlocking Valve 24 Armrest A...

Page 6: ...ansmitters and the communication equipment such as two Interference from these electromagnetic waves may cause malfunction or permanent damage to the wheelchair s braking and control system The power...

Page 7: ...el of the power wheelchair shall be securely mounted Fig A1 in case of colliding or falling down 1 Check and adjust the control panel every six months 2 If any buttons on the control panel fail or are...

Page 8: ...f rollover If you need to modify or adjust the power wheelchair consult your supplier in advance and obtain the manufacturer s authorization The modified wheelchair may require additional adjustments...

Page 9: ...upper body slowly and slightly forward when Lean your upper body gently against the backrest when Reverse Driving When driving in reverse please be extremely cautious your wheelchair may get out of co...

Page 10: ...down insert the buckle plastic card into the plastic case on the other side and you will hear a click 4 You can adjust the length of the seat belt via the adjusting buckle Fig D3 Ensure the seat belt...

Page 11: ...this button can trigger the SOS emergency and sound a continuous alarm long pressing it again will cancel the emergent situation Pressing this button can exit menu editing 5 Speed Button Up Button of...

Page 12: ...seconds later the joystick will automatically shut down Sport Mode Adjust the movement control curve of the wheelchair There are three modes soft normal and powerful 4 Backlight Adjust the brightness...

Page 13: ...e plug and pull it out By using the joystick the motor In this case the wheelchair cannot be manually pushed by the For ensuring the users safety the rotated about 90 degrees towards ON position or ne...

Page 14: ...0 60 Hz The charging port is located under the front part of the control panel 2 Before charging ensure the wheelchair is powered off 3 Plug the charger into the charging port under the front part of...

Page 15: ...ol Panel or refer to the videos 24 25 Folding Unfolding G3 Control Panel Folding Hand Knob G2 G5 G4 Folding Steps For storing and transporting the wheelchair please follow these steps to fold it after...

Page 16: ...s follows 1 As shown in Fig H5 Press the backrest adjusting button and gently press the backrest When it reaches the proper position release the button and the backrest will be locked 2 As shown in Fi...

Page 17: ...ugh roads It is normal as driving on these places can accelerate battery consumption 3 Battery use has exceeded its service life Contact customer service to replace the battery 6 Charging 1 Faulty con...

Page 18: ...Packing List Warranty Warranty Exclusions 1 The warranty exclusions extend to the following items a Backrest cushion seat cushion the foamed cotton of the armrest and the backrest and other decoratio...

Reviews: