


English
17
Sucking water from open containers
When used with the KÄRCHER suction hose with check
valve (special accessory, order number 2.643-100) this
high-pressure cleaner is suitable for sucking up surface
water, e.g. from rain barrels or ponds (for the maximum
suction height see chapter
).
The water connection coupling is not required for vacu-
uming operation.
1. Fill the suction hose with water.
2. Screw the suction hose onto the device water con-
nection and hang it in a water source (e.g. water
butt).
Vent the device
1. Switch the device on "I/ON".
2. Unlock the lever of the high-pressure gun.
3. Press the lever of the high-pressure gun.
The device switches on.
4. Allow the device for run a maximum of 2 minutes un-
til the water escaping from the high-pressure gun is
free of air bubbles.
5. Release the lever of the high-pressure gun.
6. Lock the lever of the high-pressure gun.
Operation
ATTENTION
Pump running dry
Damage to the device
If pressure does not build up in the device after 2 min-
utes then switch the device off and proceed according
to the instructions in chapter Troubleshooting guide.
Power Control System
The pressure indicator on the high-pressure gun shows
the currently set pressure level when operating with a
Power Control spray lance.
Note
The sensitivity of materials can vary greatly depending
on age and condition. The recommendations are there-
fore not binding.
Note
When operating with surface cleaner and other acces-
sories, the pressure indicator is not accurate.
High-pressure operation
ATTENTION
Damage to painted or sensitive surfaces
Surfaces can be damaged when the jet is too close to
the surface or an unsuitable spray lance is used.
Maintain a minimum spray distance of 30 cm when
cleaning painted surfaces.
Do not clean car tyres, paint or sensitive surfaces such
as wood with the dirt blaster.
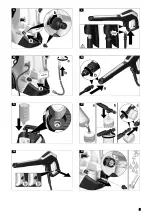
1. Insert a spray lance into the high-pressure gun and
lock it by turning it 90°.
Illustration N
2. Switch the device on ("I/ON").
3. Unlock the lever of the high-pressure gun.
4. Press the lever of the high-pressure gun.
The device switches on.
5. Turn the Vario Power Power Control spray lance un-
til the required pressure level is shown on the pres-
sure indicator.
Operation with a washing brush
ATTENTION
Paint damage
Damage to surfaces through a dirty brush
Ensure that the washing brush is free from dirt or other
particles before using it.
Note
The device operates at low pressure when using wash-
ing brushes. This means that detergent can be mixed
with the water.
1. Insert the washing brush into the high-pressure gun
and turn by 90° to fasten it.
Operation with detergent
DANGER
Failure to adhere to the safety data sheet
Incorrect handling of the detergent can seriously dam-
age your health
Observe the safety data sheet of the detergent manu-
facturer, in particular the instructions on personal pro-
tective equipment.
Note
Detergent can only be mixed into the jet at low pressure.
Note
A Plug ‘n’ Clean detergent bottle is required for operat-
ing with detergent. KÄRCHER detergent can be pur-
chased ready to use in a Plug ‘n’ Clean detergent bottle.
1. Remove the cover from the Plug ‘n’ Clean detergent
bottle.
2. Plug the detergent bottle into the Plug ‘n’ Clean de-
tergent connection with the opening facing down.
Illustration O
3. Use the Vario Power spray lance.
4. Turn the spray lance towards "MIX" until "MIX" is
displayed on the high-pressure gun.
The detergent solution is mixed with the water jet
during operation.
5. You can optionally use the foam nozzle.
aFill the detergent solution into the detergent tank.
Adhere to the dosage specifications on the deter-
gent container.
bConnect the foam nozzle to the detergent contain-
er.
cInsert the foam nozzle into the high-pressure gun
and turn by 90° to fasten it.
Illustration P
Display
Pressure
level
Recommended for e.g.
HARD
Stone terraces made of pav-
ing stones or washed con-
crete, asphalt, metal
surfaces, garden utensils
(wheelbarrow, spade, etc.)
MEDIUM
Cars / motorcycles, brick
surfaces, plastered walls,
plastic furniture
SOFT
Wooden surfaces, bicycle,
sandstone surfaces, rattan
furniture
MIX
Operation with detergent
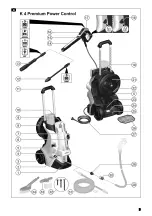
Summary of Contents for K 4 Power Control
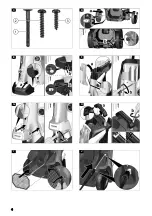
Page 2: ...2 A...
Page 3: ...3 B...
Page 4: ...4 4 C D E F G H I J...
Page 5: ...5 5 K L M N O P Q R...


