– 4
Illustration
Unscrew the lid of the filling nozzle and
fill in water till it overflows.
Screw on the lid on the filling nozzle.
Open existinng locking valves in the
pressure pipe and empty rest water.
Note:
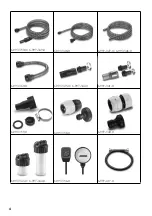
If sandy water is to be transported,
we strongly recommend using an additional
prefilter (see special accessories). Please
install this filter on the suction side of the
pump, between the suction hose and the
pump.
Insert the mains plug into the socket.
Turn on the machine.
Wait until pump suction is established
and uniform, and then close the shut-off
valve on the pressure line.
The flow meter switches the pump off
after a short overpump time.
몇
Caution
System is under pressure!
Illustration
Tip: When using the pump as a garden
pump, raise the pressure hose to ap-
prox. 1m to reduce the suction time.
몇
Caution
Missing water supply is detected by the ap-
pliance. If no water is suctioned within the
first four minutes, the pump will switch off.
A failure is detected on the suction side and
displayed by the blinking LEDs.
Restart the pump by continuously pressing
the - button.
Tip:
For failure description see the chapter:
“Troubleshooting“.
Rinse the pump after every use if you
use to transport water with additives.
Turn off the appliance.
Disconnect the main plug from the
socket.
Danger
Turn off the appliance and remove the
mains plug prior to any care and mainte-
nance work.
Open the connected shutoff valves to relief
pressure and reclose them. The system is
free of pressure.
Check pre-filter regularly for dirt. If it is vis-
ibly dirty, proceed as follows:
Illustration
Unscrew the lid of the filling nozzle.
Remove the pre-filter and the built in
backflow valve and clean them under
flowing water.
Illustration
Unscrew the lid from the discharge
opening and catch the escaping water.
Remove the safety device and the flow
meter from the discharge opening.
Completely rinse the dirt residues from
the floor of the fill neck.
Install the components in reverse order.
Pay attention to correct positioning!
Screw the lid tightly onto the discharge
opening
Operation
Finish operation
Maintenance and Care
Care
18
EN
Summary of Contents for BPE 4000/45
Page 2: ...2...
Page 3: ...3...
Page 74: ...1 35 C REACH www kaercher com REACH EL 1 EL 2 EL 3 EL 5 EL 5 EL 5 EL 6 EL 7 EL 9 EL 11 74 EL...
Page 75: ...2 3 2m 30mA 30mA 75 EL...
Page 77: ...4 10 K rcher 1 4 min 77 EL...
Page 78: ...5 Til overvintring og l ngere opbevaring 5 78 EL...
Page 82: ...9 82 EL...
Page 83: ...10 2 2 K rcher 83 EL...
Page 85: ......

