RC-BX30
1-12
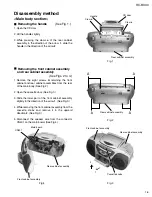
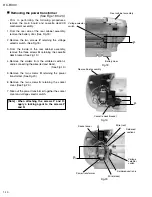
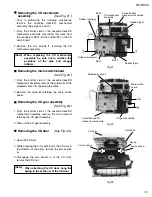
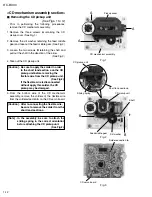
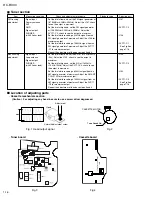
Fig.1
Fig.2
Fig.3
Removing the CD pickup unit
(See Figs. 1 to 3.)
1.
2.
3.
4.
Remove the three screws
A
retaining the CD
pickup cover. (See Fig.1.)
Remove the slit washer retaining the feed middle
gear and take out the feed middle gear. (See Fig.2.)
Loosen the two screws
B
retaining the shaft and
pull out the shaft in the direction of the arrow.
(See Fig.2.)
Take out the CD pickup unit.
<CD mechanism assembly section>
[Note]
In the assembly, be sure to attach the
sliding spring in the correct orientation
before attaching the CD pickup unit.
(See Fig.2.)
Prior to performing the following procedures,
remove the CD mechanism assembly.
[Caution] Be sure to apply the solder in order
to the short land section a on the CD
pickup unit before removing the
flexible wire from the CD pickup unit.
(See Fig.2.)
If the flexible wire is disconnected
without apply this solder, the CD
pickup may be damaged.
5. From the bottom side of the CD mechanism
assembly, remove the solders of the flexible wire
from the soldered section
b
on the CD servo board.
[Caution] After re-connecting the flexible wire,
be sure to remove the solder from the
short land section a.
CD servo board
Soldered section
b
CD mechanism assembly
Pickup cover
Short land section
a
Sliding spring
CD pickup unit
CD pickup unit
Shaft
Slit washer
Feed middle gear
A
A
B
B
A
Summary of Contents for RC-BX30
Page 23: ...RC BX30 1 23 M E M O ...

