5
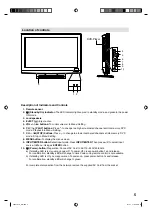
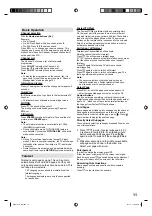
Location of controls
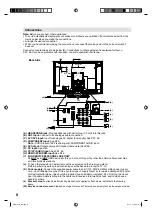
Description of Indicators and Controls
1. Remote sensor
2.
(Standby/On) indicator:
The LED indicator lights up red in standby mode, and green in the power
ON mode.
3. Loudspeakers
4. EJECT ( ):
Eject a disc.
5. VOL+/–/
◀
/
▶
buttons:
To control volume / In Menu: Setting.
6. CH /
▶
(PLAY) buttons:
Press to change to a higher numbered channel set into memory. DVD
mode : Playback. In Menu: Setting.
7. CH /
■
(STOP) buttons:
Press to change to a lower numbered channel set into memory. DVD
mode : Stop. In Menu: Setting.
8. MENU button:
To display the menu screen.
9. INPUT/ENTER button:
Select input mode. Press
INPUT/ENTER
. Then press
▲
/
▼
to select input
source. In Menu : Using as
ENTER
button.
10.
(Power)-button:
Preparation: Connect AC Cord to AC110~240V, 50/60Hz.
a) If standby-LED is red, you may power-off. To power-off, press power-button 1x and release.
For confirmation, standby-LED will change to dark. Power-on by remote control is not available.
b) If standby-LED is off, you may power-on. To power-on, press power-button 1x and release.
For confirmation, standby-LED will change to green.
For complete disconnection from the network, remove the supplied AC Cord from the socket.
3
DVD-Player
1 2
4
5
6
7
8
9
10
56V0101A_EN.indd 5
56V0101A_EN.indd 5
2/1/11 11:03:34 AM
2/1/11 11:03:34 AM

