background image

26

SiriusXM® Satellite Radio

Only SiriusXM® brings you more of what you love 
to listen to, all in one place. Get over 140 channels, 
including commercial-free music plus the best 
sports, news, talk, comedy and entertainment. 
Welcome to the world of satellite radio. A SiriusXM 
Vehicle Tuner and Subscription are required. For 
more information, visit www.siriusxm.com.

Activating subscription

1

  Check your Radio ID.

The SiriusXM Satellite Radio ID is required 
for activation and can be found by tuning to 
Channel 0 as well as on the label found on the 
SiriusXM Connect tuner and its packaging.

t

The Radio ID does not include the letters I, O, 
S or F.

2

  Activate the SiriusXM Connect Vehicle 

Tuner using one of the two methods 
below:

t

For users in the U.S.A:


– Online:  

Visit www.siriusxm.com/activatenow


– Phone: Call SiriusXM Listener Care at  

1-866-635-2349

t

For users in Canada: 


– Online:  

Visit www.siriusxm.ca/activatexm


– Phone: Call XM customer Care at  

1-877-438-9677

3

  When a confirmation message is displayed, 

touch 

[Return]

.

Listening to the SiriusXM® Satellite 
Radio


R

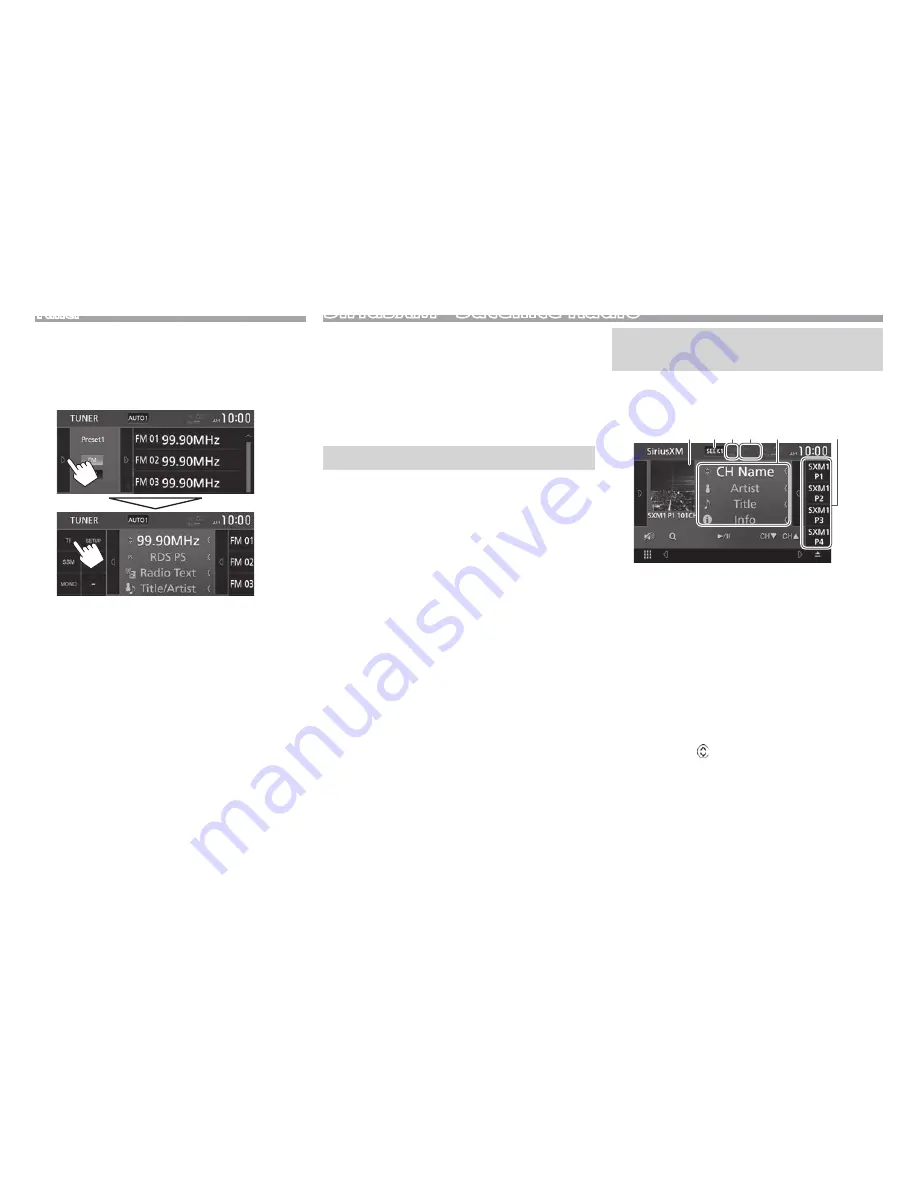
Indications and buttons on the source 
control screen

Live mode screen

2

1

6

5

3 4

SiriusXM® Satellite Radio reception information

1

  Channel Logo/Album art

2

  Seek mode (Page 27)

3

  Signal strength indicator

4

  SiriusXM® Satellite Radio indicators

t

Mix: Lights up when TuneMix™ is activated. 
(Page 31)

t

Scan: Lights up when TuneScan™ is activated. 
(Page 30)

5

 Text information

t

Touching 

[<]

 scrolls the text if  not all of the 

text is shown.

t

Touching 

[   ]

 switches the information as 

follows:


– Channel name/artist name/song title/

content information


– Channel name/category name/channel 

description/similar channels

6

  Preset list (Page 28)

Tuner


R

Activating/deactivating TI Standby 
Reception

You can receive traffic information even while 
listening to another source by activating TI Standby 
Reception.

The unit is in standby to switch to Traffic Information 
(TI) if available.

t

The TI indicator lights up in the following cases:


– Lights in white: Receives the Traffic Information.


– Lights in orange: On standby for traffic 

information reception.

t

If the TI indicator is lit in orange, tune into another 
station providing RBDS signals.

t

When traffic information is received, the screen 
switches to the Traffic Information screen 
automatically.

To deactivate TI Standby Reception:

 Touch 

[TI]

(The TI indicator turns off.)

t

The volume adjustment for Traffic Information is 
automatically memorized. The next time the unit 
switches to Traffic Information, the volume is set 
to the previous level.

Summary of Contents for KW-V820BT

Page 1: ...B5A 1051 00 b KN 2016 JVC KENWOOD Corporation MONITOR WITH DVD RECEIVER INSTRUCTION MANUAL KW V820BT ...

Page 2: ...m the actual displays or panels t This manual mainly explains operations using the buttons on the monitor panel and touch panel For operations using the remote controller RM RK258 see page 63 t indicates the various screens menus settings that appear on the touch panel t indicates the buttons selectable items on the touch panel t Indication language English indications are used for the purpose of ...

Page 3: ...hat may cause undesired operation of the device The term IC before the certification registration number only signifies that the Industry Canada technical specification were met CAUTION This equipment complies with FCC IC radiation exposure limits set forth for an uncontrolled environment and meets the FCC radio frequency RF Exposure Guidelines in Supplement C to OET65 and RSS 102 of the IC radio ...

Page 4: ...ons on the monitor panel Page 57 t Touch Panel Color Coordinate then select the desired color Camera Configure settings for the connected rear view camera Page 35 OEM SETUP Configure settings for the connected ADS adapter Page 63 DEMO Activate ON or deactivate OFF the display demonstration Page 62 2 Finish the procedure The Home screen is displayed Clock settings 1 Display the Home screen On the m...

Page 5: ...utput level 1 Power button t Turns on the power Press Page 6 t Turns off the power Hold Page 6 t Displays the pop up short cut menu Press Page 11 2 Loading slot 3 HOME Voice button t Displays the Home screen Press Page 7 t Activates the voice control function Hold When a Bluetooth mobile phone is connected Activates the voice dialing Page 45 When iPod iPhone compatible with Apple CarPlay is connec...

Page 6: ...und On the source control screen To restore the sound Touch RTurning off the screen On the monitor panel Hold To turn on the screen Press or touch the display RTurning on off the AV source You can activate the AV function by selecting a source on the Home screen To select a source not displayed on the Home screen Touch to display the source option selection screen Page 10 To turn off the AV source...

Page 7: ...reen press HOME on the monitor panel 4 5 6 2 3 1 Common operating buttons 1 Changes the playback source Page 10 2 I button Displays the source control screen currently played back Page 8 3 button Displays the source option selection screen Page 10 4 button Displays the SETUP screen Page 60 5 M Eject button Ejects the disc Press Page 12 Forcibly ejects the disc Hold Page 12 6 Displays the phone con...

Page 8: ...back operations on the source control screen t The operation buttons and information displayed vary depending on the selected source 6 7 5 4 2 3 1 Common operation buttons and indications 1 Current source or media 2 Connected Bluetooth device information Page 38 3 Battery charge indication Lights up when quick charging battery of the connected iPod iPhone Smartphone 4 Displays the other operation ...

Page 9: ... type of file media being played back 1 Displays list type selection window 2 Returns to the previous screen 3 Scrolls the text if not all of the text is shown 4 Searches for a folder track I Play Plays all tracks in the folder containing the current track A Z Enters the initial search mode Top Returns to the top layer Up Returns to the upper layer 5 Changes the page J K Scrolls the page t You can...

Page 10: ... Plays files on a USB device Page 16 iPod Plays an iPod iPhone Page 19 AV IN Switches to an external component connected to the iPod AV IN input terminal Page 36 SiriusXM Switches to the SiriusXM satellite radio broadcast Page 26 Audio Displays the sound adjustment screen Page 51 AV OFF Turns off the AV source Page 6 Displays the SETUP menu screen Page 60 t For sources and information displayed wh...

Page 11: ...y on the source option selection screen Touch and hold the item you want to move until boxes appear around the icons then drag it to the position you want to move it to Hold Using the pop up short cut menu While displaying the source control screen you can jump to another screen from the pop up short cut menu 1 Display the pop up short cut menu 2 Select an item to jump to Displays the Home screen ...

Page 12: ...ng a disc pull it horizontally t You can eject a disc when playing another AV source t If the ejected disc is not removed within 15 seconds the disc is automatically inserted again into the loading slot to protect it from dust To eject a disc forcibly Touch and hold M on the source control screen or the Home screen A confirmation message appears Touch OK Playback operations When the operation butt...

Page 13: ...isplay the other operation button window For audio playback 5 4 6 3 2 1 Playback information t The information displayed on the screen differs depending on the type of disc file being played back 1 Media type 2 Playback mode Page 15 3 Track file information t Touching scrolls the text if not all of the text is shown 4 Jacket picture Shown while playing if the file has tag data that includes the ja...

Page 14: ...list operation see page 9 To search in the folder containing the current track t Scroll the page to show more items t To hide the list touch RActivating PBC Playback Control function for VCD only While playing a VCD with PBC t The PBC indicator lights up t To select a track directly while PBC is activated operate from the remote controller Page 63 To deactivate PBC Touch PBC The PBC indicator turn...

Page 15: ...urns to the playback screen Angle Selects the view angle Subtitle Selects the subtitle type Audio Selects the audio type J K H I Selects an item RSelecting playback mode Selects Repeat playback mode Selects Random playback mode t Available playback modes differ depending on the type of disc file being played back t Each time you touch the button the playback mode changes The current playback mode ...

Page 16: ...ynamic range t Normal Select this to reduce the dynamic range a little t Dialog Initial Select this to reproduce movie dialog more clearly Screen Ratio Select the monitor type to watch a wide screen picture on the external monitor 16 9 4 3 LB 4 3 PS Initial You can change these settings only while DVD is not inserted USB Connecting a USB device You can connect a USB mass storage class device such ...

Page 17: ...layed back Hide Hides the indicators and buttons Displays the other operation button window t To hide the window touch Displays the track list of the folder containing the current track t To hide the list touch Selects Repeat playback mode t Repeats the current track file t Repeats all tracks files in the current folder or specified category t ALL Repeats all tracks files in the USB device Randoml...

Page 18: ...elect the desired track t Proceed until you select the desired track t For details about the list operation see page 9 From Folder List Select the folder then the item in the selected folder To search in the folder containing the current track t Scroll the page to show more items t To hide the list touch ...

Page 19: ...u cannot watch the video Bluetooth connection Pair the iPod iPhone through Bluetooth Page 38 t You cannot watch video with a Bluetooth connection RSelecting the connection method 1 Display the SETUP screen On the Home screen t You can also display the SETUP screen by touching on the source option selection screen Page 8 2 Display the AV screen 3 Set Automotive Mirroring to OFF 4 Display the APP iP...

Page 20: ... buttons t Available buttons on the screen and operations differ depending on the type of file being played back Displays the track list of the category containing the current track t To hide the list touch Selects Repeat playback mode t Functions the same as Repeat One t ALL Functions the same as Repeat All Selects random playback mode t Functions the same as Shuffle Songs t Functions the same as...

Page 21: ...st operation see page 9 From Category List Select a category then the item in the selected category t Available categories differ depending on the type of your iPod iPhone From Link Search Select the tag type to display a list of content that contains the same tag as the track file currently being played then select the item To search in the folder containing the current track t Scroll the page to...

Page 22: ...lity in your region from the below website http www apple com ios featureavailability applecarplay applecarplay RPreparation To use the navigation function of the maps App connect a GPS antenna Page 70 1 Configure the settings to use Apple CarPlay on the AV screen On the Home screen t You can also display the SETUP screen by touching on the source option selection screen Page 8 Automotive Mirrorin...

Page 23: ...ending on the connected device 3 1 2 1 Application buttons Starts the application 2 HOME button Exits the CarPlay screen and displays the Home screen 3 button t On the App screen Displays the home screen of CarPlay Touch t On the home screen of CarPlay Activates Siri Hold Page 22 To exit the CarPlay screen Press HOME on the monitor panel RSwitching to the Apple CarPlay screen while listening to an...

Page 24: ...tton window t To hide the window touch Displays the preset list t To hide the list touch AM Selects the AM band FM Selects the FM band Attenuate the sound Page 6 t To restore the sound touch S T Searches for a station t The search method differs according to the selected seek mode See above TI Activates deactivates TI standby reception mode Page 26 SSM Presets stations automatically See the right ...

Page 25: ...t station from the list t Scroll the page to show more items t To hide the list touch FM RBDS features RSearching for FM RBDS programs PTY Search You can search for your favorite programs being broadcast by selecting the PTY code 1 Display the PTY Search screen 2 Select a PTY code 1 then start searching 2 t Scroll the page to show more items PTY Search starts If there is a station broadcasting a p...

Page 26: ...Radio reception information 1 Channel Logo Album art 2 Seek mode Page 27 3 Signal strength indicator 4 SiriusXM Satellite Radio indicators t Mix Lights up when TuneMix is activated Page 31 t Scan Lights up when TuneScan is activated Page 30 5 Text information t Touching scrolls the text if not all of the text is shown t Touching switches the information as follows Channel name artist name song tit...

Page 27: ... live mode screen Page 26 Tune Scan Starts TuneScan Page 30 Tune Mix Presets channels automatically with your favorites Page 31 t To display all available operation buttons touch to display the other operation button window Selecting a channel RSelect a channel by specifying a channel number Direct Channel You can search for a station by entering the desired channel number 1 Display the Direct Cha...

Page 28: ...nel you want to preset Page 27 2 Display the preset list 3 Select a preset number to store Hold The channel selected in step 1 is stored t Scroll the page to show more items t To hide the list touch RSelecting a preset channel 1 Display the preset list 2 Select a preset channel t Scroll the page to show more items t To hide the list touch ...

Page 29: ...s behind the current broadcast t Updated every second RReplaying content 1 Display the Replay mode screen 2 Perform the replay operations t To start pause the playback touch IW t To skip the current track segment touch S T Touching S within 2 seconds of the beginning of the current track segment returns to the previous track Touching S after 2 seconds or more of the track have been replayed return...

Page 30: ... is cleared and new channels in the current band will start buffering TuneStart When you select a SmartFavorites channel you can listen to the current song from the beginning Activating TuneStart 1 Display the SiriusXM SETUP screen 2 To deactivate TuneStart Touch TuneStart to select OFF TuneScan When you activate TuneScan you will hear 6 seconds of the songs which have not been listened to from ea...

Page 31: ...and allowing you to build a custom channel from as few as 2 to as many as 6 music channels You can even skip songs you do not want to hear t TuneMix is available only when you connect an SXV300 or later SiriusXM Connect Vehicle Tuner Activating TuneMix t The Mix indicator lights up To deactivate TuneStart Touch Tune Mix The Mix indicator turns off ...

Page 32: ...he initial setting is 0000 t Changing the code does not change the Parental Control Parental Lock Channel Selection settings 1 Display the SiriusXM SETUP screen 2 Display the Parental Code Set screen 3 Enter the four digit code 1 and then confirm 2 t Touch to delete the last entry 4 Enter a new four digit code 1 and then confirm 2 t Touch to delete the last entry 5 Repeat step 4 to confirm the new...

Page 33: ...en Parental Control is set to Mature or OFF you cannot change the Parental Lock Channel Selection setting 1 Display the SiriusXM SETUP screen Page 32 2 3 Enter the parental code The Parental Lock Category Select screen is displayed 4 Select the desired category t Scroll the page to show more items 5 Select ON for channels you want to activate parental lock for t Scroll the page to show more items ...

Page 34: ...F for the channels you do not want to skip t To switch the sequence of the list between channel name artist name song title category name content information touch Info Change Repeat steps 3 and 4 if you want to select channels to skip from other categories To clear the channel skipping for all skipped channels Touch Disable All in the Skip Category Select screen t When a confirmation message appe...

Page 35: ...n you shift the gear to the reverse R position t OFF Hides the parking guidelines Guidelines Setup Adjusts the parking guidelines according to the size of the car parking space and so on See the right column Selectable only when Parking Guidelines is set to ON Adjusting the parking guidelines t Install the rear view camera in the appropriate position according to the instructions supplied with the...

Page 36: ...ure from the rear view camera manually 1 Display the pop up short cut menu 2 To exit the rear view screen Using external audio video players AV IN When the operation buttons are not displayed on the screen touch the area shown on the illustration t To change settings for video playback see page 56 RStarting playback 1 Connect an external component to the iPod AV IN input terminal Page 69 2 Select ...

Page 37: ...een On the Home screen t You can also display the source option selection screen by touching on the source control screen 2 Select ADS adapter features on the source option selection screen t To display more items touch or flick to change the page Example when Vehicle Info is selected RAvailable items with ADS adapter Vehicle Info Displays information about the tire pressure Radar Detector Display...

Page 38: ...tooth function on the unit 1 Display the SETUP screen On the Home screen t You can also display the SETUP screen by touching on the source option selection screen Page 8 2 Display the Bluetooth Setup screen 3 Activate ON or deactivate OFF the Bluetooth function RRegistering and connecting a new Bluetooth device When you connect a Bluetooth device to the unit for the first time pair the unit and th...

Page 39: ...hange PIN code see page 41 2 Determine usage as a mobile phone t To use the Bluetooth device as a mobile phone select the hands free number Hands Free1 or Hands Free2 to connect the device for t When you do not want to use the Bluetooth device as a mobile phone select No Connection t To close the window touch Close 3 When your Bluetooth device is compatible with A2DP or SPP Determine usage as an a...

Page 40: ... mobile phone Connected as an audio player 5 Select the usage of the device Each time you touch the selection the usage is selected appears or deselected disappears Select to connect and deselect to disconnect the device t TEL HFP 1 TEL HFP 2 Mobile phone t Audio A2DP App SPP Audio player device with Apps installed t To close the window touch Close RDeleting a paired Bluetooth device 1 Display the...

Page 41: ...lay the device name entry screen 3 Enter the device name 1 then confirm the entry 2 t Touch to delete the last entry t Touch H I to move the entry position Using a Bluetooth mobile phone RReceiving a call When a call comes in t Call information is displayed if acquired t The call incoming screen is not displayed while the camera screen is displayed To display the call incoming screen shift the gea...

Page 42: ...ume level t 10 to 10 initial 0 Echo Cancel Level Adjusts the echo volume t 5 to 5 initial 0 Noise Reduction Level Adjusts the noise reduction volume t 5 to 5 initial 0 t To close the window touch Close You can also adjust these items on the TEL SETUP screen Page 47 RSwitching between handsfree mode and phone mode While talking Each time you touch the button the talking method is switched handsfree...

Page 43: ...g a call You can send dial tone during a call using the DTMF Dual Tone Multi Frequency function 1 Display the tone input window While talking 2 Input the tone to send t To close the window touch Close RMaking a call 1 Display the phone control screen On the Home screen t You can also display the phone control screen by selecting on the pop up short cut menu Page 11 2 Select a method to make a call...

Page 44: ... alphabetical order t If the initial character is a number touch 1 and then select the number t Touch to delete the last entry t Touch to hide the keyboard 3 Select a contact to call t Scroll the page to show more items 4 Select the phone number from the list to make a call t Scroll the page to show more items t You can select a first name or last name to use when sorting the list in alphabetical ...

Page 45: ...e preset list Page 43 2 3 Select a position to store into 4 Select a method to add a phone number to preset list then register the number to the preset list Add number from phonebook Select a phone number from the phonebook Page 44 Add number direct Enter a phone number on the direct number entry screen then touch Set to add to the preset list t To close the window touch Close t To display the pre...

Page 46: ...onebook t To close the Edit Phonebook window touch Close t To cancel the transferring the phonebook touch Cancel To delete contact from the phonebook 1 Display the Edit Phonebook window See the far left column 2 Display the Delete Phonebook screen t To close the window touch Close 3 Select contacts to delete 1 then delete them 2 t appears beside the selected bookmarks t Touch All to select all boo...

Page 47: ...iring may not work for some devices depending on the iOS version t OFF Cancels Sort Order Select a first name or last name to use when sorting the list in alphabetical order t First Sorts the list in the order of first name t Last Initial Sorts the list in the order of last name Echo Cancel Level Adjusts the echo volume t 5 to 5 initial 0 Noise Reduction Level Adjusts the noise reduction volume t ...

Page 48: ...ouch t Reverse forward search 3 Hold I Starts playback W Pauses playback BT DEVICE CHANGE Switches the Bluetooth audio player t To display all available operation buttons touch to display the other operation button window 1 To cancel random mode touch the button repeatedly until it is grayed out 2 Available only for devices compatible with AVRCP 1 5 3 Available only for devices compatible with AVR...

Page 49: ... 1 Display the SETUP screen On the Home screen t You can also display the SETUP screen by touching on the source option selection screen Page 8 2 Display the AV screen 3 Set Automotive Mirroring to OFF 4 Display the APP iPod SETUP screen 5 Select the device and connection method for APP Connection select Android Bluetooth Select this to use Apps with an Android device connected via Bluetooth iPhon...

Page 50: ...up t Single Zone Selects the same source Front Source Selects the source for the front monitor Rear Source Selects the source for the rear monitor Rear VOL Adjusts the volume for the rear source t When the rear speaker sound is switched the audio source that is output at the AV OUT AUDIO terminal is also switched to the same source t When Zone Control is set to Dual Zone the following operations p...

Page 51: ...ion window appears for location and speaker tweeter setting Select an item then touch Close to close the window t Repeat steps 1 and 2 to set all speakers t When a speaker is not connected select None t When setting the front speakers also select the speaker size for Tweeter 6 Display the X over screen 1 select the speaker type 2 then adjust the crossover frequency of the selected speaker 3 HPF FR...

Page 52: ...tivate OFF the bass Bass EXT 1 and then adjust the subwoofer level SW Level 2 t Touch H I to adjust SW Level t When Bass Ext is set to ON a frequency lower than 62 5 Hz is set to the same gain level as 62 5 Hz 4 Store the adjustment A user selection window appears Select from User 1 to User 4 to store your adjustment then touch Close to close the window t To apply the adjusted equalizer to all pla...

Page 53: ...eaker output to create a more suitable environment for your vehicle 1 Display the Position DTA screen See the left column 2 Display the DTA adjustment screen 3 Touch Delay 1 then adjust the Digital Time Alignment DTA value for each speaker 2 t Touch H I to adjust the value t To return to the initial setting of Delay and Level touch Initialize and YES in the confirmation screen 4 Touch Level 1 then...

Page 54: ...recisely 2 Sound Image LR Front Adjusts the sound image to set on the front position Sound Image LR Rear Adjusts the sound image to set on the rear position Size of the Virtual Sound Field Adjusts the virtual sound field to the desired field size t If the sound image moves out of the front position adjust Sound Image LR Front Sound Image LR Rear Subwoofer Delay Adjusts the time alignment of the su...

Page 55: ...he volume output according to different sources You can adjust and store the auto adjustment volume level for each source The volume level will automatically increase or decrease when you change the source 1 Display the Audio screen Page 51 2 Display the Volume Offset screen 3 Adjust the volume output level for each source t Scroll the page to show more items t To initialize the setting value touc...

Page 56: ...ect the enhance level t OFF Initial Small Medium Large K2 2 Restores the sound lost due to audio compression to a realistic sound t OFF ON Initial Sound Response Virtually makes the sound more realistic using the Digital Signal Processor DSP system Select the sound level t OFF Initial 1 2 3 Sound Lift You can move the center of the sound to the lower or higher point Select the height t OFF Initial...

Page 57: ...original aspect ratio USB t Adjustable items are different depending on the current source t The image quality can be set for each source Backlight and Black are common to all sources Changing the display design RCustomizing the panel color 1 Display the SETUP screen On the Home screen t You can also display the SETUP screen by touching on the source option selection screen Page 8 2 Display the Di...

Page 58: ...ls t The color of the captured image may look different from that of the actual scene 1 Connect the USB device on which the image is stored Page 68 2 Display the Background screen See the left column 3 Select User1 Select or User2 Select to store the image for 4 Select the folder then the file for the background image in the selected folder t Scroll the page to show more items 5 Rotate the image i...

Page 59: ...o display the SETUP screen by touching on the source option selection screen Page 8 2 Display the Special screen 3 Select an option Audio SETUP Memory Memorizes the current audio setting Audio SETUP Recall Recalls the memorized audio setting Audio SETUP Clear Clears the AUDIO SETUP Memory and the currently memorized audio setting A confirmation message appears Touch Yes RLocking the settings You c...

Page 60: ... source option selection screen Page 8 2 Display the User Interface screen 3 Display the Touch Panel Adjust screen 4 Touch the center of the marks at the lower left and at the upper right as instructed t To reset the touch position press Reset t To cancel the current operation press Cancel Setting menu items SETUP RDisplaying the SETUP menu screen On the Home screen t You can also display the SETU...

Page 61: ...he background design Page 58 R User Interface setting screen Beep t ON Initial Activates the key touch tone t OFF Cancels Parking Assist Display When an ADS adapter is connected to the iDatalink terminal Page 69 you can display information about obstacles around the car t ON Always displays information t Dyn Displays information when the sensor detects obstacles t OFF Initial Cancels Parking Assis...

Page 62: ...o SETUP Recall Recalls the memorized audio setting Page 59 Audio SETUP Clear Clears the AUDIO SETUP Memory and the currently memorized audio setting Page 59 Software Information Display the version information of the software You can update the software Open Source Licenses Show the Open Source Licenses Initialize Touch Initialize and then touch Yes to set all the settings to the initial default s...

Page 63: ...ly If swallowed contact physician immediately t Do not leave the battery near fire or under direct sunlight A fire explosion or excessive heat generation may result t Do not set the remote control in hot places such as on the dashboard t Danger of explosion if Lithium battery is incorrectly replaced Replace only with the same or equivalent type Before using the remote controller t Aim the remote c...

Page 64: ... current aspect ratio setting operate on the touch panel Page 56 ENT Confirms selection DIRECT Enters direct search mode See the right column CLR Erases the misentry RSearching for an item directly Tuner frequency 1 Press DIRECT to enter the search mode 2 Press number buttons to enter a frequency t To erase a misentry press CLR clear 3 Press S T to confirm the entry t To exit the search mode press...

Page 65: ...first make sure the wires are not touching to cause a short circuit then replace the old fuse with one with the same rating t Insulate unconnected wires with vinyl tape or other similar material To prevent a short circuit do not remove the caps on the ends of the unconnected wires or the terminals t Connect the speaker wires correctly to the terminals to which they correspond The unit may be damag...

Page 66: ...owing order ground battery ignition 5 Connect the wiring harness connector to the unit 6 Install the unit in your car t Make sure that the unit is installed securely in place If the unit is unstable it may malfunction e g the sound may skip 7 Reconnect the battery 8 Configure Initial SETUP Page 4 Installing the unit RInstalling the unit using the mounting bracket removed from the car Car Bracket 2...

Page 67: ...emote control feature an exclusive remote adapter not supplied matching your car is required To car light control switch To car chassis Purple with white stripe Reverse sensor wire Light green Parking sensor wire To front speaker left To rear speaker right Blue Antenna control wire Blue with white stripe Power control wire Light blue with yellow stripe Steering remote control wire Orange with whit...

Page 68: ...ehand See above t You can connect two USB devices to the and iPod iPhone terminals USB device commercially available 1 0 m 4 RConnecting an iPod iPhone t Connect the USB extension cable 4 beforehand See the left column iPod iPhone 30 pin connector models commercially available 30 pin to USB cable accessory of iPod iPhone 1 0 m 4 iPod iPhone Lightning connector models commercially available KS U62 ...

Page 69: ...cting SiriusXM Connect Vehicle Tuner commercially available When connecting an external amplifier connect its ground wire to the chassis of the car otherwise the unit may be damaged Connecting external amplifiers for 3 way speakers system Tweeter preout Mid range preout Woofer preout RCA cable not supplied Speaker When connecting to an external amplifier connect its ground wire to the car s chassi...

Page 70: ...u can bend the metal plate 6 to conform to a curved surface if necessary 5 5 6 t Depending on the type of car reception of the GPS satellite signals might not be possible with an internal installation t Install this GPS antenna in an area away from any antennas that are used with CB radios or satellite televisions t The GPS antenna should be installed at a position at least 30 cm 12 inches from mo...

Page 71: ... use RTo keep discs clean Dirty discs may not play correctly If a disc does become dirty wipe it with a soft cloth in a straight line from the center to the edge t Do not use any solvents for example conventional record cleaner spray thinner benzine etc to clean discs RTo play new discs New discs may have some rough spots around the inner and outer edges If such a disc is used this unit may reject...

Page 72: ...sing any other application than iTunes AAC files copy protected with FairPlay except those stored on an iPod Files which have data such as AIFF ATRAC3 etc t This unit can display jacket pictures that meet the conditions below Picture size 32 x 32 to 1 232 x 672 PNG 800 x 480 resolution Data size less than 650 KB File type JPEG PNG BMP RDisc playback Playable disc types Disc type Recording format f...

Page 73: ...FLAC H 264 WMV MKV t This unit can recognize a maximum of 9 999 files and a maximum of 9 999 folders in a folder t Make sure all important data has been backed up to avoid losing the data Notes on using a USB device t This unit may not play back files in a USB device properly when using a USB extension cable t USB devices equipped with special functions such as data security functions cannot be us...

Page 74: ...ugu BE Byelorussian IE Interlingue NA Nauru TG Tajik BG Bulgarian IK Inupiak NE Nepali TH Thai BH Bihari IN Indonesian NO Norwegian TI Tigrinya BI Bislama IS Icelandic OC Occitan TK Turkmen BN Bengali Bangla IW Hebrew OM Afan Oromo TL Tagalog BO Tibetan JA Japanese OR Oriya TN Setswana BR Breton JI Yiddish PA Panjabi TO Tonga CA Catalan JW Javanese PL Polish TR Turkish CO Corsican KA Georgian PS P...

Page 75: ...the device again Voice Recognition is not available t The connected mobile phone does not have a voice recognition system No Contents t No phone book data is contained in the connected Bluetooth phone SXM No Signal t Make sure the SiriusXM Satellite Radio antenna is mounted outside the vehicle Move the vehicle to an area with a clear view of the sky SXM Check Antenna t Check the SiriusXM Satellite...

Page 76: ... cord correctly t Select the correct input on the external monitor t Select the appropriate setting for AV OUT Page 61 MPEG1 MPEG2 MPEG4 WMV H 264 MKV MP3 WMA AAC WAV FLAC Vorbis discs cannot be played back t Record the tracks using a compatible application on the appropriate discs Page 72 t Add appropriate extension codes to the file names Tracks on the Recordable Rewritable discs are not played ...

Page 77: ...ance between the unit and the Bluetooth mobile phone t Move the car to a place where you can get a better signal reception The sound is interrupted or skipped while using a Bluetooth audio player t Reduce the distance between the unit and the Bluetooth audio player t Disconnect the device connected for Bluetooth phone t Turn off then turn on the unit When the sound is not yet restored connect the ...

Page 78: ... Disc Format DVD Video VIDEO CD CD DA DVD R DVD RW DVD R DVD RW Sampling Frequency 44 1 kHz 48 kHz 96 kHz Quantifying Bit Number 16 20 24 bit RUSB interface section USB Standard USB 2 0 Full Speed High Speed 2 Compatible Devices Mass storage class File System FAT 16 32 Maximum Power Supply Current DC 5 V 1 5 A D A Converter Front Rear 32 bit Subwoofer 24 bit Audio Decoder MP3 WMA AAC AAC LC m4a fi...

Page 79: ...utput 50 W 4 Full Bandwidth Power Front Rear 22 W 4 4Ω 14 4 V at less than 1 THD Preout Level 4 V 10 kΩ Preout Impedance 600 Ω Speaker Impedance 4 Ω to 8 Ω Equalizer 13 Band Band Frequency Hz 62 5 100 160 250 400 630 1k 1 6k 2 5k 4k 6 3k 10k 16k Level 09 to 09 9 dB to 9 dB HPF High Pass Filter Frequency Hz Through 30 40 50 60 70 80 90 100 120 150 180 220 250 Slope 6 12 18 24 dB Oct Gain 8 7 6 5 4 ...

Page 80: ...IDEO THAT WAS ENCODED BY A CONSUMER ENGAGED IN A PERSONAL AND NON COMMERCIAL ACTIVITY AND OR WAS OBTAINED FROM A VIDEO PROVIDER LICENSED BY MPEG LA TO PROVIDE MPEG 4 VIDEO NO LICENSE IS GRANTED OR SHALL BE IMPLIED FOR ANY OTHER USE ADDITIONAL INFORMATION INCLUDING THAT RELATING TO PROMOTIONAL INTERNAL AND COMMERCIAL USES AND LICENSING MAY BE OBTAINED FROM MPEG LA LLC SEE HTTP WWW MPEGLA COM t THIS...

Page 81: ...FOUNDATION OR CONTRIBUTORS BE LIABLE FOR ANY DIRECT INDIRECT INCIDENTAL SPECIAL EXEMPLARY OR CONSEQUENTIAL DAMAGES INCLUDING BUT NOT LIMITED TO PROCUREMENT OF SUBSTITUTE GOODS OR SERVICES LOSS OF USE DATA OR PROFITS OR BUSINESS INTERRUPTION HOWEVER CAUSED AND ON ANY THEORY OF LIABILITY WHETHER IN CONTRACT STRICT LIABILITY OR TORT INCLUDING NEGLIGENCE OR OTHERWISE ARISING IN ANY WAY OUT OF THE USE ...

Page 82: ...0516EHHMDWJEIN ...

Page 83: ... JVC 0316EHHMDWJEIN ...

Page 84: ...containing audio files Blank USB memory is highly recommended Update cannot be performed if it is copied inside a folder If the updater file name is changed update cannot be performed Checking the Firmware Version 1 Touch the Settings on the HOME screen 2 1 Touch Special 2 Touch 3 Touch Software Information 1 3 2 3 Check the version Updating the Program 1 Connect the USB memory The confirmation me...

Page 85: ...questions concerning your JVC Product please contact our Customer Care Center at 800 252 5722 WHAT IS NOT COVERED This limited warranty provided by JVC does not cover 1 Products which have been subject to abuse accident alteration modification tampering negligence misuse faulty installation lack of reasonable care or if repaired or serviced by anyone other than aservice facility authorized by JVC ...

Page 86: ...oduit JVC distribue au Canada par JVC et vendu par un detaillant JVC autorise JVC vous garantit que ce produit est degage sous utilisation et entretien normal de tout detaut materiel et de fabrication sous reserve des modalites et conditions suivantes 1 Pour obtenir un service de garantie a Les produits JVC necessitant un service doit etre presentee avec Ia prevue d achat b Le produit JVC doit etr...

Reviews: