background image

Page  48   

 NOTE:

  1. All faders have integrated Level and Peaking indicators


2. Basic knowledge of audio mixer operation is required. It is beyond the scope of this manual to  


     explain Audio Mixer board operational procedures. 

SA (Settings Area Menu) - AUDIO

Activates the display of the AUDIO MIXER in the CMA and the REPLAY CAPTURE buttons in the SA.

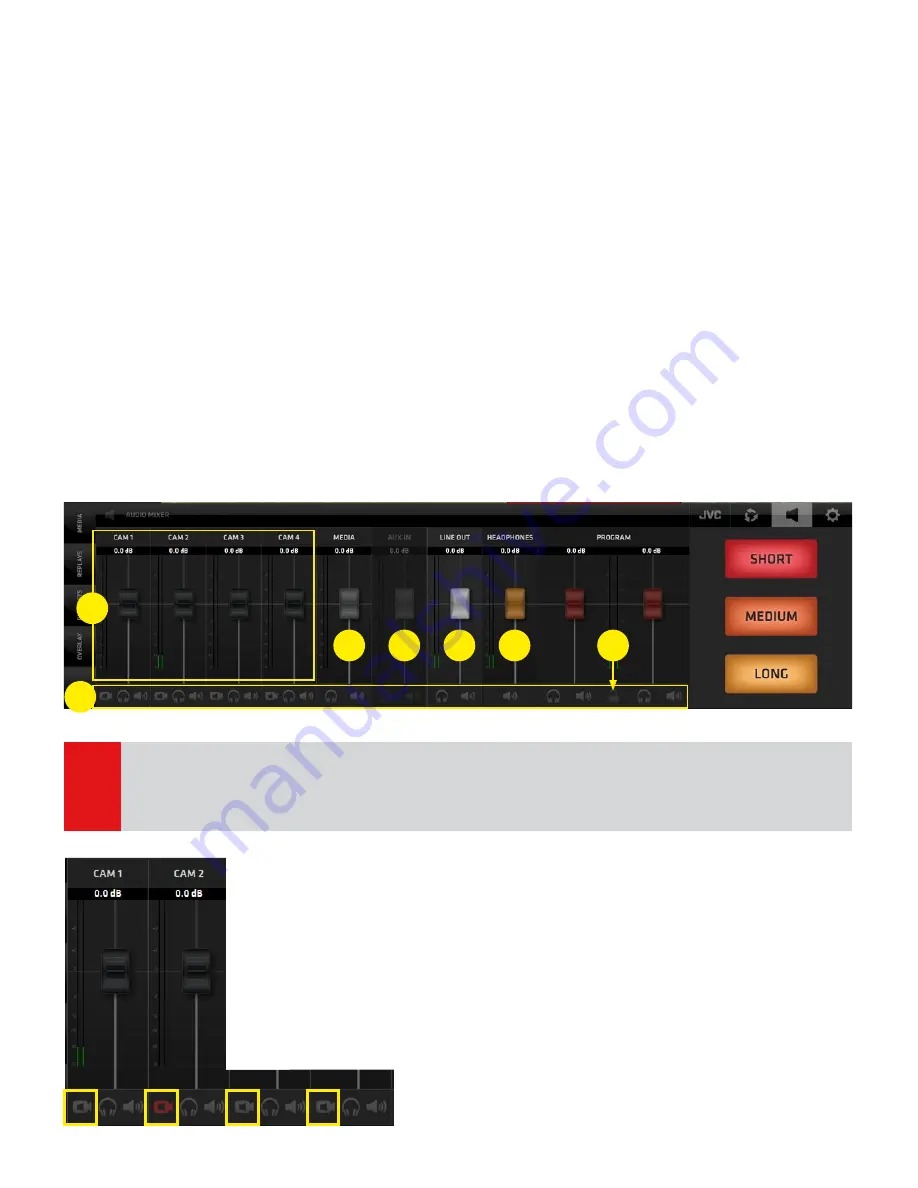
The AUDIO MIXER board provides all the standard Audio for Video mixer interface elements.
1.  Cameras SDI embedded audio faders with level and peak indicators
2.  Audio Follow Video, Solo and Mute buttons for each fader
3.  Media audio fader
4.  AUX input fader (external audio signal source)
5.  Line Out fader  
6.  Headphones output fader
7.   Program Output levels stereo faders with levels, peaking and a stereo lock/unlock 

Important notes on certain functionalities of the Audio Mixer:

  -  If the Stereo Lock is Active (locked icon) both PGM faders move in sync relative to each other. 
  -  If the Stereo Lock is Deactivated (unlocked icon) the PGM faders move individually. 
  -  Double clicking on any Fader Button will set its level to the level of 0.0 db 
  -  In the Unlocked state of the PGM Output faders double clicking one PGM Output fader will bring the  
    other PGM fader to the same level as the one that was double-clicked
  -  In the Locked state of the PGM Output faders double clicking any of the faders will bring both their
    levels to the level of  0.0 db

AUDIO FOLLOW VIDEO

The functionality makes the audio mixer a slave to the video mixer.  
When the functionality is active (red icon at bottom left of the input fader) 
switching to another camera will also switch the audio to that channel. 
If the AFV button is OFF (grey) the audio of the input is mixed to the Program 
audio regardless of switching cameras.  

Example of a practical would be to have one camera AFV Off to capture the ambi-
ance audio that always goes out to PGM and the rest of the cameras have AFV On 
so the audio of those cameras is switched with switching cameras.

1

2

3

4

5

6

7

KM-IP4100

Summary of Contents for KM-IP4100

Page 1: ...t version LIVE PRODUCTION SUITE SOFTWARE USER S MANUAL June 2019 JVCKENWOOD Corporation JVC Professional Video http pro jvc com studio All information in this document is subject to change without notice JVCKENWOOD Corporation 2019 All rights reserved ...

Page 2: ...KM IP6000 KM IP4100 MULTI CAMERA LIVE PRODUCTION AND STREAMING SMARTER FASTER EASIER ...

Page 3: ...rameters Setup 32 Timer Score CG Objects 34 Timing Options Tab 35 Clock Parameters Setup 35 Game Part Parameters Setup 36 Score Parameters Setup 36 Timer Score Live Game Controller 37 Automatic Data Control 38 Editing and XML preset 39 Settings Area Menu 40 SA System Settings Tab 41 General General tab 41 Camera Inputs tab 41 Synchronization tab 42 Ingest tab 42 Output settings tab 42 Tally port s...

Page 4: ...onal copyright laws The JVC logo is property of and used with permission of JVCKENWOOD corporation The contents of this document may be used exclusively for information purposes as a learning resource for users of the described systems Any other use including reproduction modification distribution transmission re publication display or performance of the contents of this document without prior wri...

Page 5: ...h screen user interface that has been fine tuned and tested in thousands of real life productions It offers professional live production features that will enable you to produce broadcast quality productions with unprecedented speed efficiency flexibility and extreme ease of use END USER LICENSE AGREEMENT After the installation reinstallation update of the SW at first run the END USER LICENSE AGRE...

Page 6: ... top 2 PGM CAMERA SWITCHING section in the middle 3 CONTENT MANAGEMENT SETTINGS section at bottom At the very bottom is an additional information bar displaying some helpful info on system status PRODUCTION LAYOUT Section PGM CAMERA SWITCHING Section CONTENT MANAGEMENT SETTINGS section Info bar PGM OUTPUT MONITOR CAMERA MONITORS SWITCHES NOTE The GUI of the 4 cam version is modified to make the be...

Page 7: ...cts CREATING A PROJECT 1 2 LOAD PROJECT dialog screen 1 Select an existing project by tap click on its name in the list 2 Edit the name of projects by tap click on the PENCIL icon besides the names of projects 3 Delete projects by tap click on the TRASH Icon 4 Create a new project by typing its name into the text input field and tap click CREATE NOTE To get you started after the SW installation a ...

Page 8: ...o to the CMA CG TAB section on page 29 INGEST on off switch for the INGEST layer for a description go to the SETTINGS LAYERS INGEST section on page 44 KM IP6000 KM IP4100 ACTIVITY INDICATORS 6 indicators providing status info about system processes Their function is informative only OUTPUT indicators of different types of outputs RECORDING indicators of recording functions SCREEN LAYOUT SWITCHES P...

Page 9: ...ick CANCEL to do the following a when in the Content selection state to cancel and go back to the PIP Templates selector to choose another template b when in PIP Templates selector to exit the PIP SETUP window 9 The last PIP used in live PGM is assigned to the main PIP SWITCH button in the top section menu for fast repeated use If you wish to select another PIP simply tap click and HOLD the PIP sw...

Page 10: ...ing mode with their respective functionality controls DIRECT CUT enables a direct cut between sources CROSSFADE enables automated crossfade transition between sources TRANSITION enables automated wipe transition between sources Adjusting the Mixing Modes parameters DIRECT CUT Tap Click the button to select the DIRECT CUT mode There are no parameters to adjust CROSSFADE Tap Click and HOLD the CROSS...

Page 11: ... Adjustment The next image bellow shows the TRANSITION ADJUSTMENT controls window open It contains 9 Transition Template buttons Tap click any of them to select a desired transition Use the TRANSITION DURATION BAR to adjust the duration of the transition Slide the red bar to the right to increase the transition duration to the left to decrease it Or tap click anywhere on the duration adjustment ba...

Page 12: ...SETS buttons will display their respective control switches superimposed over the camera preview and PGM preview monitors NOTE For a good understanding of these functions we recommend first to go through and familiarize yourself thoroughly with the CAMERA SWITCHING and JVC CAMERA CONTROL functionalities Therefore we will discuss the PTZ CAMERA CONTROL functionalities in detail in the JVC CAMERA CO...

Page 13: ...meras are connected to the system the PTZ CAMERA PRESETS control switches may be displayed superimposed over the corresponding camera monitors to allow instant access to PTZ camera presets Two CONTROL SWITCHES 1 become visible by enabling the PTZ CAMERA button in the TOP MENU 1a PTZ CAMERA PRESETS display button 1b SETTINGS hot key button to allow quick access to PTZ camera settings in the CMA Act...

Page 14: ...Page 14 CONNECTED CAM STUDIO KM IP6000 6 CHANNEL LIVE PRODUCTION AND STREAMING STUDIO ...

Page 15: ...YLISTS OVERLAYS and CG controls The SA Settings Area has 4 TABS on the top that reveal the control elements for SYSTEM SETTINGS AUDIO MIXER REPLAYS JVC CAMERA CONTROL The image below shows the PLAYLISTS controls in CMA and SYSTEM SETTINGS in the SA This image shows the AUDIO MIXER controls in CMA and Replay Capture buttons with the CG Live game controller in the SA CMA Content management area disp...

Page 16: ...n the thumbnail media player 5 Assign to Playlist button used to assign the media files to a Playlists Tap click the button a dialog box appears that enables you to select a playlist or to create a new one and add this media file to it The procedure is described in detail in the PLAYLISTS section on page 27 6 Loop button sets a media file into a loop tap click it several times to cycle through the...

Page 17: ...edia playback In Out points to prepare your media for playback in your live production 1st row PREVIEW EXIT DURATION RESET left to right A Preview Media Video player B media info display Media file name and entire duration edited duration C media In Out Points Editor EXIT BUTTON D playback duration time of media between the IN and OUT points If no In Out points are set it shows the entire media du...

Page 18: ...nd fine tune the positions using the 4th row controls 4th row VIDEO NAVIGATION CONTROLS left to right L GO TO FRONT moves the playhead to the beginning of the media M REWIND 1 SEC moves the playhead 1 second towards the beginning of the media N STEP BACK 1 FRAME moves the playhead 1 frame towards the beginning of the media O PLAY plays the media in the PREVIEW Video player on top left from the cur...

Page 19: ...tors 2 Tap click on any of them to activate it After the M PL reaches its end a camera with the active AUTOCUT switch is automatically switched to Live PGM By default when a M PL is switched to Live PGM the AUTOCUT SWITCH of a camera is activated that was last in live PGM before the M PL was played Tap click above the AUTOCUT SWITCH inside the Live Camera Monitor will terminate the AUTOCUT functio...

Page 20: ... Replay TAG display of replay set Tag 4 Preview button triggers the display of video monitors to preview the captured replay set Tap click a preview to cut the replay of a camera to live PGM OUT While playing a preview a blue progress bar in the preview button indicates the playhead position 5 SRP replay mode activation switch Sequential Replay Playback 6 DRCS replay mode activation switch Dynamic...

Page 21: ... as replay capture REPLAY CAPTURE BUTTONS 1 SHORT triggers the capture of 3 4 or 5 sec replays in all cameras the length can be set in REPLAY SETTINGS default is 3 sec 2 MEDIUM triggers the capture of 6 8 or 10 sec replays in all cameras the length can be set in REPLAY SETTINGS default is 6 sec 3 LONG triggers the capture of 10 15 or 20 sec replays in all cameras the length can be set in REPLAY SE...

Page 22: ... SET outlined yellow contains the following elements A EDIT REPLAY NAME button push and type to name the replay set B TIME STAMP and REPLAY NAME time and name display C PREVIEW button enter the Replay Preview pane D SRP REPLAY MODE button turn SRP Mode ON OFF E DRCS REPLAY MODE button turn DRCS Mode ON OFF F REPLAY CAMERA buttons replay playback for each camera G SORTING buttons move a replay set ...

Page 23: ...preview monitors you wish to add to the sequence All this way selected replays will play in a sequence in the same order as selected The replay playback progress is indicated by a blue progress bar above each replay video monitor Additionally a numeric display in the top right of the replay preview pane indicates its remaining time 3 Tap as many replays as you wish to add to the presently playing ...

Page 24: ...of a replay Once the replay is finished a live camera is automatically switched to PGM via AUTOCUT described on next page Replay Camera Buttons in DRCS Mode SLOW MOTION REPLAY PLAYBACK FREEZE FRAME During the replay playback SLOW MOTION functionality is available Default replay playback motion ratio is 50 of original speed Use the following keyboard shortcuts for Variable speed and Freeze frame X ...

Page 25: ...y is described in detail on page 19 WIPES Short Lead In Lead Out animations used in the Replay system as transition to enter and exit the Replay The users can create these animations themselves to enhance the visual appeal of their productions It is a well accepted unobtrusive way to introduce commercial content sponsor logos etc to the production which can become a source of extra revenue for the...

Page 26: ...Page 26 CONNECTED CAM STUDIO KM IP4100 4 CHANNEL LIVE PRODUCTION AND STREAMING STUDIO ...

Page 27: ...n off if audio is available 11a Audio Unavailable Icon indication that a playlist item does not have audio 12 Delete delete a playlist item or the entire playlist if the Playlist is closed DELETE icon is in top line CMA Content Management Area PLAYLISTS Tab Opens the PLAYLISTS pane with control elements to operate the PLAYLISTS functionality Playlists are virtual collections of MEDIA files or REPL...

Page 28: ...de in the Production Layout Section Alternatively if the OVERLAYS LAYER SWITCH in the Production Section on top left is active you can switch the Overlay graphics directly by tapping the thumbnail previews in the Overlays pane in the CMA The CONNECTED CAM STUDIO Keyboard Shortcuts for the Overlay slots are marked in BLUE The keys Q T for the top 5 slots and Y P for the bottom 5 slots 10 OVERLAY GR...

Page 29: ... CG PROJECT SELECTION select a CG project to load into the CG List B NEW TEXT creates a new TEXT CG object in the CG List C NEW CRAWL creates a new CRAWL CG object in the CG List D NEW TIMER SCORE creates a new TIMER SCORE CG object in the CG List E TIMING OPTIONS access to Timing Options settings for the Timer Score CG objects Each CG object in the CG List contains the following control elements ...

Page 30: ...ual differentiation CG Operation Procedure A Tap click the CG TAB in the left side menu bar of the CMA to display the CG list pane B Specify which CG project to use click tap the CG PROJECT Tab in the top bar of the CMA select the project from the projects list window C Tap click the CG thumbnail in the list to select it outlined in red when selected D Switch the CG Layer to live PGM using the CG ...

Page 31: ... and CRAWL Layer Allows to type paste edit the text content and control its parameters DYNAMIC TEXT Layer Used in the Timer Score CG Objects only Its content is controlled by a LIVE GAME controller that allows to increase the score the game period or it is a running timer measuring the time of the game BACKGROUND Layer parameters setup CHOSE BACKGROUND FILE select a graphics file from the Windows ...

Page 32: ...ical to editing a regular text layer with a few additional settings SPEED set the speed of text movement DIRECTIONAL BUTTONS set the direction of the text movement LOOP turn a loop of text movement on off EDIT TEXT enter a separate EDIT CRAWL TEXT pane to allow longer text edits All the other controls function the same way as already described NOTE X Y POSITION parameters define the coordinates of...

Page 33: ...E setting will terminate the crawl loop playback To loop the crawl text indefinitely you need to set the OUT TIME to a value of 999 or larger TEXT LAYER COLOR parameters setup Push the BUCKET Icon in the STYLE group of icons The COLOR EDITOR pane opens Tap click inside the color selector or enter the new color RGB values numerically Push the APPLY button to view the new text color in the PREVIEW m...

Page 34: ...fault values for those are displayed when setting up to allow for positioning and formatting The actual values will be controlled during the live game using the TIME SCORE CONTROLLER described above TIMER SCORE CG Layers BACKGROUND a graphics file used as background for all the text layers placed above it TEAM HOME and TEAM AWAY regular text layers to be filled in by user SCORE HOME and SCORE AWAY...

Page 35: ...value allowing a Time Countdown to actually take place 3 TIME DISPLAY choose whether the time counter is to display time per MATCH or per GAME PART NOTE Be aware that this parameter setting will have dramatic effects on the actual time displayed The displayed time will be affected by the Counting Method and the Start Time If the Counting method is set to Countdown and Time Display is set to PER MA...

Page 36: ...art Time again regardless of when it was stopped thus allowing to count the time of a new Game Part from its start SCORE Parameters Setup 1 SCORE TYPE drop down menu selector allowing the choice of a scoring method At the moment a general scoring method is available Scoring methods for other sports with a different scoring scheme e g Tennis Baseball will be available in a future versions of the SW...

Page 37: ...T buttons to both sides of the TIME display allow for manual time correction 3 TIMING OPTIONS HOT KEY SHOWS HIDES the Timing Options pane 4 TIME START STOP button Starts or Stops the clock 5 SCORE INDICATORS 6 SCORE ADJUST buttons Increase the score by pressing the on either side Press and hold the button for over 1 second turns it to a negative icon allowing to decrease a score Press and hold aga...

Page 38: ...eived by CONNECTED CAM STUDIO system and periodically updated from an external source 3 To setup the XML data structure conversion push the XML EDITOR BUTTON explained bellow 4 Select the variables you wish to control 3 types are within the internal CG system score clock period 5 Select a preset of XML data conversion to use 6 If there is no preset yet available create a new one by typing in the n...

Page 39: ...nvert from the external XML file data structure 4b Variable CLOCK setup active Setup its parameters to convert from the external XML file data structure 4c Variable PERIOD setup active Setup its parameters to convert from the external XML file data structure 5 After setting up the XML data conversion click SAVE to store the XML preset 1 2 3 4a 4b 4c 5 NOTE Expert skills and understanding of the XM...

Page 40: ...SA Replay capture buttons with Live Time Score Controller CMA Replays List NOTE For a good understanding of all the operating procedures and SW functionalities covered in the SA MENU TABS it is important to learn about the System Settings and their implications on the system performance first Therefore we ll go through it in right to left order 2 AUDIO Tab SA Live TIME SCORE controller CMA AUDIO M...

Page 41: ... the drop down menu for each Certain input types require additional setting which are displayed to the right Setup the necessary settings as needed and push APPLY to make them active SA Settings Area Menu SYSTEM SETTINGS Provides 9 buttons to access control panes for all system settings and functions Tap click on a Settings button in SA opens a relevant settings pane in CMA Some panes have additio...

Page 42: ...ing the numbered buttons SYSTEM SETTINGS GENERAL Tally Port Selection setup of the communication port for the optional Tally Intercom SYSTEM SETTINGS GENERAL Ingest Settings Ingest Layer Input setup a notebook an action camera or even a smartphone can be used as sources and inserted into your live production SYSTEM SETTINGS GENERAL Output Settings tab 1 Select the Output Card and Output Index to b...

Page 43: ... fill in data and SAVE The tab content will display the setup destinations in a list view SYSTEM SETTINGS STREAMING Streaming Destinations tab list view Multiple Streaming Destinations List streaming controls START EDIT and DELETE buttons for each streaming destination are provided START ALL start streaming to all destinations STOP ALL stop all streaming SAVE STREAM TO FILE specify a name and path...

Page 44: ...rding setup define drives paths start stop recording storage space info SYSTEM SETTINGS LAYERS Ingest tab A transparency color key can be created on the INGEST input ENABLE the Transparency and use the eye drop tool to sample the key color For best results use video graphics with a solid color background SYSTEM SETTINGS LAYERS Logo tab Use the PATH selector to insert a file FLV and PNG files with ...

Page 45: ...ior of replays replay durations and slow motion playback settings Replay Behavior activate deactivate replays in general setup automatic replays preview in SRP and DRCS modes setup how replays affect the display of graphics Replay Length setup the duration of a replay assigned to each replay capture button Motion Ratio setup the Slow Motion speed for default fast and slow replay playback SYSTEM SE...

Page 46: ...section on the left is the setup of audio devices AUX audio delay for A V synchronization and on the right are the IFB talk back controls IFB TALK BACK one way audio communication system between the switcher operator and cameras 1 Select a device for IFB audio talk back using the drop down menu 2 SHOW HIDE buttons reveal an additional ON OFF button in the SA MENU 3 Use this info to set RETURN OVER...

Page 47: ...ovides system information and license key entry button SYSTEM SETTINGS ABOUT Legal Notices tab Display of mandatory legal info Application shut down system shut down dialog SYSTEM SETTINGS EXIT Tap click the EXIT button to close the application ...

Page 48: ... relative to each other If the Stereo Lock is Deactivated unlocked icon the PGM faders move individually Double clicking on any Fader Button will set its level to the level of 0 0 db In the Unlocked state of the PGM Output faders double clicking one PGM Output fader will bring the other PGM fader to the same level as the one that was double clicked In the Locked state of the PGM Output faders doub...

Page 49: ...rea Activating another functionality in the left side menu will change the content of the CMA but as long as the SA REPLAY SWITCH IS ON the replay capture buttons will remain available NOTE The Replay functionality was described in great detail on pages 20 25 and the Replay Settings on page 45 Please refer to these pages to review the Replay functionality KM IP4100 ...

Page 50: ...JVC PTZ cameras and to create camera presets 5 PTZ GROUPS contains tool for creation of PTZ camera groups and group presets IP CONNECT Tab Setup of the camera connection Setup of the camera IP streaming Tally light control NOTE when a camera is connected the CONNECTED CAM STUDIO SW takes over the function of the on camera recording light and uses it as TALLY LIGHT CONTROL Tab Provides access to al...

Page 51: ...rsa Presets to create and store a camera preset tap click the SET button followed by the PRESET P1 P14 button the current settings for this camera is stored as a preset to activate a stored camera preset just push a Preset button P1 P14 to clear a preset push CLEAR button followed by the Preset button P1 P14 ZOOM AND FOCUS Tab Provides access to the ZOOM and FOCUS related JVC camera controls If a ...

Page 52: ...ld tap Pencil when done 6 Tap click SAVE to save the group preset 7 To CLEAR the contents of a Group Preset tap click CLEAR and tap whatever you wish to clear it can be a Camera Preset pair in the group or the entire group When done deactivate the clear function by tap click on the CLEAR button again to turn it off 8 Tap click MOVE to execute the Group Preset Executing a Group Preset will move all...

Page 53: ...S 2B Camera settings HOT KEY 3 Tap click on the Preset button 2A reveals a PRESETS GRID of all available presets for this PTZ camera a These presets are created in the PTZ CAMERA PRESETS pane in the JVC PTZ Tab b tap click any of the PRESET P1 P14 buttons and the camera moves to that position immediately c tap click the X button in lower right to close hide the PRESETS GRID 4 Tap click on the CAME...

Page 54: ...ESET G1 G14 c tap click the MOVE button to move all cameras to their respective presets d tap click the X button in lower right to close hide the PTZ GROUP PRESETS GRID e information display about the content of the Group Preset name comment and camera preset pairs contained in it 2c 2d 1 1 3c 3e 3a 3b 3d 4 Tap click on the CAMERA SETTINGS HOT KEY button 2d opens the PTZ CAMERA GROUPS settings in ...

Page 55: ...Page 55 For more information on CONNECTED CAM STUDIO please visit http pro jvc com studio For support visit http pro jvc com studio support Thank You for using CONNECTED CAM STUDIO Enjoy ...

Reviews: