background image

EN 

73

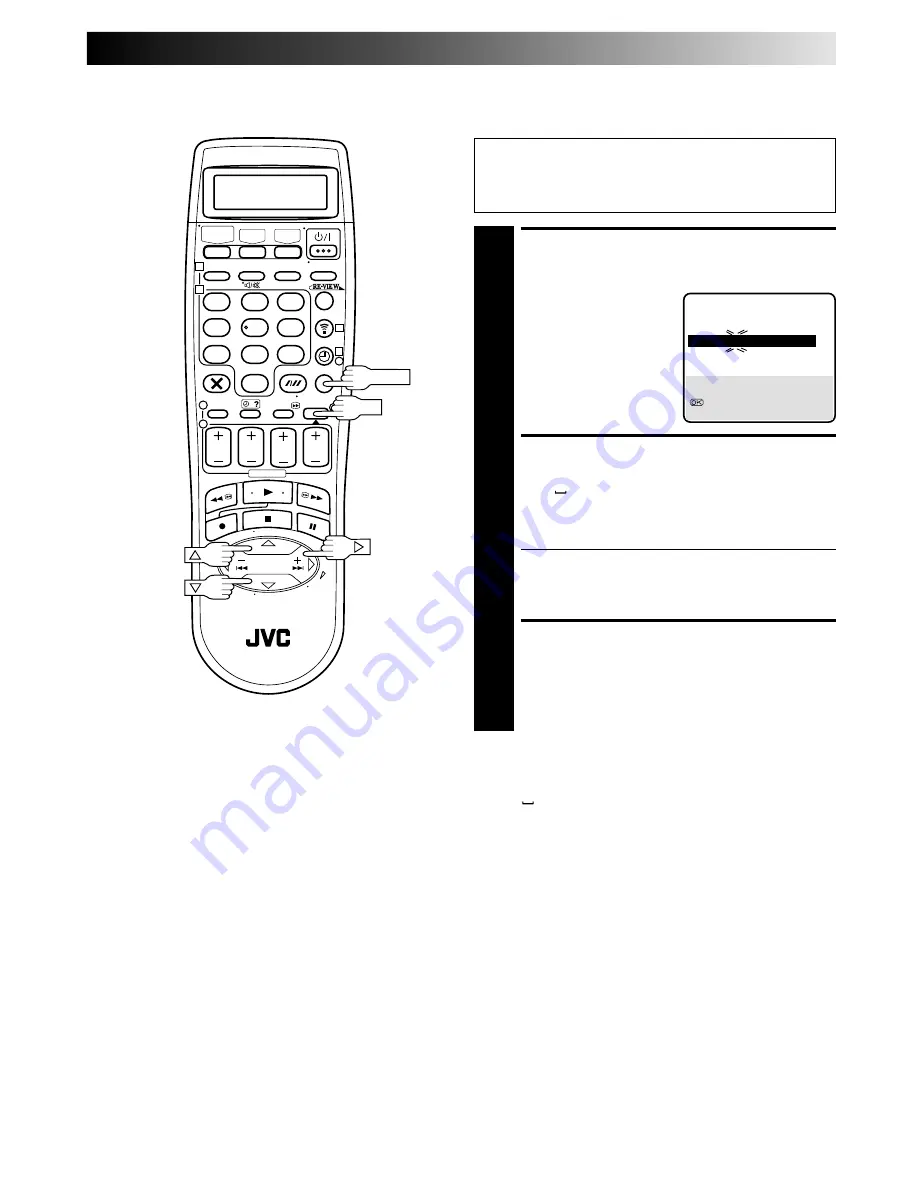
SELECT STATION NAME

CHARACTER

1

Press 

#

 until the first letter

of the station name begins
blinking.

ENTER NEW CHARACTER

2

Press 

%fi

 to cycle through the characters (A–Z, 0–9, –,

*

, +,   (space) ) and stop when the desired character

is indicated, then press

#

 to enter. Enter the remaining

characters the same way (maximum of 4).
After entering all characters, press 

OK

.

The Confirmation screen appears.

If you make a mistake, press 

@

 until the incorrect

character begins blinking. Then enter the correct
character by pressing 

%fi

.

CLOSE CONFIRMATION

SCREEN

3

Press 

MENU

.

Set Stations (B)

Perform steps 

1

 and 

2

 of "Storing Channels Manually" on

page 70 to access the Confirmation screen and then perform
step 

1

 and 

2

 of "Set Stations (A)" on page 72 before continu-

ing.

Set station names other than the ones registered in your recorder.

PR CH

ID

FINE DECODER

06 CH45 ARD

+/–

OFF

[

5∞

] : A-Z, 0-9

[

] : CURSOR 

+=

: OK

[MENU] : EXIT

NOTE:

The characters available for the station name (ID) are A–Z, 0–9,
–, 

*

, +,   (space) (maximum of 4).

1

2

3

4

5

6

7

8

9

1

2

1

2

3

0

3

4

4

OK

MENU

Summary of Contents for HR-DVS2EU

Page 1: ...em Set 17 PLAYBACK 18 Basic Playback 18 Playback Features 19 RECORDING 26 Basic Recording 26 Recording Features 28 B E S T Picture System 32 TIMER RECORDING 34 SHOWVIEW Timer Programming 34 Express Timer Programming 36 SPECIAL FEATURES 42 Remote Control Functions 42 EDITING 45 Preparation For Editing 45 Tape Dubbing 46 Normal Dubbing 47 Random Assemble Editing 48 Edit From A Camcorder 50 Edit To O...

Page 2: ...at you disconnect the power cord from the mains outlet 䡲 Dangerous voltage inside Refer internal servicing to qualified service personnel To prevent electric shock or fire hazard remove the power cord from the mains outlet prior to connecting or disconnecting any signal lead or aerial WARNING There are two different types of SECAM colour systems SECAM L used in FRANCE also called SECAM West and SE...

Page 3: ...with water or liquids such as cosmetics or medicines flower vases potted plants cups etc on top of this unit 7 DO NOT place any naked flame sources such as lighted candles on the apparatus 8 AVOID violent shocks to the recorder during transport MOISTURE CONDENSATION Moisture in the air will condense on the recorder when you move it from a cold place to a warm place or under extremely humid conditi...

Page 4: ...n be sure to use a 21 pin SCART cable that is compatible with the Y C signal Set your TV to the VIDEO or AV Y C or RGB mode according to the type of your TV s SCART connector For switching the TV s mode refer to the instruction manual of your television To obtain high quality S VHS pictures you can also use the S VIDEO Connection described on page 5 CONNECT RECORDER TO MAINS 4 Connect the provided...

Page 5: ...OUT connectors to the TV s AUDIO IN connectors CONNECT RECORDER TO MAINS 2 Connect the provided mains power cord between the mains power inlet on the rear panel of the recorder and a mains outlet To Connect to A TV With S VIDEO AUDIO IN Connectors S VIDEO Connection Mains outlet AUDIO OUT ANTENNA IN Back of Recorder ANTENNA OUT Aerial or Cable RF Cable provided Back of TV S Video cable not provide...

Page 6: ...to step 3 If you have selected MAGYARORSZÁG 36 ESKÁ REPUBLIKA 42 POLSKA 48 or OTHER EASTERN EUROPE EE press OK The Clock Set screen will appear Set the clock manually 墌 pg 76 77 then go to step 4 If you have selected any other country name code go to step 4 ATTENTION Once you have performed Auto Set Up even if the recorder s memory backup has expired all the stored stations and their Guide Program...

Page 7: ...ted SCAN COMPLETED appears for about 5 seconds then the normal screen appears When you have connected the video recorder to a TV offering T V Link via a 21 pin SCART cable 墌 pg 4 and the TV is turned on the recorder automatically performs the Preset Download 墌 pg 8 even if you select Auto for Auto Set Up function NOTES Auto channel set function takes place first it assigns automati cally all recei...

Page 8: ...rmal screen appears If you press any button on the recorder or remote control while downloading is in progress it will be interrupted NOTES In the area where no TV station transmits a PDC signal the recorder can perform neither auto clock set nor auto Guide Program number set If there is a power cut or if you press or MENU while downloading or set up is in progress it will be interrupted be sure t...

Page 9: ...k whether the channel position on which your recorder receives the broadcasting station you wish to record is selected 墌 pg 34 SHOWVIEW Timer Programming 䡲 Your video recorder memorizes all detected stations even if reception of some of them is poor In these cases picture quality may be poor To delete those stations with an unacceptable picture 墌 Delete A Channel on page 71 A B C When auto channel...

Page 10: ...SET then press OK or SELECT COUNTRY 4 Press fi to move the highlight bar pointer to your country s name then press OK or SELECT LANGUAGE 5 Press fi to move the highlight bar pointer to the language of your choice You do not have to press OK pressing OK enters Auto Set T V LINK screen RETURN TO NORMAL SCREEN 6 Press MENU Turn on the TV and select the AV mode MAIN MENU MODE SET VHS MODE SET DV MODE SE...

Page 11: ...cator VHS 墌 pg 29 7 Audio mode display 墌 pg 24 25 8 Tape position indicator VHS 墌 pg 24 9 Type of Broadcast 墌 pg 31 The superimposed indication on the TV screen tells you what the recorder is doing MODE SET S VHS AUDIO OUT AUTO O S D ON AUTO TIMER OFF DIRECT REC ON POWER SAVE OFF 5 MENU EXIT q6 PR 12 ABCD SP 21 00 24 12 00 WARNING TIMER RECORDING TO START SOON VHS ST HI FI 1 23 45 NORM REMAIN 1 00...

Page 12: ...ion 墌 pg 76 does not work while the Power Save mode is engaged While the recorder is in the Power Save mode the picture may be distorted momentarily when you turn on off the recorder Power Save does not work when the recorder is in the Timer mode the recorder s power is turned off after timer recording or Instant Timer Recording L 2 SELECT is set to DECODER or SAT 墌 pg 58 INITIAL SETTINGS cont 1 2...

Page 13: ... SATELLITE CON TROLLER TO RECORDER 4 Connect the Satellite Controller to the SAT CONTROL connector on the rear panel Satellite Receiver Control Setting The following procedure is required if you receive satellite channels through a satellite receiver Approximately 20 seconds before the SHOWVIEW timer programming 墌 pg 34 or Express timer programming 墌 pg 36 starts the recorder sets its input mode t...

Page 14: ... SET AUTO CH SET MANUAL CH SET OUTPUT INPUT SET INITIAL SET 5 MENU EXIT ACCESS INITIAL SET SCREEN 3 Press fi to move the highlight bar pointer to INITIAL SET then press OK or ACCESS SAT CONTROL SET SCREEN 4 Press fi to move the highlight bar pointer to SAT CONTROL SET then press OK or ENTER SATELLITE RECEIVER S BRAND 5 Press the appropriate NUMBER keys to enter the brand code from the list on page 1...

Page 15: ...channel number has been changed to the same channel as you set in step 6 Press fi to move the highlight bar pointer to CHANGED TO then press OK or to finish the Sat Control Set mode If the satellite receiver s channel number has not been changed correctly Press fi to move the highlight bar pointer to NOT CHANGED then press OK or Then perform the procedure again from step 5 NOTES The Satellite Contro...

Page 16: ...ed 21 pin SCART cable The degree of compatibility and available functions may differ by system Direct Rec You can start recording the programme that you are watching on your TV with simple operation Press and hold RECORD and press PLAY on the remote control or press RECORD on the recorder Follow the procedure below to use this function TURN ON THE RECORDER 1 Press ACCESS MAIN MENU SCREEN 2 Press M...

Page 17: ...n the part of either the video recorder or the TV The picture may roll up and down This can be corrected using the V HOLD control found on some TVs This cannot be corrected if the TV does not have a V HOLD control The counter and tape remaining time readings will be incorrect During search still or frame by frame playback the picture will be distorted and there may be a loss of colour Depending on...

Page 18: ...eft To go forward press FF or turn the SHUTTLE ring to the right START PLAYBACK 4 Press PLAY The VHS or DV play indicator lights BEST appears blinking in the recorder s display panel during automatic tracking VHS deck only pg 32 STOP PLAYBACK 5 Press STOP The VHS or DV play indicator goes off Then press EJECT on the VHS or DV deck to remove the cassette 1 2 3 4 5 6 7 8 9 1 2 1 2 3 0 3 4 4 S T O P ...

Page 19: ...layback press PLAY ATTENTION VHS Deck Only Picture may not appear during high speed search with an LP EP recorded tape In the high speed search still slow motion or frame by frame playback mode the picture will be distorted and there will be a loss of colour Noise may appear or the picture may appear distorted with an EP recorded tape during still slow motion frame by frame playback or variable sp...

Page 20: ...to the left for reverse variable speed search refer to the illustration on page 19 OR During playback press or The more times you press the faster the playback picture moves To decrease speed press the button for the opposite direction To resume normal playback press PLAY PLAYBACK cont SKIP OVER UNWANTED SECTIONS 1 During playback press 30 SEC 1 to 4 times Each press initiates a 30 second period o...

Page 21: ...ion Memory does not work if the Auto Timer is set to ON If the Auto Timer is set to ON the recorder directly goes into the Timer Standby mode at the same time when the button is pressed for the Automatic Power Off Instant ReView VHS Deck Only Simply by pressing a single button the recorder power comes on rewinds and begins playback of the last timer recorded programme If you have several programme...

Page 22: ...elease The Play indicator on the display panel blinks slowly The tape plays 100 times automatically and then stops STOP PLAYBACK 3 Press STOP at any time to stop playback NOTES Pressing PLAY REW FF or PAUSE also stops Repeat Playback Repeat playback is not possible with a cassette recorded in EP mode PLAYBACK cont Video Stabilizer VHS Deck Only You can automatically correct vertical vibrations in ...

Page 23: ...ress MENU ACCESS VHS MODE SET SCREEN 2 Move the highlight bar pointer to VHS MODE SET by pressing fi then press OK or SELECT DIGITAL TBC NR SET MODE 3 Move the highlight bar pointer to DIGITAL TBC NR by pressing fi then press OK or to set to ON RETURN TO NORMAL SCREEN 4 Press MENU Digital 3R VHS Deck Only Digital 3R picture system applies edge correction to the luminance signal to enhance detail ACC...

Page 24: ...der Tape Position Indicator VHS Deck The tape position indicator appears on screen when from the Stop mode you press FF REW or perform an Index Search The position of 5 in relation to 0 beginning or end shows you where you are on the tape O S D pg 11 must be set to ON or the indicator will not appear NOTE Depending on the type of tape used there may be times when the indication is not correct 3 1 ...

Page 25: ...OUND1 SOUND2 or FULL SOUND 4 Press MENU to return to the normal screen 12BIT MODE SOUND YOU HEAR SOUND1 Original recorded sound SOUND2 Audio dubbed sound FULL SOUND Original recorded sound and Audio dubbed sound DV MODE SET SOUND MODE 12BIT 12BIT MODE SOUND1 AUDIO REC NICAM 5 MENU EXIT Sound Mode Selection DV Deck 1 Press MENU to access the Main Menu screen 2 Move the highlight bar pointer to DV M...

Page 26: ...to MESECAM pg 17 START RECORDING 5 Press and hold RECORD and press PLAY on the remote control or press RECORD on the recorder The VHS record indicator lights PAUSE RESUME RECORDING 6 Press PAUSE Press PLAY to resume recording STOP RECORDING 7 Press STOP The VHS record indicator goes off Then press EJECT on the VHS deck to remove the cassette B E S T takes place at the beginning of both the first S...

Page 27: ...k to remove the cassette If DIRECT REC is set to ON the programme that appears on the TV screen will be recorded pg 16 1 2 3 4 5 6 7 8 9 1 2 1 2 3 0 3 4 4 P L A Y NUMBER RECORD SP LP EP PAUSE S T O P DV PR DV record indicator DV S T O P RECORD EJECT P L A Y PAUSE P R NOTES It is not possible to record a TV programme on both the VHS deck and the DV deck simultaneously In addition it is not possible...

Page 28: ...finished START RECORDING 1 Press RECORD on the recorder ENGAGE ITR MODE 2 Press RECORD again blinks and 0 30 appears on the front display panel SET RECORDING DURATION 3 If you want to record for more than 30 minutes press RECORD to extend the time Each press extends recording time by 30 minutes NOTES You can only perform ITR using the RECORD button on the recorder s front panel You can play a tape...

Page 29: ...HS ET S VHS ET and VHS VHS Deck Only Your recorder can record in S VHS Super VHS S VHS ET or VHS To record in S VHS Perform the steps 1 4 below to set S VHS to ON Then insert a cassette marked S VHS The S VHS indicator lights up on the front display panel The S VHS recording mode is selected To record in S VHS ET on a VHS cassette See Super VHS ET S VHS ET on page 30 To record in VHS Insert a cass...

Page 30: ... S VHS cassettes with recordings in LP EP mode To keep the highest quality recording and playback pictures over a long period of time S VHS recording on S VHS cassettes is recommended Use of high grade tapes is essential for S VHS ET recordings On some tapes picture quality will not improve even if the S VHS ET function is used Check the recording quality before you start important recordings You ...

Page 31: ...e quality of stereo sound being received is poor the broadcast will be received in monaural with better quality Before playing back a programme recorded in stereo or a bilingual programme refer to Soundtrack Selection pg 24 25 To listen to a stereo programme press AUDIO until HIFI L R appears on the screen To listen to a bilingual programme press AUDIO until HIFI L or HIFI R appears on the screen ...

Page 32: ...ACCESS VHS MODE SET SCREEN 3 Press fi to move the highlight bar pointer to VHS MODE SET then press OK or SELECT B E S T MODE 4 Press fi to move the highlight bar pointer to B E S T then press OK or to set to ON or OFF RETURN TO NORMAL SCREEN 5 Press MENU 1 2 3 4 5 6 7 8 9 1 2 1 2 3 0 3 4 4 OK MENU P L A Y PAUSE RECORD RECORDING cont MAIN MENU MODE SET VHS MODE SET DV MODE SET AUTO CH SET MANUAL CH S...

Page 33: ... Auto Tracking BEST appears blinking on the recorder s display panel NOTES When watching a tape recorded with B E S T set to ON it is recommended that you leave B E S T on during playback as well When watching a rental tape or one recorded on another video recorder or when using this recorder as the player for editing set B E S T to your preference by performing steps 1 through 5 on page 32 BEST o...

Page 34: ...ab in place or a Mini DV cassette with the erase protection switch set to REC Turn on the TV and select the AV mode With the SHOWVIEW system timer programming is greatly simplified because each TV programme has a corresponding code number which your recorder is able to recognize Perform step 1 in the left column TIMER RECORDING SHOWVIEW 0 9 SHOWVIEW EXPRESS PROGRAMING PROG EXIT SHOWVIEW 1 2 3 4 5 ...

Page 35: ...der is being used as the player for tape dubbing the warning screen is recorded on the tape in the other video recorder The warning blinks for the entire 5 minutes leading up to the start of timer recording To clear the display press WARNING TIMER RECORDING TO START SOON ATTENTION Regarding Guide Program Number Set GUIDE PROG SET appears after performing step 3 if the Guide Program number for the ...

Page 36: ...Press STOP to enter the time you want recording to stop Press and hold STOP to move in 30 minute increments or press and release repeatedly to move 1 minute at a time ENTER PROGRAMME DATE 5 Press DATE The current date appears on screen The date you enter appears in its place SP SP VHS P1 START STOP SP VPS PDC OFF DATE TV PROG 0 SAT PROG EXIT VHS P1 START STOP 21 00 SP VPS PDC OFF DATE TV PROG 0 SA...

Page 37: ...d the extra programme you must first cancel any unnecessary programmes pg 38 VPS PDC Recording Now available from some TV stations PDC Programme Delivery Control and VPS Video Programme System are service designed to assure safe accurate timer recording With this system special code signals are transmitted together with the audio video signals These code signals control your video recorder and hav...

Page 38: ...rogramme To replace a programme press the appropriate button START STOP DATE PR VPS PDC SP LP EP RETURN TO NORMAL SCREEN DISPLAY 5 Press as many times as necessary If there are still some programmes remaining go on to step 6 RETURN TO TIMER MODE 6 Press TIMER NOTE You can also check the programmes on the display panel even if the recorder s power is off unless the recorder is in the Power Save mod...

Page 39: ... and or SP LP EP when the Program screen on which you want to make changes is shown then press OK PROGRAM COMPLETED appears on the TV screen for about 5 seconds then normal screen appears NOTE If the overlap is not yet solved or another overlap occurs with the timer programme setting after making the last correction on a programme the conflicting programmes will be shown on the Program Check scree...

Page 40: ... then press OK or SELECT MODE 3 Press fi to move the highlight bar pointer to AUTO TIMER then press OK or to select either ON or OFF RETURN TO NORMAL SCREEN 4 Press MENU NOTE For safety when Auto timer is set to OFF all other recorder functions are disabled while the Timer mode is engaged To disengage the timer press TIMER MAIN MENU MODE SET VHS MODE SET DV MODE SET AUTO CH SET MANUAL CH SET OUTPUT...

Page 41: ...ot available during ITR Instant Timer Recording and the feature will not work properly with any tapes longer than E 180 or with some tapes of shorter lengths If you perform timer recording with both VPS PDC and the Auto SP LP Timer activated and the programme goes beyond its originally scheduled length there may be times when the programme cannot be recorded in its entirety Total 210 minutes Appro...

Page 42: ...DE 2 Press the NUMBER key 1 for A 2 for B 3 for C or 4 for D SET REMOTE CONTROL S CODE 3 Press OK to set the code SPECIAL FEATURES Remote Control Functions 1 2 3 4 5 6 7 8 9 1 2 1 2 3 0 3 4 4 VHS DV NUMBER 3 N U M B E R 2 NUMBER 4 NUMBER 1 OK On Recorder DISPLAY CODE 1 Press PLAY on the recorder over 5 seconds while the recorder is turned off The code currently set appears on the front display pan...

Page 43: ...NYO 16 SHARP 06 SONY 07 TCL 41 THOMSON 26 TOSHIBA 14 SET TV BRAND CODE 1 Press TV CABLE SAT to switch the display to TV and keep pressing the button down until TV _ _ appears Enter your TV s brand code using the NUMBER keys then press OK Refer to the chart below Press on the recorder s remote control to turn on the TV and try operations 墌 step 2 Once you have set the remote control to operate the ...

Page 44: ...r have more than one code If the satellite receiver does not function with one code try entering another OPERATE SATELLITE RECEIVER 2 First press TV CABLE SAT to switch the display to CABLE SAT Then press the corresponding button TV PR NUMBER keys For some brands of satellite receiver you must press after having pressed the NUMBER keys The NUMBER keys may not function with some satellite receivers...

Page 45: ...u select EDIT to dub tapes be sure to select AUTO after you finish dubbing the tapes RETURN TO NORMAL SCREEN 4 Press MENU NOTES When B E S T is OFF PICTURE CONTROL switches automatically from AUTO to NORM Select EDIT when you are dubbing tapes Refer to page 52 Advantages Of S VHS Video Recorders You can edit from VHS to S VHS S VHS to VHS or from S VHS to S VHS From VHS to S VHS Record VHS playbac...

Page 46: ... indicator light If the tapes have not been rewound both decks rewind automatically The recording deck goes into Record Pause mode and the playback deck goes into Pause mode When both decks have finished rewinding dubbing begins automatically After dubbing is completed the decks rewind both tapes automatically and eject them The recorder then shuts off NOTES If you set the dubbing direction incorr...

Page 47: ...ecording deck Press and hold PAUSE and press RECORD so that the recording deck enters the Record Pause mode START DUBBING 5 Press START Dubbing from DV to VHS DV play indicator and VHS record indicator light Dubbing from VHS to DV VHS play indicator and DV record indicator light PAUSE DUBBING 6 Press START END DUBBING 7 Press STOP Then press VHS or DV to select the playing deck and press STOP Norm...

Page 48: ... R A EDIT R A EDIT screen will appear SELECT PROGRAMME 4 Press fi to move the highlight bar pointer to the programme number you want to edit then press OK or To remove a programme from the R A EDIT screen select the programme number then press for more than 2 seconds LOCATE EDIT IN POINT 5 Press PLAY to start playback and find the point from where you want the edited scene to begin then press PAUSE...

Page 49: ...S When Random Assemble Editing doesn t work press of the DUB button then perform Random Assemble Editing again To cancel the registered scene press Each time is pressed the latest registered scene is erased When the source tape has more than 2 identical time codes 墌 pg 24 the recorder may not find the edit in point you chose and a malfunction may occur When choosing a scene set edit in and edit ou...

Page 50: ... on your recorder When a Master Edit Control equipped JVC camcorder is used the camcorder is capable of controlling the recorder Refer to the camcorder s instruction manual for operating procedure SELECT RECORDING DECK 2 Press VHS or DV SET RECORDER S INPUT MODE 3 Press PR on the recorder to select F 1 When using the VHS deck as the recording deck set VHS F 1 INPUT to VIDEO for the AUDIO VIDEO inp...

Page 51: ...not provided JVC camcorder only S VIDEO OUT EDIT Camcorder S VIDEO input Recorder PAUSE connector AUDIO OUT Audio Cable not provided Player B If the camcorder has an S VIDEO output connector AUDIO input S Video Cable not provided Audio Cable not provided Mini Plug Cable not provided JVC camcorder only EDIT DV Camcorder Recorder PAUSE connector DV OUT IN DV Cable not provided Player C If the camcor...

Page 52: ...our recorder as the recording deck set L 1 INPUT to S VIDEO and L 2 SELECT to A V 墌 pg 58 When using your recorder as the source player set L 1 OUTPUT to S VIDEO 墌 pg 58 SELECT DECK 2 Press VHS or DV When using your recorder as the source player set S VHS AUDIO OUT to VHS or DV depending on the deck being selected 墌 pg 59 SET RECORDING DECK S INPUT MODE 3 Set to AUX With this video recorder press ...

Page 53: ...u are using another recorder with S Video and Audio input output connectors you can connect those connectors to this recorder s S VIDEO and AUDIO input output connectors When Using Your Video Recorder As The Source Player connect its rear panel S OUT and AUDIO output connectors to the recording deck s S Video and Audio input connectors When Using Your Video Recorder As The Recording Deck connect i...

Page 54: ...UT Audio mixer MAKE CONNECTIONS 1 Connect an audio component to the AUDIO L R connectors on the recorder s front panel When connecting monaural equipment use only the recorder s AUDIO L connector SELECT RECORDING DECK 2 Press VHS or DV When using the DV deck as the recording deck press so that the audio signals from the AUDIO L R input connectors can be recorded The dubbing direction VHS indicator...

Page 55: ...墌 pg 24 When playing back an audio dubbed Mini DV tape on the DV deck set 12BIT MODE to SOUND2 墌 pg 25 Audio dubbing is not possible using the DV IN OUT connector 1 2 3 4 5 6 7 8 9 1 2 1 2 3 0 3 4 4 PLAY PAUSE S T O P AUDIO ENGAGE AUDIO DUBBING 5 Press A DUB Your recorder enters the Audio Dubbing Pause mode blinks and light up on the front display panel To perform audio dubbing with audio mixing p...

Page 56: ...press so that the video and audio signals from the VIDEO S VIDEO and AUDIO L R input connectors can be recorded The dubbing direction VHS indicator lights SET RECORDER S INPUT MODE 3 Press NUMBER key 0 and or PR to select F 1 When using the VHS deck as the recording deck set VHS F 1 INPUT to VIDEO for the AUDIO VIDEO input connectors or S VIDEO for the AUDIO S VIDEO input connectors depending on t...

Page 57: ...t point the end of the segment to be replaced using the SHUTTLE ring or the JOG dial or pressing and PAUSE RESET THE COUNTER VHS DECK ONLY 5 Press 0000 to change the counter display to 0 00 00 LOCATE START POINT 6 Determine the edit in point the beginning of the segment to be replaced using the SHUTTLE ring or the JOG dial or pressing and PAUSE Be sure to engage the Still mode at the edit in point...

Page 58: ...ssible to set L 2 SELECT to DECODER L 1 OUTPUT INPUT Setting The AV1 L 1 IN OUT connector accepts and delivers either a composite signal regular video signal or a Y C signal a signal in which the luminance and chrominance signals are separated Set L 1 OUTPUT and L 1 INPUT to the appropriate mode depending on the type of appliance connected to the recorder s AV1 L 1 IN OUT connector 1 Press MENU to...

Page 59: ...e Y C signal 5 Press MENU to return to normal screen S VHS AUDIO OUT Setting Set S VHS AUDIO OUT to the appropriate mode depending on the selection of the playing deck VHS or DV for editing 1 Press MENU to access the Main Menu screen 2 Press fi to move the highlight bar pointer to MODE SET then press OK or 3 Press fi to move the highlight bar pointer to S VHS AUDIO OUT 4 Press OK or to select AUTO V...

Page 60: ...the satellite receiver Mains outlet TV Aerial cable Aerial connector Satellite Receiver Unit Satellite Cable Outdoor Unit Aerial Back of TV 21 pin AV input connector SCART ANT OUT ANT IN Back of Recorder IMPORTANT When you set L 2 SELECT to SAT 墌 pg 58 it is possible to view a satellite broadcast with the TV set to its AV mode even if the recorder is in Timer mode in Stop mode recording or turned ...

Page 61: ...or and AV2 L 2 IN DECODER connector to the satellite receiver s connector Then connect the satellite receiver and TV Mains outlet TV Aerial cable Aerial connector Satellite Receiver Unit Satellite Cable Outdoor Unit Aerial Back of TV 21 pin AV input connector SCART ANT OUT ANT IN Back of Recorder Decoder NOTES Set L 2 SELECT to A V 墌 pg 58 To record a programme via the satellite receiver select L ...

Page 62: ...hrough scrambled channels SELECT INPUT MODE 1 Set L 2 SELECT to DECODER 墌 pg 58 CONNECT DECODER 2 Connect your recorder s AV2 L 2 IN DECODER connector to the decoder s Euroconnector using a 21 pin SCART cable SET TUNER 3 Perform the procedure as described in When Receiving A Scrambled Broadcast on page 71 Connecting Using A Decoder TV Receiver TV Aerial Cable RF Cable provided AV1 L 1 IN OUT Decod...

Page 63: ...eiver or amplifier NOTES When connecting your recorder s audio output connectors to a stereo amplifier make sure you connect L and R correctly If stereo or bilingual TV broadcasts are receivable in your area this recorder can record them independently of the TV set and play them back through the connected stereo system When listening to sound through the connected stereo system turn the TV s volum...

Page 64: ...eo titler PREPARE RECORDING DECK 3 Insert a cassette for recording and press DV or VHS for the recording deck To set recording deck s input mode press NUMBER key 0 and or PR to select L 2 Set L 2 SELECT to A V 墌 pg 58 LOCATE START POINT 4 Press DV or VHS for the playing deck Press PLAY to start playback and find the beginning of the scene you want to edit then press PAUSE PREPARE VIDEO TITLER 5 Pr...

Page 65: ...ion manual If the playing deck is left in the Pause mode it will automati cally goes into Stop mode for the protection of the video tape and the video head The duration of the Pause mode is 3 minutes for the DV deck and 5 minutes for the VHS deck If the recording deck is left in the Record Pause mode it will automatically goes into Stop mode for the protection of the video tape and the video head ...

Page 66: ...ctor to the recorder s DV IN OUT connector SELECT DECK 2 Press DV When you use the VHS deck Press beside the DUB button The dubbing direction VHS indicator lights START PLAYBACK 3 Press PLAY The image being displayed on the TV screen is output to the digital printer Any on screen displays are not output PLAY DV DV IN OUT To DV IN connector Your recorder Digital printer DV cable not provided 1 2 3 ...

Page 67: ...light bar pointer to GUIDE PROG SET then press OK or ENTER GUIDE PROG NUMBER 4 Press fi to enter the Guide Program number for the desired station as shown in the TV listings Then press OK or Ex When inputting the Guide Program number 2 for ZDF ENTER RECEIVING CHANNEL POSITION NUMBER 5 Press the NUMBER key 0 to select TV PROG or SAT Then press fi to input the number of the preset position on which th...

Page 68: ...ns in your area to call them up by using the PR buttons without going through any vacant channel TURN ON THE RECORDER 1 Press ACCESS MAIN MENU SCREEN 2 Press MENU ACCESS AUTO CH SET SCREEN 3 Press fi to move the highlight bar pointer to AUTO CH SET then press OK or SELECT COUNTRY 4 Press fi to move the highlight bar pointer to your country s name then press OK or SELECT LANGUAGE 5 Press fi to move th...

Page 69: ...ion names may not be stored correctly and auto Guide Program Number Set may not work properly If the Guide Program numbers are not set properly when you timer record a TV programme using the SHOWVIEW system the recorder will record a TV programme of a different station When programming the timer using the SHOWVIEW system be sure to check whether the channel position on which your recorder receives...

Page 70: ...et to A V or SAT the DECODER setting cannot be changed pg 58 ENTER NEW CHANNEL INFORMATION 6 Press OK and the Confirmation screen appears Repeat steps 3 through 6 as necessary CLOSE CONFIRMATION SCREEN 7 Press MENU To change positions see Change Station Channel Position pg 71 If you wish to set station names other than the ones registered in your recorder Set Stations B on page 73 The blueback scr...

Page 71: ...ually on page 70 SELECT POSITION 3 Press fi to select the channel position broadcast ing scrambled programmes then press OK twice CHANGE DECODER SETTING 4 Press until OFF decoder setting begins blinking and set it to ON by pressing fi RETURN TO CONFIRMATION SCREEN 5 Press OK Repeat steps 3 through 5 as necessary CLOSE CONFIRMATION SCREEN 6 Press MENU When Receiving A Scrambled Broadcast PR CH ID PR ...

Page 72: ...til the station name ID begins blinking then press fi until the new station s name ID you want to store begins blinking Registered station names pg 74 appear as you press fi SWITCH STATIONS 4 Press OK The Confirmation screen appears Repeat steps 1 through 4 as necessary CLOSE CONFIRMATION SCREEN 5 Press MENU Set Stations A Set station names that are registered in your recorder PR CH ID FINE DECODER ...

Page 73: ...take press until the incorrect character begins blinking Then enter the correct character by pressing fi CLOSE CONFIRMATION SCREEN 3 Press MENU Set Stations B Perform steps 1 and 2 of Storing Channels Manually on page 70 to access the Confirmation screen and then perform step 1 and 2 of Set Stations A on page 72 before continu ing Set station names other than the ones registered in your recorder PR...

Page 74: ...K NRK NRK2 NRK2 ODE ODEON ORF1 ORF1 ID STATION NAME ORF2 ORF2 ORF3 ORF3 OWL3 OWL3 PREM PREMIERE PRO7 PRO7 RAI1 RAI1 RAI2 RAI2 RAI3 RAI3 RET4 RETE4 21 TELE21 RTBF RTBF1 or 2 RTL RTL RTL2 RTL2 RTL4 RTL4 RTL5 RTL5 RTP RTP S4 SCHWEIZ4 SAT1 SAT1 SBS SBS SHOW SHOW SIC SOCIEDADE SKY SKY CHANNEL SKYN SKY NEWS SPRT SPORT SRTL SUPER RTL STAR STAR TV SVT1 SVT1 SVT2 SVT2 SWR SUEDWEST3 TCC TCC TELE TELE TEL5 T...

Page 75: ...gins blinking ACCESS MANUAL CHANNEL SET SCREEN 2 Press OK twice The Manual Channel Set screen appears PERFORM TUNING 3 Press until begins blinking then press fi until the picture is its clearest Then press OK The Confirmation screen appears Repeat steps 1 through 3 as necessary CLOSE CONFIRMATION SCREEN 4 Press MENU Fine Tuning Channels Already Stored 1 2 3 4 5 6 7 8 9 1 2 1 2 3 0 3 4 4 OK MENU ...

Page 76: ...n appears NOTE When you have selected MAGYARORSZÁG 36 ESKÁ REPUBLIKA 42 POLSKA 48 or OTHER EASTERN EUROPE EE for the country setting pg 6 10 you cannot use Just Clock function Skip steps 6 and 7 on page 77 SET DATE AND TIME 5 Press fi to set the time then press OK or The date display begins blinking Repeat the same procedure to set the date and year When you set the time press and hold fi to change ...

Page 77: ...Time Just Clock may not function properly depending on the reception condition SET JUST CLOCK 6 The default setting is OFF Set as desired by pressing fi then press OK or For the Just clock function Just Clock on page 76 If you set to OFF you can disregard the next step as you won t be able to receive regular clock adjustments SET CLOCK DATA SOURCE CHANNEL POSITION 7 The recorder is preset to receiv...

Page 78: ...ged The video heads may be dirty Automatic tracking is engaged CORRECTIVE ACTION Set the TV to its AV mode Try manual tracking pg 21 Use a dry cleaning cassette TCL 2UX for the VHS deck M DV12CLAU for the DV deck or consult your JVC dealer Engage and adjust tracking manually pg 21 POSSIBLE CAUSE is displayed on the display panel The tape is already fully rewound or fast forwarded POWER PLAYBACK TA...

Page 79: ...USE The clock and or the timer have been set incorrectly The timer is not engaged Timer Recording may not work when the recorder s input mode is set to F 1 for recording on the DV deck because the recorder is waiting for the signals through DV IN OUT i Link connector Timer recording is in progress The timer is engaged but there s no cassette loaded VHS deck The loaded cassette has had its Record S...

Page 80: ...TOM 1 Whistling or howling is heard from the TV during camcorder record ing 2 When scanning channels some of them are skipped over 3 The channel cannot be changed 4 Channel settings that were made manually seem to have changed or disappeared 5 No channels are stored in the recorder s memory 6 The remote control won t operate the TV or satellite receiver 7 No picture appears when you connect an app...

Page 81: ...distortion at the pause and resume points Q Can the video recorder indefinitely remain in the Record Pause mode A No The video recorder goes to its Stop mode automatically after 5 minutes VHS deck or 3 minutes DV deck to protect the heads Q What happens if the tape runs out during recording A The video recorder automatically rewinds it to the beginning TIMER RECORDING Q and remain lit on the displ...

Page 82: ...Indicators pg 46 Dubbing DUB Button pg 46 Dubbing Direction Buttons pg 46 INSERT Button pg 57 PR Buttons pg 26 Audio Dubbing A DUB Button pg 55 DV Play Indicator pg 18 DV Record Indicator pg 27 q Display Panel pg 83 w VHS Play Indicator pg 18 VHS Record Indicator pg 26 e R A EDIT Button pg 48 r IN OUT Button pg 48 t START Button pg 47 49 y JOG Dial pg 19 u SHUTTLE Ring pg 18 i S VIDEO VIDEO AUDIO ...

Page 83: ...pe Remaining Time Indicator pg 29 7 Channel Clock Display pg 9 8 Instant REVIEW Indicator pg 21 9 VPS PDC Indicator pg 35 37 0 S VHS Indicator pg 29 VCR Indicator pg 60 Cassette Loaded Mark Counter Remain Display Mode Display L 1 L 2 F 1 or SAT STILL SLOW RECORD RECORD PAUSE PLAY FF REW VARIABLE SEARCH AUDIO DUBBING AUDIO DUBBING PAUSE INSERT INSERT PAUSE AV INSERT AV INSERT PAUSE S OUT SORTIE DV ...

Page 84: ... VCR Button pg 43 e REVIEW Button pg 21 r Transmit Button pg 34 t WEEKLY Button pg 35 37 y Button pg 35 37 u AUX Button pg 52 i MENU Button pg 10 o Auto Tracking Button pg 21 SP LP EP Button pg 26 27 p OK Button pg 7 Q 30 SEC Button pg 20 W PR Button pg 26 27 E DATE Button pg 36 R Fast Forward FF Button pg 18 T PAUSE Button pg 19 Y Button pg 19 TV Button pg 43 INDEX cont Buttons with a small dot o...

Page 85: ...s which of these VIDEO TV or CABLE SAT the remote control can currently operate When you first purchase the remote control or after you have just replaced the batteries VIDEO A A code is selected 1 To operate your video recorder first press VHS or DV To switch remote control s A B C D code refer to page 42 2 To operate your TV first press TV CABLE SAT until TV appears on the LCD pg 43 3 To operate...

Page 86: ...ange 70 Hz to 10 000 Hz Normal audio 20 Hz to 20 000 Hz Hi Fi audio Maximum recording time SP 240 min with E 240 video cassette LP 480 min with E 240 video cassette EP 720 min with E 240 video cassette DV DECK VIDEO AUDIO Signal system PAL type colour signal 625 lines 50 fields Recording system Digital Component Recording Format DV format SD mode Cassette Mini DV Cassette Maximum recording time SP...

Page 87: ...MEMO ...

Page 88: ...UTSCH 02 SVENSKA 07 FRANCAIS 03 NORSK 08 ITALIANO 04 SUOMI 09 CASTELLANO 05 DANSK 10 Language Code Ex FRANCAIS is selected for BELGIUM International Telephone Country Code 3 Press OK remote Auto appears on the display panel 4 Press OK remote to start Auto Set Up Do NOT press any button on the video recorder or remote control during Auto is blinking When you have connected the video recorder to a T...

Reviews: