background image

Playback Menu (Video)

You can delete or look for specific videos.

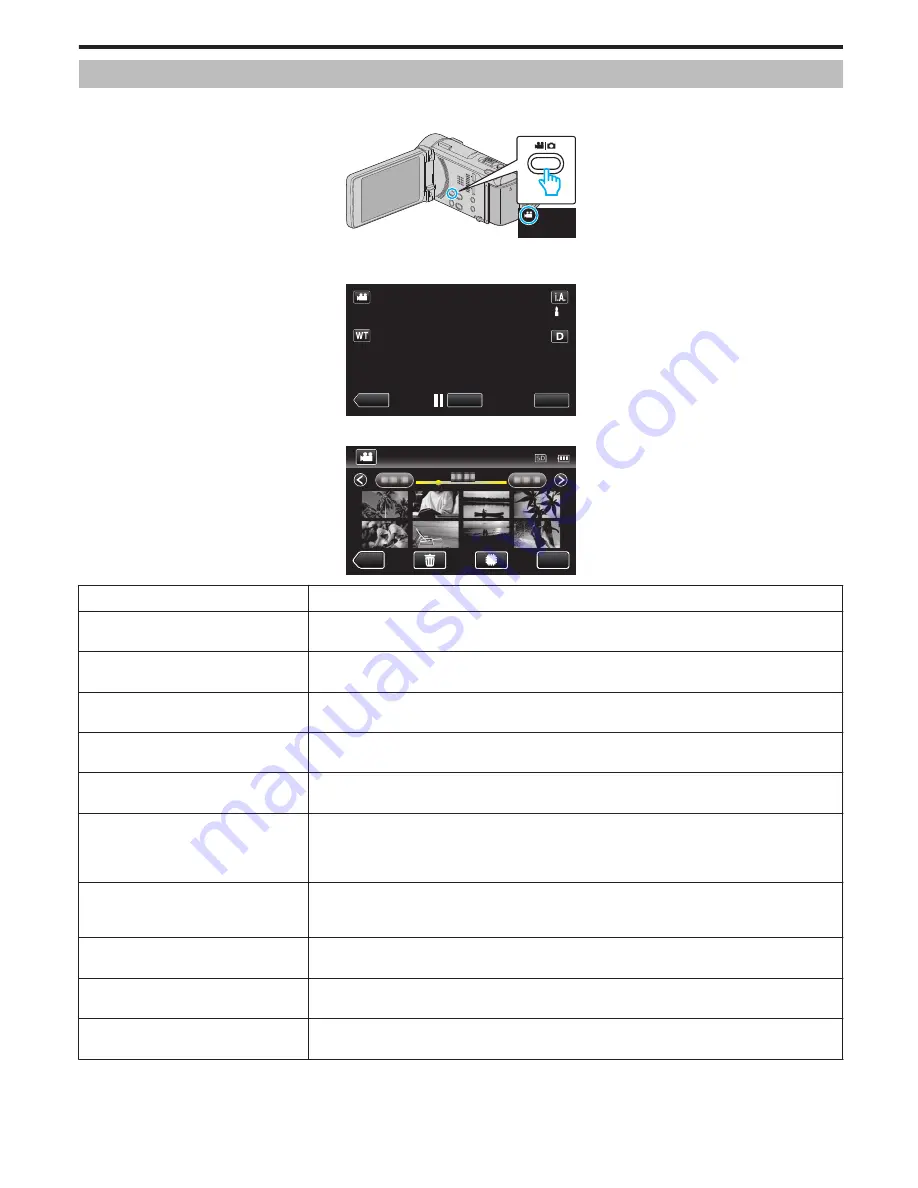
1

Open the LCD monitor.

.

0

Check if the recording mode is 

A

.

2

Tap “<<PLAY” to select the playback mode.

.

PLAY

REC

MENU

3

Tap “MENU”.

.


REC

MENU

Setting

Details

FILE INFORMATION

You can display the recording date and duration of the selected file.

“Checking the Recording Date and Other Information” (

A

 p. 122)

SEARCH DATE

You can search and play videos or still images according to recording dates.

“Searching for a Specific Video/Still Image by Date” (

A

 p. 126)

DISPLAY DATE/TIME

Displays the recording date and time during video playback.

“ DISPLAY DATE/TIME ” (

A

 p. 199)

DIGEST PLAYBACK

Plays back a digest of the recorded videos.

“Checking the Content of Videos Quickly (Digest Playback)” (

A

 p. 122)

PLAYBACK PLAYLIST

Plays back the playlists that you have created.

“Playing Back Playlists” (

A

 p. 128)

EDIT PLAYLIST

Creates or edits a playlist.

“Creating Playlists with Selected Files” (

A

 p. 137)

“Creating Playlists by Date” (

A

 p. 138)

“Editing Playlists” (

A

 p. 139)

PROTECT/CANCEL

Protects files from being deleted accidently.

“Protecting/Releasing Protection of the Currently Displayed File” (

A

 p. 131)

“Protecting/Releasing Protection of Selected Files” (

A

 p. 132)

COPY

Copies files from the built-in memory to the SD card.

“Copying Files to an SD Card” (

A

 p. 162)

MOVE

Moves files from the built-in memory to the SD card.

“Moving Files to an SD Card” (

A

 p. 163)

TRIMMING

Select the required part of a video and save it as a new video file.

“Capturing a Required Part in the Video (TRIMMING)” (

A

 p. 134)

Menu Settings

197

Summary of Contents for GZ-GX3

Page 1: ...CAMCORDER LYT2473 021A Detailed User Guide GZ GX3 GZ GX8 ...

Page 2: ... 70 Holding this Unit 71 Tripod Mounting 71 Using the Remote Control 71 Attaching Headphones 72 Attaching an External Microphone 73 Using this Unit Overseas 73 Charging the Battery Pack Overseas 73 Setting the Clock to Local Time when Traveling 74 Setting Daylight Saving Time 74 Optional Accessories 75 Recording Taking Videos in Auto Mode 76 Zooming 79 Capturing Still Images During Video Recording...

Page 3: ...9 Backing Up Files Without Using Provided Software 171 List of Files and Folders 172 Copying to Mac Computer 173 Menu Settings Operating the Menu 174 Operating the Shortcut Menu 174 Operating the Main Menu 175 Operating the Common Menu 175 Recording Menu Video 176 INFO 179 SCENE SELECT 180 FOCUS 180 BRIGHTNESS ADJUST 180 SHUTTER SPEED 180 APERTURE PRIORITY 180 WHITE BALANCE 180 BACKLIGHT COMP 180 ...

Page 4: ...RD 214 ERASE ALL DATA 214 OPEN SOURCE LICENSES 214 Names of Parts Front 215 Rear 215 Bottom 216 Interior 216 LCD Monitor 217 Indications on the LCD monitor Common Recording Indications 218 Video Recording 218 Still Image Recording 219 Video Playback 219 Still Image Playback 220 Troubleshooting When the unit is not working properly 220 Battery Pack 221 Recording 221 Card 222 Playback 222 Editing Co...

Page 5: ...o achieve stable images 0 Set to the wide angle as much as possible as the image will be prone to camera shake 0 Be considerate Do not inconvenience the people around you Squatting and Shooting at Eye Level Staying low is a common position to take when shooting small children By recording from the eye level of the child you can capture all his cute expressions clearly o Getting Ready A Kneel down ...

Page 6: ...ion No Derivative Works 3 0 Record the scenes as everyone helps to prepare the feast of the night You can film the mother who is cooking the children who are helping and of course the process of making a cake Recording the Christmas Party Photo by InnerSpirit Creative Commons Attribution No Derivative Works 3 0 After all preparations it is finally the Christmas party itself Not only should you rec...

Page 7: ...es so as to capture the scene well when the bride and groom enter again You can also make use the time while the bride and groom are changing to record comments of well wishes from the guests Finding the Right Angle to Capture Both Bride and Groom o Composing the picture with the groom in front and the guests at the back The main characters of a wedding are of course the bride and groom Record the...

Page 8: ...r you have to think about what to bring in accordance to the local conditions Here are some suggestions for your consideration o Camcorder Think about how many hours of shooting you will usually perform in a day Be sure to prepare enough recording medium especially for long overseas trips If you are recording in SD cards get ready the sufficient number of cards including some for backup o Battery ...

Page 9: ...when everyone is gathered at the meeting place if you are traveling with your friends For overseas trips taking a shot of the signs and displays at the airport of the flight you are taking may be useful for future reference Using Pan at the Places of Interest Tourists spots with beautiful scenery or historical sites are places that you would certainly want to record To capture the magnificence of ...

Page 10: ...arousal ferris wheel fun bicycle rides etc Inducing Responses by Calling Out Videos with no waving of hands nor laughter are not only dull when you view them later but also put the capability of the audio recording function of the camcorder to a waste When recording induce more reactions by enthusiastically waving your hands or shouting out Is it fun and the like Capturing the Best Moment in a Vid...

Page 11: ... of this unit automatically increases its brightness for recording If Intelligent Auto fails to function as expected or if the brightness correction is insufficient you can increase the brightness by using backlight compensation in the Manual mode Setting Details A p 91 o Without backlight compensation o With backlight compensation Useful Shooting Techniques 11 ...

Page 12: ...rmed while monitoring Image Monitoring via an Access Point at Home OUTSIDE MONITORING A p 18 0 You can check the image on the camera via internet connection with a smartphone or computer while you are outside Recording of videos and still images may be performed while monitoring Image Monitoring via the Internet OUTSIDE MONITORING A p 20 Notification Mail 0 A still image is automatically captured ...

Page 13: ...h as interception of transmission or illegal access may arise if security settings are not configured Before you connect to the network in a wireless LAN environment read through the instruction manual for the wireless LAN device in use and configure the security settings accordingly Failure to do so may increase the risk of personal information being intercepted such as user names passwords and t...

Page 14: ...ntinuous usage 0 When not monitoring from a smartphone or computer the focus of the camera is fixed 0 Recording stops when the smartphone or computer is disconnected 0 Even when monitoring from a smartphone or computer the focus of the camera will be fixed if not operated for more than 3 hours Focus works again when the camera is operated 0 You may have difficulty establishing a connection via dir...

Page 15: ...U Operation on this camera REC PLAY MENU 0 The shortcut menu appears 2 Tap DIRECT MONITORING S in the shortcut menu Operation on this camera MENU 3 Check the SSID and PASS shown on the camera s screen then add the smartphone or computer to connect Operation on the smartphone or computer WPS QUIT PASS SSID CONNECTING DIRECT MONITORING 0 For details on connecting your smartphone or computer to a Wi ...

Page 16: ... enable operations from the smartphone application 0 Using smartphone applications Using Smartphone Applications A p 44 0 To end operations tap STOP o Computer Windows 7 1 Tap CAMERA NETWORK INFO after setting direct monitoring Operation on this camera CONTROLLED BY REMOTE CURRENTLY BEING CAMERA NETWORK INFO CAMERA OPERATION QUIT DIRECT MONITORING 0 The URL for the computer to connect to appears 2...

Page 17: ...o the device o Wi Fi Protected Setup WPS 1 Tap MENU Operation on this camera REC PLAY MENU 0 The shortcut menu appears 2 Tap DIRECT MONITORING S in the shortcut menu Operation on this camera MENU 3 Tap WPS Operation on this camera WPS QUIT PASS SSID CONNECTING DIRECT MONITORING 4 Activate WPS on the smartphone within 2 minutes Operation on the smartphone 0 To activate WPS refer to the instruction ...

Page 18: ...r or crime prevention 0 To prevent the situation of forgetting to turn off the power this unit will turn off automatically after 10 days of continuous usage 0 When not monitoring from a smartphone or computer the focus of the camera is fixed 0 Recording stops when the smartphone or computer is disconnected 0 Even when monitoring from a smartphone or computer the focus of the camera will be fixed i...

Page 19: ...t Everio Sync on the smartphone 5 The smartphone starts to search for the camera automatically 0 If the camera cannot be found enter the URL LAN displayed in CAMERA NETWORK INFO directly To display CAMERA NETWORK INFO refer to Computer Windows 7 6 Log in with your username and password if authentication cannot be achieved 0 The username is everio and the default password is 0000 Changing the Setti...

Page 20: ...unit will turn off automatically after 10 days of continuous usage 0 When not monitoring from a smartphone or computer the focus of the camera is fixed 0 Recording stops when the smartphone or computer is disconnected 0 Even when monitoring from a smartphone or computer the focus of the camera will be fixed if not operated for more than 3 hours Focus works again when the camera is operated 0 To mo...

Page 21: ...S on this Camera OUT MONITORING SET A p 30 Caution 0 Even if registration is done correctly to the camera access may be temporarily unavailable such as when the dynamic DNS server is down To check whether the dynamic DNS server is working properly access and check the DDNS server with a computer etc Operation Method o Smartphone Android iPhone Memo 0 It is necessary to install the application on t...

Page 22: ... username and password if authentication cannot be achieved 0 The username is everio and the default password is 0000 Changing the Settings A p 28 0 Using smartphone applications Using Smartphone Applications A p 44 0 To end operations tap STOP Using Wi Fi 22 ...

Page 23: ...RL WAN for the computer to connect to appears Does not appear if DDNS is not set or set incorrectly 5 Check the URL WAN URL LAN http QUIT URL WAN http CAMERA NETWORK INFO 0 After checking the URL tap QUIT to return to the previous screen 6 Start Internet Explorer web browser on the computer and enter the URL 7 Log in with your username and password 0 The username is everio and the default password...

Page 24: ...sage limited may be exceeded Be sure to check the terms of the internet provider in advance to find out if there are any restrictions on the number or size of e mails that can be sent 0 When setting another person as the recipient be sure to obtain his her consent in advance 0 If you reply to the received e mail by using this unit the receiver can not check your replied e mail by using this unit C...

Page 25: ...ng of e mails Depending on the internet provider that provides the e mail service the e mails may be marked as spam or the usage limited may be exceeded Be sure to check the terms of the internet provider in advance to find out if there are any restrictions on the number or size of e mails that can be sent 0 When setting another person as the recipient be sure to obtain his her consent in advance ...

Page 26: ...ATTN Operation on this camera VIDEO MAIL ATTN Wi Fi 4 Tap the e mail address to be set as recipient Operation on this camera SET VIDEO MAIL ATTN 0 An icon a appears beside the recipient s e mail address 0 After setting tap SET 0 Settings will not be saved until SET is tapped Operation Method 1 Tap MENU Operation on this camera REC PLAY MENU 0 The shortcut menu appears 2 Tap VIDEO MAIL R in the sho...

Page 27: ...ccess Points to Connect ACCESS POINTS A p 36 0 Obtaining a dynamic DNS account Obtaining a Dynamic DNS DDNS Account A p 30 0 Setting the account on this camera Setting Dynamic DNS DDNS on this Camera OUT MONITORING SET A p 30 0 Setting the sender s e mail address Setting the Sender s E mail Address A p 31 0 Registering the recipient s e mail address Registering the Recipient s E mail Address A p 3...

Page 28: ...a ON Records videos on this camera Setting Self Recording on this Camera DETECT MAIL SETTING A p 36 NETWORK SETTINGS Configures various settings related to the network 0 ACCESS POINTS Adds deletes or perform LAN settings of access points wireless LAN router Registering the Access Points to Connect ACCESS POINTS A p 36 0 Wi Fi DIRECT SETTING Configures various settings related to direct monitoring ...

Page 29: ...aracter changes with every tap 0 Tap DELETE to delete a character 0 Tap CANCEL to exit 0 Tap A a 1 to select character input type from upper case letter lower case letter and number 0 Tap E or F to move one space to the left or right 0 After setting tap SET Setting the UPnP of this Camera OUT MONITORING SET Sets the UPnP of the camera 1 Tap MENU Operation on this camera REC PLAY MENU 0 The shortcu...

Page 30: ...will access the dynamic DNS server 5 Tap CAMERA NETWORK INFO to check that the URL WAN is displayed Registration complete Image Monitoring via the Internet OUTSIDE MONITORING A p 20 Caution 0 Registration will be canceled if you do not access the dynamic DNS server from the camera within 3 days Perform the registration again in this case 0 Registration will not be complete if the username and pass...

Page 31: ...ervice can be set on this camera Setting the Sender s E mail Address Sets the address to be used for sending e mails on the camera Memo 0 By using Gmail as the sender s mail address some of the settings can be omitted Use of Gmail is recommended for users who have a Gmail account 1 Tap MENU Operation on this camera REC PLAY MENU 0 The shortcut menu appears 2 Tap Wi Fi Q in the shortcut menu Operat...

Page 32: ...e SMTP port number if necessary and tap SET CANCEL SET DELETE SMTP PORT 0 This is automatically configured if the sender s mail address is Gmail 0 Tap on the on screen keyboard to enter characters The character changes with every tap 0 Tap DELETE to delete a character 0 Tap CANCEL to exit 0 Tap E or F to move one space to the left or right 0 After setting tap SET 8 Tap AUTHENTICATE METHOD not nece...

Page 33: ...ed SENDER S EMAIL Enter the sender s e mail address SMTP SERVER Enter the SMTP server address SMTP PORT Set this when the SMTP port number needs to be changed AUTHENTICATE METHOD Set this when the authentication method needs to be changed USERNAME Enter the username PASSWORD Enter the password Caution 0 It is necessary to obtain an e mail account in advance 0 Some web based mail addresses do not s...

Page 34: ...ETE to delete a character 0 Tap CANCEL to exit 0 Tap A a 1 to select character input type from upper case letter lower case letter and number 0 Tap E or F to move one space to the left or right 0 After setting tap SET Memo 0 Up to 8 e mail addresses can be registered as recipients Caution 0 When setting another person as the recipient be sure to obtain his her consent in advance 0 Check whether no...

Page 35: ...ETECTION to start recording upon detection of subject s movements 0 Select FACE DETECTION to start recording upon detection of human faces Setting the Detection Interval of this Camera DETECT MAIL SETTING Sets the time period to enable detection again after the previous one 1 Tap MENU Operation on this camera REC PLAY MENU 0 The shortcut menu appears 2 Tap Wi Fi Q in the shortcut menu Operation on...

Page 36: ...is the easiest way of registration Authentication method and wireless LAN setup are performed automatically in WPS allowing easy registration of connection settings between devices Search and Register A search is conducted to locate access points Select and register an access point from the list of search results Manual Registration Enter the name and authentication method manually to register an ...

Page 37: ...the device in use 8 After registration is complete tap OK on the camera s screen Operation on this camera OK WPS WPA2 ENCRYPTION METHOD SSID REGISTERED o Search and Register 1 Tap MENU Operation on this camera REC PLAY MENU 0 The shortcut menu appears 2 Tap Wi Fi Q in the shortcut menu Operation on this camera MENU 3 Tap NETWORK SETTINGS Operation on this camera Wi Fi NETWORK SETTINGS 4 Tap ACCESS...

Page 38: ...se letter and number 0 Tap E or F to move one space to the left or right 0 The password is not required if the wireless LAN router is not security protected 9 After registration is complete tap OK on the camera s screen Operation on this camera OK WPS WPA2 ENCRYPTION METHOD SSID REGISTERED o Manual Registration 1 Tap MENU Operation on this camera REC PLAY MENU 0 The shortcut menu appears 2 Tap Wi ...

Page 39: ...ration on this camera DELETE PASSWORD SET CANCEL 0 Tap on the on screen keyboard to enter characters The character changes with every tap 0 Tap DELETE to delete a character 0 Tap CANCEL to exit 0 Tap A a 1 to select character input type from upper case letter lower case letter and number 0 Tap E or F to move one space to the left or right 10 After registration is complete tap OK on the camera s sc...

Page 40: ...Y MENU 0 The shortcut menu appears 2 Tap Wi Fi Q in the shortcut menu Operation on this camera MENU 3 Tap NETWORK SETTINGS Operation on this camera Wi Fi NETWORK SETTINGS 4 Tap ACCESS POINTS Operation on this camera ACCESS POINTS NETWORK SETTINGS 5 Tap UPDATE Operation on this camera MyHome DELETE ADD UPDATE ACCESS POINTS 0 Tap 3 or 2 to select an item to edit or delete 0 To change connection to a...

Page 41: ...Operation on this camera NETWORK SETTINGS Wi Fi DIRECT SETTING 5 Tap PASSWORD Operation on this camera Wi Fi DIRECT SETTING PASSWORD SET 6 Enter the password Operation on this camera DELETE PASSWORD SET CANCEL 0 Tap on the on screen keyboard to enter characters The character changes with every tap 0 Tap DELETE to delete a character 0 Tap CANCEL to exit 0 Tap A a 1 to select character input type fr...

Page 42: ...sually If connection to devices that support Wi Fi Direct fails set to OFF 0 After setting tap SET Memo 0 When set to OFF connection to devices that do not support Wi Fi Direct will be disabled Checking the MAC Address of this Camera Displays the MAC address of the camera 1 Tap MENU Operation on this camera REC PLAY MENU 0 The shortcut menu appears 2 Tap Wi Fi Q in the shortcut menu Operation on t...

Page 43: ...er changes with every tap 0 Tap DELETE to delete a character 0 Tap CANCEL to exit 0 Tap E or F to move one space to the left or right 0 After setting tap SET Initializing the Network Settings Returns the network settings to their default values 1 Tap MENU Operation on this camera REC PLAY MENU 0 The shortcut menu appears 2 Tap Wi Fi Q in the shortcut menu Operation on this camera MENU 3 Tap NETWOR...

Page 44: ...on the password entry screen 0 Downloading starts 0 The downloaded application will be added to the home screen automatically Deleting the Application A Press and hold the Everio Sync application on the home screen B Tap L to confirm the deletion Memo The specifications of App Store are subject to changes without prior notice For operating details refer to the help file of App Store Operating the ...

Page 45: ... 0 To exit the application press the Home button Transferring Videos You can transfer recorded videos to your smartphone 0 The video to be forwarded is converted to the following format System MP4 Video H 264 MPEG 4 AVC baseline profile codec 640 x 360 resolution 25p frame rate 1 Mbps bit rate Audio Advanced Audio Coding AAC system 48 kHz sampling rate 16 bit 2 channels 1 Start Everio Sync on the ...

Page 46: ...nly when MANUAL is tapped in step 4 0 A progress status is displayed on the smartphone during preparation for the transfer and while transferring 0 To cancel the transfer tap CANCEL 6 After transferring is complete tap OK 0 To play back the video tap CHECK Android only 0 To upload share the video tap SHARE Android only Tap the desired service to start the uploading process To make use of a service...

Page 47: ...hile transferring 0 To cancel the transfer tap CANCEL 5 After transferring is complete tap OK 0 To play back the still image tap CHECK Android only 0 To upload share the still image tap SHARE Android only Tap the desired service to start the uploading process To make use of a service it is necessary to perform registration beforehand Using Wi Fi 47 ...

Page 48: ...deo to transfer URL Enter the URL when using outside monitoring HTTP AUTHORIZATION Enter the required username and password when using outside monitoring Theusernameis everio fixed andthedefault password is 0000 can be changed from camera CHANGE BACKGROUND COLOR Changes the background HELP Display how to use the Everio sync LICENSE AGREEMENT Displays the license agreement of the smartphone applica...

Page 49: ...ngth of video to transfer URL Enter the URL when using outside monitoring USERNAME Enter the required username when using outside monitoring The username is everio fixed PASSWORD Enter the required password when using outside monitoring By default the password is 0000 can be changed from camera HELP Display how to use the Everio sync Memo 0 When connecting to outside monitoring you will be prompte...

Page 50: ...are as follows Full HD SD MPEG 2 TS format Sound of the camera can be checked from the browser Recording and zoom operations cannot be performed from the browser MotionJPEG Sound of the camera cannot be played back from the browser Recording and zoom operations can be performed from the browser 0 The monitor s image stops automatically after monitoring is performed continuously for 12 hours in Ful...

Page 51: ...age click on the thumbnail o DETECT MAIL SETTING Screen Notification mail settings such as detection method and recipient s e mail address can be changed even when the camera is out of reach A check mark appears on the selected address Registered e mail addresses of recipients in Everio Up to 8 click REG to apply Notification Mail Settings Using Wi Fi 51 ...

Page 52: ...n then register them on the computer to connect Operation on this camera WPS QUIT PASS SSID CONNECT USING Wi Fi SET FROM WEB BROWSER 0 When the computer is connected to the camera a URL appears on the camera 6 Check the URL shown on the camera s screen then enter it on the Internet Explorer web browser Operation on this camera QUIT FROM YOUR WEB BROWSER TO THE FOLLOWING URL CHANGE SETTING BY CONNE...

Page 53: ...k REG 0 Password entry is not required if the access point is security protected 5 Click OK To add ACCESS POINTS manually 1 Click ACCESS POINTS 2 Click ADD 3 Enter SSID TYPE OF SECURITY and PASSWORD and click REG 0 To configure the LAN settings manually set DHCP to OFF and enter the necessary information manually 4 Click OK To change or delete an ACCESS POINTS registration 1 Click ACCESS POINTS 2 ...

Page 54: ...nges are made click REG 0 Click DELETE on this screen to delete the registered access point 3 Click OK Wi Fi DIRECT SETTING To change Wi Fi DIRECT SETTING 1 Click Wi Fi DIRECT SETTING 2 After changes are made click REG 0 Click DELETE on this screen to delete the registered access point 3 Click OK Mail Setting To change SENDER S EMAIL settings 1 Click Mail Setting 2 Click SENDER S EMAIL Using Wi Fi...

Page 55: ... and click REG 0 Select the checkbox for VIDEO MAIL and DETECT MAIL to set the address as the recipient 5 Click OK To change or delete a RECIPIENT S EMAIL 1 Click Mail Setting 2 Click RECIPIENT S EMAIL 3 Click on the mail address you want to change 4 After changes are made click REG 0 Click DELETE on this screen to delete the registered address 5 Click OK Using Wi Fi 55 ...

Page 56: ...ngs 1 Click Mail Setting 2 Click VIDEO MAIL ATTN 3 After changes are made click REG 4 Click OK To change DETECT MAIL SETTING 1 Click Mail Setting 2 Click DETECT MAIL SETTING 3 After changes are made click REG 4 Click OK Using Wi Fi 56 ...

Page 57: ...rength The unit turns off automatically 0 To prevent the situation of forgetting to turn off the power this unit will turn off automatically after 10 days of continuous usage Unable to set focus 0 When not monitoring from a smartphone or computer the focus of the camera is fixed 0 Even when monitoring from a smartphone or computer the focus of the camera will be fixed if not operated for more than...

Page 58: ...work when outside monitoring is in use 0 Operations cannot be performed from this unit when outside monitoring is in use Operate from the Android iPhone application or web browser Recording stops when the Android iPhone application or web browser is closed 0 When the Android iPhone application or web browser is closed during recording the camera gets disconnected and recording stops Video or audio...

Page 59: ...ll HD change to SD or Motion JPEG and try again Wi Fi Specifications A p 60 0 For web browser If lagging is severe reload the screen regularly 0 For smartphone Try to change the place and time to locate an environment with good signal strength The unit turns off automatically 0 To prevent the situation of forgetting to turn off the power this unit will turn off automatically after 10 days of conti...

Page 60: ...continuous usage Unable to set focus For DETECT MAIL SETTING 0 While on standby for notification mails the focus is fixed Perform the camera settings first then enable notification mails Focus may not be set correctly if the notification mails start before camera settings are made In this case disable notification mails temporarily then enable it again Vide Still Image Transmission Trouble Action ...

Page 61: ...higher SD approx 3 Mbps or higher If the network speed is too low video images may appear jumpy or audio sound may be interrupted or delayed Monitor Screen 0 MotionJPEG Video JPEG 640x360 max 5 fps Audio nil 0 Full HD Video MPEG 2 TS compliant H 264 High Profile 1920x1080 50i Audio AAC 48kHz 16 bits 2ch 0 SD Video MPEG 2 TS compliant H 264 Main Profile 720x576 50i Audio AAC 48kHz 16 bits 2ch Video...

Page 62: ...ply power I N F O S N A P S H O T S T A R T S T O P I N D E X Remote Control RM V760U 0 Operates certain functions from a distance HDMI Mini Cable 0 Connects this unit to a TV to play back recorded images on the TV in a better quality AV Cable exclusive 0 Connects this unit to a TV to play back recorded images on the TV USB Cable Type A Mini Type B 0 Connects this unit to a computer Stylus Pen 0 U...

Page 63: ...rately Types of Usable SD Card A p 66 0 When using the AC adapter overseas please prepare a commercially available converter plug for the country or region of visit Charging the Battery Pack Overseas A p 73 Getting Started 63 ...

Page 64: ...is unit outdoors in the winter weather warm the battery such as by placing it in the pocket before attaching it Keep away from direct contact with a warm pack 0 Do not expose the battery to excessive heat such as direct sunlight or fire 0 After removing the battery store it in a dry place between 15 C to 25 C 0 Keep a 30 battery level X if the battery pack is not to be used for a long period of ti...

Page 65: ... cause damage to the unit and SD card 0 Turn off the power of this unit before inserting or removing an SD card 0 Do not touch the metal contact area when inserting the SD card 0 This unit is not guaranteed to operate with all SD cards Some SD cards may not work due to specification changes etc Memo 0 When SEAMLESS RECORDING is set to ON recordings can still be made to the SD card without stopping...

Page 66: ... recorded on one SD card It is recommended to confirm the video operation of the SD card before usage 0 To protect the data do not touch the terminals of the SD card 0 UHS I SDHC SDXC cards can be used in the same manner as standard SDHC SDXC cards UHS Speed Class is not supported When your computer cannot recognize the SDXC card Confirm and update the OS of your computer Windows XP Windows XP SP1...

Page 67: ...ive area of the screen is misaligned with the touched area Adjust by lightly tapping with the stylus pen Do not press with an object with a sharp tip or do not press hard TOUCH SCREEN ADJUST A p 210 0 It is recommended to use the stylus pen for handwriting effect Names of Buttons and Functions on the LCD Monitor The following screens are displayed during the video and still image modes and operate...

Page 68: ...ing mode 5 Index Screen Button Operation Buttons for Still Image Playback A p 124 6 Delete Button Deleting the Currently Displayed File A p 130 7 Menu Button Operating the Menu A p 174 8 Operation Buttons Operation Buttons for Still Image Playback A p 124 Index Screen MENU REC 1 Video Still Image Mode Button 0 Switches between video and still image modes 2 Date Button Operation Buttons for Video P...

Page 69: ... SAVE CLOCK AREA SETTING 0 The city name and time difference are displayed 0 Tap 0 or 1 to select the city name Memo 0 The clock can be reset again later Resetting the Clock A p 69 0 When using this unit overseas you can set it to the local time for recording Setting the Clock to Local Time when Traveling A p 74 0 SET DATE TIME is displayed when you turn on this unit after it has not been used for...

Page 70: ...LOCK AREA SETTING 0 The city name and time difference are displayed 0 Tap 0 or 1 to select the city name Changing the Display Language The language on the display can be changed 1 Tap MENU REC PLAY MENU 0 When entering from the recording mode tap MENU again as the shortcut menu appears 2 Tap Q 3 Tap LANGUAGE LANGUAGE COMMON 0 Tap 3 or 2 to move upward or downward for more selection 4 Tap to the de...

Page 71: ... instruction manual of the tripod or monopod to be used and make sure that it is securely attached Memo 0 It is recommended to use a tripod or monopod when recording in conditionspronetocamerashake suchasindarkplacesorwhenzoomed to the telephoto end 0 Set the image stabilizer to b OFF when using a tripod for recording Reducing Camera Shake A p 111 Using the Remote Control You can operate this unit...

Page 72: ...to the right 0 Performs forward search during playback T Button N 0 Zooms in during pause 0 Turns up the volume during video playback W Button O 0 Zooms out during pause 0 Turns down the volume during video playback 5 Index Button 0 Stops playback and returns to index screen 6 Info Button 0 Recording Displays the remaining time for video only and battery power 0 Playback Displays file information ...

Page 73: ...ck to Local Time when Traveling A p 74 When ON is selected in DST SETTING of CLOCK ADJUST the time is set 1 hour ahead Setting Daylight Saving Time A p 74 Charging the Battery Pack Overseas The shape of the power outlet varies according to countries and regions To charge the battery pack you need a converter plug that matches the shape of the outlet A B BF C O Morocco Mozambique Republic of South ...

Page 74: ...gestheclocktimesuchthattimedifference is accounted for After returning to your country re select the region that was set initially to restore the original clock settings Setting Daylight Saving Time When ON is selected in DST SETTING of CLOCK ADJUST the time is set 1 hour ahead 1 Tap MENU REC PLAY MENU 0 When entering from the recording mode tap MENU again as the shortcut menu appears 2 Tap Q 3 Ta...

Page 75: ... the provided accessories refer to Verifying the Accessories Verifying the Accessories A p 62 0 BN VG114E is the same battery pack that comes with this unit Approximate Recording Time Using Battery Battery Pack Actual Recording Time Continuous Recording Time BN VG114E BN VG114AC Supplied 40 m 1 h 15 m BN VG121E BN VG121AC 1 h 5 m 1 h 55 m BN VG138E 1 h 55 m 3 h 25 m 0 The above are values when LIG...

Page 76: ... be performed properly even in the Intelligent Auto mode Indications During Video Recording 0 00 00 2 04 10 10 MENU REC PLAY Display Icon Description A Video Quality Displays the icon of the VIDEO QUALITY setting selected in the recording menu VIDEO QUALITY A p 185 B TOUCH PRIORITY AE AF Displays the setting of TOUCH PRIORITY AE AF By default it is set to FACE TRACKING Capturing Subjects Clearly T...

Page 77: ...ng conditions and automatically adjusted in Intelligent Auto mode 0 Some functions may not work properly depending on the shooting conditions Operation Buttons for Video Recording MENU REC REC REC PLAY Operation Button Description A Video Still Image Mode Switches between video and still image modes B T W Zoom Allows the same functions as the zoom lever to be performed Camera shake that often occu...

Page 78: ...d closed the temperature rises more easily Leave the LCD monitor open when using this unit in places exposed to direct sunlight or high temperatures 0 The power may turn off to protect the circuit if the temperature of this unit rises too much 0 If the temperature of this unit rises during recording 7 changes color to yellow as a notification 0 Do not remove the battery pack AC adapter or SD card ...

Page 79: ...WINDOW is set when ANIMATION EFFECT is set when HIGH SPEED RECORDING is set when DECORATE FACE EFFECT is set when STAMP is set when HANDWRITING EFFECT is set when AUTO REC is set when DATE TIME RECORDING is set Taking Still Images in Auto Mode You can record without worrying about the setting details by using the Intelligent Auto mode 1 Open the LCD monitor 0 Check if the recording mode is B 0 If ...

Page 80: ... is being captured I Focus Lights up in green when focused J Aperture Value Displays the aperture value K Shutter Speed Displays the shutter speed o Scenes of Intelligent Auto Display Icon Description E Captures one s skin beautifully A Allows people to be captured naturally D Focuses at a far distance and captures a sharp image with vivid colors I Records with minimal noise in the overall image B...

Page 81: ...UTO POWER OFF is set to ON this unit turns itself off automatically to conserve power when it is not operated for 5 minutes only when using the battery pack AUTO POWER OFF A p 208 0 When TOUCH PRIORITY AE AF is set to FACE TRACKING this unit detects faces and automatically adjusts its brightness and focus to record the faces more clearly Capturing Subjects Clearly TOUCH PRIORITY AE AF A p 100 Caut...

Page 82: ... Manual recording can be set for both video and still image modes 1 Open the LCD monitor 0 Set the recording mode to either A video or B still image 0 To switch the mode between video and still image tap A or B on the recording screen to display the mode switching screen Tap A or B to switch the mode to video or still image respectively You can also use the A B button on this unit 2 Select the Man...

Page 83: ...oving subject or to emphasize the subject s movement Setting Shutter Speed A p 88 APERTURE PRIORITY 0 You can adjust the aperture to capture an image with only the subject in focus while blurring the surroundings Setting Aperture A p 89 WHITE BALANCE 0 Overall color on the screen can be adjusted 0 Use this when the color on the screen appears differently from the actual color Setting White Balance...

Page 84: ...cording mode to Manual intelligent AUTO MANUAL 2 Tap MENU REC PLAY MENU 0 The shortcut menu appears 3 Tap MENU in the shortcut menu MENU 4 Tap SCENE SELECT SCENE SELECT VIDEO 0 Tap 3 or 2 to move upward or downward for more selection 0 Tap L to exit the menu 0 Tap J to return to the previous screen 5 Tap the appropriate scene NIGHTALIVE OFF SCENE SELECT PORTRAIT NIGHT 0 Tap OFF to cancel the selec...

Page 85: ...y using a slow shutter in the still image mode w PORTRAIT Blurs the background to bring out the people in the picture u SPORTS Captures fast moving subjects clearly in every single frame v SNOW Prevents the subject from appearing too dark when recording snow scenes on a sunny day g SPOTLIGHT Prevents the human subject from appearing too bright under light Memo 0 All scenes of SCENE SELECT cannot b...

Page 86: ...OCUS VIDEO 0 Tap 3 or 2 to move upward or downward for more selection 0 Tap L to exit the menu 0 Tap J to return to the previous screen 5 Tap MANUAL MANUAL AUTO FOCUS 6 Adjust the focus MENU MENU PLAY REC SET 0 Tap E to focus on a distant subject If E appears blinking focus cannot be set any further 0 Tap p to focus on a near subject If p appears blinking focus cannot be set any nearer 7 Tap SET t...

Page 87: ...menu MENU 4 Tap BRIGHTNESS ADJUST BRIGHTNESS ADJUST VIDEO 0 Tap 3 or 2 to move upward or downward for more selection 0 Tap L to exit the menu 0 Tap J to return to the previous screen 5 Tap MANUAL MANUAL AUTO BRIGHTNESS ADJUST 6 Adjust the brightness value PLAY REC MENU SET 0 Compensation range during video recording 2 0 to 2 0 0 Compensation range during still image recording 2 0 to 2 0 0 Tap 3 to...

Page 88: ...0 Tap J to return to the previous screen 5 Tap MANUAL MANUAL AUTO SHUTTER SPEED 6 Adjust the shutter speed 1 30 1 30 PLAY REC MENU SET 0 Shutter speed can be set from 1 2 to 1 4000 0 Tap 3 to increase the shutter speed 0 Tap 2 to decrease the shutter speed 7 Tap SET to confirm 1 30 PLAY REC MENU Memo 0 Settings can be adjusted separately for videos and still images 0 SHUTTERSPEED canonlybesettoama...

Page 89: ...nu 0 Tap J to return to the previous screen 5 Tap MANUAL MANUAL AUTO APERTURE PRIORITY 6 Adjust the aperture F1 8 F1 8 PLAY REC MENU MENU SET 0 Aperture can be set from F1 2 to F5 6 0 If you want the background to be in focus as well larger aperture value tap 3 0 If you want the background to appear blurry smaller aperture value tap 2 7 Tap SET to confirm F1 8 MENU MENU PLAY REC Memo 0 Settings ca...

Page 90: ...ls AUTO Adjusts automatically to the natural colors MWB Use this when the problem of unnatural colors is not resolved FINE Set this when shooting outdoors on a sunny day CLOUD Set this when shooting on a cloudy day or inside a shade HALOGEN Set this when shooting under illumination such as a video light MARINE BLUE Set this when shooting the sea at deep water area water appears blue using an optio...

Page 91: ...e mode switching screen Tap H to switch the recording mode to Manual intelligent AUTO MANUAL 2 Tap MENU REC PLAY MENU 0 The shortcut menu appears 3 Tap MENU in the shortcut menu MENU 4 Tap BACKLIGHT COMP BACKLIGHT COMP VIDEO 0 Tap 3 or 2 to move upward or downward for more selection 0 Tap L to exit the menu 0 Tap J to return to the previous screen 5 Tap ON ON OFF BACKLIGHT COMP 0 After setting the...

Page 92: ...he recording mode to Manual intelligent AUTO MANUAL 2 Tap MENU REC PLAY MENU 0 The shortcut menu appears 3 Tap MENU in the shortcut menu MENU 4 Tap ZEBRA ZEBRA VIDEO 0 Tap 3 or 2 to move upward or downward for more selection 0 Tap L to exit the menu 0 Tap J to return to the previous screen 5 Tap 70 80 or OVER100 Setting Details OFF Deactivates the function 70 80 Sections that are close to be overe...

Page 93: ...shortcut menu MENU 4 Tap TELE MACRO TELE MACRO VIDEO 0 Tap 3 or 2 to move upward or downward for more selection 0 Tap L to exit the menu 0 Tap J to return to the previous screen 5 Tap ON ON OFF TELE MACRO 0 After setting the tele macro icon o appears Setting Details OFF Enables close up shots up to 1 m at the telephoto T end Enables close up shots up to 5 cm at the wide angle W end ON Enables clos...

Page 94: ...fects to video recordings The animation effects appear when smiles are detected or when the screen is touched 1 Open the LCD monitor 0 Check if the recording mode is A 0 If the mode is B still image tap B on the recording screen to display the mode switching screen Tap A to switch the recording mode You can also use the A B button on this unit 2 Tap MENU REC PLAY MENU 0 The shortcut menu appears 3...

Page 95: ... To perform operations other than recording tap L to cancel the ANIMATION EFFECT first Recording 95 ...

Page 96: ...etected Animation effect appears when smiles are detected Animation effect appears when smiles are detected Animation effect appears when the screen is touched Animation effect appears when the screen is touched Animation effect appears when the screen is touched Animation effect appears when the screen is touched Recording 96 ...

Page 97: ... Go to step 4 Alternatively tap DECORATE FACE EFFECT 5 in the shortcut menu Go to step 5 MENU 4 Tap DECORATE FACE EFFECT DECORATE FACE EFFECT VIDEO 0 Tap 3 or 2 to move upward or downward for more selection 0 Tap L to exit the menu 0 Tap J to return to the previous screen 5 Select a desired effect and tap SET SET 0 Tap 0 or 1 to select an item 0 Press the START STOP button the camera to start reco...

Page 98: ...t the menu 0 Tap J to return to the previous screen 5 Select a stamp 1 0 00 00 ޓ 0 53 0 Tap K to start selecting a stamp Tap on the desired stamp to use The number indicates the size of the stamp 1 0 Tap I to scroll through the list of stamps 0 Tap M to change the size of stamps 0 Tap J to return to the previous screen 6 Tap on the screen to add a stamp 0 00 00 ޓ 0 53 1 ON OFF 0 Tap Jto delete the...

Page 99: ... the line color and thickness The number indicates the thickness of the line 1 0 You can select a color from white gray black etc 0 Select P to tap and erase part of the line 0 Tap H to select the line color Tap I to scroll through the list of colors 0 Tap L to select the line thickness 0 Tap J to return to the previous screen 6 Start writing and drawing with the provided stylus 0 00 00 ޓ 0 53 1 O...

Page 100: ...ppears around the tapped face subject When the face of a person is registered it becomes the main subject and the blue frame appears even without specific selection PET TRACKING N appears on the screen Recording is performed while tracking and automatically adjusting the face of the tapped pet subject with appropriate brightness In addition a blue frame appears around the tapped pet subject COLOR ...

Page 101: ...on it again For registered faces focus and brightness will be adjusted automatically even without specific selection In addition registered faces may be tracked back again even if they are lost Therefore it is recommended to register the faces that are often being recorded by this camera beforehand Registering Human Face Personal Authentication Information A p 106 Capturing Smiles Automatically SM...

Page 102: ... of face smile level etc It is also difficult to detect a smile in backlight 0 After a smile is detected and captured it takes time before the next recording may be performed 0 SMILE SHOT does not work in the following cases when menu is being displayed when remaining recording time or battery power is being displayed when FACE SUB WINDOW is set when ANIMATION EFFECT is set when DECORATE FACE EFFE...

Page 103: ... to switch the mode to video or still image respectively You can also use the A B button on this unit 2 Tap MENU REC PLAY MENU 0 The shortcut menu appears 3 Tap MENU in the shortcut menu MENU 4 Tap PET SHOT PET SHOT VIDEO 0 Tap 3 or 2 to move upward or downward for more selection 0 Tap L to exit the menu 0 Tap J to return to the previous screen 5 Tap ON ON OFF PET SHOT 0 Tap L to exit the menu as ...

Page 104: ...set to ON if TOUCH PRIORITY AE AF is not set to PET TRACKING PET SHOT will be set to OFF automatically 0 If appropriate results cannot be obtained record with PET SHOT set to OFF Recording while Displaying a Magnified View of a Selected Face FACE SUB WINDOW You can record while viewing both the overall image of the scene and magnified image of a subject s expression Frames appear around the faces ...

Page 105: ...ow display will also be recorded Memo 0 When a face is magnified and displayed in the sub window only the name of the person will be displayed When a face is not registered the name of the person will not be displayed 0 The face sub window mode is canceled when the power is turned off 0 Frames do not appear around the faces in the face sub window mode as easily as in the other modes They appear ar...

Page 106: ...e the A B button on this unit 2 Tap MENU REC PLAY MENU 0 The shortcut menu appears 3 Tap MENU in the shortcut menu MENU 4 Tap FACE REGISTRATION FACE REGISTRATION VIDEO 0 Tap 3 or 2 to move upward or downward for more selection 0 Tap L to exit the menu 0 Tap J to return to the previous screen 5 Tap REGISTER NEW FACE CANCEL EDIT REGISTER NEW FACE FACE REGISTRATION 6 Point the camera toward the human...

Page 107: ...lue is as high as possible 0 A sound can be heard when recording is complete 0 To cancel recording of smiling face and proceed to enter a name tap STOP then tap NO and go to step 11 11 Tap OK STOP OK ENTER A NAME RECORDING COMPLETED 0 Tapping OK registers the recorded face and the screen for entering a name appears 0 To cancel the registration tap STOP When CANCEL FACE RECOGNITION appears tap YES ...

Page 108: ...onditions distance angle brightness etc and expressions 0 Face tracking face sub window and name display may not work properly for people with similar facial features such as siblings parents children etc Setting SMILE NAME DISPLAY SMILE NAME DISPLAY allows you to set the items to display when faces are detected This item is only displayed when TOUCH PRIORITY AE AF is set to FACE TRACKING Capturin...

Page 109: ...rity level of person before recording 0 Up to 3 registered names will be displayed according to the priority level Registering Human Face Personal Authentication Information A p 106 0 SMILE NAME DISPLAY is set to ON when the demo mode is activated DEMO MODE A p 209 Editing the Registered Face Information Editing Registered Face Information You can change the name priority level and face informatio...

Page 110: ...hat is registered 1 Tap MENU REC PLAY MENU 0 The shortcut menu appears 2 Tap MENU in the shortcut menu MENU 3 Tap FACE REGISTRATION FACE REGISTRATION VIDEO 0 Tap 3 or 2 to move upward or downward for more selection 0 Tap L to exit the menu 0 Tap J to return to the previous screen 4 Tap CANCEL CANCEL EDIT REGISTER NEW FACE FACE REGISTRATION 5 Tap the person to cancel registration of JOHN MIKE KEN S...

Page 111: ... angle of view becomes narrower In the enhanced AIS mode the angle of view becomes even narrower than ON AIS 0 Dynamic zoom is not available in the enhanced AIS mode 0 Image stabilization only starts when the SNAPSHOT button is pressed halfway during still image recording Slow motion High speed Recording You can record videos in slow motion by increasing the recording speed to emphasize the moveme...

Page 112: ...NG Enables the changes of a scene that occur slowly over a long period to be shown within a short time by taking frames of it at a certain interval This is useful for making observations such as the opening of a flower bud 1 Open the LCD monitor 0 Check if the recording mode is A 0 If the mode is B still image tap B on the recording screen to display the mode switching screen Tap A to switch the m...

Page 113: ...videos will be played back at 50 times speed 5SEC INTERVAL Takes a frame at 5 second intervals Recorded videos will be played back at 125 times speed 10SEC INTERVAL Takes a frame at 10 second intervals Recorded videos will be played back at 250 times speed 20SEC INTERVAL Takes a frame at 20 second intervals Recorded videos will be played back at 500 times speed 40SEC INTERVAL Takes a frame at 40 s...

Page 114: ... still movements of the subject changes in brightness within the red frame When there are no more movements of the subject changes in brightness within the red frame recording will stop in 5 seconds 0 To stop video recording manually press the START STOP button However as the AUTO REC setting remains at ON even after the video recording is stopped recording starts again when movements of the subje...

Page 115: ...creen to display the mode switching screen Tap B to switch the mode to still image You can also use the A B button on this unit 2 Tap MENU MENU MENU PLAY 0 The shortcut menu appears 3 Tap MENU in the shortcut menu MENU 4 Tap SELF TIMER SELF TIMER IMAGE 0 Tap 3 or 2 to move upward or downward for more selection 0 Tap L to exit the menu 0 Tap J to return to the previous screen 5 Tap 2SEC or 10SEC FA...

Page 116: ...3 or 2 to move upward or downward for more selection 0 Tap L to exit the menu 0 Tap J to return to the previous screen 5 Tap FACE DETECTION FACE DETECTION 10SEC 2SEC OFF SELF TIMER 6 After making sure that everyone is facing the camera press the SNAPSHOT button 0 Frames appear around the faces of the subjects 0 Pressing the SNAPSHOT button again starts the 10 second self timer 7 The photographer e...

Page 117: ... 2 Tap MENU REC PLAY MENU 0 The shortcut menu appears 3 Tap MENU in the shortcut menu MENU 4 Tap DATE TIME RECORDING DATE TIME RECORDING VIDEO 0 Tap 3 or 2 to move upward or downward for more selection 0 Tap L to exit the menu 0 Tap J to return to the previous screen 0 When the item is tapped the precaution for date time recording appears 5 Press the START STOP button to start recording 0 Press th...

Page 118: ...u 0 Tap J to return to the previous screen 0 If in the still image mode go directly to step 6 5 Display the remaining recording time 0h46m 0h46m USED FREE MAX RECORDING TIME 0 The remaining recording time is displayed only in the video recording mode 0 To display the remaining battery power tap l 0 l will not be displayed when the AC adapter is connected 0 Tap J to return to the recording mode 0 T...

Page 119: ...9 1200 2500 5000 9999 1920 1440 2 8M 4 3 9999 9999 2400 4900 9700 9999 640 480 0 3M 4 3 9999 9999 9999 9999 9999 9999 1920 1080 2M 16 9 9999 9999 3100 6500 9999 9999 0 Still images that are captured during video recording or video playback are saved at a size of 1920 x 1080 Approximate Recording Time Using Battery Battery Pack Actual Recording Time Continuous Recording Time 50i 50p 50i 50p BN VG11...

Page 120: ... images recorded in 50i mode set SYSTEM SELECT in the video recording menu to 50i before selecting the playback mode In cases such as during Digest Playback or when playing back editing a playlist set SYSTEM SELECT in the same way before operating Operation Buttons for Video Playback During Index Screen Display REC MENU Display Description A Video Still Image Mode Switches between video and still ...

Page 121: ...hes to the recording mode J u Stop returns to index screen K A Deletes the currently displayed video L MENU Displays the menu screen Memo 0 Tap or drag on the operation area of the touch screen 0 Operations buttons on the touch screen disappear if the unit is not operated for about 5 seconds Tap on the screen to display the operation buttons again 0 You can search for a specific file by the record...

Page 122: ...ly Digest Playback You can play back a digest of the recorded videos Digest Playback This is useful for checking the content of the videos quickly 1 Open the LCD monitor 0 Check if the recording mode is A 0 If the mode is B still image tap B on the recording screen to display the mode switching screen Tap A to switch the mode to video You can also use the A B button on this unit 2 Tap PLAY to sele...

Page 123: ...ttons for Video Playback A p 120 Playing a Video with Defective Management Information The management information of a video may be damaged if recording is not performed correctly such as turning off the power in the middle of recording You can perform the following operations to play back the videos with defective management information 1 Open the LCD monitor 0 Check if the recording mode is A 0 ...

Page 124: ...e is shown and the group is displayed with a green frame Display Description A Video Still Image Mode Switches between video and still image modes B Date Moves to the previous next date C Displays the previous index screen thumbnail display 0 You can perform the same operation with the zoom lever D Displays the next index screen thumbnail display 0 You can perform the same operation with the zoom ...

Page 125: ...rations buttons on the touch screen disappear if the unit is not operated for about 5 seconds Tap on the screen to display the operation buttons again 0 You can rotate a still image 90 to the right or left during playback Rotation applies to the on screen display only 0 You can search for a specific file by the recording date This is useful when searching from a large number of files Searching for...

Page 126: ... A p 128 0 To display the date and time on TV set both DISPLAY DATE TIME and DISPLAY ON TV to ON DISPLAY DATE TIME A p 199 DISPLAY ON TV A p 211 Unnatural Displays on TV Trouble Action Images do not appear on the TV properly 0 Disconnect the cable and connect again 0 Turn off and on this unit again 0 Images may not appear properly when the remaining battery power is low Use an AC adapter Images ar...

Page 127: ...Not all HDMI control devices comply with the HDMI CEC standard The HDMI control function of this unit will not work when connected to these devices 0 This unit is not guaranteed to operate with all HDMI CEC enabled devices 0 Depending on the specifications of each HDMI CEC enabled device some functions may not work with this unit For details refer to the instruction manual of your TV 0 Unintended ...

Page 128: ...od of connection contact your TV s manufacturer Playing Back Playlists Plays back the playlists that you have created 1 Open the LCD monitor 0 Check if the recording mode is A 0 If the mode is B still image tap B on the recording screen to display the mode switching screen Tap A to switch the mode to video You can also use the A B button on this unit 2 Tap PLAY to select the playback mode PLAY REC...

Page 129: ...Blu ray recorder P P DVD writer with playback function CU VD50 P Only for AVCHD compatible devices Caution 0 DVDs that are created in AVCHD format cannot be played back on DVD players with standard quality You may not be able to remove the disc from the player Digest Playback on a Blu ray or DVD Player You can play back a few seconds from each scene of the recorded videos in the created disc 1 Loa...

Page 130: ...mage mode 2 Tap YES NO YES SCENE ARE ALTERED OR DELETED PLAYLISTS THAT INCLUDE THIS REMAINING SCENES 0030 DELETE 0 Tap h g to select the previous or next file 0 When no file remains the screen returns to the index screen Deleting Selected Files Deletes the selected files Caution 0 Deleted files cannot be restored 1 Open the LCD monitor 0 Tap A or B to select the video or still image mode 0 Tap B o...

Page 131: ...NES 0030 DELETE 0 After deleting is complete tap OK 0 To cancel the deletion tap QUIT Protecting Files Prevent important videos still images from being deleted accidently by protecting them Protecting Releasing Protection of the Currently Displayed File A p 131 Protecting Releasing Protection of Selected Files A p 132 Caution 0 When the recording media is formatted even the protected files will be...

Page 132: ...To remove P from a file tap on the file again 0 I and P are displayed on the files that are already protected To release protection of a file tap on the file such that P is removed 0 Tap SEL ALL to select all files 0 Tap REL ALL to release all selections 0 Grouped Files REL ALL SEL ALL PROTECT CANCEL Still images that are recorded continuously within 2 seconds or with the continuous shooting mode ...

Page 133: ...s are captured with a size of 1920 1080 0 Captured still images are stored in the media where the video is being played back from Combining Videos Recorded by Seamless Recording Videos that are recorded on two separate media and with SEAMLESS RECORDING in the video recording menu enabled can be combined into a single video SEAMLESS RECORDING A p 186 1 Open the LCD monitor 0 Check if the recording ...

Page 134: ...ess videos or delete the combination information of the seamless videos To delete the combination information of seamless videos select DEL COMBINED SCENES in step 5 Capturing a Required Part in the Video TRIMMING Select the required part of a video and save it as a new video file 0 The original video remains in its existing location 1 Open the LCD monitor 0 Check if the recording mode is A 0 If t...

Page 135: ...e index screen Memo 0 The division point may deviate slightly from the selected scene Capturing Videos for Uploading to YouTube Capture and copy a part of a recorded video maximum 15 minutes for uploading to YouTube and save it as a YouTube video When capturing videos for YouTube the duration cannot be longer than 15 minutes 1 Open the LCD monitor 0 Check if the recording mode is A 0 If the mode i...

Page 136: ...E 0 After copying tap OK 0 When copying finishes the copied file is added to the index screen 0 To exit upload settings tap STOP on the upload settings screen Memo 0 The division point may deviate slightly from the selected scene Uploading Videos to YouTube You can upload your videos to YouTube using the provided software Everio MediaBrowser 4 BE Install the software on your PC and connect this un...

Page 137: ...PLAYLIST EDIT PLAYLIST VIDEO 5 Tap NEW LIST DELETE EDIT NEW LIST EDIT PLAYLIST 6 Tap CREATE FROM SCENE CREATE BY DATE CREATE FROM SCENE EDIT PLAYLIST 7 Tap on the video to add to playlist 1920 1920 1920 1920 1920 1920 1920 1920 1920 TOTAL 0 999 FROM SCENE QUIT 00h00m 0 d appears on the selected video Tap J to deselect 0 Tap on the selected video again to check the video After checking tap J 0 Tap ...

Page 138: ...ode is B still image tap B on the recording screen to display the mode switching screen Tap A to switch the mode to video You can also use the A B button on this unit 2 Tap PLAY to select the playback mode PLAY REC MENU 3 Tap MENU REC MENU 4 Tap EDIT PLAYLIST EDIT PLAYLIST VIDEO 5 Tap NEW LIST DELETE EDIT NEW LIST EDIT PLAYLIST 6 Tap CREATE BY DATE CREATE BY DATE CREATE FROM SCENE EDIT PLAYLIST 7 ...

Page 139: ...videos of the same date After checking tap J 0 To delete of a video in the playlist lower row tap the video then tap CANCEL 9 After arranging tap SAVE FROM DATE SAVE TOTAL 0 999 4 4 4 4 6 2 DVD DL 1 DVD 01 00h00m 10 Tap YES SAVE EDITED CONTENTS QUIT PLAYLIST NO YES Memo 0 Tap L on each screen to exit the menu Editing Playlists You can change the content of a created playlist However the playlists ...

Page 140: ...eck the video After checking tap J 0 To delete of a video in the playlist lower row tap the video then tap CANCEL 0 X indicates the size of the video 9 After arranging tap SAVE 1920 1920 1920 1920 1920 1920 1920 1920 1920 1920 1920 1920 SAVE TOTAL 0 999 DVD DL 1 DVD 01 EDIT 00h00m 10 Tap YES SAVE EDITED CONTENTS QUIT PLAYLIST NO YES Memo 0 Tap L on each screen to exit the menu Deleting Playlists D...

Page 141: ... TV Creating Discs with a DVD Writer o Preparing a DVD Writer Preparing a DVD Writer CU VD3 A p 142 Preparing a DVD Writer CU VD50 A p 142 o Copying to Discs Copying All Files A p 143 Copying Files by Date A p 144 Copying Selected Playlists A p 145 Copying Selected Files A p 147 o Other Operations Playing Back with a DVD Writer A p 148 Memo 0 Discs created on this unit are saved in the AVCHD forma...

Page 142: ...functions may occur Preparing a DVD Writer CU VD50 1 Remove the AC adapter and battery pack from this unit 2 Open the LCD monitor 3 Connect the USB cable and the AC adapter 3 1 DVD Writer CU VD50 Protrusion To DC Connector To USB Connector AC Adapter To AC Outlet 110 V to 240 V A Connect the USB cable provided with the DVD writer B Connect the AC adapter of the DVD writer 0 Turn on the DVD writer ...

Page 143: ... While the video mode is shown in the image the same operations apply for the still image mode 0 Tap A to switch between the video 50i and still image modes 3 Tap on the media to copy SD CARD BUILT IN MEMORY SELECT THE MEDIA TO BACK UP CREATE FROM ALL 4 Tap the desired method UNSAVED SCENES ALL SCENES CREATE FROM ALL 0 While the video mode is shown in the image the same operations apply for the st...

Page 144: ... Videos or still images are sorted and copied according to the date on which they were recorded 1 Select video or still image mode 2 Tap SELECT AND CREATE video or SELECT AND SAVE still image PLAYBACK SELECT AND CREATE CREATE FROM ALL VIDEO BACKUP 0 While the video mode is shown in the image the same operations apply for the still image mode 0 Tap A to switch between the video 50i and still image ...

Page 145: ...ing Selected Playlists Arrange and copy the created playlists in the order you like 1 Select video mode 2 Tap SELECT AND CREATE PLAYBACK SELECT AND CREATE CREATE FROM ALL VIDEO BACKUP 3 Tap on the media to copy SD CARD BUILT IN MEMORY SELECT THE MEDIA TO BACK UP SELECT AND CREATE 4 Tap CREATE BY PLAYLIST SELECT FROM SCENES CREATE BY PLAYLIST CREATE BY DATE SELECT AND CREATE 5 Tap on the playlist t...

Page 146: ...EXIT appears change the disc 11 Tap OK when COMPLETED is displayed OK COMPLETED CREATE BY PLAYLIST 12 Press and hold the M button for 2 seconds or more to turn off this unit and disconnect the USB cable Caution 0 Do not turn off the power or remove the USB cable until copying is complete 0 Files that are not on the index screen during playback cannot be copied Special files cannot be copied either...

Page 147: ...le the video mode is shown in the image the same operations apply for the still image mode 7 Tap EXECUTE RETURN EXECUTE PREPARE AN EMPTY DISC DVD 2 DVD DL 1 REQUIRED DISC SPACE SELECT FROM SCENES 0 The number of discs required to copy the files is displayed Prepare the discs accordingly 8 Tap AUTO or BY DATE A mode only BY DATE AUTO SELECT THE SORT METHOD ON THE TOP MENU CREATE HEADLINES SELECT FR...

Page 148: ...ni Connector A p 127 Connecting via the AV Connector A p 128 Creating Discs with a BD Writer External Blu ray Drive You can copy the recorded files to discs or play back the created discs using an optional BD writer external Blu ray drive Compatible BD Writers External Blu ray Drives You can use BE08LU20 from LG as of February 2012 Creating Discs with a BD Writer External Blu ray Drive o Preparing...

Page 149: ...ay Drive A Connect the USB cable of the BD writer external Blu ray drive to this unit 0 The USB cable provided with this unit cannot be used B Connect the AC adapter of the BD writer external Blu ray drive C Turn on the BD writer external Blu ray drive D Connect the AC adapter to this unit 0 This unit powers on automatically when the AC adapter is connected 0 This unit turns on and the BACK UP men...

Page 150: ...os in a Blu ray disc in the high definition quality 0 Selecting DVD AVCHD enables you to save videos in a DVD in the high definition quality 4 Tap on the media to copy SD CARD BUILT IN MEMORY SELECT THE MEDIA TO BACK UP CREATE FROM ALL 5 Tap the desired method UNSAVED SCENES ALL SCENES CREATE FROM ALL 0 ALL SCENES video ALL IMAGES still image All videos or still images in this unit are copied 0 UN...

Page 151: ...ay Drive A p 156 Copying Files by Date Videos or still images are sorted and copied according to the date on which they were recorded 1 Select video or still image mode 2 Tap SELECT AND CREATE video or SELECT AND SAVE still image PLAYBACK SELECT AND CREATE CREATE FROM ALL VIDEO BACKUP 0 While the video mode is shown in the image the same operations apply for the still image mode 0 Tap A to switch ...

Page 152: ... OK COMPLETED CREATE BY DATE 11 Press and hold the M button for 2 seconds or more to turn off this unit and disconnect the USB cable Caution 0 Do not turn off the power or remove the USB cable until copying is complete 0 Files that are not on the index screen during playback cannot be copied Special files cannot be copied either 0 All DVDs will be finalized automatically While files cannot be adde...

Page 153: ...p 0 1 or move the zoom lever to display the previous next playlist 0 If the desired playlist cannot be found switch the mode to video 50i or video 50p accordingly in step 2 7 Tap ADD to insert a playlist ADD 0 999 1920 1920 1920 1920 1920 1920 1920 1920 1920 QUIT TOTAL 00h00m 0 Repeat steps 6 7 and arrange the playlists 0 To change the position of a playlist lower row select the insertion point wi...

Page 154: ...Back with a BD Writer External Blu ray Drive A p 156 0 To create a playlist Creating Playlists from the Recorded Videos A p 137 0 Playlists created from Digest Playback cannot be copied to discs Copying Selected Files Select and copy the desired videos or still images individually 1 Select video or still image mode 2 Tap SELECT AND CREATE video or SELECT AND SAVE still image PLAYBACK SELECT AND CR...

Page 155: ...COMPLETED SELECT FROM SCENES 12 Press and hold the M button for 2 seconds or more to turn off this unit and disconnect the USB cable Caution 0 Do not turn off the power or remove the USB cable until copying is complete 0 Files that are not on the index screen during playback cannot be copied Special files cannot be copied either 0 All DVDs will be finalized automatically While files cannot be adde...

Page 156: ... connected to the BD writer external Blu ray drives Connecting via the HDMI Mini Connector A p 127 Connecting via the AV Connector A p 128 Creating a Disc Using a Connected Blu ray Recorder You can create discs using a Blu ray recorder by connecting it to this unit using a USB cable 1 Remove the AC adapter and battery pack from this unit 2 Open the LCD monitor 3 Connect to a Blu ray recorder Blu r...

Page 157: ...and time during dubbing set DISPLAY DATE TIME in the video playback menu to ON Set DISPLAY ON TV in the common menu to ON Dubbing Files to a VHS Tape by Connecting to a VCR You can dub videos in standard quality by connecting to a VCR 0 Refer also to the instruction manuals of the TV and VCR 1 Remove the AC adapter and battery pack from this unit 2 Open the LCD monitor 3 Connect to a VCR DVD recor...

Page 158: ...the USB external hard disk drive Disconnecting the USB cable 0 Do not format the USB external hard disk drive using the PC If you did format again using this unit All the data in the USB external hard disk drive will be erased 0 Avoid the following operations using the PC Deleting files or folders in the USB external hard disk drive Moving files or folders in the USB external hard disk drive Chang...

Page 159: ...ent remaining space on the hard disk drive and tap YES NO YES START TO BACKUP FREE SPACE 0 007 768MB REQ SPACE 147MB 15 SCENES ALL SCENES 0 Backup starts when YES is tapped 6 Tap OK when COMPLETED is displayed OK SAVED ALL SCENES 7 Press and hold the M button for 2 seconds or more to turn off this unit and disconnect the USB cable Caution 0 Do not turn off the power or remove the USB cable until c...

Page 160: ...ack the setting for the SYSTEM SELECT is automatically changed to the video mode either 50i or 50p that is played Change the settings as necessary SYSTEM SELECT A p 184 Memo 0 Sound or video may be interrupted during playback Deleting Folders in the USB External Hard Disk Drive Files that are copied to the external hard disk drive can be deleted Caution 0 Deleted files cannot be restored 0 Be sure...

Page 161: ...y of this unit or an SD card 1 Select video mode 2 Tap IMPORT FROM DEVICE in BACK UP IMPORT FROM DEVICE VIDEO BACKUP 0 Tap A to switch between the video 50i video 50p and still image modes Switch to the mode in which you want to import files 3 Tap USB HDDFBUILT IN MEM or USB HDDFSD USB HDD BUILT IN MEM SELECT COPY DIRECTION IMPORT FROM DEVICE USB HDD SD 0 Files will be imported to the selected med...

Page 162: ...opying Files to an SD Card You can copy videos and still images from the built in memory to SD card Copying still images to cards makes it convenient to bring them to the shop for printing developing Caution 0 Make sure that there is enough space left in the destination medium 0 Videos in the SD card cannot be copied to the built in memory 1 Open the LCD monitor 2 Tap A or B to select the video or...

Page 163: ...ing developing Caution 0 Make sure that there is enough space left in the destination medium 0 Videos in the SD card cannot be moved to the built in memory 1 Open the LCD monitor 2 Tap A or B to select the video or still image mode 3 Tap PLAY to select the playback mode REC PLAY MENU 0 The mode changes between recording and playback with every tap 4 Tap MENU REC MENU 5 Tap MOVE MOVE VIDEO 6 Tap on...

Page 164: ... STOP SET REL ALL SEL ALL QUANTITY 0030 0 SET is deactivated when no file is selected 8 Tap YES NO YES START MOVING MOVE QUANTITY 30 MOVE VIDEO 0 Moving of files starts 0 After moving tap OK Copying 164 ...

Page 165: ...oftware refer to MediaBrowser Help in the Help menu of Everio MediaBrowser 4 BE Verifying System Requirements Guideline Right click on Computer or My Computer in the Start menu and select Properties to check the following items Windows Vista Windows 7 0 Refer to the operating instructions found in the animation on the Detailed User Guide Windows XP 0 Refer to the operating instructions found in th...

Page 166: ...ormat and perform simple editing using the provided software Windows Vista Windows 7 0 Refer to the operating instructions found in the animation on the Detailed User Guide Windows XP 0 Refer to the operating instructions found in the animation on the Detailed User Guide Copying 166 ...

Page 167: ...be performed on the computer 6 Select the source of the image file 1 2 Click Click Click Next Click All volume in camcorder 7 Start backup Click Saving Destination PC 0 Backup starts 8 After backup is complete click OK Click Memo 0 Before making backup load the SD card in which the videos and still images are stored on this unit 0 If you encounter any problems with the provided software Everio Med...

Page 168: ...is useful not only for creating discs but for viewing the files too 1 Double click on the Everio MediaBrowser 4 BE icon 0 The provided software starts up 2 Display the month of the files to organize Click Recording Month 3 Create a user list Recording Date Click 2 1 Click Input the name of the new user list 0 A new user list is added to the user list library Copying 168 ...

Page 169: ...sh German French Spanish 800 1532 4865 toll free Other Countries in Europe English German French Spanish 44 1489 564 764 Asia Philippines English 63 2 438 0090 China Chinese 10800 163 0014 toll free Homepage http www pixela co jp oem jvc mediabrowser e Recording Videos to Discs Copy the files that are arranged using the user list to discs 1 Insert a new disc into the PC s recordable DVD drive 2 Se...

Page 170: ...c the videos need to be converted to XP recording mode before copying Therefore it may take a longer time than copying videos recorded in other modes 0 Videos recorded in the UXP or AVCHD Progressive mode can only be created into a disc in the Blu ray format 0 To view the help file of Everio MediaBrowser 4 BE select Help from the Everio MediaBrowser 4 BE s menu bar or press F1 on the keyboard 0 If...

Page 171: ...us screen 0 Close the Everio MediaBrowser 4 BE program if it starts 0 Operations are to be performed on the computer after the screen switches 6 Select Computer Windows Vista My Computer Windows XP Computer Windows 7 from the Start menu then click on the JVCCAM_MEM or JVCCAM_SD icon 0 Open the folder with the desired files List of Files and Folders A p 172 7 Copy the files to any folder in the com...

Page 172: ...TMOV PRIVATE DEM_0000 MTS MOV_0001 MTS MOV_0002 MTS MOV_0003 MTS XXXXX MTS JVC PIC_0001 JPG PIC_0002 JPG PIC_0003 JPG Video files with defective management information There may be no demo video file Demo Video File Video File Still Image File Management Information Still Image Folder SD Card SD Card Built In Memory Built In Memory Caution 0 When the folders or files are deleted moved renamed in t...

Page 173: ...ers or files are deleted moved renamed in the computer they cannot be played back on this unit anymore 0 MTS files that are copied to a Mac computer cannot be imported to iMovie To use MTS files with iMovie import the files using iMovie 0 Videos recorded in the 50p mode when SYSTEM SELECT is set to 50p are not supported Memo 0 To edit view the files use a software that supports AVCHD video JPEG st...

Page 174: ...image recording mode using the shortcut menu 1 Tap MENU REC PLAY MENU 0 The shortcut menu appears 2 Tap the desired menu and setting Shortcut Menu During Video Recording Mode MENU Wi Fi Capabilities A p 12 Image Monitoring via Direct Connection DIRECT MONITORING A p 14 Record and Send Videos via E mail VIDEO MAIL ATTN A p 25 0 SMILE Allows settings of SMILE SHOT and SMILE NAME DISPLAY 0 EFFECT REC...

Page 175: ...ious screen Tap J return 0 To display the help file Tap K help and tap the item Help file may not be available for some items Operating the Common Menu You can configure common setting items regardless of the mode using the common menu 1 Tap MENU 0 The menu differs according to the mode in use REC PLAY MENU 0 When entering from the recording mode tap MENU again as the shortcut menu appears 2 Tap Q...

Page 176: ...layed only in the manual recording mode FOCUS Focus can be adjusted manually Adjusting Focus Manually A p 86 Displayed only in the manual recording mode BRIGHTNESS ADJUST Adjusts the overall brightness of the screen Adjusting Brightness A p 87 Displayed only in the manual recording mode SHUTTER SPEED Shutter speed can be adjusted Setting Shutter Speed A p 88 Displayed only in the manual recording ...

Page 177: ...n High speed Recording A p 111 TIME LAPSE RECORDING Enables the changes of a scene that occur slowly over a long period to be shown within a short time by taking frames of it at a certain interval Recording at Intervals TIME LAPSE RECORDING A p 112 AUTO REC This function enables the unit to record automatically by sensing the changes in subject s movement brightness within the red frame displayed ...

Page 178: ...e remaining space on the built in memory runs out SEAMLESS RECORDING A p 186 x v Color Captures the true colors Use an x v Color compatible TV for playback x v Color A p 186 ZOOM MIC Sets the zoom microphone ZOOM MIC A p 187 MIC LEVEL Make the adjustments such that MIC LEVEL does not turn red MIC LEVEL A p 187 MIC LEVEL SETTING Sets the microphone level MIC LEVEL SETTING A p 188 HEADPHONE VOL ADJ ...

Page 179: ...INFO You can check the remaining recording time on the built in memory and SD card Operating Details Checking the Remaining Recording Time A p 118 Menu Settings 179 ...

Page 180: ...ing Details Setting Backlight Compensation A p 91 ZEBRA During video recording diagonal lines zebra pattern are displayed only at areas with the specified luminance levels Operating Details Checking for Overexposed Areas ZEBRA A p 92 TELE MACRO Enables close up shots when using the telephoto T end of the zoom Operating Details Taking Close up Shots A p 93 TOUCH PRIORITY AE AF Automatically adjusts...

Page 181: ...ubject may become unnatural Displaying the Item 1 Open the LCD monitor 0 Check if the recording mode is A 2 Tap MENU REC PLAY MENU 0 The shortcut menu appears 3 Tap MENU in the shortcut menu MENU 4 Tap GAIN UP VIDEO GAIN UP WIND CUT Reduces the noise caused by wind Setting Details OFF Deactivates the function ON Activates the function Displaying the Item 1 Open the LCD monitor 0 Check if the recor...

Page 182: ...ents and play back the slow motion video smoothly This is a handy function for checking movements such as golf swings Operating Details Slow motion High speed Recording A p 111 TIME LAPSE RECORDING Enables the changes of a scene that occur slowly over a long period to be shown within a short time by taking frames of it at a certain interval This is useful for making observations such as the openin...

Page 183: ...T SHOOTING SPEED Sets the speed for continuous shooting Setting Details HIGH SPEED 0 Shoots up to 95 still images continuously in the still image mode in about 7 6 second 0 Shoots up to 90 still images continuously in the video mode in about 1 8 second MEDIUM SPEED 0 Shoots up to 95 still images continuously in the still image mode in about 15 2 second 0 Shoots up to 90 still images continuously i...

Page 184: ...recorded In addition fast moving subjects can also be captured sharply without flickering Setting Details 50i Does not perform progressive recording Videos are recorded in 1080 50i 50p Performs progressive recording Videos are recorded in 1080 50p Memo 0 Video quality cannot be set in the 50p mode 0 High speed recording is not available in the 50p mode 0 Videos that are recorded in the 50p mode ar...

Page 185: ... shortcut menu appears 3 Tap MENU in the shortcut menu MENU 4 Tap VIDEO QUALITY VIDEO QUALITY VIDEO ZOOM Sets the maximum zoom ratio Setting Details 10x OPTICAL Enables recording with 1 10x optical zoom Set this when digital zoom is not desired 15 13 x DYNAMIC Zoom ratio varies according to the image stabilizer setting OFF Up to 15x ON Up to 13x ON AIS Up to 12x ON Enhanced AIS Up to 10x 60x DIGIT...

Page 186: ...ation of the seamless videos Combining Videos Recorded by Seamless Recording A p 133 Displaying the Item 1 Open the LCD monitor 0 Check if the recording mode is A 2 Tap MENU REC PLAY MENU 0 The shortcut menu appears 3 Tap MENU in the shortcut menu MENU 4 Tap SEAMLESS RECORDING SEAMLESS RECORDING VIDEO x v Color Captures the true colors Use an x v Color compatible TV for playback Setting Details OF...

Page 187: ...t menu appears 3 Tap MENU in the shortcut menu MENU 4 Tap ZOOM MIC ZOOM MIC VIDEO MIC LEVEL Make the adjustments such that MIC LEVEL does not turn red Setting Details OFF Hides display of microphone input level ON Shows display of microphone input level Displaying the Item 1 Open the LCD monitor 0 Check if the recording mode is A 2 Tap MENU REC PLAY MENU 0 The shortcut menu appears 3 Tap MENU in t...

Page 188: ...u appears 3 Tap MENU in the shortcut menu MENU 4 Tap MIC LEVEL SETTING MIC LEVEL SETTING VIDEO HEADPHONE VOL ADJ Sets the volume level of the connected headphones Adjusting the Volume Level of Headphones During Recording 1 Open the LCD monitor 0 Check if the recording mode is A 2 Tap MENU REC PLAY MENU 0 The shortcut menu appears 3 Tap MENU in the shortcut menu MENU 4 Tap HEADPHONE VOL ADJ HEADPHO...

Page 189: ...e recording mode is A 2 Tap PLAY to select the playback mode PLAY REC MENU 3 Tap on the file to start playback REC MENU 4 Adjust the volume level of the headphones 0 To turn up the volume set the zoom lever to the T end 0 To turn down the volume set the zoom lever to the W end Menu Settings 189 ...

Page 190: ...isplayed only in the manual recording mode FOCUS Focus can be adjusted manually Adjusting Focus Manually A p 86 Displayed only in the manual recording mode BRIGHTNESS ADJUST Adjusts the overall brightness of the screen Adjusting Brightness A p 87 Displayed only in the manual recording mode SHUTTER SPEED Shutter speed can be adjusted Setting Shutter Speed A p 88 Displayed only in the manual recordi...

Page 191: ...atically by Sensing Movements AUTO REC A p 114 SHUTTER MODE Continuous shooting settings can be adjusted SHUTTER MODE A p 194 CONT SHOOTING SPEED Sets the speed for continuous shooting CONT SHOOTING SPEED A p 195 SMILE SHOT Automatically captures a still image upon detection of a smile Capturing Smiles Automatically SMILE SHOT A p 101 SMILE NAME DISPLAY Sets the items to display when faces are det...

Page 192: ...tails Setting Backlight Compensation A p 91 TELE MACRO Enables close up shots when using the telephoto T end of the zoom Operating Details Taking Close up Shots A p 93 TOUCH PRIORITY AE AF Automatically adjusts focus and brightness based on the subjects faces or selected area Operating Details Capturing Subjects Clearly TOUCH PRIORITY AE AF A p 100 FLASH For setting the flash Setting Details OFF F...

Page 193: ...rect usage may result in burns 0 Heat from the flash may result in emission of smoke 0 Do not touch the flash immediately after it is used SELF TIMER Use this when taking a group photo Operating Details Taking Group Shots Self timer A p 115 GAIN Enables selection of the ISO level Setting Details AUTO Adjusts the ISO level automatically according to the brightness of the subject ISO100 ISO200 ISO40...

Page 194: ...till images continuously while the SNAPSHOT button is pressed Memo 0 The continuous shooting speed can be changed CONT SHOOTING SPEED A p 195 0 Continuous shooting is not available when image size is set to 3968x2976 0 Some SD cards may not support continuous shooting 0 The continuous shooting speed will drop if this function is used repeatedly Displaying the Item 1 Open the LCD monitor 0 Check if...

Page 195: ...ng continuous shooting while video recording is in progress sets the mode to LOW SPEED temporarily Displaying the Item 1 Open the LCD monitor 0 Check if the recording mode is B 2 Tap MENU MENU MENU PLAY 0 The shortcut menu appears 3 Tap MENU in the shortcut menu MENU 4 Tap CONT SHOOTING SPEED IMAGE CONT SHOOTING SPEED SMILE SHOT Automatically captures a still image upon detection of a smile Operat...

Page 196: ...Open the LCD monitor 0 Check if the recording mode is B 2 Tap MENU MENU MENU PLAY 0 The shortcut menu appears 3 Tap MENU in the shortcut menu MENU 4 Tap IMAGE SIZE IMAGE SIZE IMAGE GRID Displays gridlines to make it easier to detect when the subject appears slanted Setting Details OFF Turns off grid display ON Turns on grid display Displaying the Item 1 Select still image mode 0 Check if the recor...

Page 197: ...ecorded videos Checking the Content of Videos Quickly Digest Playback A p 122 PLAYBACK PLAYLIST Plays back the playlists that you have created Playing Back Playlists A p 128 EDIT PLAYLIST Creates or edits a playlist Creating Playlists with Selected Files A p 137 Creating Playlists by Date A p 138 Editing Playlists A p 139 PROTECT CANCEL Protects files from being deleted accidently Protecting Relea...

Page 198: ...e Management Information A p 123 SEAMLESS REC CTRL Videos that are recorded on two separate media and with SEAMLESS RECORDING in the video recording menu enabled can be combined into a single video Combining Videos Recorded by Seamless Recording A p 133 K2 TECHNOLOGY Reproduces small or high pitched sounds that cannot be recorded during recording and plays back with a sound quality close to the or...

Page 199: ... a Specific Video Still Image by Date A p 126 DISPLAY DATE TIME Sets whether to display the recording date and time during video playback Setting Details OFF Does not display the date and time during playback ON Displays the date and time during playback Displaying the Item 1 Open the LCD monitor 0 Check if the recording mode is A 2 Tap PLAY to select the playback mode PLAY REC MENU 3 Tap MENU REC...

Page 200: ...rd Operating Details Moving Files to an SD Card A p 163 TRIMMING Select the required part of a video and save it as a new video file Operating Details Capturing a Required Part in the Video TRIMMING A p 134 UPLOAD SETTINGS Capture and copy a part of a recorded video maximum 15 minutes for uploading to YouTube Operating Details Capturing Videos for Uploading to YouTube A p 135 PLAYBACK OTHER FILE P...

Page 201: ...n slideshow playback SLIDE SHOW EFFECTS A p 202 PROTECT CANCEL Protects files from being deleted accidently Protecting Releasing Protection of the Currently Displayed File A p 131 Protecting Releasing Protection of Selected Files A p 132 COPY Copies files from the built in memory to the SD card Copying Files to an SD Card A p 162 MOVE Moves files from the built in memory to the SD card Moving File...

Page 202: ...rnal hard disk drives Displaying the Item 1 Open the LCD monitor 0 Check if the recording mode is B 2 Tap PLAY to select the playback mode MENU MENU PLAY 3 Tap MENU MENU REC 4 Tap SLIDE SHOW EFFECTS SLIDE SHOW EFFECTS IMAGE PROTECT CANCEL Protects files from being deleted accidently Operating Details Protecting Releasing Protection of the Currently Displayed File A p 131 Protecting Releasing Prote...

Page 203: ...05 REC MEDIA FOR VIDEO Sets the recording playback media of videos REC MEDIA FOR VIDEO A p 206 REC MEDIA FOR IMAGE Sets the recording playback media of still images REC MEDIA FOR IMAGE A p 206 OPERATION SOUND Turns on or off the operation sound OPERATION SOUND A p 207 SILENT MODE Sets to the Silent mode in which operation sounds are turned off and the brightness of the screen is reduced SILENT MOD...

Page 204: ...is unit are connected using the HDMI mini connector HDMI CONTROL A p 212 FACTORY PRESET Returns all the settings to their default values FACTORY PRESET A p 213 UPDATE Updates the functions of this unit to the latest version UPDATE A p 213 FORMAT BUILT IN MEM Deletes all files on the built in memory FORMAT BUILT IN MEM A p 213 FORMAT SD CARD Deletes all files on the SD card FORMAT SD CARD A p 214 E...

Page 205: ...hange the display style 0 After setting tap SET LANGUAGE The language on the display can be changed Operating Details Changing the Display Language A p 70 MONITOR BRIGHTNESS Sets the brightness of the LCD monitor Setting Details AUTO Sets the brightness automatically to 4 when using outdoors and to 3 when using indoors 4 Brightens the backlight of the monitor regardless of the surrounding conditio...

Page 206: ...shortcut menu appears 2 Tap Q 3 Tap REC MEDIA FOR VIDEO REC MEDIA FOR VIDEO COMMON REC MEDIA FOR IMAGE Sets the recording playback media of still images Setting Details BUILT IN MEMORY Records still images to this unit s built in memory SD CARD Records still images to the SD card Displaying the Item 1 Tap MENU REC PLAY MENU 0 When entering from the recording mode tap MENU again as the shortcut men...

Page 207: ... ON Turns on the Silent mode Displaying the Item 1 Tap MENU REC PLAY MENU 0 When entering from the recording mode tap MENU again as the shortcut menu appears 2 Tap Q 3 Tap SILENT MODE SILENT MODE COMMON Memo 0 T appears when SILENT MODE is set to ON 0 You can also turn on the Silent mode using the SILENT button on this unit SILENT Button A p 216 0 It may be difficult to see the screen in Silent mo...

Page 208: ...de tap MENU again as the shortcut menu appears 2 Tap Q 3 Tap AUTO POWER OFF AUTO POWER OFF COMMON QUICK RESTART Enables the power to turn on quickly when the LCD monitor is opened again within 5 minutes Setting Details OFF Deactivates the function ON Enables the power to turn on quickly when the LCD monitor is opened again within 5 minutes Memo 0 The power consumption within 5 minutes after the LC...

Page 209: ...lays a demonstration of the special features of this unit Displaying Demo Mode A Remove the battery pack and SD card B Connect the AC adapter C Open the LCD monitor and turn on the power 0 Demonstration starts playing after 3 minutes 0 To stop playback tap on the screen Memo 0 This mode is not available in the playback mode 0 SMILE NAME DISPLAY is set to ON when the demo mode is activated Setting ...

Page 210: ... confirm the adjusted positions 3 times in total 1 3 PRESS MARK AGAIN CONFIRM THE ADJUSTMENT 0 Keep tapping as its position changes with every tap 0 If areas on the adjustment screen other than the mark are tapped errors will occur In this case try again from step 4 6 Tap OK OK COMPLETED 0 Setting ends and returns to the menu screen Caution 0 Do not tap areas other than the mark during touch scree...

Page 211: ...ortcut menu appears 2 Tap Q 3 Tap DISPLAY ON TV DISPLAY ON TV COMMON VIDEO OUTPUT Sets the aspect ratio 16 9 or 4 3 according to the connecting TV Setting Details 4 3 Select this when connecting to a conventional TV 4 3 16 9 Select this when connecting to a widescreen TV 16 9 Displaying the Item 1 Tap MENU REC PLAY MENU 0 When entering from the recording mode tap MENU again as the shortcut menu ap...

Page 212: ...en entering from the recording mode tap MENU again as the shortcut menu appears 2 Tap Q 3 Tap HDMI OUTPUT HDMI OUTPUT COMMON HDMI CONTROL Sets whether to link operations with an HDMI CEC compliant TV Setting Details OFF Turns off linked operations ON Turns on linked operations Displaying the Item 1 Tap MENU REC PLAY MENU 0 When entering from the recording mode tap MENU again as the shortcut menu a...

Page 213: ... www3 jvckenwood com english support index html FORMAT BUILT IN MEM Deletes all files on the built in memory Setting Details FILE Deletes all files on the built in memory FILE MANAGEMENT NO Deletes all files on the built in memory and resets the folder and file numbers to 1 Caution 0 All data on the built in memory will be deleted when it is formatted Copy all files on the built in memory to a com...

Page 214: ...e tap MENU again as the shortcut menu appears 2 Tap Q 3 Tap FORMAT SD CARD FORMAT SD CARD COMMON ERASE ALL DATA Execute this process when disposing of this unit or passing it to another person 1 Tap MENU REC PLAY MENU 0 When entering from the recording mode tap MENU again as the shortcut menu appears 2 Tap Q 3 Tap ERASE ALL DATA ERASE ALL DATA COMMON 4 Tap YES NO YES ALL DATA WILL BE ERASED MEMORY...

Page 215: ...ed the remote control cannot be used as the sensor will be covered In addition white balance may not function properly Set WHITE BALANCE in the Manual mode accordingly Setting White Balance A p 90 0 Wide conversion lens cannot be attached Rear 1 Zoom Volume Lever 0 During shooting Adjusts the shooting range 0 During playback index screen Moves to the next or previous page 0 During video playback A...

Page 216: ...in progress 0 Goes out Charging finished 7 ACCESS Access Lamp 0 Lights up blinks during recording or playback Do not remove the battery pack AC adapter or SD card 8 USB Connector 0 Connects to computer using a USB cable 9 HDMI Mini Connector 0 Connects to TV using an HDMI mini cable 10 AV Headphones Connector 0 Connects to the AV connector of a TV etc 0 Connects to optional headphones Attaching He...

Page 217: ...s self portraits to be taken by rotating the monitor Using the Touch Screen A p 67 Names of Buttons and Functions on the LCD Monitor A p 67 Caution 0 Do not press against the surface with force or subject it to strong impact Doing so may damage or break the screen Names of Parts 217 ...

Page 218: ...ode A p 76 Manual Recording A p 82 13 SILENT MODE SILENT MODE A p 207 14 Zoom ZOOM A p 185 15 LCD Monitor Brightness MONITOR BRIGHTNESS A p 205 16 Focus Adjusting Focus Manually A p 86 17 APERTURE PRIORITY Setting Aperture A p 89 18 Brightness Adjusting Brightness A p 87 19 Shutter Speed Setting Shutter Speed A p 88 Video Recording 0 00 12 34 0 12 34 010 00 50P 1 2 4 6 7 9 8 0 a b c d 5 3 1 Video ...

Page 219: ...ng SYSTEM SELECT A p 184 4 Operation Indicator Operation Buttons for Video Playback A p 120 5 Date Time 0 Displays the recording date and time 6 Media 7 Battery Indicator Checking the Remaining Recording Time A p 118 8 Playback Time Playing Back Videos A p 120 9 Time Lapse Playback Time Lapse Setting A p 113 10 External Storage Playback Playing Back with a DVD Writer A p 148 Playing Back with a BD...

Page 220: ...A p 207 8 External Storage Playback Playing Back with a DVD Writer A p 148 Playing Back with a BD Writer External Blu ray Drive A p 156 Playing Back Files in the USB External Hard Disk Drive A p 160 9 1080p Output HDMI OUTPUT A p 212 When the unit is not working properly Turning Off the Power 1 Close the LCD monitor 2 Remove the AC adapter and battery pack from this unit reattach them open the LCD...

Page 221: ...In this case adjust the settings manually Adjusting Focus Manually A p 86 Recording stops automatically Recording stops automatically as it cannot be performed for 12 or more consecutive hours according to specifications It may take some time to resume recording Turn off this unit wait for a while and turn it on again This unit stops automatically to protect the circuit when the temperature rises ...

Page 222: ...Clean the terminals of the SD card with a dry cotton swab or something similar Execute FORMAT SD CARD in the COMMON menu All data will be deleted FORMAT SD CARD A p 214 Verify the system requirements of your computer when using Everio MediaBrowser to play back Verifying System Requirements Guideline A p 165 Cannot find a recorded file Cancel the date search function Searching for a Specific Video ...

Page 223: ...d correctly Preparing a DVD Writer CU VD50 A p 142 Preparing a DVD Writer CU VD3 A p 142 Unable to create disc with a BD writer external Blu ray drive The USB cable is not connected correctly Preparing a BD Writer External Blu ray Drive A p 149 BACK UP menu does not disappear While the USB cable is connected the BACK UP menu is displayed Unable to turn off the BACK UP menu Turn off the power of th...

Page 224: ...is not a malfunction The recorded subject is too dark Use backlight compensation when the background is bright and the subject is dark Setting Backlight Compensation A p 91 Use LIGHT in the menu LIGHT A p 180 Use NIGHTALIVE in SCENE SELECT Shooting According to Scene Subject A p 84 Use GAIN UP in the menu GAIN UP A p 181 Set BRIGHTNESS ADJUST in the recording menu to the side Adjusting Brightness ...

Page 225: ... and battery pack This unit will be reset Make a backup of important recorded data Make a backup of important recorded data It is recommended to copy your important recorded data to a DVD or other recording media for storage JVC will not be responsible for any lost data Error Message SET DATE TIME Connect the AC adapter charge the battery for more than 24 hours and set the clock If the message sti...

Page 226: ... SD CARD A p 214 PLAYLIST QUANTITY EXCEEDS LIMIT Reduce the number of the playlist to 99 files or less Up to 99 playlists can be created CANCELLED BECAUSE PLAYLIST AMOUNT EXCEEDED MAXIMUM LIMIT When creating a DVD reduce the number of playlists to be saved Reduce the number of videos to add to the playlist to 999 files Creating Playlists from the Recorded Videos A p 137 PROCESSING CANCELLED DUE TO...

Page 227: ...ohol Doing so may cause damage to the unit 0 When using a chemical cloth or cleaner be sure to observe the warning labels and instructions of the product 0 Do not leave the device in contact with rubber or plastic products for a long time Lens LCD Monitor 0 Use a lens blower commercially available to remove any dust and a cleaning cloth commercially available to wipe off any dirt Mold may form if ...

Page 228: ...SELECT NIGHTALIVE Flash Recommended shooting distance Within 2 m Filter diameter 2 46 mm screw pitch 0 75 mm Zoom during video recording Optical zoom Up to 10x Dynamic zoom Up to 15x a OFF Up to 13x a ON Up to 12x a ON AIS Up to 10x a ON enhanced AIS Digital zoom Up to 200x Zoom during still image recording Optical zoom Up to 10x Continuous shooting speed during video record standby HIGH SPEED App...

Page 229: ...JPEG standard Extension JPG Image size Approximate Number of Still Images Unit Number of Shots A p 119 AC Adapter AP V30M Item Details Power supply AC 110 V to 240 V 50 Hz 60 Hz Output DC 5 2 V 1 8 A Allowable operating temperature 0 C to 40 C 10 C to 35 C during charging Dimensions mm 50 x 29 x 100 W x H x D excluding cord and AC plug Mass Approx 112 g Battery Pack BN VG114E BN VG114AC Item Detai...

Page 230: ...0212HOH SW VM C2C 2012 JVC KENWOOD corporation ...

Reviews: