60
EN
PLAYBACK
Advanced Connections
4
TURN ON POWER
Turn the camcorder's Power Dial to "PLAY"
while pressing down the lock button located
on the dial and turn on the PC.
NOTES:
●
When transferring still images, never use the
battery pack installed in the camcorder as the
power supply. Use the provided AC Power
Adapter/Charger.
●
Never connect the JLIP-PC connection cable and
the DV cable simultaneously to the camcorder.
Connect only the cable you wish to use to the
camcorder.
●
The date/time information cannot be captured into
PC.
●
Also refer to the instruction manuals of the provided
Software and the DV connector-equipped capture
board.
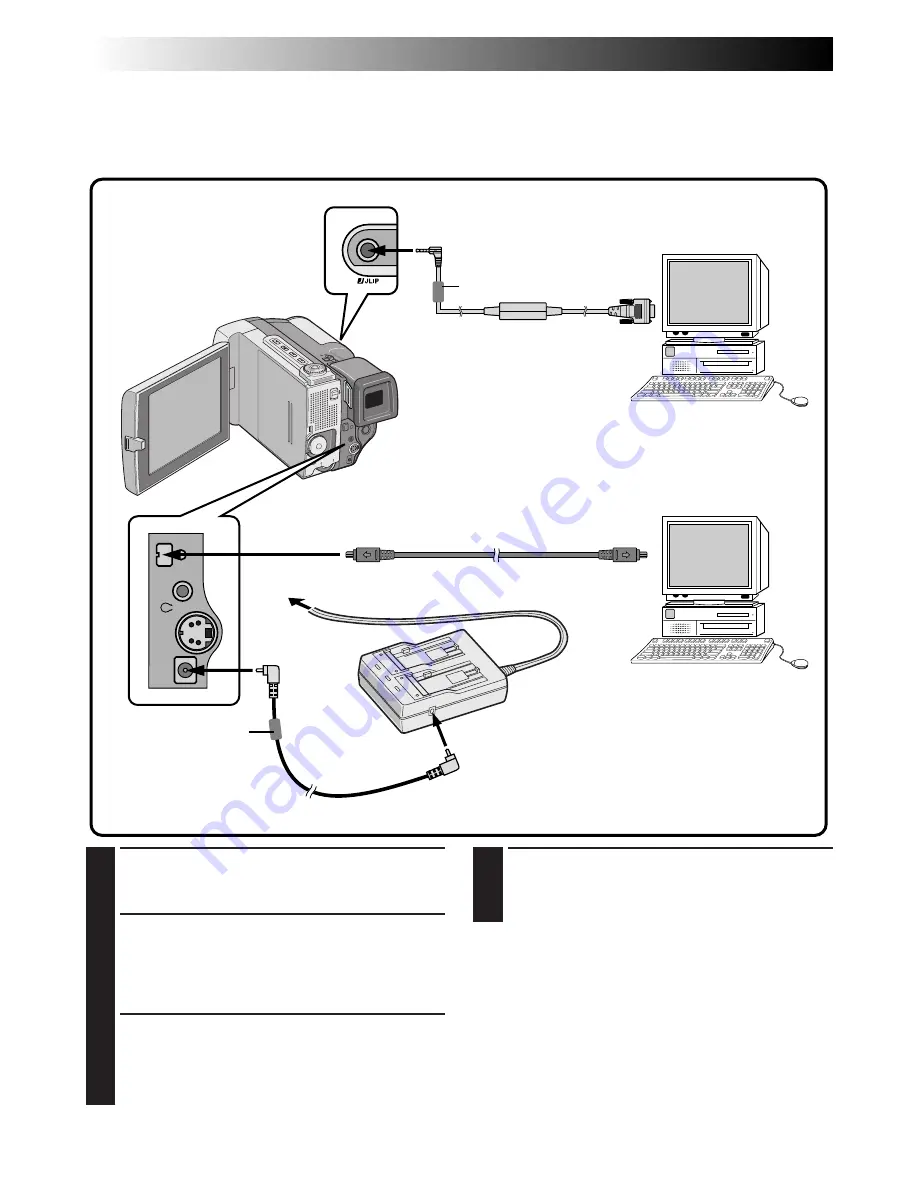
Connection To A Personal Computer
This camcorder can transfer still images to a personal computer by using the provided software when
connected as shown in the illustration below. It is also possible to transfer still images to a personal compu-
ter with a DV connector-equipped capture board installed.
1
CONFIRM POWER-OFF STATUS
Make sure the camcorder and PC are turned
off.
2
CONNECT CAMCORDER TO PC
Pull out the connector cover and open it.
Connect the camcorder to a PC using the cable
according to your PC type as shown in the
illustration.
3
SUPPLY POWER
Connect the camcorder to the AC Power
Adapter/Charger using the DC cord, then plug
the AC Power Adapter/Charger's power cord
into an AC outlet.
JLIP (DIGITAL STILL)
output connector
To RS-232C
To AC outlet
JLIP-PC connection cable
(provided)
DV cable (optional)
To DV
connector
AC Power
Adapter/Charger
(provided)
To DC OUT jack
PC with DV
connector-
equipped
capture board
To DV OUT
connector
PC
To DC IN
jack
DC cord
Core filter
Core filter
Summary of Contents for GR-DVL9000
Page 90: ...90EN MEMO ...
Page 91: ...EN 91 MEMO ...


