38
EN
MANUAL
PAUSE
W
H
FOCUS
EXPOSURE
AUTO
OFF
OFF
AUTO
AUTO
W. BALANCE
FADER
/ WIPE
P. AE
/ EFFECT
RETURN
4
FADER / WIPE
FADER – BLACK
FADER – B.W
WIPE – SHUTTER
RANDOM
OFF
FADER – WHITE
P
R
?
W
H
B
K
B W
WIPE–CORNER
SEL.
4
A
M
5S
OFF
PLAY
RECORDING
Advanced Features (Cont.)
FADE/WIPE Effects
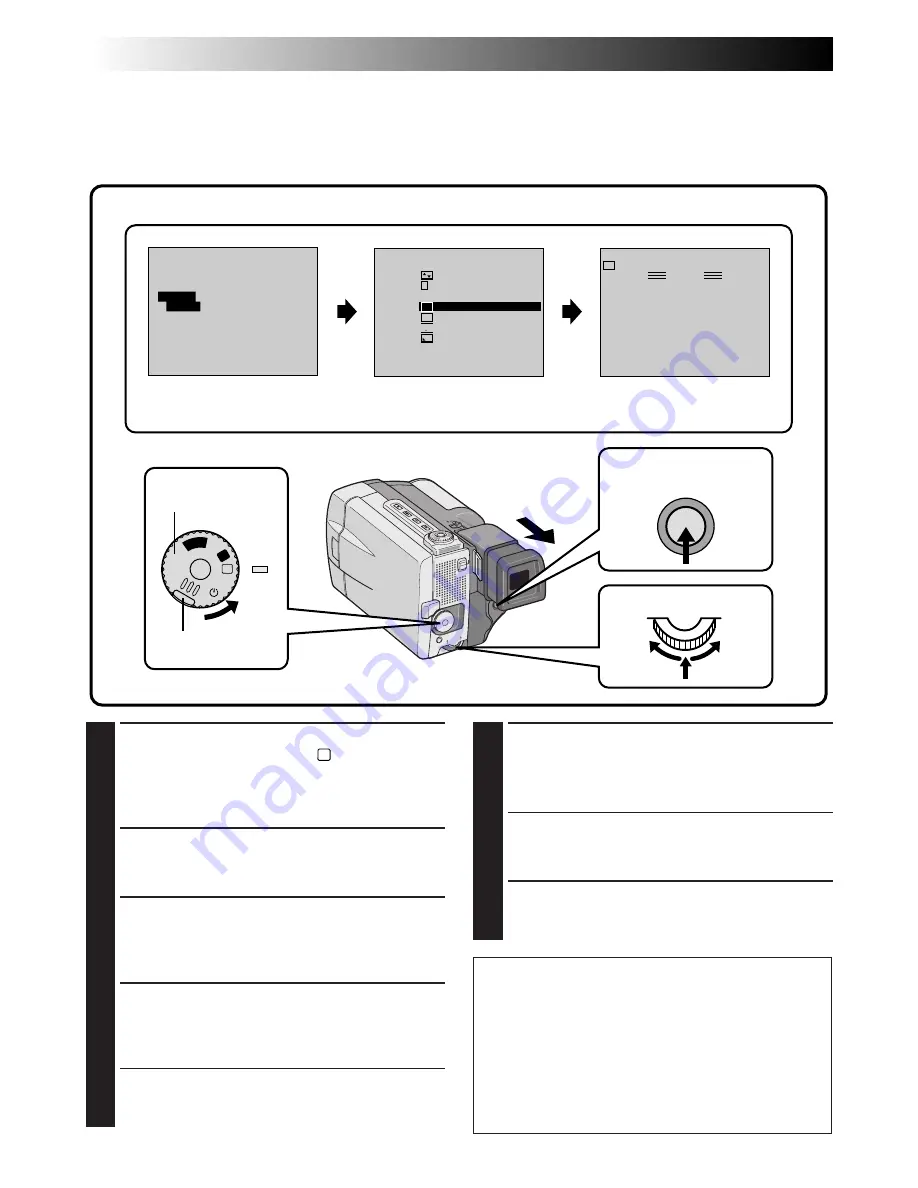
Use these to spice up the transition from one scene to the next. You can also vary transitions from scene to
scene. Refer to pages 38 – 43 for Fade/Wipe effects and techniques.
Select any one effect from the Fader/Wipe Menu.
1
SELECT OPERATION MODE
First turn the Power Dial to “
M
” while pressing
down the lock button located on the dial,
make sure the LCD monitor is open fully or the
viewfinder is pulled out.
2
ACCESS MANUAL MODE ITEM
MENU
Press the Select Dial.
3
ACCESS FADER/WIPE MENU
Move the pointer and highlight bar to “FADER/
WIPE” by rotating the Select Dial and then
press it. The Fader/Wipe Menu appears.
4
SELECT EFFECT
Move the pointer and highlight bar to the
desired effect by rotating the Select Dial, then
press it.
• The Fader/Wipe Menu disappears and the
effect is reserved. The indicator representing
the selected effect appears.
5
START RECORDING
Press START/STOP to start recording and
activate fade- or wipe- in
OR . . .
END RECORDING
Press START/STOP to end recording and
activate fade- or wipe- out.
6
TO CANCEL FADE/WIPE EFFECTS
In step 4, move the pointer and highlight bar to
“OFF”. Press the Select Dial.
Lock button
Power Dial
Display
Fader/Wipe Menu
Manual Mode Item Menu
START/STOP button
Select Dial
IMPORTANT:
●
If certain P.AE/Effects (
Z
pg. 44) are activated
or if the Progressive Dial is set to "VIDEO",
some Fade/Wipe Effects cannot be used. If
you select a Fade/Wipe Effect that is unusable
in the current situation, the indication blinks.
●
When the Digital Image Stabilizer is activated,
the Fade/Wipe Effects are not available.
Summary of Contents for GR-DVL9000
Page 90: ...90EN MEMO ...
Page 91: ...EN 91 MEMO ...


