background image

5

ENGLISH

Discs you can play

You can play back the following discs on this
unit:

DVD Video

: whose video format is NTSC or

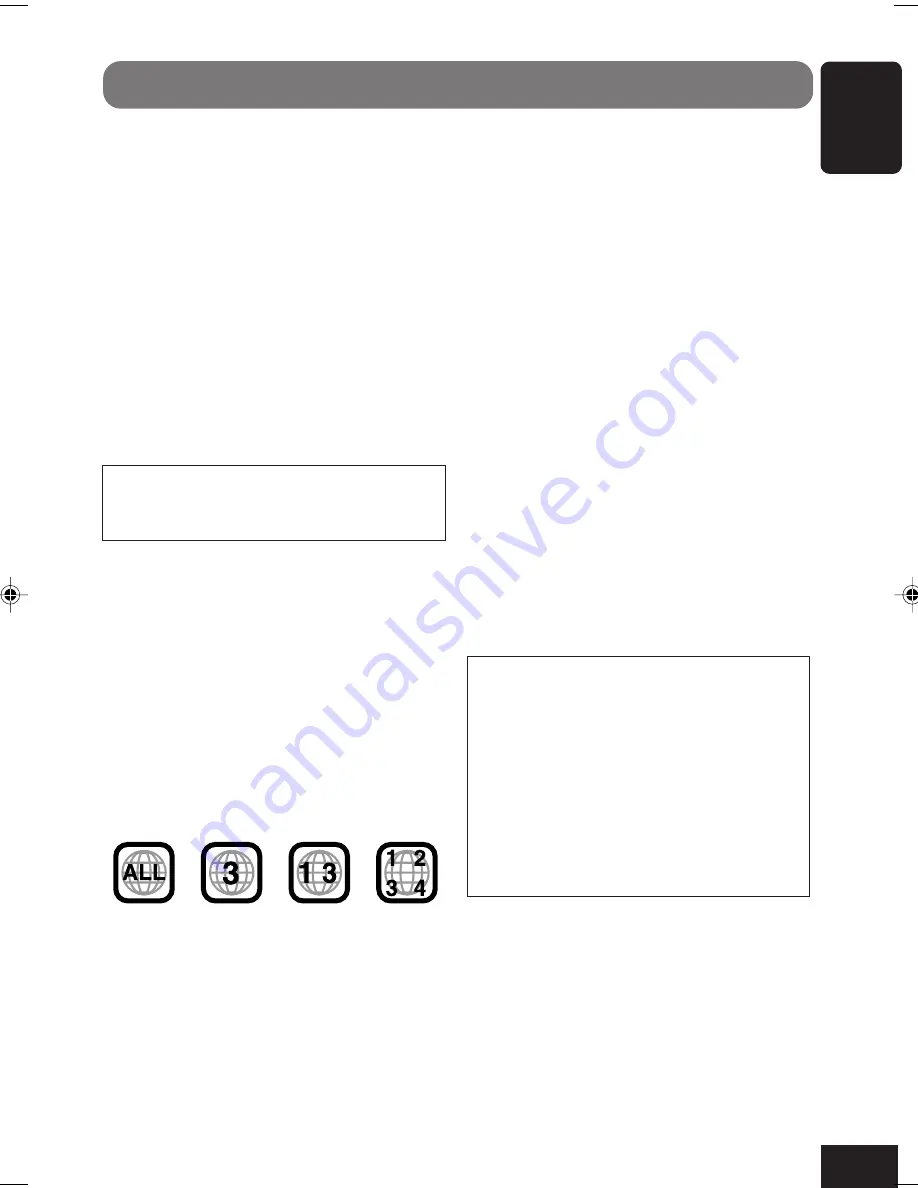
PAL and whose region code is “3.”

–DVD-Rs and DVD-RWs recorded in

the DVD-Video format can also be
played (see page 69).

Video CD (VCD)/Audio CD

MP3

: CD-Rs or CD-RWs including MP3

files with the file extension code
<mp3>. They must be recorded in the
format compliant with ISO 9660 Level
1, ISO 9660 Level 2, Romeo, and Joliet.

On some discs, the actual operations may be
different from what is explained in this
manual.

The following discs cannot be played back

DVD Audio, DVD-ROM, DVD-RAM,
DVD-RW recorded in the DVD-VR format,
CD-ROM, CD-I (CD-I Ready), Photo CD, etc.
• Playing back these discs will generate noise

and damage the speakers.

* Note on Region Code

DVD players and DVD Video discs have their
own Region Code numbers. This unit can only
play back DVD discs whose Region Code
numbers include “3.”

If you insert a DVD Video disc of an incorrect
Region Code

“REGION CODE ERROR!” appears on the
monitor.

• “DVD Logo” is a trademark of DVD Format/

Logo Licensing Corporation registered in the
US, Japan and other countries.

Examples:

Introduction—Playable Discs

*

Manufactured under license from Dolby
Laboratories. “Dolby”, “Pro Logic”, and
the double-D symbol are trademarks of
Dolby Laboratories.

**

“DTS” and “DTS Digital Surround” are
registered trademarks of Digital Theater
Systems, Inc.

DVD Video—digital audio formats

The System can play back the following digital
audio formats.

Linear PCM:

 Uncompressed digital audio, the

same format used for CDs and most studio
masters.

Dolby Digital 

*

:

 Compressed digital audio,

developed by Dolby Laboratories, which
enables multi-channel encode to create the
realistic surround sound.

DTS 

**

 (Digital Theater Systems):

Compressed digital audio, developed by Digital
Theater Systems, Inc., which enables multi-
channel like Dolby Digital. As the compression
ratio is lower than for Dolby Digital, it provides
wider dynamic range and better separation.

MPEG Multichannel:

 Another compressed

digital audio which also enables multi-channel
encode to create the realistic surround sound.
However, this System downmix the multi-
channel singnals into 2 channels (decoded
PCM) and play it back.

This product incorporates copyright
protection technology that is protected by
U.S. patents and other intellectual property
rights. Use of this copyright protection
technology must be authorized by
Macrovision, and is intended for home and
other limited viewing uses only unless
otherwise authorized by Macrovision.
Reverse engineering or disassembly is
prohibited.

02-07_KD-AV7005[U]f.p65

10/1/04, 11:52 AM

5

Summary of Contents for EXAD KD-AV7000

Page 1: ...lation et les raccordements se référer au manuel séparé ENGLISH Detachable ESPAÑOL FRANÇAIS DVD RECEIVER WITH MONITOR RECEPTOR DVD CON MONITOR RECEPTEUR DVD ET MONITEUR KD AV7000 ATT MAIN SUB ZOOM ASPECT MENU VOLUME TOPMENU TUNER 5 6 4 2 3 1 8 9 7 11 0 12 10 10 DISC OK AV GUI SET UP RETURN DUAL AVOUT VOL This unit is equipped with the display demonstration To cancel it see page 14 Esta unidad está...

Page 2: ...control panel see page 77 then press the reset button on the main unit using a ball point pen or a similar tool This will reset the built in microcomputer Your preset adjustments such as preset channels or sound adjustments will also be erased The monitor will go into its place if opened IMPORTANT FOR LASER PRODUCTS 1 CLASS 1 LASER PRODUCT 2 CAUTION Do not open the top cover There are no user serv...

Page 3: ...plained later in the sections More about This Receiver see page 68 but not in the same section explaining the operations If you want to know more about the functions or if you have a doubt about the function go to the section and you will find the answers Operations are explained only with the illustrations as follows Hold CAUTIONS on the monitor This product has a fluorescent lamp that contains a...

Page 4: ...Receiver 68 Troubleshooting 72 Additional Information 74 Specifications 76 How to reset your unit 2 Important How to read this manual 3 Introduction Playable Discs 5 Quick Guide How to Use the Controls 6 Remote controller 6 Main unit front 8 Preparation Remote Controller RM RK220 9 Operation Methods 10 Basic Operations 12 Setting the clock 13 Changing the source 14 Changing the graphic screen 14 C...

Page 5: ...ration registered in the US Japan and other countries Examples Introduction Playable Discs Manufactured under license from Dolby Laboratories Dolby Pro Logic and the double D symbol are trademarks of Dolby Laboratories DTS and DTS Digital Surround are registered trademarks of Digital Theater Systems Inc DVD Video digital audio formats The System can play back the following digital audio formats Li...

Page 6: ...aspect ratio Display the monitor adjustment screen Display and erase GUI screen Display Setup Menus Change menu items Confirm General operations AV TUNER DISC VOLUME ZOOM DUAL MAIN SUB AVOUT VOL ASPECT GUI SET UP OK 1 When using Dual Mode the remote controller operates either main or sub source depending on the MAIN SUB setting 2 Only for MP3 3 While playing a DVD chapter is selected on the other ...

Page 7: ...t view angle Zoom the picture Display disc menu Change menu items Confirm MENU TOPMENU Buttons To do Select folders 2 Select tracks Search Change discs Select disc numbers 5 6 4 2 3 1 8 9 7 11 0 12 10 10 OK OK TV tuner operations Buttons To do Start Auto Search Start Manual Search Change preset channel numbers Select preset channel numbers 5 6 4 2 3 1 8 9 7 11 0 12 10 10 ZOOM DUAL Buttons To do Re...

Page 8: ...r angle See page 55 Change the aspect ratio Display the monitor adjustment screen Monitor operations Buttons To do Eject the disc Select chapters tracks Search Display FOLDER select folders 1 Disc operations then Buttons To do Select tracks Search once Display DISC select discs twice Display FOLDER select folders 1 CD changer operations then Buttons To do Start Auto Search Start Manual Search TV t...

Page 9: ...is may cause the battery to give off heat crack or start a fire When throwing away or saving the battery wrap it in tape and insulate otherwise the battery may be overheated crack or fire Do not poke the battery with tweezers or similar tools Doing this may cause the battery to be overheated crack or fire CAUTION DO NOT leave the remote controller in a place such as dashboards exposed to direct su...

Page 10: ...lock time indication Icons shown on this column change each time you press Changes the function modes icons shown to the right change accordingly Changes the source Source and play mode information Ex DVD playback Returns to the previous screen Operation icon FADER REAR Operation icon BALANCE RIGHT Operation icon BALANCE LEFT Operation icon FADER FRONT Ex Fader balance adjustment To erase and disp...

Page 11: ... and off at a press of the button 2 1 3 Move the cursor to an icon you want Confirm Using the buttons and controls directly Some operations are only performed by pressing the buttons directly You can also use the buttons and controls on the main unit and remote controller if they have the same or similar name or marks as shown on the touch panel Examples To eject a loaded disc To eject the monitor...

Page 12: ...cting the CD changer or TV tuner unit you cannot select CD CH CD changer or TV Basic Operations To change the monitor angle See page 55 for details To drop the volume in a moment ATT To restore the sound press it again To store the monitor in place When the unit is turned off the power is temporarily turned on To turn off the power TUNER DISC AV1 AV2 TV CD CH Hold CAUTION on the monitor Do not ope...

Page 13: ... the clock time is displayed on the display of the main unit for a while When the unit is turned on Each time you press the button the information shown on the display of the main unit changes Information shown on the display differs according to the selected source TUNER Frequency Clock Band Preset no DISC Play time Clock Title Chapter Folder Track no AV1 AV2 Source name Clock TV Channel Clock TV...

Page 14: ... display demonstration has been activated and starts automatically when no operations are done for about 30 seconds except while playing a DVD VCD To cancel it select one of the graphic screen 1 While playing any source 2 To view the playback picture from any video source select the screen where the actual playback pictures are shown Changing the touch panel color You can change the touch panel co...

Page 15: ...on mode is MONO 4 ST indicator lights while receiving an FM stereo broadcast While playing a disc 1 Lights up when Dolby Digital signal is detected see page 36 2 Lights up when Dolby Pro Logic II is activated see page 36 3 Lights up when DTS signal is detected see page 36 4 Main information Play time Title no Chapter no Folder no Track no 5 Lights up when the disc is detected 6 Lights up when an M...

Page 16: ... See pages 43 52 Volume level appears when adjusted Dual Mode indicator see page 33 SOURCE icon see pages 14 and 33 Current band Preset no Station frequency FM reception mode Search mode Sound mode see page 39 Surround DSP mode see page 36 Not available for AM Available only after pressing M next to this icon ...

Page 17: ...only possible after storing stations in memory 4 Tune in to a station For Auto Search press either icon once Auto Search begins When a station is received searching stops For Manual Search press either icon repeatedly or hold until a station you want is selected For Preset Search press either icon repeatedly until a preset number you want is selected When an FM stereo broadcast is hard to receive ...

Page 18: ...band FM1 FM3 you want to store FM stations into 2 Start SSM Local FM stations with the strongest signals are searched and stored automatically in the selected FM band Manual presetting 1 Select the band FM1 FM3 and AM you want to store a station into 2 Tune in to a station 3 4 Store the station into a preset number then then then Preset station information will be displayed Select MANUAL or AUTO ...

Page 19: ...set list on the monitor screen To select a preset station using the preset list 1 2 Preset numbers station frequencies and assigned names see page 53 are shown on the list To store a station using the preset list 1 Select the band FM1 FM3 and AM you want to store a station into 2 Tune into a station 3 4 Store the station into a preset number then then Select MANUAL or AUTO ...

Page 20: ...layback buttons see page 22 Back to the beginning Input signal channels are indicated a few second after detected See page 69 VCD DVD See page 14 See page 14 See page 15 See page 39 See pages 43 52 While playing Before playing Playback picture will be shown in the picture view window 1 Available only while playing 2 Not available while playing with PBC activated 3 Not available while playing with ...

Page 21: ...n see page 30 Playback mode see page 30 Sound mode see page 39 Surround DSP mode see page 36 Playback buttons see page 22 MP3 CD CD Text Back to the beginning Only for MP3 see page 22 Disc text ID3 tag information area Only for CD See page 53 See page 14 See page 14 See page 15 See page 39 See pages 43 52 Audio signal format only for DTS CD Available only while playing ...

Page 22: ...s not comes out It takes several seconds for the unit to detect a disc type If a disc menu appears see page 25 2 Adjust the volume 3 Operate the disc Selects the folder only for MP3 Stops see Stopping play on page 69 VCD CD MP3 playback will continue endlessly until you stop it Starts playback Pauses To resume playback press 3 Goes back to the beginning of the current chapter track then skips to t...

Page 23: ...track press or 1 on the remote controller while playing a disc Each time you press the button the search speed changes as follows x2 x5 x10 x20 x60 To resume normal speed press 3 If you hold or 4 while playing a disc the search speed changes x2 x10 If you release the button normal speed playback resumes To play back the still picture Press 8 A still picture appears Frame by Frame Playback You can ...

Page 24: ...n the loading slot While playing any source NO EJT appears on the display of the main unit and the disc cannot be ejected To cancel the prohibition press the same buttons again EJT OK appears Selecting MP3 folders You can also select the MP3 folder using the buttons on the main unit and on the remote controller Hold Hold at the same time OK OK then When you change the aspect ratio either RECEIVER ...

Page 25: ...playing a VCD The PBC function allows you to operate the VCD using menus When you start playback a menu will automatically appear on the monitor A menu may be a list of items divided screens or some moving pictures When a VCD with PBC is detected the PBC indicator appears on the monitor When 3 or SELECT is displayed on the monitor press 3 or OK on the remote controller if pressing 3 does not work ...

Page 26: ...e 31 and Time Search icon see page 32 on the Touch Panel to start playback without PBC To resume the PBC function again press TOPMENU or MENU on the remote controller You can also use PBC icon on the Touch Panel Replaying the previous scenes You can replay about 10 second portion of the previous scene while playing a DVD One Touch Replay Zooming in You can zoom into a particular portion of the pic...

Page 27: ...nel to play This is convenient when playing a Karaoke VCD 1 2 Select an audio language you want Selecting subtitles While playing a chapter containing subtitles in different languages you can select the subtitle language to display on the monitor You can also select the subtitle language using SETUP menu see page 44 1 2 Select a subtitle language you want When playing DVD 1 3 ENGLISH 3 3 SPANISH 2...

Page 28: ...ngle views you can view the same scene at different angles 1 2 Select a view angle you want STEREO To listen to normal stereo left right playback LEFT To listen to the left audio channel RIGHT To listen to the right audio channel When playing VCD STEREO LEFT RIGHT 1 3 2 3 3 3 Ex ...

Page 29: ...ions only for MP3 1 2 3 Select a folder you want To next previous page of the list Current track name or ID3 Tag To locate a track by displaying the track list 1 2 3 Select a track you want Ex when playing MP3 To next previous page of the list Current folder name or ID3 Tag for MP3 Disc name for CD or CD Text ...

Page 30: ... T REM Remaining title time for DVD Remaining disc time for other discs For MP3 TOTAL T REM REM TIME For CD Selecting playback modes You can use only one of the following playback modes at a time Repeat Play Random Play and Intro Scan For VCD While PBC is not in use Repeat Play You can repeat playback Repeat Play can be deactivated only for DVD 1 2 When playing DVD When playing VCD CD When playing...

Page 31: ...hen playing VCD CD When playing MP3 Random Play You can play back tracks at random 1 2 RANDOM PLAY DISC Plays randomly all tracks on the disc FOLDER Plays randomly all tracks of the current folder then moves to the next folder and so on OFF Cancels Random Play Intro Scan You can play back the first 15 seconds of each track sequentially 1 When playing VCD CD When playing MP3 RANDOM PLAY DISC RANDOM...

Page 32: ...c for VCD CD For DVD During play or pause For some DVDs any time For VCD While not playing with PBC activated 1 2 Confirm Ex when playing DVD Clear the entry 3 Enter a number then confirm Examples for DVD To play back from 2 H 34 M 00 S Press number buttons 2 3 4 then ENTER TIME 2 34 00 To play back from 58 M 00 S Press number buttons 0 5 8 then ENTER TIME 0 58 00 Example for VCD CD To play back f...

Page 33: ...Dual Mode and select the subsidiary source 1 2 3 Select the subsidiary source SUB you want The current sources for MAIN and SUB are highlighted Dual Mode Operations To show the main subsidiary source operation screen on the monitor 1 2 To cancel the Dual Mode press Each time you press the icon Dual Mode is turned on and off alternately When Dual Mode is turned off the main source screen appears To...

Page 34: ...you press and hold the button Dual Mode turns on and off When Dual Mode is turned on the source selection screen appears on the monitor see page 33 To operate the subsidiary source 1 2 Press the source buttons then the source operation buttons To operate the main source 1 2 Press the source buttons then the source operation buttons ZOOM DUAL Hold MAIN SUB AVOUT VOL On the remote controller then MA...

Page 35: ...d mode is activated When DSP mode is activated 1 2 3 Activate and select the surround mode or DSP mode 4 Make adjustment if you want to If neither surround mode nor DSP mode is activated you cannot make adjustment 2 1 1 1 It does not appear for some sources 2 It will be shaded when not available 2 ...

Page 36: ...ression rate which enables it to add breadth and depth to the sounds reproduced As such DTS Digital Surround features natural solid and clear sound Dolby Pro Logic II It is a multi channel playback format to convert 2 channel software into 5 channel plus subwoofer The matrix based conversion method used for Dolby Pro Logic II makes no limitation for the cutoff frequency of the surround treble and ...

Page 37: ...nd DSP mode is defeated set to DEFEAT and cannot be changed 1 2 3 While playing a multi channel encoded disc While playing a 2 channel stereo disc Surround On DSP Off While playing a multi channel Dolby Digital encoded disc Dolby Digital is automatically selected While playing a multi channel DTS encoded disc DTS is automatically selected While playing any other disc Dolby Pro Logic II is automati...

Page 38: ...it may be heard only from the center speaker only from the left right front speakers as a phantom center image or various combinations of these speakers As the number increases the phantom effect becomes stronger Normally select 4 To cancel it select OFF When DSP mode is activated 1 Select one of the DSP modes HALL Reproduces the spatial feeling of a large shoebox shaped hall designed primarily fo...

Page 39: ...nd modes Adjust the level of each frequency band Store your adjustment display the screen below Select memory no to store 1 2 3 4 Select one of the preset sound iEQ modes then make adjustment if you want to make your own sound mode See page 41 See page 41 See page 34 See page 35 See page 35 1 It does not appear for some sources 2 It will be shaded when not available 2 1 1 ...

Page 40: ... iEQ modes Display the other set of the sound modes see below Storing your own sound modes You can adjust the sound modes and store your own adjustments in memory 1 Repeat steps 1 to 4 on the left column to select a sound mode you want to adjust 2 Make adjustments as you like 3 After adjustment is finished 4 Select one of the user sound modes USER1 USER2 or USER3 you want to store into For details...

Page 41: ...e you have made an adjustment the volume level will automatically changes by adjusted level whenever you change the source Adjust to match the input level to the FM sound level To adjust fader and balance Adjust fader speaker output balance between the front and rear speakers Adjust the balance speaker output balance between the left and right speakers See page 34 See page 39 1 It does not appear ...

Page 42: ... and night time LIGHT DARK The monitor can memorize the difference between the ambient light level and adjusted level and adjusts the brightness automatically keeping the level difference memorized Adjust the contrast DOWN UP Adjust the tint if the human skin color is unnatural RED GREEN Adjust the color of the picture thinner THIN or thicker THICK 1 Display SCREEN CONTROL screen 2 Select an item ...

Page 43: ...conditions While playing no change can be made on the DVD Menu 1 2 3 4 Select the item you want 5 Change the setting For details see the following pages Ex When setting MONITOR TYPE See page 13 2 1 1 1 It does not appear for some sources 2 It will be shaded when not available ...

Page 44: ... aspect ratio adjustment function 4 3 LB Letter Box Select when the aspect ratio of your TV is 4 3 conventional TV While viewing a wide screen picture the black bars appear on the top and the bottom of the screen 4 3 PS Pan Scan Select when the aspect ratio of your TV is 4 3 While viewing a wide screen picture the black bars do not appear however the left and right edges of the pictures will not b...

Page 45: ... the initial monitor conditions 1 2 3 4 Select the item you want 5 Change the setting For details see the following pages Ex When setting BEEP TONE to OFF See page 13 2 1 1 1 It does not appear for some sources 2 It will be shaded when not available ...

Page 46: ... 63 3 Center portion Turns on and off the on screen icons This also works even if BLIND CONTROL is set to OFF OFF Cancels this function BEEP TONE ON Sound beeps when you operate the unit OFF Cancels this function WIRING CHECK You can confirm the wiring connection is correctly done for particular functions When the listed wires have been connected and electrical signals are detected through the wir...

Page 47: ... screen conditions 1 2 3 4 Select the item you want 5 Change the setting For details see the following pages Ex When setting CLOCK to OFF Language selection screen appears See page 13 2 1 1 1 It does not appear for some sources 2 It will be shaded when not available ...

Page 48: ...SSAGE ON Speaker signal indicators see page 69 and messages are displayed Messages are displayed on the viewing window of the monitor screen When selecting repeat mode random mode intro scan etc When starting Time Search Title Search Chapter Search and Track Search OFF Cancels this function CLOCK ON Display the clock time on the monitor OFF Cancels this function ANIMATION EFFECT ON Source selectio...

Page 49: ...rce operation screen is displayed on the monitor with Dual Mode turned on see page 33 1 2 3 4 Select the item you want 5 Change the setting or enter the setting screen For details see the following pages Ex When entering SEAT POSITION See page 13 2 1 1 1 It does not appear for some sources 2 It will be shaded when not available Appears when TV tuner unit KV C1000 is connected ...

Page 50: ...efeated OFF Cancels this function Auto Surround does not work for any sources other than DISC When another source is selected the currently selected Surround or DSP mode is resumed see page 37 SEAT POSITION Select the listening seat position where you want to locate the sound image Speaker distance and speaker level can be memorized for each position Display sub setting screens FRONT LEFT For the ...

Page 51: ... used SUBWOOFER Select YES connected or NO disconnected SUBWOOFER PHASE Select either NORMAL or REV reverse to obtain better subwoofer sounds These settings are very related to one another therefore one setting is changed some other settings will be changed automatically and appropriately see page 73 Sound comes out of the subwoofer for Dolby Pro Logic II only when either the front speakers or the...

Page 52: ...an watch the rear view as the camera takes MIRROR You can watch the rear view as reflected on the mirror While watching the camera view you can change it to the source playback screen by touching the center portion of the monitor screen In this case you cannot change the aspect ratio and make monitor adjustments see pages 24 and 42 FM IF FILTER In some areas adjacent stations may interfere with ea...

Page 53: ...ntered name Erase all entered character Entered name is displayed Display the other page of the character list of the same type Alternates between Roman alphabet and accented letter lists Alternates between upper and lower cases Roman alphabet list Upper cases Lower cases Accented characters Upper cases Accented characters Lower cases ...

Page 54: ... unit Insert a CD For CDs in the CD changer Select CD CH then select a disc number For TV stations Change TV then select a TV station 2 3 4 Enter a name 5 Confirm If the DELETE DISC NAME or DELETE STATION NAME screen appears The internal memory is full Delete unwanted names before assignment 1 Select an unwanted name 2 Delete 3 Repeat the above steps if you want to delete more names 4 Finish Ex Wh...

Page 55: ... out halfway 2 3 Insert the blind cover to protect the internal mechanism from dust To attach the monitor Insert the monitor into the compartment with the screen facing down Hold Changing the monitor position angle You can change the monitor position and the monitor angle Once you change them they are stored The monitor opens at the stored position and angle next time you eject the monitor To chan...

Page 56: ...folder track no Elapsed playing time Playback mode Sound mode see page 39 Surround DSP mode see page 36 Only for MP3 Back to the beginning Volume level appears when adjusted MP3 CD CD Text Disc text ID3 tag information area Only for CD See page 53 See page 14 See page 14 See page 15 See page 39 See pages 43 52 ...

Page 57: ...However they are not compatible with MP3 discs so you cannot play back MP3 discs You cannot use the KD MK series CD changers with this unit Before operating your CD changer Refer also to the Instructions supplied with your CD changer If no discs are in the magazine of the CD changer or the discs are inserted upside down NO DISC will appear on the monitor If this happens remove the magazine and set...

Page 58: ...ing a disc folder track using the list To locate a disc by displaying the disc list Example while playing MP3 1 2 DISC FOLDER TRACK 3 Select a disc you want To locate a folder by displaying the folder list This functions only for MP3 Though you play back the same disc on the CD changer its folder list may look differently from the one you display while playing it on the main unit This happens beca...

Page 59: ...you can display the text and scroll it on the monitor if it is long and cannot be displayed at a time 1 2 Scroll Text on the information area scrolls once Auto Scroll Text on the information area scrolls every 5 seconds Off The information area goes off no text information will be shown For MP3 For CD Off Auto Scroll Scroll 3 Select a folder you want Shaded when no MP3 files are included You canno...

Page 60: ...g MP3 REPEAT PLAY TRACK REPEAT PLAY DISC REPEAT PLAY OFF REPEAT PLAY TRACK REPEAT PLAY FOLDER REPEAT PLAY DISC REPEAT PLAY OFF Random Play You can play back tracks at random 1 2 RANDOM PLAY FOLDER Plays randomly all tracks of the current folder then moves to the next folder and so on DISC Plays randomly all tracks on the current disc ALL Plays randomly all tracks of all discs in the magazine OFF C...

Page 61: ...s of each track sequentially 1 2 INTRO SCAN TRACK Plays the beginning of all tracks of the current disc FOLDER Plays the first tracks of all folders of the current disc only for MP3 DISC Plays the first tracks of all discs in the magazine OFF Cancels Intro Scan When playing CD When playing MP3 Confirm Clear the entry For CD MP3 For MP3 Ex when playing MP3 INTRO SCAN TRACK INTRO SCAN FOLDER INTRO S...

Page 62: ...iew camera to the AV INPUT 2 jacks to guide you to back the car set the usage of the AV INPUT 2 jacks correctly see page 52 For connections see the Installation Connection Manual separate volume 1 Select the external source AV1 To watch the playback pictures through the component connected to the AV INPUT 1 jacks AV2 To watch the playback pictures through the component connected to the AV INPUT 2 ...

Page 63: ...ges 14 and 33 Current preset no Channel no Search mode Sound mode see page 39 Surround DSP mode see page 36 See page 53 See page 14 See page 14 See page 15 See page 39 See pages 43 52 Playback picture will be shown in the picture view window Not available while viewing the playback picture Available only after pressing M next to this icon ...

Page 64: ...ion For Auto Search press either icon once Auto Search begins When a station is received searching stops For Manual Search press either icon repeatedly or hold until a station you want is selected For Preset Search press either icon repeatedly until a preset number you want is selected Storing stations in memory You can preset 12 TV stations To tune into a preset station see Watching TV programs T...

Page 65: ...to a preset number To tune in to a preset station See also Watching TV programs on page 64 1 2 Select a preset number Preset station information will be displayed Select MANUAL or AUTO then then To select the rest of the preset stations To select the rest of the preset stations ...

Page 66: ...ou can store and select the preset station using the preset list on the monitor screen To select a preset station using the preset list 1 2 Preset numbers channel numbers and assigned names see page 53 of the preset TV stations are shown on the list Select MANUAL or AUTO then then To next previous page of the list To next previous page of the list ...

Page 67: ...the following cases After starting the heater in the car If it becomes very humid inside the car Should this occur the disc player may malfunction In this case eject the disc and leave the unit turned on for a few hours until the moisture evaporates Maintenance How to handle discs When removing a disc from its case press down the center holder of the case and lift the disc out holding it by the ed...

Page 68: ...y to the memory circuit is interrupted for example during battery replacement If this occurs preset the stations again More about This Receiver Basic Disc Operations General In this manual words track and file are interchangeably used when referring to MP3 files and their file names When a disc has been already loaded selecting DISC for the playback source starts disc play Inserting a disc When a ...

Page 69: ...D CDs Do not use following discs Discs with stickers labels or protective seal stuck to the surface Discs on which labels can be directly printed by an ink jet printer Using these discs under high temperatures or high humidity may cause malfunctions or damage to discs The speaker signal indicators appear in the following cases only for DVD CD When a different type of the digital signal is detected...

Page 70: ...recognize 99 folders and 150 files in each folder which recorded in 10 hierarchies This unit can play back the files recorded in VBR variable bit rate The files recorded in VBR have a discrepancy in elapsed time display and do not show the actual elapsed time Especially after performing the search function this difference becomes noticeable Playlist is not available on this unit The search functio...

Page 71: ...interrupted for example during battery replacement If this occurs preset the stations again Sound Mode iEQ Operations If you do not want to store your current adjustment but only to apply the adjustment to the current playback source press RETURN on the monitor screen to go back to the operation screen of the current source Adjustment you made remains effective until you select a sound mode Other ...

Page 72: ... additionally purchased monitor KV MAV7001 in the optional cradle KV CR100 If the original monitor is not removed from the main unit you cannot watch the playback picture while driving Troubleshooting You cannot change the aspect ratio While the GUI operation is in use you cannot change the aspect ratio The left and right edges of the picture are missing on the screen 4 3 PS is selected when viewi...

Page 73: ...utton of the TV tuner unit TV IS NOT CONNECTED appears on the monitor TV tuner unit is disconnected Connect it again Auto Memory does not work Signals are too weak Store TV stations manually The TV s main power does not shut off automatically when you change the source from TV to another TV is connected to the TV tuner unit Connect it to the hideaway unit Remember that audio video signals are alwa...

Page 74: ...00 00 00 Preset iEQ mode The table below shows the preset frequency level settings for each iEQ mode Additional Information Graphic screens You can select one of the following graphic screens For details see page 14 You can activate the display demonstration To cancel it select any other graphic screen While playing a video source except DVD VCD select no graphic screen in other words select the a...

Page 75: ... Persian FI Finnish FJ Fiji FO Faroese FY Frisian GA Irish GD Scots Gaelic GL Galician GN Guarani GU Gujarati HA Hausa HI Hindi HR Croatian HU Hungarian HY Armenian IA Interlingua IE Interlingue IK Inupiak IN Indonesian IS Icelandic IW Hebrew JI Yiddish JW Javanese Code Language KA Georgian KK Kazakh KL Greenlandic KM Cambodian KN Kannada KO Korean KOR KS Kashmiri KU Kurdish KY Kirghiz LA Latin LN...

Page 76: ...4 V 11 V to 16 V allowance Grounding System Negative ground Allowable Operating Temperature 0 C to 40 C 32 F to 104 F Main unit AUDIO AMPLIFIER SECTION Maximum Power Output Front 50 W per channel Rear 50 W per channel Center 35 W Continuous Power Output RMS Front 19 W per channel into 4 Ω 40 Hz to 20 000 Hz at no more than 0 8 total harmonic distortion Rear 19 W per channel into 4 Ω 40 Hz to 20 00...

Page 77: ...ACKCAMERA REMOTE CENTER SPEAKER Power cord POWER Dimensions W H D 230 mm 35 mm 181 mm 9 1 16 in 1 7 16 in 7 3 16 in Mass 1 3 kg 2 9 lbs Design and specifications are subject to change without notice If a kit is necessary for your car consult your telephone directory for the nearest car audio speciality shop Required space for the monitor ejection CAUTION When ejecting the monitor keep an open spac...

Page 78: ...IN EN SP FR 2004 Victor Company of Japan Limited Having TROUBLE with operation Please reset your unit Refer to page of How to Reset Still having trouble USA ONLY Call 1 800 252 5722 http www jvc com We can help you ...

Page 79: ... endroit isolé tel que sous le tapis de sol qui ne permettra pas à l appareil de dissiper sa chaleur Remarques sur les connexions électriques Remplacez le fusible par un de la valeur précisée Si le fusible saute souvent consulter votre revendeur d autoradios JVC L entrée maximum des enceintes doit être supérieure à 50 W à l arrière et à 50 W l avant et 35 W au centre avec une impédance de 4 Ω à 8 ...

Page 80: ...ez vous à E Connexion d amplificateurs externes TV tuner unit Unidad de sintonizador de TV Appareil de tuner de télévision KV C1000 KV C1000 KV C1000 Antenna cord from the car Cable de antena procedente del automóvil Cordon d antenne de la voiture Hideaway unit Unidad oculta Appareil satellite Main unit Unidad principal Appareil principal AV bus cable supplied 1 Cable AV bus suministrado 1 Câble d...

Page 81: ...anga Installation de l appareil sans utiliser de manchon In a Toyota for example first remove the car radio and install the unit in its place En un Toyota por ejemplo primero retire la radio del automóvil y luego instale la unidad en su lugar Par exemple dans une voiture Toyota retirer d abord l autoradio et installer l appareil à sa place Note When installing the unit on the mounting bracket make...

Page 82: ... unidad previa a la instalación es necesario conectar este cable de lo contrario no se podrá conectar la alimentación 1 Non fourni avec cet appareil 2 Pour vérifier le fonctionnement de cet appareil avant installation ce fil doit être connecté sinon l appareil ne peut pas être mis sous tension 1 1 1 1 To parking brake of the car Al freno de estacionamiento del automóvil Au frein de stationnement d...

Page 83: ...can view the playback picture even while the driver are driving your car The driver must not put on the headphones while driving It is dangerous to shut off the outside sounds while driving Additional monitor KV MAV7001 can also be purchased to used so that you do not need to remove the monitor from the main unit KV CR100 Main unit Unidad principal Appareil principal Removable monitor or additiona...

Page 84: ...inture enlevez d abord la peinture avant d attacher le fil L appareil peut être endommagé si cela n est pas fait correctement 5 5 5 5 Remote lead Conductor remoto Fil de commande à distance Y connector not supplied with this unit Conector en Y no suministrado con esta unidad Connecteur Y non fourni avec cet appareil Remote lead Blue with white stripe Conductor remoto Azul con rayas blancas Fil de ...

Page 85: ...at vindt u in de desbetreffende handleiding ENGLISH DEUTSCH FRANÇAIS NEDERLANDS Detachable ATT MAIN SUB ZOOM ASPECT MENU VOLUME TOPMENU TUNER 5 6 4 2 3 1 8 9 7 11 0 12 10 10 DISC OK AV GUI SET UP RETURN DUAL AVOUT VOL This unit is equipped with the display demonstration To cancel it see page 14 Dieses Gerät ist mit einer Demonstrationsfunktion für das Display ausgestattet Auf Seite 14 wird beschri...

Page 86: ...ject to high temperature and humidity Do not leave them in a car For safety Do not raise the volume level too much as this will block outside sounds making driving dangerous Stop the car before performing any complicated operations Temperature inside the car If you have parked the car for a long time in hot or cold weather wait until the temperature in the car becomes normal before operating the u...

Page 87: ...portant How to read this manual To make the explanations as simple and easy to understand as possible we have adapted the following methods Some related tips and notes are explained later in the sections More about This Receiver see page 81 but not in the same section explaining the operations If you want to know more about the functions or if you have a doubt about the function go to the section ...

Page 88: ...tions 38 Selecting the sources 38 Adjusting AV OUTPUT volume 39 Surround Mode Operations 40 Introducing surround DSP mode 41 Turning on and off the surround DSP mode 42 Sound Modes iEQ Operations 44 Selecting preset sound modes 45 Storing your own sound modes 45 Other Sound Adjustments 46 Monitor Adjustments 47 Initial Setup DVD MENU 48 Initial Setup MONITOR 50 Initial Setup ON SCREEN 52 Initial S...

Page 89: ...icense from Dolby Laboratories Dolby Pro Logic and the double D symbol are trademarks of Dolby Laboratories DTS and DTS Digital Surround are registered trademarks of Digital Theater Systems Inc DVD Video digital audio formats The System can play back the following digital audio formats Linear PCM Uncompressed digital audio the same format used for CDs and most studio masters Dolby Digital Compress...

Page 90: ...ns To do Turn on the main unit Turn off the main unit Attenuate sounds Select TUNER and DAB Select DISC and CD CH Select external components TV AV1 AV2 Adjust the volume Set the main or sub operation for Dual Mode 1 Turn on off Dual Mode Adjust the monitor angle with MAIN SUB set MAIN Adjust the AV output level with MAIN SUB set SUB Change the aspect ratio Display the monitor adjustment screen Dis...

Page 91: ...3 1 Tuner operations Buttons To do Play Pause Stop Select chapters tracks Search Selects folders 2 Select tracks 2 Search Select audio language Select subtitle language Select view angle Zoom the picture Display disc menu Change menu items Confirm Return to the previous screen while operating the disc menu MENU TOPMENU OK ZOOM DUAL OK OK then RETURN CD changer operations Buttons To do Select folde...

Page 92: ...disc Select chapters tracks Search Display FOLDER select folders 1 Disc operations then Buttons To do Select tracks Search once Display DISC select discs twice Display FOLDER select folders 1 CD changer operations then Buttons To do Start Auto Search Start Manual Search TV tuner operations 1 Only for MP3 Buttons To do Select the band Start Auto Search Start Manual Search Change FM reception mode T...

Page 93: ... the battery may be overheated crack or fire Do not poke the battery with tweezers or similar tools Doing this may cause the battery to be overheated crack or fire CAUTION DO NOT leave the remote controller in a place such as dashboards exposed to direct sunlight for a long time Otherwise it may be damaged This receiver is equipped with the steering wheel remote control function If your car is equ...

Page 94: ...lock time indication Icons shown on this column change each time you press Changes the function modes icons shown to the right change accordingly Changes the source Source and play mode information Ex DVD playback Returns to the previous screen Operation icon FADER REAR Operation icon BALANCE RIGHT Operation icon BALANCE LEFT Operation icon FADER FRONT Ex Fader balance adjustment To erase and disp...

Page 95: ... and off at a press of the button 2 1 3 Move the cursor to an icon you want Confirm Using the buttons and controls directly Some operations are only performed by pressing the buttons directly You can also use the buttons and controls on the main unit and remote controller if they have the same or similar name or marks as shown on the touch panel Examples To eject a loaded disc To eject the monitor...

Page 96: ...thout connecting each component you cannot select it for the source Basic Operations CAUTION on the monitor Do not open or close the monitor by hand Do not apply any force to the monitor while it is moving Such a behavior may damage the monitor loading mechanism To change the monitor angle See page 60 for details To drop the volume in a moment ATT To restore the sound press it again To store the m...

Page 97: ...yed on the display of the main unit for a while When the unit is turned on Each time you press and hold the button the information shown on the display of the main unit changes Information shown on the display differs according to the selected source TUNER Frequency Clock Band Preset no DISC Play time Clock Title Chapter Folder Track no AV1 AV2 Source name Clock TV Channel Clock TV Preset no CD CH...

Page 98: ... display demonstration has been activated and starts automatically when no operations are done for about 30 seconds except while playing a DVD VCD To cancel it select one of the graphic screen 1 While playing any source 2 To view the playback picture from any video source select the screen where the actual playback pictures are shown Changing the touch panel color You can change the touch panel co...

Page 99: ...Main information Frequency Band Preset no 5 MO indicator lights when FM reception mode is MONO 6 ST indicator lights while receiving an FM stereo broadcast While playing a disc 1 Lights up when Dolby Digital signal is detected see page 41 2 Lights up when Dolby Pro Logic II is activated see page 41 3 Lights up when DTS signal is detected see page 41 4 Main information Play time Title no Chapter no...

Page 100: ...ages 48 57 Volume level appears when adjusted Dual Mode indicator see page 38 SOURCE icon see pages 14 and 38 Current band Preset no Station frequency FM reception mode Search mode Sound mode see page 44 Surround DSP mode see page 41 Not available for AM Available only after pressing M next to this icon ...

Page 101: ...only possible after storing stations in memory 4 Tune in to a station For Auto Search press either icon once Auto Search begins When a station is received searching stops For Manual Search press either icon repeatedly or hold until a station you want is selected For Preset Search press either icon repeatedly until a preset number you want is selected When an FM stereo broadcast is hard to receive ...

Page 102: ...band FM1 FM3 you want to store FM stations into 2 Start SSM Local FM stations with the strongest signals are searched and stored automatically in the selected FM band Manual presetting 1 Select the band FM1 FM3 and AM you want to store a station into 2 Tune in to a station 3 4 Store the station into a preset number then then then Preset station information will be displayed Select MANUAL or AUTO ...

Page 103: ...set list on the monitor screen To select a preset station using the preset list 1 2 Preset numbers station frequencies and programme station PS names are shown on the list To store a station using the preset list 1 Select the band FM1 FM3 and AM you want to store a station into 2 Tune into a station 3 4 Store the station into a preset number then then Select MANUAL or AUTO ...

Page 104: ...amme signals For example the stations send their station names PS as well as information about what type of programme they broadcast such as sports or music etc By receiving the RDS data this unit can do the following Programme Type PTY Search Standby Reception of Traffic Announcement TA or your favorite programme PTY Programme Search Tracking the same programme automatically Network Tracking Rece...

Page 105: ...ic announcement Traffic Information appears on the monitor screen and this unit temporarily tunes in to the station or the service The volume changes to the preset TA volume level see page 24 To activate TA Standby Reception If the TP indicator lights up on the display TA Standby Reception is activated If the TP indicator flashes on the display TA Standby Reception is not yet activated This occurs...

Page 106: ...n unit SPORT Sport events EDUCATE Educational programmes DRAMA Radio plays CULTURE Programmes on national or regional culture SCIENCE Programmes on natural science and technology VARIED Other programmes like comedies or ceremonies POP M Pop music ROCK M Rock music EASY M Easy listening music LIGHT M Light music CLASSICS Classical music OTHER M Other music WEATHER Weather information FINANCE Report...

Page 107: ...LISH RDS Setup RDS SET You can make RDS setting and use some other convenient functions 1 2 3 Change the setting or enter the setting screen For details see the following pages Ex When pressing ALTERNATE FREQ ...

Page 108: ...ctivate the PTY Standby Reception press and hold TP PTY on the main unit PTY STANDBY You can activate ON and deactivate OFF PTY Standby Reception for the FM tuner and the DAB tuner if connected PROGRAMME SEARCH When you select a preset number the station of the frequency stored in the preset number is tuned in OFF However if the signals from a preset RDS station are not sufficient enough this unit...

Page 109: ...layback buttons see page 27 Back to the beginning Input signal channels are indicated a few second after detected See page 82 VCD DVD See page 14 See page 14 See page 15 See page 44 See pages 48 57 While playing Before playing Playback picture will be shown in the picture view window PBC indicator for VCD see page 30 1 Available only while playing 2 Not available while playing with PBC activated 3...

Page 110: ...n see page 35 Playback mode see page 35 Sound mode see page 44 Surround DSP mode see page 41 Playback buttons see page 27 MP3 CD CD Text Back to the beginning Only for MP3 see page 27 Disc text ID3 tag information area Only for CD See page 58 See page 14 See page 14 See page 15 See page 44 See pages 48 57 Audio signal format only for DTS CD Available only while playing ...

Page 111: ...s not comes out It take several seconds for the unit to detect a disc type If a disc menu appears see page 30 2 Adjust the volume 3 Operate the disc Selects the folder only for MP3 Stops see Stopping play on page 82 VCD CD MP3 playback will continue endlessly until you stop it Starts playback Pauses To resume playback press 3 Goes back to the beginning of the current chapter track then skips to th...

Page 112: ...track press or 1 on the remote controller while playing a disc Each time you press the button the search speed changes as follows x2 x5 x10 x20 x60 To resume normal speed press 3 If you hold or 4 while playing a disc the search speed changes x2 x10 If you release the button normal speed playback resumes To play back the still picture Press 8 A still picture appears Frame by Frame Playback You can ...

Page 113: ...n the loading slot While playing any source NO EJT appears on the display of the main unit and the disc cannot be ejected To cancel the prohibition press the same buttons again EJT OK appears Selecting MP3 folders You can also select the MP3 folder using the buttons on the main unit and on the remote controller Hold Hold at the same time OK OK then NORMAL FULL ZOOM WIDE CINEMA NORMAL FULL ZOOM CIN...

Page 114: ...you to operate the VCD using menus When you start playback a menu will automatically appear on the monitor A menu may be a list of items divided screens or some moving pictures When a VCD with PBC is detected the PBC indicator appears on the monitor When 3 or SELECT is displayed on the monitor press 3 or OK on the remote controller if pressing 3 does not work to start playback 1 2 3 Enter a number...

Page 115: ...e 36 and Time Search icon see page 37 on the Touch Panel to start playback without PBC To resume the PBC function again press TOPMENU or MENU on the remote controller You can also use PBC icon on the Touch Panel Replaying the previous scenes You can replay about 10 second portion of the previous scene while playing a DVD One Touch Replay Zooming in You can zoom into a particular portion of the pic...

Page 116: ...dio channel to play This is convenient when playing a Karaoke VCD 1 2 Select an audio language you want Selecting subtitles While playing a chapter containing subtitles in different languages you can select the subtitle language to display on the monitor You can also select the subtitle language using SETUP menu see page 49 1 2 Select a subtitle language you want When playing DVD 1 3 ENGLISH 3 3 S...

Page 117: ...ngle views you can view the same scene at different angles 1 2 Select a view angle you want STEREO To listen to normal stereo left right playback LEFT To listen to the left audio channel RIGHT To listen to the right audio channel When playing VCD STEREO LEFT RIGHT 1 3 2 3 3 3 Ex ...

Page 118: ...ions only for MP3 1 2 3 Select a folder you want To locate a track by displaying the track list 1 2 3 Select a track you want To next previous page of the list Current track name or ID3 Tag To next previous page of the list Ex when playing MP3 Current folder name or ID3 Tag for MP3 Disc name for CD or CD Text ...

Page 119: ... T REM Remaining title time for DVD Remaining disc time for other discs For MP3 TOTAL T REM REM TIME For CD Off Auto Scroll Scroll Selecting playback modes You can use only one of the following playback modes at a time Repeat Play Random Play and Intro Scan For VCD While PBC is not in use Repeat Play You can repeat playback Repeat Play can be deactivated only for DVD 1 2 When playing DVD When play...

Page 120: ...se 1 2 When playing VCD CD When playing MP3 Random Play You can play back tracks at random 1 2 RANDOM PLAY DISC Plays randomly all tracks on the disc FOLDER Plays randomly all tracks of the current folder then moves to the next folder and so on OFF Cancels Random Play Intro Scan You can play back the first 15 seconds of each track sequentially 1 When playing VCD CD When playing MP3 RANDOM PLAY DIS...

Page 121: ...isc for VCD CD For DVD During play or pause For some DVDs any time For VCD While not playing with PBC in use 1 2 Confirm Ex when playing DVD Clear the entry 3 Enter a number then confirm Examples for DVD To play back from 2 H 34 M 00 S Press number buttons 2 3 4 then ENTER TIME 2 34 00 To play back from 58 M 00 S Press number buttons 0 5 8 then ENTER TIME 0 58 00 Example for VCD CD To play back fr...

Page 122: ...Dual Mode and select the subsidiary source 1 2 3 Select the subsidiary source SUB you want The current sources for MAIN and SUB are highlighted Dual Mode Operations To show the subsidiary source operation screen DUAL SUB To show the main source operation screen DUAL MAIN Ex When the subsidiary source operation screen DUAL SUB is displayed Dual Mode indicator DUAL MAIN or DUAL SUB appears To show t...

Page 123: ...you press and hold the button Dual Mode turns on and off When Dual Mode is turned on the source selection screen appears on the monitor see page 38 To operate the subsidiary source 1 2 Press the source buttons then the source operation buttons To operate the main source 1 2 Press the source buttons then the source operation buttons ZOOM DUAL Hold MAIN SUB AVOUT VOL On the remote controller then MA...

Page 124: ... 2 3 Activate and select the surround mode or DSP mode 4 Make adjustment if you want to If neither surround mode nor DSP mode is activated you cannot make adjustment See page 46 See page 46 See page 39 See page 44 2 1 1 1 It does not appear for some sources 2 It will be shaded when not available 2 ...

Page 125: ...ression rate which enables it to add breadth and depth to the sounds reproduced As such DTS Digital Surround features natural solid and clear sound Dolby Pro Logic II It is a multi channel playback format to convert 2 channel software into 5 channel plus subwoofer The matrix based conversion method used for Dolby Pro Logic II makes no limitation for the cutoff frequency of the surround treble and ...

Page 126: ...L surround DSP mode is defeated set to DEFEAT and cannot be changed 1 2 3 While playing a multi channel encoded disc While playing a 2 channel stereo disc Surround On DSP Off While playing a multi channel Dolby Digital encoded disc Dolby Digital is automatically selected While playing a multi channel DTS encoded disc DTS is automatically selected While playing any other disc Dolby Pro Logic II is ...

Page 127: ...ed surround or DSP mode When surround mode is activated Selected automatically when multi channel DTS signal is detected while playing a DVD or a DTS CD No further adjustment is allowed Selected automatically when multi channel Dolby Digital signal is detected while playing a DVD No further adjustment is allowed Select either MOVIE or MUSIC When you select MUSIC you can adjust the following items ...

Page 128: ...nd modes Adjust the level of each frequency band Store your adjustment display the screen below Select memory no to store 1 2 3 4 Select one of the preset sound iEQ modes then make adjustment if you want to make your own sound mode See page 46 See page 46 See page 39 See page 40 See page 40 2 1 1 1 It does not appear for some sources 2 It will be shaded when not available ...

Page 129: ... iEQ modes Display the other set of the sound modes see below Storing your own sound modes You can adjust the sound modes and store your own adjustments in memory 1 Repeat steps 1 to 4 on the left column to select a sound mode you want to adjust 2 Make adjustments as you like 3 After adjustment is finished 4 Select one of the user sound modes USER1 USER2 or USER3 you want to store into For details...

Page 130: ...e you have made an adjustment the volume level will automatically changes by adjusted level whenever you change the source Adjust to match the input level to the FM sound level To adjust fader and balance Adjust fader speaker output balance between the front and rear speakers Adjust the balance speaker output balance between the left and right speakers See page 39 See page 44 2 1 1 1 It does not a...

Page 131: ... and night time LIGHT DARK The monitor can memorize the difference between the ambient light level and adjusted level and adjusts the brightness automatically keeping the level difference memorized Adjust the contrast DOWN UP Adjust the tint if the human skin color is unnatural RED GREEN Adjust the color of the picture thinner THIN or thicker THICK 1 Display SCREEN CONTROL screen 2 Select an item ...

Page 132: ...conditions While playing no change can be made on the DVD Menu 1 2 3 4 Select the item you want 5 Change the setting For details see the following pages Ex When setting MONITOR TYPE See page 13 2 1 1 1 It does not appear for some sources 2 It will be shaded when not available ...

Page 133: ... aspect ratio adjustment function 4 3 LB Letter Box Select when the aspect ratio of your TV is 4 3 conventional TV While viewing a wide screen picture the black bars appear on the top and the bottom of the screen 4 3 PS Pan Scan Select when the aspect ratio of your TV is 4 3 While viewing a wide screen picture the black bars do not appear however the left and right edges of the pictures will not b...

Page 134: ... the initial monitor conditions 1 2 3 4 Select the item you want 5 Change the setting For details see the following pages Ex When setting BEEP TONE to OFF See page 13 2 1 1 1 It does not appear for some sources 2 It will be shaded when not available ...

Page 135: ... 68 3 Center portion Turns on and off the on screen icons This also works even if BLIND CONTROL is set to OFF OFF Cancels this function BEEP TONE ON Sound beeps when you operate the unit OFF Cancels this function WIRING CHECK You can confirm the wiring connection is correctly done for particular functions When the listed wires have been connected and electrical signals are detected through the wir...

Page 136: ... screen conditions 1 2 3 4 Select the item you want 5 Change the setting For details see the following pages Ex When setting CLOCK to OFF Language selection screen appears See page 13 2 1 1 1 It does not appear for some sources 2 It will be shaded when not available ...

Page 137: ...SSAGE ON Speaker signal indicators see page 82 and messages are displayed Messages are displayed on the viewing window of the monitor screen When selecting repeat mode random mode intro scan etc When starting Time Search Title Search Chapter Search and Track Search OFF Cancels this function CLOCK ON Display the clock time on the monitor OFF Cancels this function ANIMATION EFFECT ON Source selectio...

Page 138: ...rce operation screen is displayed on the monitor with Dual Mode turned on see page 38 1 2 3 4 Select the item you want 5 Change the setting or enter the setting screen For details see the following pages Ex When entering SEAT POSITION See page 13 2 1 1 1 It does not appear for some sources 2 It will be shaded when not available Appears when TV tuner unit KV C1001 is connected ...

Page 139: ...efeated OFF Cancels this function Auto Surround does not work for any sources other than DISC When another source is selected the currently selected Surround or DSP mode is resumed see page 42 SEAT POSITION Select the listening seat position where you want to locate the sound image Speaker distance and speaker level can be memorized for each position Display sub setting screens FRONT LEFT For the ...

Page 140: ...WOOFER Select YES connected or NO disconnected SUBWOOFER PHASE Select either NORMAL or REV reverse to obtain better subwoofer sounds These settings are very related to one another therefore one setting is changed some other settings will be changed automatically and appropriately see page 87 Sound comes out of the subwoofer for Dolby Pro Logic II only when either the front speakers or the center s...

Page 141: ...mera view you can change it to the source playback screen by touching the center portion of the monitor screen In this case you cannot change the aspect ratio and make monitor adjustments see pages 29 and 47 FM IF FILTER In some areas adjacent stations may interfere with each other If this interference occurs noise may be heard AUTO When this type of interference occurs this unit automatically inc...

Page 142: ...haracter Entered name is displayed Display the other page of the character list of the same type Alternates between Roman alphabet and accented letter lists Alternates between upper and lower cases Roman alphabet list Upper cases Lower cases Accented characters Upper cases Accented characters Lower cases Backspace Erase the last entry ...

Page 143: ...For a CD in this unit Insert a CD For CDs in the CD changer Select CD CH then select a disc number For TV stations Change TV then select a TV station 2 3 4 Enter a name 5 Confirm If the DELETE DISC NAME or DELETE STATION NAME screen appears The internal memory is full Delete unwanted names before assignment 1 Select an unwanted name 2 Delete 3 Repeat the above steps if you want to delete more name...

Page 144: ... out halfway 2 3 Insert the blind cover to protect the internal mechanism from dust To attach the monitor Insert the monitor into the compartment with the screen facing down Hold Changing the monitor position angle You can change the monitor position and the monitor angle Once you change them they are stored The monitor opens at the stored position and angle next time you eject the monitor To chan...

Page 145: ...folder track no Elapsed playing time Playback mode Sound mode see page 44 Surround DSP mode see page 41 Only for MP3 Back to the beginning Volume level appears when adjusted MP3 CD CD Text Disc text ID3 tag information area Only for CD See page 58 See page 14 See page 14 See page 15 See page 44 See pages 48 57 ...

Page 146: ...ble with MP3 discs so you cannot play back MP3 discs You cannot use the KD MK series CD changers with this unit Before operating your CD changer Refer also to the Instructions supplied with your CD changer If no discs are in the magazine of the CD changer or the discs are inserted upside down NO DISC will appear on the monitor If this happens remove the magazine and set the discs correctly If no m...

Page 147: ...pressing the corresponding number buttons 1 12 Locating a disc folder track using the list To locate a disc by displaying the disc list Example while playing MP3 1 2 DISC FOLDER TRACK 3 Select a disc you want To locate a folder by displaying the folder list This functions only for MP3 Though you play back the same disc on the CD changer its folder list may look differently from the one you display...

Page 148: ... cannot be displayed at a time 1 2 Scroll Text on the information area scrolls once Auto Scroll Text on the information area scrolls every 5 seconds Off The information area goes off no text information will be shown For MP3 For CD Off Auto Scroll Scroll To next previous page of the list Current folder name or ID3 Tag for MP3 Disc name for CD or CD Text To next previous page of the list Current tr...

Page 149: ...g MP3 REPEAT PLAY TRACK REPEAT PLAY DISC REPEAT PLAY OFF REPEAT PLAY TRACK REPEAT PLAY FOLDER REPEAT PLAY DISC REPEAT PLAY OFF Random Play You can play back tracks at random 1 2 RANDOM PLAY FOLDER Plays randomly all tracks of the current folder then moves to the next folder and so on DISC Plays randomly all tracks on the current disc ALL Plays randomly all tracks of all discs in the magazine OFF C...

Page 150: ...en playing MP3 Intro Scan You can play back the first 15 seconds of each track sequentially 1 2 INTRO SCAN TRACK Plays the beginning of all tracks of the current disc FOLDER Plays the first tracks of all folders of the current disc only for MP3 DISC Plays the first tracks of all discs in the magazine OFF Cancels Intro Scan When playing CD When playing MP3 INTRO SCAN TRACK INTRO SCAN FOLDER INTRO S...

Page 151: ...w camera to the AV INPUT 2 jacks to guide you to back the car set the usage of the AV INPUT 2 jacks correctly see page 57 For connections see the Installation Connection Manual separate volume 1 Select the external source AV1 To watch the playback pictures through the component connected to the AV INPUT 1 jacks AV2 To watch the playback pictures through the component connected to the AV INPUT 2 ja...

Page 152: ...ges 14 and 38 Current preset no Channel no Search mode Sound mode see page 44 Surround DSP mode see page 41 See page 58 See page 14 See page 14 See page 15 See page 44 See pages 48 57 Playback picture will be shown in the picture view window Not available while viewing the playback picture Available only after pressing M next to this icon ...

Page 153: ...ng stations in memory then 3 Tune in to a TV station For Auto Search press either icon once Auto Search begins When a station is received searching stops For Manual Search press either icon repeatedly or hold until a station you want is selected For Preset Search press either icon repeatedly until a preset number you want is selected Storing stations in memory You can preset 12 TV stations To tune...

Page 154: ...to a preset number To tune in to a preset station See also Watching TV programs on page 69 1 2 Select a preset number Preset station information will be displayed Select MANUAL or AUTO then then To select the rest of the preset stations To select the rest of the preset stations ...

Page 155: ...ou can store and select the preset station using the preset list on the monitor screen To select a preset station using the preset list 1 2 Preset numbers channel numbers and assigned names see page 58 of the preset TV stations are shown on the list Select MANUAL or AUTO then then To next previous page of the list To next previous page of the list ...

Page 156: ...e 38 SOURCE icon see pages 14 and 38 Service type primary or secondary Service label Current band Preset no Ensemble frequency TEXT indicator DLS DAB radio text Search mode Sound mode see page 44 Surround DSP mode see page 41 Ensemble label PTY code Service label ANN Announcement indicator Channel no 1 Available only when DLS is displayed 1 Works only while receiving an ensemble ...

Page 157: ...bands DAB1 DAB2 DAB3 You can use any one of them to listen to a DAB service ListeningtotheDABTuner then 3 Select Search Mode AUTO To start Auto Search MANUAL To start Manual Search PRESET To select preset numbers only possible after storing services in memory 4 Tune in to an ensemble For Auto Search press either icon once Auto Search begins When an ensemble is received searching stops For Manual S...

Page 158: ...gnal distortion Furthermore it can carry text pictures and data In contrast to FM broadcast where each programme is transmitted on its own frequency DAB combines several programmes called services to form one ensemble In addition each service called primary service can also be divided into its components called secondary service A typical ensemble has 6 or more programmes services broadcast at the...

Page 159: ...into a preset number then then Select MANUAL or AUTO To tune in to a preset service See also Listening to the DAB Tuner on page 73 1 2 Displaying the preset list You can store and select the preset services using the preset list on the monitor screen To select a preset service using the preset list 1 2 Preset numbers and service labels are shown on the list ...

Page 160: ... the same as explained on page 22 for FM RDS stations You cannot store PTY codes separately for the DAB tuner and for the FM tuner To store your favorite programme service types see page 24 or 79 To search for your favorite programme service type see page 22 24 or 79 Displaying the DAB text You can change the initial display label information ensemble label service label PTY code to the DAB radio ...

Page 161: ...et activated To activate Announcement Standby Reception tune in to another service providing these signals The ANN indicator stops flashing and remains lit To display the other announcement types TRAVEL Programmes about travel destinations package tours and travel ideas and opportunities WARNING Warnings about earthquakes tsunami etc NEWS News WEATHER Weather information EVENT Information about ev...

Page 162: ...LISH DAB Setup DAB SET You can make DAB setting and use some other convenient functions 1 2 3 Change the setting or enter the setting screen For details see the following pages Ex When pressing DAB BAND RANGE ...

Page 163: ... where a DAB service is broadcasting the same programme as the FM RDS station is broadcasting this unit automatically tunes in to the DAB service PTY STANDBY CODE Select the PTY code for PTY Standby Reception see also page 24 You cannot select a different PTY code separately for the DAB tuner and for the FM tuner PTY STANDBY You can activate ON and deactivate OFF PTY Standby Reception both for the...

Page 164: ...the following cases After starting the heater in the car If it becomes very humid inside the car Should this occur the disc player may malfunction In this case eject the disc and leave the unit turned on for a few hours until the moisture evaporates Maintenance How to handle discs When removing a disc from its case press down the center holder of the case and lift the disc out holding it by the ed...

Page 165: ...Preset stations are erased when the power supply to the memory circuit is interrupted for example during battery replacement If this occurs preset the stations again More about This Receiver Basic Disc Operations General In this manual words track and file are interchangeably used when referring to MP3 files and their file names When a disc has been already loaded selecting DISC for the playback s...

Page 166: ...es if a disc includes both audio CD CD DA files and MP3 files This unit can play back multi session discs however unclosed sessions will be skipped while playing This unit cannot play back the files which have the data such as WMA WAVE ATRAC3 MPEG 2 5 etc The speaker signal indicators appear in the following cases for DVD CD When a different type of the digital signal is detected or When you start...

Page 167: ...the following formats MP3i MP3 PRO Layer 1 Layer 2 format This unit can show the names of albums artists performer and tracks of ID3 Tag Version 1 0 and 1 1 This unit can show up to 64 characters on the monitor screen This unit can handle only one byte characters Any other characters cannot be correctly displayed This unit can play back MP3 files meeting the conditions below Bit rate 8 kbps 320 kb...

Page 168: ...tunia2 mp3 north pole2 mp3 1 2 5 4 6 3 Dual Mode Operations Adjusting AV OUTPUT volume This adjustment does not affect the volume level of the monitor inserted into the optional cradle KV CR100 KV CR101 Surround Mode Operations Dolby Digital disc is not always encoded as multi channel source If it is not multi channel encoded Dolby Digital cannot be selected for surround mode Sound Mode iEQ Operat...

Page 169: ...on works for both DAB services and FM RDS stations Monitor Adjustments You may not able to adjust the brightness in the following case You cannot make it brighter when the ambient light is very bright You cannot make it darker when the ambient light is very dark Initial Setup DVD MENU MENU AUDIO SUBTITLE LANGUAGE When the language you have selected is not recorded on a disc the original language i...

Page 170: ...l monitor is not removed from the main unit you cannot watch the playback picture while driving Troubleshooting You cannot change the aspect ratio While the GUI operation is in use you cannot change the aspect ratio The left and right edges of the picture are missing on the screen 4 3 PS is selected when viewing on a conventional TV aspect ratio 4 3 Select 4 3 LB Audio language or subtitle languag...

Page 171: ...stations cannot be received TV CHANNEL AREA setting is not correct see page 57 The TV s main power does not shut off automatically when you change the source from TV to another TV is connected to the TV tuner unit Connect it to the hideaway unit Remember that audio video signals are always transmitted to the TV while it is on RESET 8 appears on the display of the main unit This unit is not connect...

Page 172: ...00 00 00 Preset iEQ mode The table below shows the preset frequency level settings for each iEQ mode Additional Information Graphic screens You can select one of the following graphic screens For details see page 14 You can activate the display demonstration To cancel it select any other graphic screen While playing a video source except DVD VCD select no graphic screen in other words select the a...

Page 173: ... Persian FI Finnish FJ Fiji FO Faroese FY Frisian GA Irish GD Scots Gaelic GL Galician GN Guarani GU Gujarati HA Hausa HI Hindi HR Croatian HU Hungarian HY Armenian IA Interlingua IE Interlingue IK Inupiak IN Indonesian IS Icelandic IW Hebrew JI Yiddish JW Javanese Code Language KA Georgian KK Kazakh KL Greenlandic KM Cambodian KN Kannada KO Korean KOR KS Kashmiri KU Kurdish KY Kirghiz LA Latin LN...

Page 174: ...0 C Dimensions W H D 170 mm 141 mm 15 mm Mass 475 g Main unit AUDIO AMPLIFIER SECTION Maximum Power Output Front 50 W per channel Rear 50 W per channel Center 35 W Continuous Power Output RMS Front 19 W per channel into 4 Ω 40 Hz to 20 000 Hz at no more than 0 8 total harmonic distortion Rear 19 W per channel into 4 Ω 40 Hz to 20 000 Hz at no more than 0 8 total harmonic distortion Center 15 W int...

Page 175: ...t in a traffic accident Hideaway unit Input Terminals AV INPUT 1 2 Audio 0 5 Vrms Left Right Video composite 1 Vp p 75 Ω Output Terminals Level Impedance AV OUTPUT Audio 2 0 V 20 kΩ load full scale Video composite 1 Vp p 75 Ω PRE OUT Audio 2 0 V 20 kΩ load full scale Other Terminals System integration TO MAIN UNIT FM AM antenna FM AM ANTENNA AV bus AV BUS CD changer TO CHANGER Rear view camera Cen...

Page 176: ...ück Siehe Seite Zurücksetzen des Geräts Vous avez des PROBLÈMES de fonctionnement Réinitialisez votre appareil Référez vous à la page intitulée Comment réinitialiser votre appareil Hebt u PROBLEMEN met de bediening Stel het apparaat terug Zie de pagina met de paragraaf Het apparaat terugstellen 1004MNMMDWJEIN EN GE FR NL 2004 Victor Company of Japan Limited ...

Page 177: ... wie etwa Airbags behindern kann da sonst die Gefahr von tödlichen Unfällen droht es die freie Sicht beeinträchtigen kann Bedienen Sie KEINESFALLS ein Gerät beim Lenken des Fahrzeugs da sonst die Gefahr von Verkehrsunfällen droht Der Fahrer darf während der Fahrt keinesfalls den Monitor betrachten Andernfalls droht Unfallgefahr durch Unachtsamkeit Muss das Gerät während der Fahrt bedient werden so...

Page 178: ...he car Antennenkabel von Fahrzeug Cordon d antenne de la voiture Antennesnoer van auto See C Connecting the back camera lead Siehe C Anschließen der Rückfahrkameraleitung Référez vous à C Connexion du fil de la caméra de recul Zie C Aansluiten van het snoer voor de achteruitkijkcamera These products are optionally available from JVC Diese Produkte sind von JVC als Sonderzubehör erhältlich Ces prod...

Page 179: ... verwenden so dass diese nicht Fahrzeugteile beschädigen Assurez vous d utiliser des vis autotaraudeuses non fournies de la longueur appropriée de façon qu elles n endommagent aucune partie de la voiture Gebruik beslist tapse schroeven niet bijgeleverd met een geschikte lengte zodat de schroeven geen onderdelen van de auto kunnen beschadigen ı Installation der versteckten Einheit unter dem Vorders...

Page 180: ... original Originele bedrading Modified wiring 1 Geänderte Verdrahtung 1 Câblage modifié 1 Aangepaste bedrading 1 ISO connector ISO Stecker Connecteur ISO ISO connector Use modified wiring 2 if the unit does not turn on Geänderte Verdrahtung 2 verwenden wenn das Gerät so nicht an geht Utilisez le câblage modifié 2 si l appareil ne se met pas sous tension Pas de bedrading 2 aan indien het apparaat n...

Page 181: ...vec cet appareil 2 Pour vérifier le fonctionnement de cet appareil avant installation ce fil doit être connecté sinon l appareil ne peut pas être mis sous tension 1 Wird nicht mit Gerät mitgeliefert 2 Vor der Überprüfung der Funktionsfähigkeit des Geräts vor dem Einbau muß diese Leitung angeschlossen werden da sonst die Stromversorgung nicht eingeschaltet werden kann Before connecting Make sure th...

Page 182: ...tomatisch in overeenstemming met de andere apparatuur kan worden in en uitgeschakeld Sie können Verstärker zur Erweiterung des Klangsystems im Autoinnenraum anschließen Verbinden Sie die Klemmen PRE OUT der versteckten Einheit mit den Klemmen Line In des Verstärkers Trennen Sie die Lautsprecher von der versteckten Einheit ab und schließen Sie sie am Verstärker an Lassen Sie die Lautsprecherkabel d...

Page 183: ...ENGLISH DVD RECEIVER WITH MONITOR asa ËÕß Ëπ DVD æ ÈÕ Õ æ KD AV7005 Detachable ATT MAIN SUB ZOOM ASPECT MENU VOLUME TOPMENU TUNER 5 6 4 2 3 1 8 9 7 11 0 12 10 10 DISC OK AV GUI SET UP RETURN DUAL AVOUT VOL This unit is equipped with the display demonstration To cancel it see page 14 01 14 ËÕßπ È È µ µ Èß µ æª Õ À µÈÕß ª Ÿ ÀπÈ 14 ...

Page 184: ... a long time in hot or cold weather wait until the temperature in the car becomes normal before operating the unit IMPORTANT FOR LASER PRODUCTS 1 CLASS 1 LASER PRODUCT 2 CAUTION Do not open the top cover There are no user serviceable parts inside the unit leave all servicing to qualified service personnel 3 CAUTION Visible and invisible laser radiation when open and interlock failed or defeated Av...

Page 185: ...bstruct the operation of safety devices such as air bags as this may result in a fatal accident it may obstruct visibility DO NOT operate any unit while manipulating the steering wheel as this may result in a traffic accident The driver must not watch the monitor while driving If the driver watches the monitor while driving it may lead to carelessness and cause an accident If you need to operate t...

Page 186: ...Receiver 68 Troubleshooting 72 Additional Information 74 Specifications 76 How to reset your unit 2 Important How to read this manual 3 Introduction Playable Discs 5 Quick Guide How to Use the Controls 6 Remote controller 6 Main unit front 8 Preparation Remote Controller RM RK220 9 Operation Methods 10 Basic Operations 12 Setting the clock 13 Changing the source 14 Changing the graphic screen 14 C...

Page 187: ...icense from Dolby Laboratories Dolby Pro Logic and the double D symbol are trademarks of Dolby Laboratories DTS and DTS Digital Surround are registered trademarks of Digital Theater Systems Inc DVD Video digital audio formats The System can play back the following digital audio formats Linear PCM Uncompressed digital audio the same format used for CDs and most studio masters Dolby Digital Compress...

Page 188: ...ay the monitor adjustment screen Display and erase GUI screen Display Setup Menus Change menu items Confirm General operations AV TUNER DISC VOLUME ZOOM DUAL MAIN SUB AVOUT VOL ASPECT GUI SET UP OK ATT functions if pressed and held Remote controller 1 When using Dual Mode the remote controller operates either main or sub source depending on the MAIN SUB setting 2 Only for MP3 3 While playing a DVD...

Page 189: ...picture Display disc menu Change menu items Confirm MENU TOPMENU OK ZOOM DUAL OK OK then CD changer operations Buttons To do Select folders 2 Select tracks Search Change discs Select disc numbers 5 6 4 2 3 1 8 9 7 11 0 12 10 10 OK TV tuner operations Buttons To do Start Auto Search Start Manual Search Change preset channel numbers Select preset channel numbers 5 6 4 2 3 1 8 9 7 11 0 12 10 10 Butto...

Page 190: ...e monitor angle See page 55 Change the aspect ratio Display the monitor adjustment screen Monitor operations Buttons To do Eject the disc Select chapters tracks Search Display FOLDER select folders 1 Disc operations then Buttons To do Select tracks Search once Display DISC select discs twice Display FOLDER select folders 1 CD changer operations then Buttons To do Start Auto Search Start Manual Sea...

Page 191: ...is may cause the battery to give off heat crack or start a fire When throwing away or saving the battery wrap it in tape and insulate otherwise the battery may be overheated crack or fire Do not poke the battery with tweezers or similar tools Doing this may cause the battery to be overheated crack or fire CAUTION DO NOT leave the remote controller in a place such as dashboards exposed to direct su...

Page 192: ...lock time indication Icons shown on this column change each time you press Changes the function modes icons shown to the right change accordingly Changes the source Source and play mode information Ex DVD playback Returns to the previous screen Operation icon FADER REAR Operation icon BALANCE RIGHT Operation icon BALANCE LEFT Operation icon FADER FRONT Ex Fader balance adjustment To erase and disp...

Page 193: ... and off at a press of the button 2 1 3 Move the cursor to an icon you want Confirm Using the buttons and controls directly Some operations are only performed by pressing the buttons directly You can also use the buttons and controls on the main unit and remote controller if they have the same or similar name or marks as shown on the touch panel Examples To eject a loaded disc To eject the monitor...

Page 194: ...t the volume This depends on the AUTO OPEN CLOSE setting see page 46 If the monitor does not come out For turning on the power use the buttons on the main unit and the remote controller 1 Turn on the power WAITING scrolls on the display of the main unit and the monitor comes out When the monitor comes out power comes on to the monitor even if you have turned it off For the space required for the m...

Page 195: ... the clock time is displayed on the display of the main unit for a while When the unit is turned on Each time you press the button the information shown on the display of the main unit changes Information shown on the display differs according to the selected source TUNER Frequency Clock Band Preset no DISC Play time Clock Title Chapter Folder Track no AV1 AV2 Source name Clock TV Channel Clock TV...

Page 196: ... display demonstration has been activated and starts automatically when no operations are done for about 30 seconds except while playing a DVD VCD To cancel it select one of the graphic screen 1 While playing any source 2 To view the playback picture from any video source select the screen where the actual playback pictures are shown Changing the touch panel color You can change the touch panel co...

Page 197: ...on mode is MONO 4 ST indicator lights while receiving an FM stereo broadcast While playing a disc 1 Lights up when Dolby Digital signal is detected see page 36 2 Lights up when Dolby Pro Logic II is activated see page 36 3 Lights up when DTS signal is detected see page 36 4 Main information Play time Title no Chapter no Folder no Track no 5 Lights up when the disc is detected 6 Lights up when an M...

Page 198: ... See pages 43 52 Volume level appears when adjusted Dual Mode indicator see page 33 SOURCE icon see pages 14 and 33 Current band Preset no Station frequency FM reception mode Search mode Sound mode see page 39 Surround DSP mode see page 36 Not available for AM Available only after pressing M next to this icon ...

Page 199: ...only possible after storing stations in memory 4 Tune in to a station For Auto Search press either icon once Auto Search begins When a station is received searching stops For Manual Search press either icon repeatedly or hold until a station you want is selected For Preset Search press either icon repeatedly until a preset number you want is selected When an FM stereo broadcast is hard to receive ...

Page 200: ...band FM1 FM3 you want to store FM stations into 2 Start SSM Local FM stations with the strongest signals are searched and stored automatically in the selected FM band Manual presetting 1 Select the band FM1 FM3 and AM you want to store a station into 2 Tune in to a station 3 4 Store the station into a preset number then then then Preset station information will be displayed Select MANUAL or AUTO ...

Page 201: ...set list on the monitor screen To select a preset station using the preset list 1 2 Preset numbers station frequencies and assigned names see page 53 are shown on the list To store a station using the preset list 1 Select the band FM1 FM3 and AM you want to store a station into 2 Tune into a station 3 4 Store the station into a preset number then then Select MANUAL or AUTO ...

Page 202: ...layback buttons see page 22 Back to the beginning VCD DVD See page 14 See page 14 See page 15 See page 39 See pages 43 52 While playing Before playing Playback picture will be shown in the picture view window 1 Available only while playing 2 Not available while playing with PBC activated 3 Not available while playing with PBC activated but available while not playing PBC indicator for VCD see page...

Page 203: ...n see page 30 Playback mode see page 30 Sound mode see page 39 Surround DSP mode see page 36 Playback buttons see page 22 MP3 CD CD Text Back to the beginning Only for MP3 see page 22 Disc text ID3 tag information area Only for CD See page 53 See page 14 See page 14 See page 15 See page 39 See pages 43 52 Audio signal format only for DTS CD Available only while playing ...

Page 204: ...s not comes out It takes several seconds for the unit to detect a disc type If a disc menu appears see page 25 2 Adjust the volume 3 Operate the disc Selects the folder only for MP3 Stops see Stopping play on page 69 VCD CD MP3 playback will continue endlessly until you stop it Starts playback Pauses To resume playback press 3 Goes back to the beginning of the current chapter track then skips to t...

Page 205: ...dicate the playable discs VCD with without PBC CD DVD MP3 VCD with PBC All playable discs To fast forward or reverse the chapter or track press or 1 on the remote controller while playing a disc Each time you press the button the search speed changes as follows x2 x5 x10 x20 x60 To resume normal speed press 3 If you hold or 4 while playing a disc the search speed changes x2 x10 If you release the ...

Page 206: ...e aspect ratio You can change the aspect ratio of the playback pictures This function is only possible using the buttons on the main unit or on the remote controller Aspect ratio cannot be changed while the GUI operation mode is activated On the main unit ASPECT On the remote controller When viewing 16 9 video signals When viewing 4 3 video signals When you change the aspect ratio either RECEIVER ...

Page 207: ...llows you to operate the VCD using menus When you start playback a menu will automatically appear on the monitor A menu may be a list of items divided screens or some moving pictures When a VCD with PBC is detected the PBC indicator appears on the monitor When 3 or SELECT is displayed on the monitor press 3 or OK on the remote controller if pressing 3 does not work to start playback 1 2 3 Enter a ...

Page 208: ...press 10 10 then 3 To cancel the PBC playback You can cancel the menu driven operations PBC function using the remote controller 1 Press 7 to stop playback 2 Press number buttons to select a track Playback without PBC starts from the selected track You can also use Track Search icon see page 31 and Time Search icon see page 32 on the Touch Panel to start playback without PBC To resume the PBC func...

Page 209: ...nel to play This is convenient when playing a Karaoke VCD 1 2 Select an audio language you want Selecting subtitles While playing a chapter containing subtitles in different languages you can select the subtitle language to display on the monitor You can also select the subtitle language using SETUP menu see page 44 1 2 Select a subtitle language you want When playing DVD 1 3 ENGLISH 3 3 SPANISH 2...

Page 210: ...ngle views you can view the same scene at different angles 1 2 Select a view angle you want STEREO To listen to normal stereo left right playback LEFT To listen to the left audio channel RIGHT To listen to the right audio channel When playing VCD STEREO LEFT RIGHT 1 3 2 3 3 3 Ex ...

Page 211: ...ions only for MP3 1 2 3 Select a folder you want To next previous page of the list Current track name or ID3 Tag To locate a track by displaying the track list 1 2 3 Select a track you want Ex when playing MP3 To next previous page of the list Current folder name or ID3 Tag for MP3 Disc name for CD or CD Text ...

Page 212: ... T REM Remaining title time for DVD Remaining disc time for other discs For MP3 TOTAL T REM REM TIME For CD Selecting playback modes You can use only one of the following playback modes at a time Repeat Play Random Play and Intro Scan For VCD While PBC is not in use Repeat Play You can repeat playback Repeat Play can be deactivated only for DVD 1 2 When playing DVD When playing VCD CD When playing...

Page 213: ...hen playing VCD CD When playing MP3 Random Play You can play back tracks at random 1 2 RANDOM PLAY DISC Plays randomly all tracks on the disc FOLDER Plays randomly all tracks of the current folder then moves to the next folder and so on OFF Cancels Random Play Intro Scan You can play back the first 15 seconds of each track sequentially 1 When playing VCD CD When playing MP3 RANDOM PLAY DISC RANDOM...

Page 214: ...c for VCD CD For DVD During play or pause For some DVDs any time For VCD While not playing with PBC activated 1 2 Confirm Ex when playing DVD Clear the entry 3 Enter a number then confirm Examples for DVD To play back from 2 H 34 M 00 S Press number buttons 2 3 4 then ENTER TIME 2 34 00 To play back from 58 M 00 S Press number buttons 0 5 8 then ENTER TIME 0 58 00 Example for VCD CD To play back f...

Page 215: ...Dual Mode and select the subsidiary source 1 2 3 Select the subsidiary source SUB you want The current sources for MAIN and SUB are highlighted Dual Mode Operations To show the main subsidiary source operation screen on the monitor 1 2 To cancel the Dual Mode press Each time you press the icon Dual Mode is turned on and off alternately When Dual Mode is turned off the main source screen appears To...

Page 216: ...you press and hold the button Dual Mode turns on and off When Dual Mode is turned on the source selection screen appears on the monitor see page 33 To operate the subsidiary source 1 2 Press the source buttons then the source operation buttons To operate the main source 1 2 Press the source buttons then the source operation buttons ZOOM DUAL Hold MAIN SUB AVOUT VOL On the remote controller then MA...

Page 217: ...d mode is activated When DSP mode is activated 1 2 3 Activate and select the surround mode or DSP mode 4 Make adjustment if you want to If neither surround mode nor DSP mode is activated you cannot make adjustment 2 1 1 1 It does not appear for some sources 2 It will be shaded when not available 2 ...

Page 218: ...ression rate which enables it to add breadth and depth to the sounds reproduced As such DTS Digital Surround features natural solid and clear sound Dolby Pro Logic II It is a multi channel playback format to convert 2 channel software into 5 channel plus subwoofer The matrix based conversion method used for Dolby Pro Logic II makes no limitation for the cutoff frequency of the surround treble and ...

Page 219: ...nd DSP mode is defeated set to DEFEAT and cannot be changed 1 2 3 While playing a multi channel encoded disc While playing a 2 channel stereo disc Surround On DSP Off While playing a multi channel Dolby Digital encoded disc Dolby Digital is automatically selected While playing a multi channel DTS encoded disc DTS is automatically selected While playing any other disc Dolby Pro Logic II is automati...

Page 220: ...ed surround or DSP mode When surround mode is activated Selected automatically when multi channel DTS signal is detected while playing a DVD or a DTS CD No further adjustment is allowed Selected automatically when multi channel Dolby Digital signal is detected while playing a DVD No further adjustment is allowed Select either MOVIE or MUSIC When you select MUSIC you can adjust the following items ...

Page 221: ...nd modes Adjust the level of each frequency band Store your adjustment display the screen below Select memory no to store 1 2 3 4 Select one of the preset sound iEQ modes then make adjustment if you want to make your own sound mode See page 41 See page 41 See page 34 See page 35 See page 35 1 It does not appear for some sources 2 It will be shaded when not available 2 1 1 ...

Page 222: ... iEQ modes Display the other set of the sound modes see below Storing your own sound modes You can adjust the sound modes and store your own adjustments in memory 1 Repeat steps 1 to 4 on the left column to select a sound mode you want to adjust 2 Make adjustments as you like 3 After adjustment is finished 4 Select one of the user sound modes USER1 USER2 or USER3 you want to store into For details...

Page 223: ...e you have made an adjustment the volume level will automatically changes by adjusted level whenever you change the source Adjust to match the input level to the FM sound level To adjust fader and balance Adjust fader speaker output balance between the front and rear speakers Adjust the balance speaker output balance between the left and right speakers See page 34 See page 39 1 It does not appear ...

Page 224: ... and night time LIGHT DARK The monitor can memorize the difference between the ambient light level and adjusted level and adjusts the brightness automatically keeping the level difference memorized Adjust the contrast DOWN UP Adjust the tint if the human skin color is unnatural RED GREEN Adjust the color of the picture thinner THIN or thicker THICK 1 Display SCREEN CONTROL screen 2 Select an item ...

Page 225: ...conditions While playing no change can be made on the DVD Menu 1 2 3 4 Select the item you want 5 Change the setting For details see the following pages Ex When setting MONITOR TYPE See page 13 2 1 1 1 It does not appear for some sources 2 It will be shaded when not available ...

Page 226: ... 4 3 LB Letter Box Select when the aspect ratio of your TV is 4 3 conventional TV While viewing a wide screen picture the black bars appear on the top and the bottom of the screen 4 3 PS Pan Scan Select when the aspect ratio of your TV is 4 3 While viewing a wide screen picture the black bars do not appear however the left and right edges of the pictures will not be shown on the screen COLOR SYSTE...

Page 227: ... the initial monitor conditions 1 2 3 4 Select the item you want 5 Change the setting For details see the following pages Ex When setting BEEP TONE to OFF See page 13 2 1 1 1 It does not appear for some sources 2 It will be shaded when not available ...

Page 228: ...also the Installation Connection Manual separate volume Indicators AUTO OPEN CLOSE AUTO The monitor comes out or goes in automatically when you turn on or off the power OFF Cancels this function If you close the monitor before turning off the power the monitor will not come out next time you turn on the power BLIND CONTROL ON The monitor works as Touch Panel when playing back pictures on the monit...

Page 229: ... screen conditions 1 2 3 4 Select the item you want 5 Change the setting For details see the following pages Ex When setting CLOCK to OFF Language selection screen appears See page 13 2 1 1 1 It does not appear for some sources 2 It will be shaded when not available ...

Page 230: ...on MESSAGE ON Speaker signal indicators see page 69 and messages are displayed Messages are displayed on the viewing window of the monitor screen When selecting repeat mode random mode intro scan etc When starting Time Search Title Search Chapter Search and Track Search OFF Cancels this function CLOCK ON Display the clock time on the monitor OFF Cancels this function ANIMATION EFFECT ON Source sel...

Page 231: ...layed on the monitor with Dual Mode turned on see page 33 1 2 3 4 Select the item you want 5 Change the setting or enter the setting screen For details see the following pages Ex When entering SEAT POSITION See page 13 2 1 1 1 It does not appear for some sources 2 It will be shaded when not available Appears when TV tuner unit KV C1001 or KV C1000 is connected Example above is when KV C1001 is con...

Page 232: ...efeated OFF Cancels this function Auto Surround does not work for any sources other than DISC When another source is selected the currently selected Surround or DSP mode is resumed see page 37 SEAT POSITION Select the listening seat position where you want to locate the sound image Speaker distance and speaker level can be memorized for each position Display sub setting screens FRONT LEFT For the ...

Page 233: ...WOOFER Select YES connected or NO disconnected SUBWOOFER PHASE Select either NORMAL or REV reverse to obtain better subwoofer sounds These settings are very related to one another therefore one setting is changed some other settings will be changed automatically and appropriately see page 73 Sound comes out of the subwoofer for Dolby Pro Logic II only when either the front speakers or the center s...

Page 234: ...urce playback screen by touching the center portion of the monitor screen In this case you cannot change the aspect ratio and make monitor adjustments see pages 24 and 42 FM IF FILTER In some areas adjacent stations may interfere with each other If this interference occurs noise may be heard AUTO When this type of interference occurs this unit automatically increases the tuner selectivity so that ...

Page 235: ...ntered name Erase all entered character Entered name is displayed Display the other page of the character list of the same type Alternates between Roman alphabet and accented letter lists Alternates between upper and lower cases Roman alphabet list Upper cases Lower cases Accented characters Upper cases Accented characters Lower cases ...

Page 236: ...AM stations Change FM or AM then select a station For a CD in this unit Insert a CD For CDs in the CD changer Select CD CH then select a disc number For TV stations Change TV then select a TV station 2 3 4 Enter a name 5 Confirm If the DELETE DISC NAME or DELETE STATION NAME screen appears The internal memory is full Delete unwanted names before assignment 1 Select an unwanted name 2 Delete 3 Repe...

Page 237: ... out halfway 2 3 Insert the blind cover to protect the internal mechanism from dust To attach the monitor Insert the monitor into the compartment with the screen facing down Hold Changing the monitor position angle You can change the monitor position and the monitor angle Once you change them they are stored The monitor opens at the stored position and angle next time you eject the monitor To chan...

Page 238: ...folder track no Elapsed playing time Playback mode Sound mode see page 39 Surround DSP mode see page 36 Only for MP3 Back to the beginning Volume level appears when adjusted MP3 CD CD Text Disc text ID3 tag information area Only for CD See page 53 See page 14 See page 14 See page 15 See page 39 See pages 43 52 ...

Page 239: ...However they are not compatible with MP3 discs so you cannot play back MP3 discs You cannot use the KD MK series CD changers with this unit Before operating your CD changer Refer also to the Instructions supplied with your CD changer If no discs are in the magazine of the CD changer or the discs are inserted upside down NO DISC will appear on the monitor If this happens remove the magazine and set...

Page 240: ...ing a disc folder track using the list To locate a disc by displaying the disc list Example while playing MP3 1 2 DISC FOLDER TRACK 3 Select a disc you want To locate a folder by displaying the folder list This functions only for MP3 Though you play back the same disc on the CD changer its folder list may look differently from the one you display while playing it on the main unit This happens beca...

Page 241: ...you can display the text and scroll it on the monitor if it is long and cannot be displayed at a time 1 2 Scroll Text on the information area scrolls once Auto Scroll Text on the information area scrolls every 5 seconds Off The information area goes off no text information will be shown For MP3 For CD Off Auto Scroll Scroll 3 Select a folder you want Shaded when no MP3 files are included You canno...

Page 242: ...g MP3 REPEAT PLAY TRACK REPEAT PLAY DISC REPEAT PLAY OFF REPEAT PLAY TRACK REPEAT PLAY FOLDER REPEAT PLAY DISC REPEAT PLAY OFF Random Play You can play back tracks at random 1 2 RANDOM PLAY FOLDER Plays randomly all tracks of the current folder then moves to the next folder and so on DISC Plays randomly all tracks on the current disc ALL Plays randomly all tracks of all discs in the magazine OFF C...

Page 243: ...s of each track sequentially 1 2 INTRO SCAN TRACK Plays the beginning of all tracks of the current disc FOLDER Plays the first tracks of all folders of the current disc only for MP3 DISC Plays the first tracks of all discs in the magazine OFF Cancels Intro Scan When playing CD When playing MP3 Confirm Clear the entry For CD MP3 For MP3 Ex when playing MP3 INTRO SCAN TRACK INTRO SCAN FOLDER INTRO S...

Page 244: ...ra as a rear view camera to the AV INPUT 2 jacks to guide you to back the car set the usage of the AV INPUT 2 jacks correctly see page 52 For connections see the Installation Connection Manual separate volume 1 Select the external source AV1 To watch the playback pictures through the component connected to the AV INPUT 1 jacks AV2 To watch the playback pictures through the component connected to t...

Page 245: ...ges 14 and 33 Current preset no Channel no Search mode Sound mode see page 39 Surround DSP mode see page 36 See page 53 See page 14 See page 14 See page 15 See page 39 See pages 43 52 Playback picture will be shown in the picture view window Not available while viewing the playback picture Available only after pressing M next to this icon ...

Page 246: ...tions in memory then 3 Tune in to a TV station For Auto Search press either icon once Auto Search begins When a station is received searching stops For Manual Search press either icon repeatedly or hold until a station you want is selected For Preset Search press either icon repeatedly until a preset number you want is selected Storing stations in memory You can preset 12 TV stations To tune into ...

Page 247: ...to a preset number To tune in to a preset station See also Watching TV programs on page 64 1 2 Select a preset number Preset station information will be displayed Select MANUAL or AUTO then then To select the rest of the preset stations To select the rest of the preset stations ...

Page 248: ...ou can store and select the preset station using the preset list on the monitor screen To select a preset station using the preset list 1 2 Preset numbers channel numbers and assigned names see page 53 of the preset TV stations are shown on the list Select MANUAL or AUTO then then To next previous page of the list To next previous page of the list ...

Page 249: ...the following cases After starting the heater in the car If it becomes very humid inside the car Should this occur the disc player may malfunction In this case eject the disc and leave the unit turned on for a few hours until the moisture evaporates Maintenance How to handle discs When removing a disc from its case press down the center holder of the case and lift the disc out holding it by the ed...

Page 250: ...y to the memory circuit is interrupted for example during battery replacement If this occurs preset the stations again More about This Receiver Basic Disc Operations General In this manual words track and file are interchangeably used when referring to MP3 files and their file names When a disc has been already loaded selecting DISC for the playback source starts disc play Inserting a disc When a ...

Page 251: ...D CDs Do not use following discs Discs with stickers labels or protective seal stuck to the surface Discs on which labels can be directly printed by an ink jet printer Using these discs under high temperatures or high humidity may cause malfunctions or damage to discs The speaker signal indicators appear in the following cases only for DVD CD When a different type of the digital signal is detected...

Page 252: ...and 150 files in each folder which recorded in 10 hierarchies This unit can play back the files recorded in VBR variable bit rate The files recorded in VBR have a discrepancy in elapsed time display and do not show the actual elapsed time Especially after performing the search function this difference becomes noticeable Playlist is not available on this unit The search function works but search sp...

Page 253: ...interrupted for example during battery replacement If this occurs preset the stations again Sound Mode iEQ Operations If you do not want to store your current adjustment but only to apply the adjustment to the current playback source press RETURN on the monitor screen to go back to the operation screen of the current source Adjustment you made remains effective until you select a sound mode Other ...

Page 254: ...k picture while driving The playback pictures cannot be shown correctly they scroll vertically The color system NTSC PAL is not correct see page 44 Troubleshooting You cannot change the aspect ratio While the GUI operation is in use you cannot change the aspect ratio The left and right edges of the picture are missing on the screen 4 3 PS is selected when viewing on a conventional TV aspect ratio ...

Page 255: ...ak Store TV stations manually TV stations cannot be received Only for the TV tuner unit KV C1001 users TV CHANNEL AREA setting is not correct see page 52 The TV s main power does not shut off automatically when you change the source from TV to another TV is connected to the TV tuner unit Connect it to the hideaway unit Remember that audio video signals are always transmitted to the TV while it is ...

Page 256: ...00 00 00 Preset iEQ mode The table below shows the preset frequency level settings for each iEQ mode Additional Information Graphic screens You can select one of the following graphic screens For details see page 14 You can activate the display demonstration To cancel it select any other graphic screen While playing a video source except DVD VCD select no graphic screen in other words select the a...

Page 257: ... Persian FI Finnish FJ Fiji FO Faroese FY Frisian GA Irish GD Scots Gaelic GL Galician GN Guarani GU Gujarati HA Hausa HI Hindi HR Croatian HU Hungarian HY Armenian IA Interlingua IE Interlingue IK Inupiak IN Indonesian IS Icelandic IW Hebrew JI Yiddish JW Javanese Code Language KA Georgian KK Kazakh KL Greenlandic KM Cambodian KN Kannada KO Korean KOR KS Kashmiri KU Kurdish KY Kirghiz LA Latin LN...

Page 258: ...e Operating Temperature 0 C to 40 C Main unit AUDIO AMPLIFIER SECTION Maximum Power Output Front 50 W per channel Rear 50 W per channel Center 35 W Continuous Power Output RMS Front 19 W per channel into 4 Ω 40 Hz to 20 000 Hz at no more than 0 8 total harmonic distortion Rear 19 W per channel into 4 Ω 40 Hz to 20 000 Hz at no more than 0 8 total harmonic distortion Center 15 W into 4 Ω 40 Hz to 2...

Page 259: ...ace for the monitor ejection CAUTION When ejecting the monitor keep an open space for the monitor to come out If not the monitor may obstruct the steering wheel and gearshift lever operations as this may result in a traffic accident mm About mistracking Mistracking may result from driving on extremely rough roads This does not damage the unit and the disc but will be annoying It is recommended to ...

Page 260: ...1004MNMMDWJEIN EN CT TH 2004 Victor Company of Japan Limited ...

Page 261: ...lessness and cause an accident If you need to operate the main unit while driving be sure to look ahead carefully or you may be involved in a traffic accident If the parking brake is not engaged DRIVER MUST NOT WATCH THE MONITOR WHILE DRIVING appears on the monitor and no playback picture will be shown This warning appears only when the parking brake wire is connected to the parking brake system b...

Page 262: ... CH X1500 ËÕß Ëπ CD CH X1500 œ œ 2nd monitor Õ æµ Ë Õß Center speaker æß ß CS CN100 etc CS CN100 CS CN100 œ œ See C Electrical connections C Ÿ C ËÕ È øøÈ See E Connecting the external amplifiers E Ÿ E µËÕ ËÕ ËÕß Õ æ ø ÕÕ Ï πÕ TV tuner unit ËÕß t í πá Antenna cord from the car Õ πµÏ Hideaway unit Õÿª ϵ µ Èß È π π Main unit µ ËÕß AV bus cable supplied 1 1 AV bus ÀÈ æ ÈÕ ËÕß 1 See F Connecting the b...

Page 263: ... sure to use screws of proper length refering to the table above If longer screws are used they could damage the unit 01234567 89 23 4 89 À Àµÿ µ µ Èß ËÕß π Ëπ Õß Õ ÀÈ Ÿ ÀÈ πË Ë È Ÿ Ë À µ Ë ÿ πµ ß È ßµÈπ À È Ÿ Ë Ë ÿÕ ÀÈ ËÕß È When using the optional stay ËÕ Èµ Õ È Õ ª È ß È È Screw option Ÿ Õ È Stay option µ Õ È Fire wall ºπ ß π ø Dashboard ºßÀπÈ ª Ï Install the unit at an angle of less than 30 ta...

Page 264: ... Õ øøÈ Õ µ π µ À π Ÿß ÿ 250 mA Blue øÈ Main unit µ ËÕß Hideaway unit Õÿª ϵ µ Èß È π π 1 2 0123456 789 1 Ë È ÀÈ æ ÈÕ ËÕß 2 ËÕπ µ Õ ß π Õß ÿ ª Õ π È ËÕπ Ë µ µ Èß µÈÕßµËÕ µ Ë π È ËÕπ π Èπ Ë ª ËÕß 1 1 1 1 To parking brake of the car ß Õ 15 A fuse 15 A ø Ï π 15 A Ç 01232 0123456 0123 1 0 2 3 0123 Ç ËÕ È øøÈ ËÕπ µËÕ ËÕ Ÿ ÀÈ πË Ë ÈµËÕ Õ Õß Õÿª ϵ µ Èß È π π È ŸÀπÈ 2 À Õ ËæÕ ÀÈ È µËÕ Ë È ÀÈ æ ÈÕ ËÕß µ Õ ...

Page 265: ...r are driving your car The driver must not put on the headphones while driving It is dangerous to shut off the outside sounds while driving Additional monitor KV MAV7002 can also be purchased to used so that you do not need to remove the monitor from the main unit KV CR100 Main unit µ ËÕß Removable monitor or additional monitor KV MAV7002 3 KV MAV7002 3 Õ æ Õ Á È À Õ Õ æ KV MAV7002 3 AV bus cable ...

Page 266: ...ed with paint remove the paint before attaching the wire Failure to do so may cause damage to the unit 5 01234 0 1 5 µËÕ π ÀÈ πËπ È µ ß À Á À Õµ ß µ ß Ë π Ë Ë Õ À Õ Õ ŸË ÀÈ Ÿ ÕÕ ËÕπ ËÕπµËÕ π À 軯 µ µ π π π È ËÕßÕ ÿ À Õ À È 5 5 5 5 Remote lead µ Ë Y connector not supplied with this unit Y ÈÕµËÕ Ÿªµ Y Ë È ÀÈ ÿ ª Õ π È Remote lead Blue with white stripe E F µ Ë πÈ ß π Hideaway unit Õÿª ϵ µ Èß È π π...

Page 267: ...e manual Detachable DVD RECEIVER WITH MONITOR KD AV7008 COMPACT DIGITAL VIDEO ATT MAIN SUB ZOOM ASPECT MENU VOLUME TOPMENU TUNER 5 6 4 2 3 1 8 9 7 11 0 12 10 10 DISC OK AV GUI SET UP RETURN DUAL AVOUT VOL This unit is equipped with the display demonstration To cancel it see page 14 ...

Page 268: ...ong time in hot or cold weather wait until the temperature in the car becomes normal before operating the unit IMPORTANT FOR LASER PRODUCTS 1 CLASS 1 LASER PRODUCT 2 CAUTION Do not open the top cover There are no user serviceable parts inside the unit leave all servicing to qualified service personnel 3 CAUTION Visible and invisible laser radiation when open and interlock failed or defeated Avoid ...

Page 269: ...uct the operation of safety devices such as air bags as this may result in a fatal accident it may obstruct visibility DO NOT operate any unit while manipulating the steering wheel as this may result in a traffic accident The driver must not watch the monitor while driving If the driver watches the monitor while driving it may lead to carelessness and cause an accident If you need to operate the m...

Page 270: ...iver 68 Troubleshooting 72 Additional Information 74 Specifications 76 How to reset your unit 2 Important How to read this manual 3 Introduction Playable Discs 5 Quick Guide How to Use the Controls 6 Remote controller 6 Main unit front 8 Preparation Remote Controller RM RK220 9 Operation Methods 10 Basic Operations 12 Setting the clock 13 Changing the source 14 Changing the graphic screen 14 Chang...

Page 271: ...se from Dolby Laboratories Dolby Pro Logic and the double D symbol are trademarks of Dolby Laboratories DTS and DTS Digital Surround are registered trademarks of Digital Theater Systems Inc DVD Video digital audio formats The System can play back the following digital audio formats Linear PCM Uncompressed digital audio the same format used for CDs and most studio masters Dolby Digital Compressed d...

Page 272: ...he monitor adjustment screen Display and erase GUI screen Display Setup Menus Change menu items Confirm General operations AV TUNER DISC VOLUME ZOOM DUAL MAIN SUB AVOUT VOL ASPECT GUI SET UP OK ATT functions if pressed and held Remote controller 1 When using Dual Mode the remote controller operates either main or sub source depending on the MAIN SUB setting 2 Only for MP3 3 While playing a DVD cha...

Page 273: ...ure Display disc menu Change menu items Confirm MENU TOPMENU OK ZOOM DUAL OK OK then CD changer operations Buttons To do Select folders 2 Select tracks Search Change discs Select disc numbers 5 6 4 2 3 1 8 9 7 11 0 12 10 10 OK TV tuner operations Buttons To do Start Auto Search Start Manual Search Change preset channel numbers Select preset channel numbers 5 6 4 2 3 1 8 9 7 11 0 12 10 10 Buttons T...

Page 274: ... Adjust the monitor angle See page 55 Change the aspect ratio Display the monitor adjustment screen Monitor operations Buttons To do Eject the disc Select chapters tracks Search Display FOLDER select folders 1 Disc operations then Buttons To do Select tracks Search once Display DISC select discs twice Display FOLDER select folders 1 CD changer operations then Buttons To do Start Auto Search Start ...

Page 275: ...ay cause the battery to give off heat crack or start a fire When throwing away or saving the battery wrap it in tape and insulate otherwise the battery may be overheated crack or fire Do not poke the battery with tweezers or similar tools Doing this may cause the battery to be overheated crack or fire CAUTION DO NOT leave the remote controller in a place such as dashboards exposed to direct sunlig...

Page 276: ... time indication Icons shown on this column change each time you press Changes the function modes icons shown to the right change accordingly Changes the source Source and play mode information Ex DVD playback Returns to the previous screen Operation icon FADER REAR Operation icon BALANCE RIGHT Operation icon BALANCE LEFT Operation icon FADER FRONT Ex Fader balance adjustment To erase and display ...

Page 277: ... off at a press of the button 2 1 3 Move the cursor to an icon you want Confirm Using the buttons and controls directly Some operations are only performed by pressing the buttons directly You can also use the buttons and controls on the main unit and remote controller if they have the same or similar name or marks as shown on the touch panel Examples To eject a loaded disc To eject the monitor or ...

Page 278: ...e volume This depends on the AUTO OPEN CLOSE setting see page 46 If the monitor does not come out For turning on the power use the buttons on the main unit and the remote controller 1 Turn on the power WAITING scrolls on the display of the main unit and the monitor comes out When the monitor comes out power comes on to the monitor even if you have turned it off For the space required for the monit...

Page 279: ... clock time is displayed on the display of the main unit for a while When the unit is turned on Each time you press the button the information shown on the display of the main unit changes Information shown on the display differs according to the selected source TUNER Frequency Clock Band Preset no DISC Play time Clock Title Chapter Folder Track no AV1 AV2 Source name Clock TV Channel Clock TV Pre...

Page 280: ...play demonstration has been activated and starts automatically when no operations are done for about 30 seconds except while playing a DVD VCD To cancel it select one of the graphic screen 1 While playing any source 2 To view the playback picture from any video source select the screen where the actual playback pictures are shown Changing the touch panel color You can change the touch panel color ...

Page 281: ...ode is MONO 4 ST indicator lights while receiving an FM stereo broadcast While playing a disc 1 Lights up when Dolby Digital signal is detected see page 36 2 Lights up when Dolby Pro Logic II is activated see page 36 3 Lights up when DTS signal is detected see page 36 4 Main information Play time Title no Chapter no Folder no Track no 5 Lights up when the disc is detected 6 Lights up when an MP3 C...

Page 282: ... pages 43 52 Volume level appears when adjusted Dual Mode indicator see page 33 SOURCE icon see pages 14 and 33 Current band Preset no Station frequency FM reception mode Search mode Sound mode see page 39 Surround DSP mode see page 36 Not available for AM Available only after pressing M next to this icon ...

Page 283: ... possible after storing stations in memory 4 Tune in to a station For Auto Search press either icon once Auto Search begins When a station is received searching stops For Manual Search press either icon repeatedly or hold until a station you want is selected For Preset Search press either icon repeatedly until a preset number you want is selected When an FM stereo broadcast is hard to receive FM r...

Page 284: ... FM1 FM3 you want to store FM stations into 2 Start SSM Local FM stations with the strongest signals are searched and stored automatically in the selected FM band Manual presetting 1 Select the band FM1 FM3 and AM you want to store a station into 2 Tune in to a station 3 4 Store the station into a preset number then then then Preset station information will be displayed Select MANUAL or AUTO ...

Page 285: ...list on the monitor screen To select a preset station using the preset list 1 2 Preset numbers station frequencies and assigned names see page 53 are shown on the list To store a station using the preset list 1 Select the band FM1 FM3 and AM you want to store a station into 2 Tune into a station 3 4 Store the station into a preset number then then Select MANUAL or AUTO ...

Page 286: ...ack buttons see page 22 Back to the beginning VCD DVD See page 14 See page 14 See page 15 See page 39 See pages 43 52 While playing Before playing Playback picture will be shown in the picture view window 1 Available only while playing 2 Not available while playing with PBC activated 3 Not available while playing with PBC activated but available while not playing PBC indicator for VCD see page 25 ...

Page 287: ...e page 30 Playback mode see page 30 Sound mode see page 39 Surround DSP mode see page 36 Playback buttons see page 22 MP3 CD CD Text Back to the beginning Only for MP3 see page 22 Disc text ID3 tag information area Only for CD See page 53 See page 14 See page 14 See page 15 See page 39 See pages 43 52 Audio signal format only for DTS CD Available only while playing ...

Page 288: ...t comes out It takes several seconds for the unit to detect a disc type If a disc menu appears see page 25 2 Adjust the volume 3 Operate the disc Selects the folder only for MP3 Stops see Stopping play on page 69 VCD CD MP3 playback will continue endlessly until you stop it Starts playback Pauses To resume playback press 3 Goes back to the beginning of the current chapter track then skips to the p...

Page 289: ...te the playable discs VCD with without PBC CD DVD MP3 VCD with PBC All playable discs To fast forward or reverse the chapter or track press or 1 on the remote controller while playing a disc Each time you press the button the search speed changes as follows x2 x5 x10 x20 x60 To resume normal speed press 3 If you hold or 4 while playing a disc the search speed changes x2 x10 If you release the butt...

Page 290: ...pect ratio You can change the aspect ratio of the playback pictures This function is only possible using the buttons on the main unit or on the remote controller Aspect ratio cannot be changed while the GUI operation mode is activated On the main unit ASPECT On the remote controller When viewing 16 9 video signals When viewing 4 3 video signals When you change the aspect ratio either RECEIVER or C...

Page 291: ...s you to operate the VCD using menus When you start playback a menu will automatically appear on the monitor A menu may be a list of items divided screens or some moving pictures When a VCD with PBC is detected the PBC indicator appears on the monitor When 3 or SELECT is displayed on the monitor press 3 or OK on the remote controller if pressing 3 does not work to start playback 1 2 3 Enter a numb...

Page 292: ...s 10 10 then 3 To cancel the PBC playback You can cancel the menu driven operations PBC function using the remote controller 1 Press 7 to stop playback 2 Press number buttons to select a track Playback without PBC starts from the selected track You can also use Track Search icon see page 31 and Time Search icon see page 32 on the Touch Panel to start playback without PBC To resume the PBC function...

Page 293: ...to play This is convenient when playing a Karaoke VCD 1 2 Select an audio language you want Selecting subtitles While playing a chapter containing subtitles in different languages you can select the subtitle language to display on the monitor You can also select the subtitle language using SETUP menu see page 44 1 2 Select a subtitle language you want When playing DVD 1 3 ENGLISH 3 3 SPANISH 2 3 F...

Page 294: ... views you can view the same scene at different angles 1 2 Select a view angle you want STEREO To listen to normal stereo left right playback LEFT To listen to the left audio channel RIGHT To listen to the right audio channel When playing VCD STEREO LEFT RIGHT 1 3 2 3 3 3 Ex ...

Page 295: ... only for MP3 1 2 3 Select a folder you want To next previous page of the list Current track name or ID3 Tag To locate a track by displaying the track list 1 2 3 Select a track you want Ex when playing MP3 To next previous page of the list Current folder name or ID3 Tag for MP3 Disc name for CD or CD Text ...

Page 296: ...EM Remaining title time for DVD Remaining disc time for other discs For MP3 TOTAL T REM REM TIME For CD Selecting playback modes You can use only one of the following playback modes at a time Repeat Play Random Play and Intro Scan For VCD While PBC is not in use Repeat Play You can repeat playback Repeat Play can be deactivated only for DVD 1 2 When playing DVD When playing VCD CD When playing MP3...

Page 297: ...playing VCD CD When playing MP3 Random Play You can play back tracks at random 1 2 RANDOM PLAY DISC Plays randomly all tracks on the disc FOLDER Plays randomly all tracks of the current folder then moves to the next folder and so on OFF Cancels Random Play Intro Scan You can play back the first 15 seconds of each track sequentially 1 When playing VCD CD When playing MP3 RANDOM PLAY DISC RANDOM PLA...

Page 298: ...r VCD CD For DVD During play or pause For some DVDs any time For VCD While not playing with PBC activated 1 2 Confirm Ex when playing DVD Clear the entry 3 Enter a number then confirm Examples for DVD To play back from 2 H 34 M 00 S Press number buttons 2 3 4 then ENTER TIME 2 34 00 To play back from 58 M 00 S Press number buttons 0 5 8 then ENTER TIME 0 58 00 Example for VCD CD To play back from ...

Page 299: ... Mode and select the subsidiary source 1 2 3 Select the subsidiary source SUB you want The current sources for MAIN and SUB are highlighted Dual Mode Operations To show the main subsidiary source operation screen on the monitor 1 2 To cancel the Dual Mode press Each time you press the icon Dual Mode is turned on and off alternately When Dual Mode is turned off the main source screen appears To sho...

Page 300: ...press and hold the button Dual Mode turns on and off When Dual Mode is turned on the source selection screen appears on the monitor see page 33 To operate the subsidiary source 1 2 Press the source buttons then the source operation buttons To operate the main source 1 2 Press the source buttons then the source operation buttons ZOOM DUAL Hold MAIN SUB AVOUT VOL On the remote controller then MAIN S...

Page 301: ...de is activated When DSP mode is activated 1 2 3 Activate and select the surround mode or DSP mode 4 Make adjustment if you want to If neither surround mode nor DSP mode is activated you cannot make adjustment 2 1 1 1 It does not appear for some sources 2 It will be shaded when not available 2 ...

Page 302: ...ion rate which enables it to add breadth and depth to the sounds reproduced As such DTS Digital Surround features natural solid and clear sound Dolby Pro Logic II It is a multi channel playback format to convert 2 channel software into 5 channel plus subwoofer The matrix based conversion method used for Dolby Pro Logic II makes no limitation for the cutoff frequency of the surround treble and enab...

Page 303: ...SP mode is defeated set to DEFEAT and cannot be changed 1 2 3 While playing a multi channel encoded disc While playing a 2 channel stereo disc Surround On DSP Off While playing a multi channel Dolby Digital encoded disc Dolby Digital is automatically selected While playing a multi channel DTS encoded disc DTS is automatically selected While playing any other disc Dolby Pro Logic II is automaticall...

Page 304: ...urround or DSP mode When surround mode is activated Selected automatically when multi channel DTS signal is detected while playing a DVD or a DTS CD No further adjustment is allowed Selected automatically when multi channel Dolby Digital signal is detected while playing a DVD No further adjustment is allowed Select either MOVIE or MUSIC When you select MUSIC you can adjust the following items Sele...

Page 305: ...odes Adjust the level of each frequency band Store your adjustment display the screen below Select memory no to store 1 2 3 4 Select one of the preset sound iEQ modes then make adjustment if you want to make your own sound mode See page 41 See page 41 See page 34 See page 35 See page 35 1 It does not appear for some sources 2 It will be shaded when not available 2 1 1 ...

Page 306: ... modes Display the other set of the sound modes see below Storing your own sound modes You can adjust the sound modes and store your own adjustments in memory 1 Repeat steps 1 to 4 on the left column to select a sound mode you want to adjust 2 Make adjustments as you like 3 After adjustment is finished 4 Select one of the user sound modes USER1 USER2 or USER3 you want to store into For details abo...

Page 307: ...u have made an adjustment the volume level will automatically changes by adjusted level whenever you change the source Adjust to match the input level to the FM sound level To adjust fader and balance Adjust fader speaker output balance between the front and rear speakers Adjust the balance speaker output balance between the left and right speakers See page 34 See page 39 1 It does not appear for ...

Page 308: ... night time LIGHT DARK The monitor can memorize the difference between the ambient light level and adjusted level and adjusts the brightness automatically keeping the level difference memorized Adjust the contrast DOWN UP Adjust the tint if the human skin color is unnatural RED GREEN Adjust the color of the picture thinner THIN or thicker THICK 1 Display SCREEN CONTROL screen 2 Select an item to a...

Page 309: ...itions While playing no change can be made on the DVD Menu 1 2 3 4 Select the item you want 5 Change the setting For details see the following pages Ex When setting MONITOR TYPE See page 13 2 1 1 1 It does not appear for some sources 2 It will be shaded when not available ...

Page 310: ... LB Letter Box Select when the aspect ratio of your TV is 4 3 conventional TV While viewing a wide screen picture the black bars appear on the top and the bottom of the screen 4 3 PS Pan Scan Select when the aspect ratio of your TV is 4 3 While viewing a wide screen picture the black bars do not appear however the left and right edges of the pictures will not be shown on the screen COLOR SYSTEM Se...

Page 311: ... initial monitor conditions 1 2 3 4 Select the item you want 5 Change the setting For details see the following pages Ex When setting BEEP TONE to OFF See page 13 2 1 1 1 It does not appear for some sources 2 It will be shaded when not available ...

Page 312: ...See also the Installation Connection Manual separate volume Indicators AUTO OPEN CLOSE AUTO The monitor comes out or goes in automatically when you turn on or off the power OFF Cancels this function If you close the monitor before turning off the power the monitor will not come out next time you turn on the power BLIND CONTROL ON The monitor works as Touch Panel when playing back pictures on the m...

Page 313: ...een conditions 1 2 3 4 Select the item you want 5 Change the setting For details see the following pages Ex When setting CLOCK to OFF Language selection screen appears See page 13 2 1 1 1 It does not appear for some sources 2 It will be shaded when not available ...

Page 314: ...E ON Speaker signal indicators see page 69 and messages are displayed Messages are displayed on the viewing window of the monitor screen When selecting repeat mode random mode intro scan etc When starting Time Search Title Search Chapter Search and Track Search OFF Cancels this function CLOCK ON Display the clock time on the monitor OFF Cancels this function ANIMATION EFFECT ON Source selection sc...

Page 315: ...operation screen is displayed on the monitor with Dual Mode turned on see page 33 1 2 3 4 Select the item you want 5 Change the setting or enter the setting screen For details see the following pages Ex When entering SEAT POSITION See page 13 2 1 1 1 It does not appear for some sources 2 It will be shaded when not available Appears when TV tuner unit KV C1008 is connected ...

Page 316: ...ted OFF Cancels this function Auto Surround does not work for any sources other than DISC When another source is selected the currently selected Surround or DSP mode is resumed see page 37 SEAT POSITION Select the listening seat position where you want to locate the sound image Speaker distance and speaker level can be memorized for each position Display sub setting screens FRONT LEFT For the fron...

Page 317: ...d SUBWOOFER Select YES connected or NO disconnected SUBWOOFER PHASE Select either NORMAL or REV reverse to obtain better subwoofer sounds These settings are very related to one another therefore one setting is changed some other settings will be changed automatically and appropriately see page 73 Sound comes out of the subwoofer for Dolby Pro Logic II only when either the front speakers or the cen...

Page 318: ...nge it to the source playback screen by touching the center portion of the monitor screen In this case you cannot change the aspect ratio and make monitor adjustments see pages 24 and 42 FM IF FILTER In some areas adjacent stations may interfere with each other If this interference occurs noise may be heard AUTO When this type of interference occurs this unit automatically increases the tuner sele...

Page 319: ...ed name Erase all entered character Entered name is displayed Display the other page of the character list of the same type Alternates between Roman alphabet and accented letter lists Alternates between upper and lower cases Roman alphabet list Upper cases Lower cases Accented characters Upper cases Accented characters Lower cases ...

Page 320: ...r AM then select a station For a CD in this unit Insert a CD For CDs in the CD changer Select CD CH then select a disc number For TV stations Change TV then select a TV station 2 3 4 Enter a name 5 Confirm If the DELETE DISC NAME or DELETE STATION NAME screen appears The internal memory is full Delete unwanted names before assignment 1 Select an unwanted name 2 Delete 3 Repeat the above steps if y...

Page 321: ... halfway 2 3 Insert the blind cover to protect the internal mechanism from dust To attach the monitor Insert the monitor into the compartment with the screen facing down Hold Changing the monitor position angle You can change the monitor position and the monitor angle Once you change them they are stored The monitor opens at the stored position and angle next time you eject the monitor To change t...

Page 322: ...er track no Elapsed playing time Playback mode Sound mode see page 39 Surround DSP mode see page 36 Only for MP3 Back to the beginning Volume level appears when adjusted MP3 CD CD Text Disc text ID3 tag information area Only for CD See page 53 See page 14 See page 14 See page 15 See page 39 See pages 43 52 ...

Page 323: ...ver they are not compatible with MP3 discs so you cannot play back MP3 discs You cannot use the KD MK series CD changers with this unit Before operating your CD changer Refer also to the Instructions supplied with your CD changer If no discs are in the magazine of the CD changer or the discs are inserted upside down NO DISC will appear on the monitor If this happens remove the magazine and set the...

Page 324: ...a disc folder track using the list To locate a disc by displaying the disc list Example while playing MP3 1 2 DISC FOLDER TRACK 3 Select a disc you want To locate a folder by displaying the folder list This functions only for MP3 Though you play back the same disc on the CD changer its folder list may look differently from the one you display while playing it on the main unit This happens because ...

Page 325: ...can display the text and scroll it on the monitor if it is long and cannot be displayed at a time 1 2 Scroll Text on the information area scrolls once Auto Scroll Text on the information area scrolls every 5 seconds Off The information area goes off no text information will be shown For MP3 For CD Off Auto Scroll Scroll 3 Select a folder you want Shaded when no MP3 files are included You cannot se...

Page 326: ...3 REPEAT PLAY TRACK REPEAT PLAY DISC REPEAT PLAY OFF REPEAT PLAY TRACK REPEAT PLAY FOLDER REPEAT PLAY DISC REPEAT PLAY OFF Random Play You can play back tracks at random 1 2 RANDOM PLAY FOLDER Plays randomly all tracks of the current folder then moves to the next folder and so on DISC Plays randomly all tracks on the current disc ALL Plays randomly all tracks of all discs in the magazine OFF Cance...

Page 327: ... each track sequentially 1 2 INTRO SCAN TRACK Plays the beginning of all tracks of the current disc FOLDER Plays the first tracks of all folders of the current disc only for MP3 DISC Plays the first tracks of all discs in the magazine OFF Cancels Intro Scan When playing CD When playing MP3 Confirm Clear the entry For CD MP3 For MP3 Ex when playing MP3 INTRO SCAN TRACK INTRO SCAN FOLDER INTRO SCAN ...

Page 328: ...camera to the AV INPUT 2 jacks to guide you to back the car set the usage of the AV INPUT 2 jacks correctly see page 52 For connections see the Installation Connection Manual separate volume 1 Select the external source AV1 To watch the playback pictures through the component connected to the AV INPUT 1 jacks AV2 To watch the playback pictures through the component connected to the AV INPUT 2 jack...

Page 329: ...14 and 33 Current preset no Channel no Search mode Sound mode see page 39 Surround DSP mode see page 36 See page 53 See page 14 See page 14 See page 15 See page 39 See pages 43 52 Playback picture will be shown in the picture view window Not available while viewing the playback picture Available only after pressing M next to this icon ...

Page 330: ...ations in memory then 3 Tune in to a TV station For Auto Search press either icon once Auto Search begins When a station is received searching stops For Manual Search press either icon repeatedly or hold until a station you want is selected For Preset Search press either icon repeatedly until a preset number you want is selected Storing stations in memory You can preset 12 TV stations To tune in t...

Page 331: ... preset number To tune in to a preset station See also Watching TV programs on page 64 1 2 Select a preset number Preset station information will be displayed Select MANUAL or AUTO then then To select the rest of the preset stations To select the rest of the preset stations ...

Page 332: ...an store and select the preset station using the preset list on the monitor screen To select a preset station using the preset list 1 2 Preset numbers channel numbers and assigned names see page 53 of the preset TV stations are shown on the list Select MANUAL or AUTO then then To next previous page of the list To next previous page of the list ...

Page 333: ...following cases After starting the heater in the car If it becomes very humid inside the car Should this occur the disc player may malfunction In this case eject the disc and leave the unit turned on for a few hours until the moisture evaporates Maintenance How to handle discs When removing a disc from its case press down the center holder of the case and lift the disc out holding it by the edges ...

Page 334: ...stations are erased when the power supply to the memory circuit is interrupted for example during battery replacement If this occurs preset the stations again More about This Receiver Basic Disc Operations General In this manual words track and file are interchangeably used when referring to MP3 files and their file names When a disc has been already loaded selecting DISC for the playback source s...

Page 335: ...VD CDs Do not use following discs Discs with stickers labels or protective seal stuck to the surface Discs on which labels can be directly printed by an ink jet printer Using these discs under high temperatures or high humidity may cause malfunctions or damage to discs The speaker signal indicators appear in the following cases only for DVD CD When a different type of the digital signal is detecte...

Page 336: ...150 files in each folder which recorded in 10 hierarchies This unit can play back the files recorded in VBR variable bit rate The files recorded in VBR have a discrepancy in elapsed time display and do not show the actual elapsed time Especially after performing the search function this difference becomes noticeable Playlist is not available on this unit The search function works but search speed ...

Page 337: ...rrupted for example during battery replacement If this occurs preset the stations again Sound Mode iEQ Operations If you do not want to store your current adjustment but only to apply the adjustment to the current playback source press RETURN on the monitor screen to go back to the operation screen of the current source Adjustment you made remains effective until you select a sound mode Other Soun...

Page 338: ...cture while driving The playback pictures cannot be shown correctly they scroll vertically The color system NTSC PAL is not correct see page 44 Troubleshooting You cannot change the aspect ratio While the GUI operation is in use you cannot change the aspect ratio The left and right edges of the picture are missing on the screen 4 3 PS is selected when viewing on a conventional TV aspect ratio 4 3 ...

Page 339: ...ignals are too weak Store TV stations manually TV stations cannot be received TV CHANNEL AREA setting is not correct see page 52 The TV s main power does not shut off automatically when you change the source from TV to another TV is connected to the TV tuner unit Connect it to the hideaway unit Remember that audio video signals are always transmitted to the TV while it is on RESET 8 appears on the...

Page 340: ...0 00 Preset iEQ mode The table below shows the preset frequency level settings for each iEQ mode Additional Information Graphic screens You can select one of the following graphic screens For details see page 14 You can activate the display demonstration To cancel it select any other graphic screen While playing a video source except DVD VCD select no graphic screen in other words select the actua...

Page 341: ...sian FI Finnish FJ Fiji FO Faroese FY Frisian GA Irish GD Scots Gaelic GL Galician GN Guarani GU Gujarati HA Hausa HI Hindi HR Croatian HU Hungarian HY Armenian IA Interlingua IE Interlingue IK Inupiak IN Indonesian IS Icelandic IW Hebrew JI Yiddish JW Javanese Code Language KA Georgian KK Kazakh KL Greenlandic KM Cambodian KN Kannada KO Korean KOR KS Kashmiri KU Kurdish KY Kirghiz LA Latin LN Lin...

Page 342: ...e Grounding System Negative ground Allowable Operating Temperature 0 C to 40 C Main unit AUDIO AMPLIFIER SECTION Maximum Power Output Front 50 W per channel Rear 50 W per channel Center 35 W Continuous Power Output RMS Front 19 W per channel into 4 Ω 40 Hz to 20 000 Hz at no more than 0 8 total harmonic distortion Rear 19 W per channel into 4 Ω 40 Hz to 20 000 Hz at no more than 0 8 total harmonic...

Page 343: ...for the monitor ejection CAUTION When ejecting the monitor keep an open space for the monitor to come out If not the monitor may obstruct the steering wheel and gearshift lever operations as this may result in a traffic accident mm About mistracking Mistracking may result from driving on extremely rough roads This does not damage the unit and the disc but will be annoying It is recommended to stop...

Page 344: ...1004MNMMDWJEIN EN 2004 Victor Company of Japan Limited Having TROUBLE with operation Please reset your unit Refer to page of How to reset your unit ...

Page 345: ...with one of the specified rating If the fuse blows frequently consult your JVC car audio dealer Maximum input of the speakers should be more than 50 W at the rear 50 W at the front and 35 W at the center with an impedance of 4 Ω to 8 Ω Be sure to ground each unit to the car s chassis The main unit and the hideaway unit become very hot after use Be careful not to get burned when removing them To pr...

Page 346: ...D Connecting the cradle These products are optionally available from JVC Use the extension antenna cord supplied if necessary 1 Extension AV bus cable KV U1013 not supplied can be used when the supplied AV bus cable is not long enough Black Black with white stripe Purple with white stripe 2 1 53 m m 184 m m Ÿ l s p k c A d B B INSTALLATION The following illustration shows a typical installation Ho...

Page 347: ...cord to the speakers check the speaker wiring in your car L R L R L R Where to connect depends on your dimmer usage For details see page 46 of the Instructions PARKING BRAKE h Connecting the parking brake wire Connect the parking brake wire to the parking brake system built in the car To metallic body or chassis of the car Parking brake switch inside the car Parking brake wire light green Parking ...

Page 348: ...onnecting the external amplifiers You can connect amplifiers to upgrade surround system in the car compartment Connect the PRE OUT terminals of the hideaway unit to the amplifier s line in terminals Disconnect the speakers from the hideaway unit connect them to the amplifier Leave the speaker leads of the unit unused 5 Firmly attach the ground wire to the metallic body or to the chassis of the car...

Page 349: ...can be determined by turning the equipment off and on the user is encouraged to try to correct the interference by one or more of the following measures Reorient or relocate the receiving antenna Increase the separation between the equipment and receiver Connect the equipment into an outlet on a circuit different from that to which the receiver is connected Consult the dealer or an experienced rad...

Page 350: ...vous au manuel d instructions du KD AV7000 KD AV7001 KD AV7008 Spécifications Taille de l écran affichage à cristaux liquides de 7 pouces en diagonale Nombre de pixels 336 960 pixels 480 vertical 234 horizontal 3 Méthode d entraînement TFT Transitors à couches minces à matrice active Standard de couleur PAL NTSC Format d image 16 9 large Température de rangement autorisée 10 C à 60 C Température d...

Page 351: ...NDUCE y no se mostrará la imagen de reproducción consulte el manual de instrucciones del KD AV7005 KV CR100 These buttons do not work when the monitor is installed into the cradle Estos botones no funcionan cuando el monitor se encuentra instalado en el cradle Ces touches ne fonctionnent pas quand le moniteur est installé sur le berceau B A Français Merci pour avoir acheté un produit JVC Veuillez ...

Page 352: ... È ß È À Àµÿ È Õ æ ˵ µ Èß πµ ËÕß DVD Õ æ ˵ µ Èß ß π Ëπ ßæ ÈÕ π ËÕß Ëπ æ π π Õ Èß Õß À Ë È Õ È ÈÕ Ë DRIVER MUST NOT WATCH THE MONITOR WHILE DRIVING ª Ø Èπ π Õ æ Ë æ ß π Õ Ÿ π π π ŸË Õ Èß π KD AV7005 ÿß Ÿ π π π ŸË Õ Èß π KD AV7005 ÈÕ Ÿ æ π Õ æ Õ æ LCD È ß 7 π È π πæ 336 960 æ 480 π µ Èß x 234 π πÕπ x 3 À Ïø Ÿª TFT π µÕ Ï æËπæ Ï π ß ÕÁ æ Ï PAL NTSC í Ë π æ 16 9 È ß Õÿ À Ÿ ˪ Õ π Á 10 C ß 60 C Õÿ À ...

Reviews: