background image

.

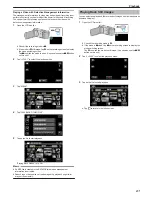
0

d

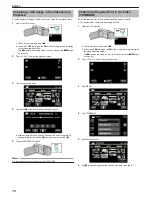
 appears on the selected video.

Tap 

J

 to deselect.

0

Tap on the selected video again to check all the videos of the same

date. After checking, tap 

J

.

0

Tap 

0

/

1

 or move the zoom lever to display the previous/next video.

0

The number on the video indicates the number of videos recorded on

the same day.

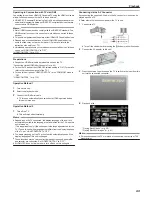
8

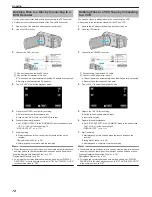
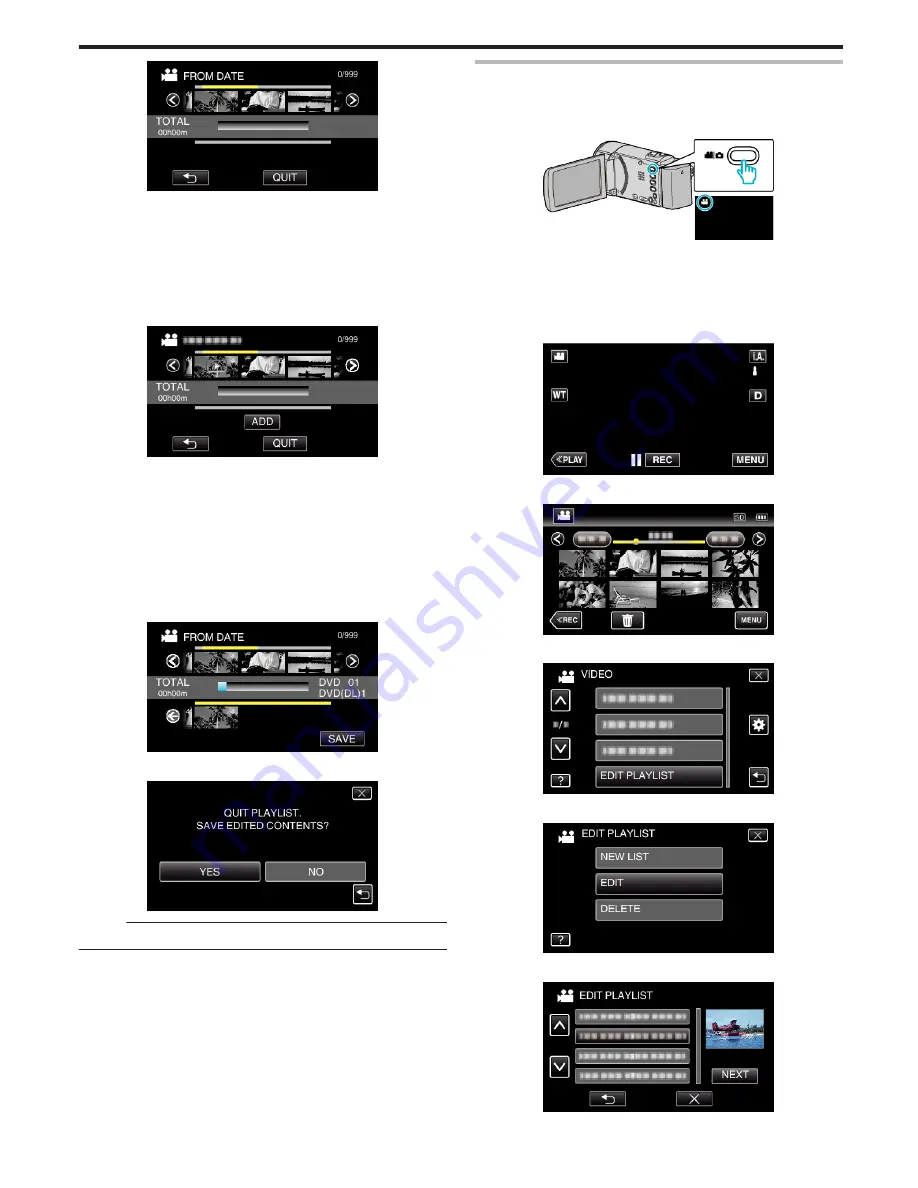
Tap “ADD”, and insert the video image.

.

0

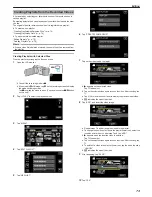
Repeat steps 7-8 and arrange the videos in the playlist.

0

To change the position of a video in the playlist (lower row), select the

insertion point with 

E

/

F

 after step 7 and tap “ADD”.

0

d

 appears when the inserted video is selected.

Tap 

J

 to deselect.

0

Tap on the selected video again to check all the videos of the same

date. After checking, tap 

J

.

0

To delete of a video in the playlist (lower row), tap the video, then tap

“CANCEL”.

9

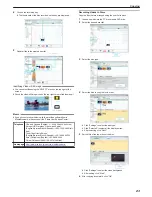
After arranging, tap “SAVE”.

.

10

Tap “YES”.

.

Memo : 

0

Tap 

L

 on each screen to exit the menu.

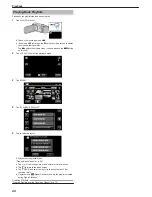
Editing Playlists

You can change the content of a created playlist.

However, the playlists created from Digest Playback cannot be changed.

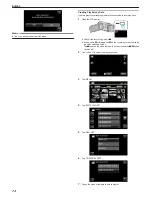
1

Open the LCD monitor.

.

0

Check if the recording mode is 

A

.

0

If the mode is 

B

 still image, tap 

B

 on the recording screen to display

the mode switching screen.

Tap 

A

 to switch the mode to video. (You can also use the 

A

/

B

 button

on this unit.)

2

Tap “<<PLAY” to select the playback mode.

.

3

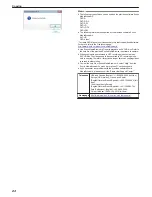
Tap “MENU”.

.

4

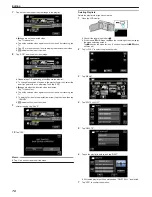
Tap “EDIT PLAYLIST”.

.

5

Tap “EDIT”.

.

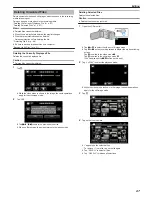
6

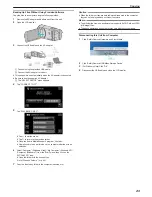
Tap on the playlist to edit, and tap “NEXT”.

.

Editing

75

Summary of Contents for Everio GZ-E200

Page 1: ...CAMCORDER LYT2431 009A Detailed User Guide GZ E200 GZ E205 GZ E207 GZ E209 ...

Page 2: ...kly Digest Playback 60 Playing a Video with Defective Management Information 61 Playing Back Still Images 61 Slideshow Playback 63 Searching for a Specific Video Still Image by Date 63 Connecting to and Viewing on TV 64 Connecting via the HDMI Mini Connector 64 Connecting via the AV Connector 65 Playing Back Playlists 66 Editing Deleting Unwanted Files 67 Deleting the Currently Displayed File 67 D...

Page 3: ...LOCK ADJUST 109 DATE DISPLAY STYLE 109 LANGUAGE 109 MONITOR BRIGHTNESS 109 OPERATION SOUND 110 SILENT MODE 110 AUTO POWER OFF 111 QUICK RESTART 111 DEMO MODE 112 TOUCH SCREEN ADJUST 112 DISPLAY ON TV 113 VIDEO OUTPUT 114 HDMI OUTPUT 114 HDMI CONTROL 115 FACTORY PRESET 115 UPDATE 115 FORMAT SD CARD 116 Names of Parts Front 117 Rear 117 Bottom 118 Interior 118 LCD Monitor 119 Indications on the LCD ...

Page 4: ...o achieve stable images 0 Set to the wide angle as much as possible as the image will be prone to camera shake 0 Be considerate Do not inconvenience the people around you Squatting and Shooting at Eye Level Staying low is a common position to take when shooting small children By recording from the eye level of the child you can capture all his cute expressions clearly o Getting Ready A Kneel down ...

Page 5: ...ion No Derivative Works 3 0 Record the scenes as everyone helps to prepare the feast of the night You can film the mother who is cooking the children who are helping and of course the process of making a cake Recording the Christmas Party Photo by InnerSpirit Creative Commons Attribution No Derivative Works 3 0 After all preparations it is finally the Christmas party itself Not only should you rec...

Page 6: ...es so as to capture the scene well when the bride and groom enter again You can also make use the time while the bride and groom are changing to record comments of well wishes from the guests Finding the Right Angle to Capture Both Bride and Groom o Composing the picture with the groom in front and the guests at the back The main characters of a wedding are of course the bride and groom Record the...

Page 7: ...lar you have to think about what to bring in accordance to the local conditions Here are some suggestions for your consideration o Camcorder Think about how many hours of shooting you will usually perform in a day Be sure to prepare enough recording medium especially for long overseas trips If you are recording in SD cards get ready the sufficient number of cards including some for backup o Batter...

Page 8: ...when everyone is gathered at the meeting place if you are traveling with your friends For overseas trips taking a shot of the signs and displays at the airport of the flight you are taking may be useful for future reference Using Pan at the Places of Interest Tourists spots with beautiful scenery or historical sites are places that you would certainly want to record To capture the magnificence of ...

Page 9: ... with no waving of hands nor laughter are not only dull when you view them later but also put the capability of the audio recording function of the camcorder to a waste When recording induce more reactions by enthusiastically waving your hands or shouting out Is it fun and the like Capturing the Best Moment in a Video as a Still Image Shots with the eyes closed are often taken by accident To reduc...

Page 10: ...tion as expected or if the brightness correction is insufficient you can increase the brightness by using backlight compensation in the Manual mode Setting Details A p 37 o Without backlight compensation o With backlight compensation Useful Shooting Techniques 10 ...

Page 11: ...ors Power Cord Battery Pack BN VG114E GZ E207 0 Attaches to this unit to supply power Battery Pack BN VG108E x 1 GZ E200 GZ E205 BN VG108E x 2 GZ E209 0 Attaches to this unit to supply power AV Cable 0 Connects this unit to a TV to play back recorded images on the TV USB Cable Type A Mini Type B 0 Connects this unit to a computer Core Filter for AV Cable 0 The core filter reduces interference when...

Page 12: ...ed easily when necessary Memo 0 SD cards are sold separately Types of Usable SD Card A p 16 0 When using the AC adapter overseas please prepare a commercially available converter plug for the country or region of visit Charging the Battery Pack Overseas A p 22 Getting Started 12 ...

Page 13: ...taching the Core Filter Attach a core filter to the end of the AV cable that is connected to this unit The core filter reduces interference when this unit is connected to other devices Getting Started 13 ...

Page 14: ...is unit outdoors in the winter weather warm the battery such as by placing it in the pocket before attaching it Keep away from direct contact with a warm pack 0 Do not expose the battery to excessive heat such as direct sunlight or fire 0 After removing the battery store it in a dry place between 15 C to 25 C 0 Keep a 30 battery level X if the battery pack is not to be used for a long period of ti...

Page 15: ...g 0 Make sure not to insert the SD card in the wrong direction It may cause damage to the unit and SD card 0 Turn off the power of this unit before inserting or removing an SD card 0 Do not touch the metal contact area when inserting the SD card 0 This unit is not guaranteed to operate with all SD cards Some SD cards may not work due to specification changes etc Memo 0 Both videos and still images...

Page 16: ...mended to confirm the video operation of the SD card before usage 0 To protect the data do not touch the terminals of the SD card 0 UHS I SDHC SDXC cards can be used in the same manner as standard SDHC SDXC cards UHS Speed Class is not supported When your computer cannot recognize the SDXC card Confirm and update the OS of your computer Windows XP Windows XP SP1 Necessary to update to SP2 or highe...

Page 17: ...apply slightly more force to your fingertip or the stylus pen 0 Tap the buttons icons on the touch screen accurately The buttons may not respond if they are not tapped on the right area 0 Do not press or rub with excessive force 0 If you apply a protect sheet or a sticker the touch screen may not respond smoothly 0 Do not operate the touch screen using an object with a sharp tip 0 Pressing two or ...

Page 18: ...telligent Auto and H Manual Playback Screen Video 1 Video Still Image Mode Button 0 Switches between video and still image modes 2 Recording Mode Button 0 Switches to the recording mode 3 Index Screen Button Operation Buttons for Video Playback A p 58 4 Delete Button Deleting the Currently Displayed File A p 67 5 Menu Button Operating the Menu A p 88 6 Operation Buttons Operation Buttons for Video...

Page 19: ...ot set yet Set the clock before recording 1 Open the LCD monitor 0 The unit turns on 0 When the LCD monitor is closed the unit turns off 2 Tap YES when SET DATE TIME is displayed 3 Set the date and time 0 When the year month day hour or minute item is tapped 3 and 2 will be displayed 0 Tap 3 or 2 to adjust the year month day hour and minute 4 After setting the date and time tap SET 5 Select the re...

Page 20: ...ard or downward for more selection 4 Tap CLOCK SETTING 5 Set the date and time 0 When the year month day hour or minute item is tapped 3 and 2 will be displayed 0 Tap 3 or 2 to adjust the year month day hour and minute 6 After setting the date and time tap SET 7 Select the region where you live and tap SAVE 0 The city name and time difference are displayed 0 Tap 0 or 1 to select the city name Gett...

Page 21: ...attention when this unit is being used by children Memo 0 If camera shake is excessive use the image stabilizer Reducing Camera Shake A p 50 Tripod Mounting This unit can be mounted on a tripod or monopod This is useful for preventing camera shake and recording from the same position 0 To prevent this unit from falling off check the tripod mounting screw holes and positioning holes on the unit car...

Page 22: ...me display to the local time by selecting your travel destination in AREA SETTING of CLOCK ADJUST Setting the Clock to Local Time when Traveling A p 23 When ON is selected in DST SETTING of CLOCK ADJUST the time is set 1 hour ahead Setting Daylight Saving Time A p 23 Charging the Battery Pack Overseas The shape of the power outlet varies according to countries and regions To charge the battery pac...

Page 23: ...ing AREASETTING changestheclocktimesuchthattimedifference is accounted for After returning to your country re select the region that was set initially to restore the original clock settings Setting Daylight Saving Time When ON is selected in DST SETTING of CLOCK ADJUST the time is set 1 hour ahead 1 Tap MENU 0 When entering from the recording mode tap MENU again as the shortcut menu appears 2 Tap ...

Page 24: ... 0 For details on the provided accessories refer to Verifying the Accessories Verifying the Accessories A p 11 Approximate Recording Time Using Battery Battery Pack Actual Recording Time Continuous Recording Time BN VG108E Supplied GZ E200 GZ E205 GZ E209 40 m 1 h 5 m BN VG114E Supplied GZ E207 1 h 15 m 2 h 10 m BN VG121E 1 h 55 m 3 h 15 m BN VG138E 3 h 20 m 5 h 45 m 0 The above are values when LI...

Page 25: ...operly even in the Intelligent Auto mode Indications During Video Recording Display Icon Description A Video Quality Displays the icon of the VIDEO QUALITY setting selected in the recording menu VIDEO QUALITY A p 94 B TOUCH PRIORITY AE AF Displays the setting of TOUCH PRIORITY AE AF By default it is set to FACE TRACKING Capturing Subjects Clearly TOUCH PRIORITY AE AF A p 42 C Time Displays the cur...

Page 26: ...o the shooting conditions and automatically adjusted in Intelligent Auto mode 0 Some functions may not work properly depending on the shooting conditions Operation Buttons for Video Recording Operation Button Description A Video Still Image Mode Switches between video and still image modes B T W Zoom Allows the same functions as the zoom lever to be performed Camera shake that often occurs when us...

Page 27: ...a to a DVD or other recording media for storage JVC will not be responsible for any lost data Memo 0 Checktheremainingrecordingtimeinthemediabeforeyoustart shooting If there is not enough space move copy the data to a computer or disc 0 When there are many files in the media it may take time for them to be displayed on the playback screen Wait for a while as the access lamp appears blinking which ...

Page 28: ...lligent Auto mode Indications During Still Image Recording Display Icon Description A Image Size Displays the icon of the image size 0 The size of still images can be changed IMAGE SIZE A p 101 B TOUCH PRIORITY AE AF Displays the setting of TOUCH PRIORITY AE AF By default it is set to FACE TRACKING Capturing Subjects Clearly TOUCH PRIORITY AE AF A p 42 C Time Displays the current time Clock Settin...

Page 29: ...onditions and automatically adjusted in Intelligent Auto mode 0 Some functions may not work properly depending on the shooting conditions Operation Buttons for Still Image Recording Operation Button Description A Video Still Image Mode Switches between video and still image modes B T W Zoom Allows the same functions as the zoom lever to be performed Camera shake that often occurs when using the zo...

Page 30: ...use this unit in places subject to excessive humidity or dust as well as places exposed to steam or smoke directly 0 The power may turn off to protect the circuit if the temperature of this unit rises too much 0 Do not remove the battery pack AC adapter or SD card when the access lamp is lighted The recorded data may become unreadable ACCESS Access Lamp A p 117 0 This unit is a microcomputer contr...

Page 31: ...e mode switching screen Tap A or B to switch the mode to video or still image respectively You can also use the A B button on this unit 3 Select the Manual recording mode 0 If the mode is P Intelligent Auto tap P on the recording screen to display the mode switching screen Tap H to switch the recording mode to Manual 4 Tap MENU 0 The shortcut menu appears 5 Tap MENU in the shortcut menu 6 Tap the ...

Page 32: ...BACKLIGHT COMP 0 Corrects the image when the subject appears dark due to backlight 0 Use this when shooting against the light Setting Backlight Compensation A p 37 TELE MACRO 0 Use this to take close up macro shots of the subject Taking Close up Shots A p 38 Shooting According to Scene Subject Common scenes that are often encountered can be recorded with the most suitable settings 1 Select the Man...

Page 33: ...pression Setting Effect b NIGHTALIVE Increases gain and brightens the scene automatically using a slow shutter when the surrounding is dark To prevent camera shake use a tripod g SPOTLIGHT Prevents the human subject from appearing too bright under light Memo 0 All scenes of SCENE SELECT cannot be set during TIME LAPSE RECORDING Recording 33 ...

Page 34: ... FOCUS 0 Tap 3 or 2 to move upward or downward for more selection 0 Tap L to exit the menu 0 Tap J to return to the previous screen 5 Tap MANUAL 6 Adjust the focus 0 Tap E to focus on a distant subject If E appears blinking focus cannot be set any further 0 Tap p to focus on a near subject If p appears blinking focus cannot be set any nearer 7 Tap SET to confirm 0 When focus is confirmed the focus...

Page 35: ...NU in the shortcut menu 4 Tap BRIGHTNESS ADJUST 0 Tap 3 or 2 to move upward or downward for more selection 0 Tap L to exit the menu 0 Tap J to return to the previous screen 5 Tap MANUAL 6 Adjust the brightness value 0 Compensation range during video recording 2 0 to 2 0 0 Compensation range during still image recording 2 0 to 2 0 0 Tap 3 to increase the brightness 0 Tap 2 to decrease the brightnes...

Page 36: ...s MWB Use this when the problem of unnatural colors is not resolved FINE Set this when shooting outdoors on a sunny day CLOUD Set this when shooting on a cloudy day or inside a shade HALOGEN Set this when shooting under illumination such as a video light MARINE BLUE Set this when shooting the sea at deep water area water appears blue using an optional marine case MARINE GREEN Set this when shootin...

Page 37: ...n the recording screen to display the mode switching screen Tap H to switch the recording mode to Manual 2 Tap MENU 0 The shortcut menu appears 3 Tap MENU in the shortcut menu 4 Tap BACKLIGHT COMP 0 Tap 3 or 2 to move upward or downward for more selection 0 Tap L to exit the menu 0 Tap J to return to the previous screen 5 Tap ON 0 After setting the backlight icon l appears Recording 37 ...

Page 38: ...ut menu 4 Tap TELE MACRO 0 Tap 3 or 2 to move upward or downward for more selection 0 Tap L to exit the menu 0 Tap J to return to the previous screen 5 Tap ON 0 After setting the tele macro icon o appears Setting Details OFF Enables close up shots up to 1 m at the telephoto T end Enables close up shots up to 5 cm at the wide angle W end ON Enables close up shots up to 50 cm at the telephoto T end ...

Page 39: ...CD monitor 0 Check if the recording mode is A 0 If the mode is B still image tap B on the recording screen to display the mode switching screen Tap A to switch the recording mode You can also use the A B button on this unit 2 Tap MENU 0 The shortcut menu appears 3 Tap MENU Go to step 4 Alternatively tap ANIMATION EFFECT 4 in the shortcut menu Go to step 5 4 Tap ANIMATION EFFECT 0 Tap 3 or 2 to mov...

Page 40: ...0 To perform operations other than recording tap L to cancel the ANIMATION EFFECT first Recording 40 ...

Page 41: ...ct appears when smiles are detected Animation effect appears when smiles are detected Animation effect appears when smiles are detected Animation effect appears when smiles are detected Animation effect appears when the screen is touched Recording 41 ...

Page 42: ... appears around the tapped area Memo 0 When TOUCH PRIORITY AE AF is set FOCUS will be set to AUTO automatically 0 Tap the selected position face color area again to cancel the setting Setting remains for registered faces 0 Tap on an unselected position face color area to reset 0 If the camera loses track of a subject tap the subject again 0 Settings are canceled when zoom operation is performed AR...

Page 43: ... between video and still image tap A or B on the recording screen to display the mode switching screen Tap A or B to switch the mode to video or still image respectively You can also use the A B button on this unit 2 Tap MENU 0 The shortcut menu appears 3 Tap MENU Go to step 4 Alternatively tap SMILE SHOT 8 in the shortcut menu Go to step 5 4 Tap SMILE SHOT 0 Tap 3 or 2 to move upward or downward ...

Page 44: ... etc It is also difficult to detect a smile in backlight 0 After a smile is detected and captured it takes time before the next recording may be performed 0 SMILE SHOT does not work in the following cases when menu is being displayed when remaining recording time or battery power is being displayed when FACE SUB WINDOW is set when ANIMATION EFFECT is set when AUTO REC is set when DATE TIME RECORDI...

Page 45: ...tion 0 Take note of the following when FACE SUB WINDOW is set Functions such as digital zoom zoom operation on the touch screen simultaneous still image recording TIME LAPSE RECORDING and AUTO REC are not available Settings such as FOCUS and BRIGHTNESS ADJUST are set to AUTO automatically If TOUCH PRIORITY AE AF is set to FACE TRACKING appropriate focus and brightness will be adjusted for the pers...

Page 46: ...ter information collection is complete 0 To cancel the registration tap STOP When CANCEL FACE RECOGNITION appears tap YES to return to the normal recording mode 7 Tap RECORD and record the face from the front 0 A face is captured to be used on the face registration index screen 0 Other than tapping RECORD you can also record by pressing the SNAPSHOT button fully 0 A sound can be heard when recordi...

Page 47: ... 1 The priority level of the registered subject becomes number 1 while the priority levels of the original number 1 and the ones below drop by one place In this example the original number 1 becomes number 2 and the orignal number 2 becomes number 3 0 When REG is tapped the registration complete screen appears 0 Tap OK to complete the registration 0 You can edit registered face information in EDIT...

Page 48: ... 5 4 Tap SMILE NAME DISPLAY 5 Tap the desired setting Setting Details OFF Displays only the frames when faces are detected ON Displays the frames names and smile levels when faces are detected 0 Frame Appears around detected faces Name Appears for faces that are registered Smile level Appears in value 0 100 for detected smiles Memo 0 The camera is able to detect up to 16 faces Smile levels will be...

Page 49: ...on Information A p 46 0 If you select CHANGE NAME proceed to step 12 in Registering Human Face Personal Authentication Information A p 47 0 If you select CHANGE ORDER OF PRIORITY proceed to step 13 in Registering Human Face Personal Authentication Information A p 47 Registering Human Face Personal Authentication Information A p 46 Canceling Deleting Registered Face Information You can cancel delet...

Page 50: ...f image stabilizer changes with every press Setting Details b OFF Deactivates image stabilizer a ON Reduces camera shake under normal shooting conditions r ON AIS Reduces camera shake more effectively when shooting bright scenes on the wide angle end Only on the wide angle end approx 5x Memo 0 It is recommended to set the image stabilizer to OFF when shooting a subject of little movement with the ...

Page 51: ...ds the longer the recording interval 0 Tap 3 or 2 to move upward or downward for more selection 0 Tap L to exit the menu 0 Tap J to return to the previous screen 6 Start recording 0 A frame is taken at intervals of the selected period 0 When the recording interval is set to 20SEC INTERVAL or higher this unit switches to the power saving mode between recordings At the next point to record the power...

Page 52: ...in time lapse recording Memo 0 Settings of time lapse recording are reset when the power is turned off To start time lapse recording again it is necessary to make the selection once more 0 Recording stops automatically 99 hours after it is started 0 Make use of a tripod and AC adapter for time lapse recordings with long intervals It is also recommended to fix the focus and white balance manually T...

Page 53: ... 0 Recording stops when there are no changes for 5 seconds during video recording 0 Settings of AUTO REC are not saved when the power is turned off 0 Recording may not start when the movements of the subject within the red frame are too fast or the changes in brightness are too small 0 Recording may start due to changes in brightness even if there is no movement within the red frame 0 While zoomin...

Page 54: ...fter another person enters the frame This function is useful when you want to include the photographer in the group photo 1 Open the LCD monitor and select the still image mode 0 The still image mode icon appears 2 Tap MENU 0 The shortcut menu appears 3 Tap MENU in the shortcut menu 4 Tap SELF TIMER 0 Tap 3 or 2 to move upward or downward for more selection 0 Tap L to exit the menu 0 Tap J to retu...

Page 55: ...ot be deleted after recording 1 Open the LCD monitor 0 Check if the recording mode is A 0 If the mode is B still image tap B on the recording screen to display the mode switching screen Tap A to switch the mode to video You can also use the A B button on this unit 2 Tap MENU 0 The shortcut menu appears 3 Tap MENU in the shortcut menu 4 Tap DATE TIME RECORDING 0 Tap 3 or 2 to move upward or downwar...

Page 56: ... recording time 0 The remaining recording time is displayed only in the video recording mode 0 Press the INFO button to check the remaining recording time of each recording media 0 To display the remaining battery power tap l 0 l will not be displayed when the AC adapter is connected 0 Tap J to return to the recording mode 0 To exit the display tap L 4 Display the remaining battery power 0 For vid...

Page 57: ...Still images that are captured during video recording or video playback are saved at a size of 1920 x 1080 Approximate Recording Time Using Battery Battery Pack Actual Recording Time Continuous Recording Time BN VG108E Supplied GZ E200 GZ E205 GZ E209 40 m 1 h 5 m BN VG114E Supplied GZ E207 1 h 15 m 2 h 10 m BN VG121E 1 h 55 m 3 h 15 m BN VG138E 3 h 20 m 5 h 45 m 0 The above are values when LIGHT ...

Page 58: ...back During Index Screen Display Display Description A Video Still Image Mode Switches between video and still image modes B Date Moves to the previous next date C Displays the previous index screen thumbnail display 0 You can perform the same operation with the zoom lever D Displays the next index screen thumbnail display 0 You can perform the same operation with the zoom lever E Thumbnail File T...

Page 59: ...perations buttons on the touch screen disappear if the unit is not operated for about 5 seconds Tap on the screen to display the operation buttons again 0 You can search for a specific file by the recording date Searching for a Specific Video Still Image by Date A p 63 0 The recording date and time can be displayed on the screen during playback DISPLAY DATE TIME A p 103 Adjusting the Volume of Vid...

Page 60: ...ayback will be performed for all the dates 0 Tap 3 or 2 to move upward or downward for more selection 0 Tap L to exit the menu 0 Tap J to return to the previous screen 6 Select the Digest Playback time 0 The time display of Digest Playback varies according to the recording time 0 When it takes time more than 2 seconds for DIGEST PLAYBACK to start after selecting Digest Playback time a progress sta...

Page 61: ...ack mode 3 Tap MENU 4 Tap PLAYBACK OTHER FILE 5 Tap on the file to start playback Playing Back Videos A p 58 Memo 0 An MTS file is created in the EXTMOV folder when management information is corrupted 0 Depending on the condition of the damaged file playback might fail or may not run smoothly Playing Back Still Images You can select and play back the recorded still images from an index screen thum...

Page 62: ...C R Rotates to the left rotates by 90 with each tap D S Rotates to the right rotates by 90 with each tap E h Returns to the previous still image 0 You can perform the same operation with the zoom lever F d e Starts pauses slideshow Slideshow Playback A p 63 G g Advances to the next still image 0 You can perform the same operation with the zoom lever H REC Switches to the recording mode I u Returns...

Page 63: ...e you want You can search and play videos or still images according to recording dates 1 Tap MENU 0 Searching can be performed in both the video and still image modes The image shows the video mode 2 Tap SEARCH DATE 3 Tap a recording date then tap NEXT 0 Tap again to cancel the selected date 4 Tap on the file to start playback 0 You can select videos in the video mode and still images in the still...

Page 64: ...e on the display changed 0 It may occur when you connect this unit to a TV with different language setting using an HDMI mini cable Caution 0 Do not remove the recording medium or perform any other operation such as turning off the power while accessing files Also be sure to use the provided AC adapter as the data on the recording medium may be corrupted if the battery becomes exhausted during ope...

Page 65: ...ect the HDMI mini cable 0 TV turns on automatically and switches to HDMI input mode when this unit is turned on Operation Method 2 1 Turn off the TV 0 This unit turns off automatically Memo 0 Depending on the TV connected the display language of this unit will automatically switch to the language that is selected for the TV when this unit is turned on This is applicable only if this unit supports ...

Page 66: ...2 Tap PLAY to select the playback mode 3 Tap MENU 4 Tap PLAYBACK PLAYLIST 5 Tap to select a playlist 0 Playback of the playlist starts Playing Back Videos A p 58 0 Tap 3 or 2 to move upward or downward for more selection 0 Tap u to return to the index screen 0 Tap CHECK and select a playlist to check its content After checking tap J 0 Playlists with a O Digest Playback icon are the playlists creat...

Page 67: ...shown in the image the same operations apply for the still image mode 2 Tap YES 0 Tap h g to select the previous or next file 0 When no file remains the screen returns to the index screen Deleting Selected Files Deletes the selected files Caution 0 Deleted files cannot be restored 1 Open the LCD monitor 0 Tap A or B to select the video or still image mode 0 Tap B or A on the recording screen to di...

Page 68: ...leasing Protection of the Currently Displayed File A p 68 Protecting Releasing Protection of Selected Files A p 69 Caution 0 When the recording media is formatted even the protected files will be deleted Protecting Releasing Protection of the Currently Displayed File Protects or releases protection of the currently displayed file 1 Tap MENU 2 Tap PROTECT CANCEL 3 Tap YES 0 Tap h g to select the pr...

Page 69: ...t 2 Tap PLAY to select the playback mode 3 Tap MENU 4 Tap PROTECT CANCEL 5 Tap on the files to protect or release protection of 0 P appears on the selected files To remove P from a file tap on the file again 0 I and P are displayed on the files that are already protected To release protection of a file tap on the file such that P is removed 0 Tap SEL ALL to select all files 0 Tap REL ALL to releas...

Page 70: ...point to capture by tapping forward slow motion k and reverse slow motion l 5 Press the SNAPSHOT button Memo 0 Still images are captured with a size of 1920 1080 Capturing a Required Part in the Video TRIMMING Select the required part of a video and save it as a new video file 0 The original video remains in its existing location 1 Open the LCD monitor 0 Check if the recording mode is A 0 If the m...

Page 71: ...ate slightly from the selected scene Capturing Videos for Uploading to YouTube Capture and copy a part of a recorded video maximum 15 minutes for uploading to YouTube and save it as a YouTube video When capturing videos for YouTube the duration cannot be longer than 15 minutes 1 Open the LCD monitor 0 Check if the recording mode is A 0 If the mode is B still image tap B on the recording screen to ...

Page 72: ...it upload settings tap STOP on the upload settings screen Memo 0 The division point may deviate slightly from the selected scene Uploading Videos to YouTube You can upload your videos to YouTube using the provided software Everio MediaBrowser 4 Install the software on your PC and connect this unit to the PC 0 For details on how to use the software refer to the help file Trouble with Uploading Vide...

Page 73: ...lay the mode switching screen Tap A to switch the mode to video You can also use the A B button on this unit 2 Tap PLAY to select the playback mode 3 Tap MENU 4 Tap EDIT PLAYLIST 5 Tap NEW LIST 6 Tap CREATE FROM SCENE 7 Tap on the video to add to playlist 0 d appears on the selected video Tap J to deselect 0 Tap on the selected video again to check the video After checking tap J 0 Tap 0 1 or move ...

Page 74: ...heck if the recording mode is A 0 If the mode is B still image tap B on the recording screen to display the mode switching screen Tap A to switch the mode to video You can also use the A B button on this unit 2 Tap PLAY to select the playback mode 3 Tap MENU 4 Tap EDIT PLAYLIST 5 Tap NEW LIST 6 Tap CREATE BY DATE 7 Tap on the video of the date to add to playlist Editing 74 ...

Page 75: ...o deselect 0 Tap on the selected video again to check all the videos of the same date After checking tap J 0 To delete of a video in the playlist lower row tap the video then tap CANCEL 9 After arranging tap SAVE 10 Tap YES Memo 0 Tap L on each screen to exit the menu Editing Playlists You can change the content of a created playlist However the playlists created from Digest Playback cannot be cha...

Page 76: ...ed video again to check the video After checking tap J 0 To delete of a video in the playlist lower row tap the video then tap CANCEL 0 X indicates the size of the video 9 After arranging tap SAVE 10 Tap YES Memo 0 Tap L on each screen to exit the menu Deleting Playlists Delete the playlists that you have created 1 Open the LCD monitor 0 Check if the recording mode is A 0 If the mode is B still im...

Page 77: ...nnect using the provided USB cable B Connect the AC adapter to this unit 0 This unit powers on automatically when the AC adapter is connected 0 Be sure to use the supplied AC adapter 0 This unit turns on and the SELECT DEVICE screen appears 4 Tap CONNECT TO OTHER 5 Tap the desired media 0 Operations are to be performed on the Blu ray recorder after the screen switches 6 Perform dubbing on the Blu ...

Page 78: ... and time during dubbing set DISPLAY DATE TIME in the video playback menu to ON Set DISPLAY ON TV in the common menu to ON Dubbing Files to a VHS Tape by Connecting to a VCR You can dub videos in standard quality by connecting to a VCR 0 Refer also to the instruction manuals of the TV and VCR 1 Remove the AC adapter and battery pack from this unit 2 Open the LCD monitor 3 Connect to a VCR DVD reco...

Page 79: ...software refer to MediaBrowser Help in the Help menu of Everio MediaBrowser 4 Verifying System Requirements Guideline Right click on Computer or My Computer in the Start menu and select Properties to check the following items Windows Vista Windows 7 0 Refer to the operating instructions found in the animation on the Detailed User Guide Windows XP 0 Refer to the operating instructions found in the ...

Page 80: ...ears 4 Tap CONNECT TO PC 5 Tap PLAYBACK ON PC 0 Tap L to exit the menu 0 Tap J to return to the previous screen 0 Everio Software Setup appears on the computer Operations are to be performed on the computer after the screen switches Memo 0 If Everio Software Setup doesn t appear double click JVCCAM_APP in My Computer or Computer then double click install or Install exe 0 If the auto play dialog bo...

Page 81: ...puter The subsequent operations are to be performed on the computer 6 Select the source of the image file 7 Start backup 0 Backup starts 8 After backup is complete click OK Memo 0 Before making backup load the SD card in which the videos and still images are stored on this unit 0 If you encounter any problems with the provided software Everio MediaBrowser 4 please consult the Pixela User Support C...

Page 82: ... monitor Organizing Files After backing up your files organize them by adding labels such as Family Trip or Athletic Meet This is useful not only for creating discs but for viewing the files too 1 Double click on the Everio MediaBrowser 4 icon 0 The provided software starts up 2 Display the month of the files to organize 3 Create a user list 0 A new user list is added to the user list library Copy...

Page 83: ... Spanish 800 1532 4865 toll free Other Countries in Europe English German French Spanish 44 1489 564 764 Asia Philippines English 63 2 438 0090 China Chinese 10800 163 0014 toll free Homepage http www pixela co jp oem jvc mediabrowser e Recording Videos to Discs Copy the files that are arranged using the user list to discs 1 Insert a new disc into the PC s recordable DVD drive 2 Select the desired...

Page 84: ...mode to create an AVCHD disc the videos need to be converted to XP recording mode before copying Therefore it may take a longer time than copying videos recorded in other modes 0 To view the help file of Everio MediaBrowser 4 select Help from the Everio MediaBrowser 4 s menu bar or press F1 on the keyboard 0 If you encounter any problems with the provided software Everio MediaBrowser 4 please cons...

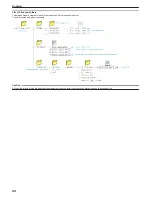
Page 85: ... to be performed on the computer after the screen switches 6 Select Computer Windows Vista My Computer Windows XP Computer Windows 7 from the Start menu then click on the JVCCAM_SD icon 0 Open the folder with the desired files List of Files and Folders A p 86 7 Copy the files to any folder in the computer desktop etc Caution 0 When the folders or files are deleted moved renamed in the computer the...

Page 86: ...iles are created in the built in memory and SD card as shown below They are created only when necessary Caution 0 When the folders or files are deleted moved renamed in the computer they cannot be played back on this unit anymore Copying 86 ...

Page 87: ...ter they cannot be played back on this unit anymore 0 MTS files that are copied to a Mac computer cannot be imported to iMovie To use MTS files with iMovie import the files using iMovie Memo 0 To edit view the files use a software that supports AVCHD video JPEG still image files 0 When removing this unit from the computer drag and drop the JVCCAM_SD icon on the desktop to the trash bin iMovie and ...

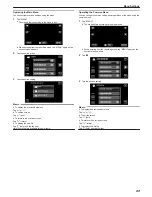
Page 88: ...Operating the Shortcut Menu You can configure various settings of the recommended functions in the video still image recording mode using the shortcut menu 1 Tap MENU 0 The shortcut menu appears 2 Tap the desired menu and setting Shortcut Menu During Video Recording Mode 0 SMILE Allows settings of SMILE SHOT and SMILE NAME DISPLAY 0 EFFECT RECORDING Allows settings of ANIMATION EFFECT 0 MENU Allow...

Page 89: ...urn 0 To display the help file Tap K help and tap the item Help file may not be available for some items Operating the Common Menu You can configure common setting items regardless of the mode using the common menu 1 Tap MENU 0 The menu differs according to the mode in use 0 When entering from the recording mode tap MENU again as the shortcut menu appears 2 Tap Q 3 Tap the desired setting Memo 0 T...

Page 90: ...ne Subject A p 32 Displayed only in the manual recording mode FOCUS Focus can be adjusted manually Adjusting Focus Manually A p 34 Displayed only in the manual recording mode BRIGHTNESS ADJUST Adjusts the overall brightness of the screen Adjusting Brightness A p 35 Displayed only in the manual recording mode WHITE BALANCE Adjusts the color according to the light source Setting White Balance A p 36...

Page 91: ... to record automatically by sensing the changes in subject s movement brightness within the red frame displayed on the LCD monitor Recording Automatically by Sensing Movements AUTO REC A p 52 DATE TIME RECORDING You can record videos together with the date and time Set this when you want to save the file with date and time display The date and time cannot be deleted after recording Recording Video...

Page 92: ...t Operating Details Setting Backlight Compensation A p 37 TELE MACRO Enables close up shots when using the telephoto T end of the zoom Operating Details Taking Close up Shots A p 38 TOUCH PRIORITY AE AF Automatically adjusts focus and brightness based on the subjects faces or selected area Operating Details Capturing Subjects Clearly TOUCH PRIORITY AE AF A p 42 LIGHT GZ E205 GZ E207 GZ E209 Turns ...

Page 93: ...ne more than ON movements of the subject may become unnatural Displaying the Item 1 Open the LCD monitor 0 Check if the recording mode is A 2 Tap MENU 0 The shortcut menu appears 3 Tap MENU in the shortcut menu 4 Tap GAIN UP WIND CUT Reduces the noise caused by wind Setting Details OFF Deactivates the function ON Activates the function Displaying the Item 1 Open the LCD monitor 0 Check if the reco...

Page 94: ...WINDOW A p 45 SMILE SHOT Automatically captures a still image upon detection of a smile Operating Details Capturing Smiles Automatically SMILE SHOT A p 43 SMILE NAME DISPLAY Sets the items to display when faces are detected Operating Details Setting SMILE NAME DISPLAY A p 48 FACE REGISTRATION Registers the faces of people who are often shot with this unit Operating Details Registering Human Face P...

Page 95: ...larged 0 The angle of view changes when the image stabilizer is turned on or off Displaying the Item 1 Open the LCD monitor 0 Check if the recording mode is A 2 Tap MENU 0 The shortcut menu appears 3 Tap MENU in the shortcut menu 4 Tap ZOOM ZOOM MIC Sets the zoom microphone Setting Details OFF Deactivates the zoom microphone ON Records audio sounds in the same direction as the zoom operation Displ...

Page 96: ...Scene Subject A p 32 Displayed only in the manual recording mode FOCUS Focus can be adjusted manually Adjusting Focus Manually A p 34 Displayed only in the manual recording mode BRIGHTNESS ADJUST Adjusts the overall brightness of the screen Adjusting Brightness A p 35 Displayed only in the manual recording mode WHITE BALANCE Adjusts the color according to the light source Setting White Balance A p...

Page 97: ...aces GAIN UP A p 99 AUTO REC Enables the unit to record still images automatically by sensing the changes in brightness within the red frame displayed on the LCD monitor Recording Automatically by Sensing Movements AUTO REC A p 52 SHUTTER MODE Continuous shooting settings can be adjusted SHUTTER MODE A p 100 SMILE SHOT Automatically captures a still image upon detection of a smile Capturing Smiles...

Page 98: ...t Operating Details Setting Backlight Compensation A p 37 TELE MACRO Enables close up shots when using the telephoto T end of the zoom Operating Details Taking Close up Shots A p 38 TOUCH PRIORITY AE AF Automatically adjusts focus and brightness based on the subjects faces or selected area Operating Details Capturing Subjects Clearly TOUCH PRIORITY AE AF A p 42 LIGHT GZ E205 GZ E207 GZ E209 Turns ...

Page 99: ...rk Memo 0 Setting can be adjusted separately for videos GAIN UP Video A p 93 Displaying the Item 1 Open the LCD monitor 0 Check if the recording mode is B 2 Tap MENU 0 The shortcut menu appears 3 Tap MENU in the shortcut menu 4 Tap GAIN UP AUTO REC Starts recording automatically by sensing the changes in subject s movement brightness within the red frame displayed on the LCD monitor Operating Deta...

Page 100: ...onitor 0 Check if the recording mode is B 2 Tap MENU 0 The shortcut menu appears 3 Tap MENU in the shortcut menu 4 Tap SHUTTER MODE SMILE SHOT Automatically captures a still image upon detection of a smile Operating Details Capturing Smiles Automatically SMILE SHOT A p 43 SMILE NAME DISPLAY Sets the items to display when faces are detected Operating Details Setting SMILE NAME DISPLAY A p 48 FACE R...

Page 101: ...0 The sides of still images recorded in 16 9 aspect ratio may be cut off when printed 1440X1080 1 5M 640X480 0 3M Takes still images with aspect ratio 4 3 Displaying the Item 1 Open the LCD monitor 0 Check if the recording mode is B 2 Tap MENU 0 The shortcut menu appears 3 Tap MENU in the shortcut menu 4 Tap IMAGE SIZE Menu Settings 101 ...

Page 102: ...playlist Creating Playlists with Selected Files A p 73 Creating Playlists by Date A p 74 Editing Playlists A p 75 PROTECT CANCEL Protects files from being deleted accidently Protecting Releasing Protection of the Currently Displayed File A p 68 Protecting Releasing Protection of Selected Files A p 69 TRIMMING Select the required part of a video and save it as a new video file Capturing a Required ...

Page 103: ...os are arranged is called a playlist By creating a playlist you can play back only your favorite videos in the order you like The original video file remains even when it is registered to a playlist Operating Details Creating Playlists with Selected Files A p 73 Creating Playlists by Date A p 74 Editing Playlists A p 75 PROTECT CANCEL Protects files from being deleted accidently Operating Details ...

Page 104: ...and plays back with a sound quality close to the original Setting Details OFF Deactivates K2 TECHNOLOGY ON Activates K2 TECHNOLOGY Displaying the Item 1 Open the LCD monitor 0 Check if the recording mode is A 2 Tap PLAY to select the playback mode 3 Tap MENU 4 Tap K2 TECHNOLOGY Menu Settings 104 ...

Page 105: ...rch and play videos or still images according to recording dates Searching for a Specific Video Still Image by Date A p 63 SLIDE SHOW EFFECTS Sets the transition effects in slideshow playback SLIDE SHOW EFFECTS A p 106 PROTECT CANCEL Protects files from being deleted accidently Protecting Releasing Protection of the Currently Displayed File A p 68 Protecting Releasing Protection of Selected Files ...

Page 106: ...gh a checkered pattern RANDOM Switches the screen with a random effect from SLIDE BLINDS and CHECKERBOARD Memo 0 Slideshow effects are not available when playing back still images in external devices such as USB external hard disk drives Displaying the Item 1 Open the LCD monitor 0 Check if the recording mode is B 2 Tap PLAY to select the playback mode 3 Tap MENU 4 Tap SLIDE SHOW EFFECTS PROTECT C...

Page 107: ...nging the Display Language A p 21 MONITOR BRIGHTNESS Sets the brightness of the LCD monitor MONITOR BRIGHTNESS A p 109 OPERATION SOUND Turns on or off the operation sound OPERATION SOUND A p 110 SILENT MODE Sets to the Silent mode in which operation sounds are turned off and the brightness of the screen is reduced SILENT MODE A p 110 AUTO POWER OFF Prevents the situation of forgetting to turn off ...

Page 108: ...A p 114 HDMI OUTPUT Sets the definition of the video output from the HDMI mini connector HDMI OUTPUT A p 114 HDMI CONTROL Sets the linked operations ON OFF when the TV and this unit are connected using the HDMI mini connector HDMI CONTROL A p 115 FACTORY PRESET Returns all the settings to their default values FACTORY PRESET A p 115 UPDATE Updates the functions of this unit to the latest version UP...

Page 109: ... display style 0 After setting tap SET LANGUAGE The language on the display can be changed Operating Details Changing the Display Language A p 21 MONITOR BRIGHTNESS Sets the brightness of the LCD monitor Setting Details AUTO Sets the brightness automatically to 4 when using outdoors and to 3 when using indoors 4 Brightens the backlight of the monitor regardless of the surrounding conditions 3 Sets...

Page 110: ...s on the Silent mode Displaying the Item 1 Tap MENU 0 When entering from the recording mode tap MENU again as the shortcut menu appears 2 Tap Q 3 Tap SILENT MODE Memo 0 T appears when SILENT MODE is set to ON 0 You can also turn on the Silent mode using the SILENT button on this unit Taking Videos in Auto Mode A p 27 0 It may be difficult to see the screen in Silent mode as the LCD monitor darkens...

Page 111: ... from the recording mode tap MENU again as the shortcut menu appears 2 Tap Q 3 Tap AUTO POWER OFF QUICK RESTART Enables the power to turn on quickly when the LCD monitor is opened again within 5 minutes Setting Details OFF Deactivates the function ON Enables the power to turn on quickly when the LCD monitor is opened again within 5 minutes Memo 0 The power consumption within 5 minutes after the LC...

Page 112: ... 48 Displaying the Item 1 Tap MENU 0 When entering from the recording mode tap MENU again as the shortcut menu appears 2 Tap Q 3 Tap DEMO MODE TOUCH SCREEN ADJUST Adjusts the response position of the buttons on the touch screen 1 Tap MENU 0 When entering from the recording mode tap MENU again as the shortcut menu appears 2 Tap Q 3 Tap TOUCH SCREEN ADJUST 0 The touch screen adjustment screen appear...

Page 113: ... with a corner of an SD card etc 0 Do not press with an object with a sharp tip or do not press hard DISPLAY ON TV Displays icons and date time on a TV screen Setting Details OFF Does not display icons and date time on TV ON Displays icons and date time on TV Displaying the Item 1 Tap MENU 0 When entering from the recording mode tap MENU again as the shortcut menu appears 2 Tap Q 3 Tap DISPLAY ON ...

Page 114: ... recording mode tap MENU again as the shortcut menu appears 2 Tap Q 3 Tap VIDEO OUTPUT HDMI OUTPUT Sets the output from the HDMI connector of this unit when it is connected to a TV Setting Details AUTO It is recommended to select AUTO usually 576p Select this when the video is not output in AUTO correctly Displaying the Item 1 Tap MENU 0 When entering from the recording mode tap MENU again as the ...

Page 115: ...ET Returns all the settings to their default values 1 Tap MENU 0 When entering from the recording mode tap MENU again as the shortcut menu appears 2 Tap Q 3 Tap FACTORY PRESET 4 Tap YES 0 All settings return to their default values UPDATE Updates the functions of this unit to the latest version For details refer to the JVC homepage When no program to update the software of this unit is available n...

Page 116: ... no SD card is inserted 0 All data on the SD card will be deleted when it is formatted Copy all files on the SD card to a computer before formatting 0 Make sure that the battery pack is fully charged or connect the AC adapter as the formatting process may take some time Displaying the Item 1 Tap MENU 0 When entering from the recording mode tap MENU again as the shortcut menu appears 2 Tap Q 3 Tap ...

Page 117: ... E209 A p 92 5 Stereo Microphone 0 Do not cover the microphone with your fingers during video recording Rear 1 DC Connector 0 Connects to an AC adapter to charge the battery 2 ACCESS Access Lamp 0 Lights up blinks during recording or playback Do not remove the battery pack AC adapter or SD card 3 POWER CHARGE Power Charge Lamp 0 Lights up Power ON 0 Blinks Charging in progress 0 Goes out Charging ...

Page 118: ...ess and hold the button again SILENT MODE A p 110 4 a Image Stabilizer Button 0 The setting of image stabilizer changes with every press during video recording Reducing Camera Shake A p 50 5 INFO Information Button 0 Recording Displays the remaining time for video only and battery power 0 Playback Displays file information such as recording date 6 AV Connector 0 Connects to the AV connector of a T...

Page 119: ...s self portraits to be taken by rotating the monitor Using the Touch Screen A p 17 Names of Buttons and Functions on the LCD Monitor A p 18 Caution 0 Do not press against the surface with force or subject it to strong impact Doing so may damage or break the screen Names of Parts 119 ...

Page 120: ...HUTTER MODE Still Image A p 100 12 Recording Mode Taking Videos in Auto Mode A p 25 Manual Recording A p 31 13 Light GZ E205 GZ E207 GZ E209 LIGHT GZ E205 GZ E207 GZ E209 A p 92 14 SILENT MODE SILENT MODE A p 110 15 Zoom ZOOM A p 95 16 Focus Adjusting Focus Manually A p 34 17 Brightness Adjusting Brightness A p 35 Video Recording 1 Video Mode A B Video Still Image Button A p 118 2 Video Quality VI...

Page 121: ...deo Mode A B Video Still Image Button A p 118 2 Video Quality VIDEO QUALITY A p 94 3 Operation Indicator Operation Buttons for Video Playback A p 58 4 Date Time 0 Displays the recording date and time 5 Media 6 Battery Indicator Checking the Remaining Recording Time A p 56 7 Playback Time Playing Back Videos A p 58 8 Time Lapse Playback Time Lapse Setting A p 52 9 1080p Output HDMI OUTPUT A p 114 1...

Page 122: ...cator Checking the Remaining Recording Time A p 56 7 SILENT MODE SILENT MODE A p 110 8 1080p Output HDMI OUTPUT A p 114 When the unit is not working properly Turning Off the Power 1 Close the LCD monitor 2 Remove the AC adapter and battery pack from this unit reattach them open the LCD monitor and this unit powers on automatically Reset complete Indications on the LCD monitor 122 ...

Page 123: ...focus may not be adjusted correctly in the Intelligent Auto mode In this case adjust the settings manually Adjusting Focus Manually A p 34 Recording stops automatically Recording stops automatically as it cannot be performed for 12 or more consecutive hours according to specifications It may take some time to resume recording Turn off this unit wait for a while and turn it on again This unit stops...

Page 124: ... 16 Clean the terminals of the SD card with a dry cotton swab or something similar Execute FORMAT SD CARD in the COMMON menu All data will be deleted FORMAT SD CARD A p 116 Verify the system requirements of your PC when using Everio MediaBrowser 4 to play back Verifying System Requirements Guideline A p 79 Cannot find a recorded file Cancel the date search function Searching for a Specific Video S...

Page 125: ...o discs a recordable DVD or Blu ray drive is required for the computer in use Cannot upload the file to YouTube Check if you have created an account with YouTube You need a YouTube account to upload files to YouTube Changing videos to the file format for uploading cannot be performed on this unit Refer to Q A Latest Information Download Information etc in Click for Latest Product Info in the help ...

Page 126: ...d if you touch them with your fingernails or with gloves on The image is grainy When digital zoom is used the image becomes grainy as it is digitally enlarged This unit heats up This is not a malfunction This unit may become warm when used for a long time The language on the display changed ItmayoccurwhenyouconnectthisunittoaTVwithdifferentlanguagesetting using an HDMI mini cable Operating in Conj...

Page 127: ...TED Switch off the PROTECT CANCEL function in the EDIT menu Protecting Files A p 68 CHECK CARD S WRITE PROTECTION SWITCH Set the write protect switch of the SD card to off INSUFFICIENT AVAILABLE SPACE Delete files or move files to a computer or other devices Replace the SD card with a new one Seamless videos cannot be combined if there is not enough free space in the built in memory or SD card Che...

Page 128: ...ohol Doing so may cause damage to the unit 0 When using a chemical cloth or cleaner be sure to observe the warning labels and instructions of the product 0 Do not leave the device in contact with rubber or plastic products for a long time Lens LCD Monitor 0 Use a lens blower commercially available to remove any dust and a cleaning cloth commercially available to wipe off any dirt Mold may form if ...

Page 129: ...Recording area Video 630 000 to 1 050 000 pixels AIS ON 1 250 000 pixels AIS OFF Recording area Still image 930 000 pixels 4 3 1 250 000 pixels 16 9 Lens F1 8 6 3 f 2 9 mm to 116 0 mm Video 35 mm conversion 45 6 mm to 1 824 mm AIS ON 35 mm conversion 42 0 mm to 1 680 mm AIS OFF Still Image 35 mm conversion 51 4 in to 2 056 in 4 3 35 mm conversion 42 0 mm to 1 680 mm 16 9 Item Details Lowest illumi...

Page 130: ...Average Approximate 6 2 Mbps SEW 16 9 720 x 576 pixels Interlaced Average Approximate 3 Mbps Sound quality Audio 48 kHz 256 kbps Still Image Item Details Recording format JPEG standard Extension JPG Image size Approximate Number of Still Images Unit Number of Shots A p 57 AC Adapter AC V10M Item Details Power supply AC 110 V to 240 V 50 Hz 60 Hz Output DC 5 2 V 1 A Allowable operating temperature ...

Page 131: ......

Reviews: