background image

Introduction

61

(Continued)

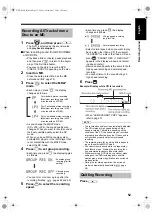
Editing Tracks by Group

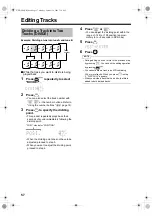
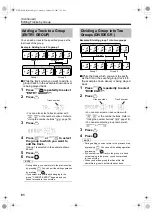
You can add a track to the specified group as the 

last track of the group.

Example: Adding tune F to group 1

While the track which you want to add to a 

group (track 6 in the example shown above) 

is being played back

1

Press 

 repeatedly to select 

"ENTRY GROUP?".

2

Press .

• You can also select a track number with 

 or the number buttons. Refer to 

"Using the number buttons" (

 page 18).

3

Press .

4

Press 

 or 

 to select 

the group to which you want to 

add the track.

(Group 1 is selected in the example shown 

above)

5

Press .

6

Press .

NOTE

• During editing, you can return to the previous step 

by pressing 

. You can quit the editing operation 

by pressing 

.

• If you select a track already belonging to the 

group, "CANNOT ENTRY!" appears and you 

cannot proceed to the next step.

Example: Dividing group 1 into two groups

While the track which you want to specify 

as the first in the second group (track 4 in 

the example shown above) is being played 

back

1

Press 

 repeatedly to select 

"DIVIDE GR.?".

2

Press .

• You can also select a track number with 

 or the number buttons. Refer to 

"Using the number buttons" (

 page 18).

• You can also select a group number with 

 or 

.

3

Press .

4

Press .

NOTE

• During editing, you can return to the previous step 

by pressing 

. You can quit the editing operation 

by pressing 

.

• If you select the first track in the group or a track 

not belonging to the group, you cannot proceed 
to the next step.

• When you divide a group that has a title, the 

same title is given to both divided sections.

Adding a Track to a Group 

(ENTRY GROUP)

Group 1

Group 2

Group 1

Group 2

Track number

Dividing a Group into Two 

Groups (DIVIDE GR.)

Group 1

Group 1

Group 2

Group number

Track number

NX-DD30[UB].book  Page 61  Monday, October 24, 2005  7:16 PM

Summary of Contents for CA-NXDD30

Page 1: ... SURROUND MODE OUTPUT MODE PHONES LINE OUT VOLUME for Digital Audio Player DVD CD LINE FM AM MD LINE DVD CD MD FM AM NX DD30 Consists of CA NXDD30 and SP NXDD30 由 CA NXDD30 及 SP NXDD30 组成 INSTRUCTIONS 使用说明书 LVT1430 002A UB English 中 文 NX DD30 UB 01 fm Page 1 Thursday November 24 2005 1 47 PM ...

Page 2: ...candles on the apparatus When discarding batteries environmental problems must be considered and local rules or laws governing the disposal of these batteries must be followed strictly Do not expose this apparatus to rain moisture dripping or splashing and that no objects filled with liquids such as vases shall be placed on the apparatus 注意 切勿堵塞通风口或通风孔 如果通风口或通风孔被报纸或布等物堵塞 热量将无 法散出 切勿在本系统上放置明火 如点燃的蜡...

Page 3: ...height of 10 cm or more In addition maintain the best possible air circulation 注意 正确的通风方法 为了防止触电 火灾及避免损坏 按如下要求放置机器 上面 前面 后面 侧面 在图中所示范围中 不应放置任何障 碍物 底部 放置在水平面上 放置在一个高 10 cm 或更高的台上以保留足够的通风道 此外 如图所示 尽可能保持最佳的空气循环 15cm 15cm 10cm 15cm 1cm 1cm 10cm STANDBY DISC IN MD IN DISC LOADING MECHANISM REC SURROUND MODE OUTPUT MODE PHONES LINE OUT VOLUME for Digital Audio Player LINE DVD CD MD FM AM 0 0 Wall or obs...

Page 4: ...ging the Display in the Display Window 21 Basic Operations of the DVD Player 22 Playback 22 Changing the Display in the Display Window 24 Playing Back from a Position 10 Seconds Before One Touch Replay 24 Stopping Playback 25 Resuming Playback RESUME 25 Pausing Playback 25 Advancing Picture Frame by Frame 25 Fast Reverse Fast Forward Search 25 Slow Motion Playback 26 Skipping to the Beginning of a...

Page 5: ...ing 53 Recording Sound from Radio or Other Equipment 53 Quitting Recording 54 Giving Editing Titles 55 Things You Should Know about Editing 55 Giving Editing Titles 55 Entering Titles 56 Available Characters 56 Editing Tracks 57 Dividing a Track into Two Tracks DIVIDE 57 Joining Tracks JOIN 58 Moving a Track MOVE 58 Erasing a Track ERASE 59 Erasing All Tracks ALL ERASE 59 Editing Tracks by Group 6...

Page 6: ...inners ben zenes or other chemical agents Do not spray insecticides onto the operation panel These may cause discoloration and damage to the surface When using headphones keep the volume at a moderate level so as not to over stimulate your ears When enjoying sound from the speakers adjust the volume to a suitable level to avoid disturbing your neighbors Even low volume sound carries a long way esp...

Page 7: ...the disc or dirt or condensation on the lens Before using a disc carefully read the cautions regarding the disc This product does not support playback or CD text display of sound files such as MP3s To play back a CD RW or DVD RW on this product erase all tracks if the CD RW or DVD RW was recorded in a format other than the format described on the left Using the CD RW or DVD RW with out erasing all...

Page 8: ...d time is not displayed until playing back starts If playing back starts the elapsed time may not be dis played correctly For an MP3 WMA file a disc with a sampling fre quency of 44 1 kHz and transmission rate of 128 kbps is recommended This product is not compatible with MP3i or MP3PRO This product can play back a baseline JPEG file excluding monochromatic JPEG files This product can play back JP...

Page 9: ...oduct can recognize up to 150 tracks files per group and up to 99 groups in a disc Since the unit ignores the tracks files whose numbers are exceeding 150 and the groups whose numbers are exceeding 99 they cannot be played back If there is any type of files other than MP3 WMA JPEG ASF DivX files in a disc those tracks files are also counted in the total file number Regarding TV mode This product i...

Page 10: ...of time disconnect the power cord plug from the wall outlet Do not block the vents Blocking the vents may damage the system Care of the cabinet When cleaning the system use a soft cloth and fol low the relevant instructions on the use of chemi cally coated cloths Do not use benzene thinner or other organic solvents including disinfectants These may cause deformation or discoloring If water gets in...

Page 11: ...s is the quantity of the pieces supplied If anything is missing contact your dealer immediately Remote control 1 Batteries 2 FM antenna 1 AM loop antenna 1 Video cord 1 Power cord 1 Speaker cord 2 bundles with plugs 3 meters each Supplied Accessories NX DD30 UB book Page 8 Friday November 25 2005 10 26 AM ...

Page 12: ...round Our original speaker layout and signal processing does not only save space but it also ensures a more realistic sound field Since high quality sound is produced using basic 2 channel stereo it is ideal for playing music The center surround speaker allows listeners to enjoy realistic speech localization It provides realistic surround effects with wider lis tening points for both front and bac...

Page 13: ...hich the parts are explained STANDBY DISC IN MD IN DISC LOADING MECHANISM LINE SURROUND OUTPUT MODE PHONES LINE OUT VOLUME for Digital Audio Player STANDBY REC MODE OUTPUT MODE PHONES LINE OUT for Digital Audio Player LINE DVD CD MD FM AM 69 65 68 52 22 20 30 31 30 22 45 48 52 54 9 38 38 36 24 25 45 69 38 40 22 19 50 54 17 19 20 19 22 69 19 20 40 45 40 45 19 45 51 54 19 45 47 54 Remote control sen...

Page 14: ...l or subject it to excessive shock The numbers refer to the pages in which the parts are explained Opening the cover 24 19 19 19 19 20 54 19 45 48 54 25 26 46 19 12 18 19 29 24 26 29 29 30 19 39 19 39 19 34 35 39 12 18 21 26 32 34 35 46 47 56 66 67 52 52 69 65 52 51 52 54 18 66 68 48 18 21 48 54 55 57 68 18 32 47 56 66 68 18 21 24 46 50 53 54 56 55 56 60 64 55 59 33 48 20 31 33 47 48 31 41 28 28 2...

Page 15: ...ng it towards the TV 1 Make sure to slide the remote control mode selector to the TV side in advance NOTE When the batteries are replaced perform the man ufacturer s code setting again This page is for when operating your TV using the remote control of this product Operating the TV Using the Remote Control Setting the manufacturer s code Manufacturer Code Manufacturer Code JVC 01 Samsung 12 Hitach...

Page 16: ...tennas Connecting the AM antenna Insert the tab into the slot Main unit rear view When insulation covers the tips of the antenna cord twist and pull off the insulation Black White Vinyl covered wire 3 5 m not supplied Twist together vinyl covered wire and the AM loop antenna cord Stretch out the vinyl covered wire horizontally preferably in a high place such as above a window or outdoors Connect t...

Page 17: ...irregularity occurs in pictures keep a distance of more than 10 cm between the TV and the speakers NOTE Improper speaker cord connection spoils the stereo effect and sound quality The impedance of speakers connected to this product must be within the range of 4 Ω to 16 Ω Cooling fan is built into the main unit for emitting generated heat The internal cooling fan auto matically rotates and stops To...

Page 18: ... this section when connecting other audio equipment to this product LINE IN Other audio equipment Audio cord not supplied Main unit rear view Connecting with digital equipment AV amplifier with a built in decoder not supplied To an optical digital input terminal Optical digital cable not supplied Optical digital cable not supplied MD player or CS tuner not supplied To an optical digital output ter...

Page 19: ...video cord If both cords are used pictures may not be played back properly NOTE In order to enjoy pictures with the progressive mode page 30 the TV is required to have progressive video input If the component video input jacks of your TV are BNC type use a plug adapter not supplied to convert the plugs Connecting with a TV When a Clearer Picture Is Desired TV Supplied video cord Main unit rear vie...

Page 20: ...els and sound adjustment may be erased in a few days in the following cases When you disconnect the power plug When a power failure occurs Connect all necessary parts before connecting the power plug Connecting the Sub woofer Equipment LINE IN Amplifier built in sub woofer To an audio input terminal Main unit rear view Audio cord not supplied If an audio cord comes with the amplifier built in sub ...

Page 21: ...he hour Refer to Using the number buttons shown below 3 Press To return to step 2 press 4 Set the minute in the same manner as steps 2 and 3 Press five times to display the clock and then adjust the clock starting from step 2 Press repeatedly NOTE The time display on the main unit is a 24 hour clock The clock will gain or lose approximately 1 minute per month Set the clock again after you have dis...

Page 22: ... Voice function is activated is displayed in the display window NOTE This function cannot be used when the sound source is radio This function is effective when the center chan nel signal exists with surround sound or when the sound is set to Surround even with stereo sound page 38 Performing the recording operation deselects Clear Voice function 1 Press repeatedly to select BASS or TREBLE 2 Press...

Page 23: ... or AM Example Display while an FM radio broadcast is received 2 Press or repeatedly to select a radio station frequency You can also select a radio station using the automatic tuning When the main unit has received an FM stereo broadcast ST lights up NOTE If an FM stereo broadcast is difficult to hear because of noise you may be able to hear more easily by pressing to switch the sound to monaural...

Page 24: ...tion has previously been stored the newly set radio station replaces the pre viously stored radio station While an FM or AM broadcast is being received 1 Set the remote control mode selector to AUDIO 2 Use the number buttons to select the preset number of the radio sta tion to which you want to tune in Refer to Using the number buttons page 18 You can also select the preset number by pressing or P...

Page 25: ...layed back Display while the DVD VIDEO is stopped While resume function page 25 is on While resume function page 25 is off Continued on next page How to read this manual Operations are described by mainly using the remote control buttons If there are the same marks on the main unit the buttons on the main unit can also be used The following marks tell you for which type of the discs the operation ...

Page 26: ... while the ASF DivX is stopped Display for VCD SVCD Display while a VCD SVCD is being played back PBC indicator is displayed while PBC is acti vated Display while the VCD SVCD is stopped 1 PBC will appear when the disc is PBC compatible NOTE The menu may appear in the display window after DVD playback starts In such a case select the desired menu item by using the following buttons on the remote c...

Page 27: ...he operation you have attempted Play page 22 Pause page 25 Fast reverse Fast forward search page 25 Slow motion playback reverse forward directions page 26 Changing the Display in the Display Window Playing Back from a Position 10 Seconds Before One Touch Replay PBC Playback control PBC is a signal recorded in a VCD version 2 0 for controlling VCD playback You can operate software that has interac...

Page 28: ...information will be cleared Resume function is set to on as the initial preset You can set the function to off page 42 While a disc is being played back Press To resume normal playback press Playback cannot be paused by pressing on the main unit during JPEG disc slide show While a disc is paused Press Each time you press picture will be advanced frame by frame You cannot operate this function with...

Page 29: ...sing the number buttons page 18 NOTE You can operate a VCD or SVCD while the disc is stopped or played back with PBC off You can operate a DVD AUDIO CD MP3 WMA or JPEG while the disc is either played back or stopped This operation may not be carried out for some discs While a disc is stopped or being played back 1 Set the remote control mode selector to AUDIO 2 Press or A menu screen of the disc a...

Page 30: ...hin a long file When a disc is played back 1 Set the remote control mode selector to AUDIO 2 Press or Each time you press the button the play back position skips to the beginning of the previous or next interval Each interval is about 5 minutes NOTE Intervals are automatically assigned from the beginning of a file You can use this function only within the same file You cannot use this function for...

Page 31: ... number of the language is displayed on the TV screen While a disc containing two or more subti tles is being played back 1 Press Example TV screen 2 Press to select a subtitle 3 Wait for a few seconds or press NOTE You can also operate this function by using the menu bar page 34 For an SVCD each time you press in step 1 the subtitle type and ON OFF will be changed For a language code such as AA r...

Page 32: ...c is played back or paused 1 Press Example TV screen 2 Press to select VFP mode NORMAL For normal playback You cannot adjust the image quality Go to step 7 CINEMA Suitable when viewing a movie in a dim room You cannot adjust the image quality Go to step 7 USER1 USER2 You can adjust the image quality Go to step 3 3 Press to select an item you want to adjust Setting items GAMMA Controls the brightne...

Page 33: ...wo or more seconds 2 Press or to select NTSC NTSC PROG PAL or PAL PROG 3 Press It returns to sound source display When the progressive mode is selected the display window shows PROGRESSIVE There are some DVD AUDIO discs with a special group called bonus group recorded This operation can be carried out when BONUS is lit in the display window on the main unit While a disc is being played back 1 Set ...

Page 34: ...change the pictures by pressing Example TV screen 2 Wait for a few seconds or press NOTE You can operate this function on the menu bar page 34 You can program a maximum of 99 chapters or tracks You can program the same chapter or track more than once While a disc is stopped 1 Set the remote control mode selector to AUDIO 2 Press to select PROGRAM Display for DVD VIDEO DVD AUDIO MP3 WMA CD VCD SVCD...

Page 35: ...ress NOTE You can set tracks from either a disc or MD in a program playback setting While playback is stopped press or repeatedly During this operation you can add a track as the last in the program step 3 or erase the last track To erase the last track press While playback is stopped press repeatedly to display an item other than PROGRAM This operation does not erase the pro grammed content While...

Page 36: ...D VR is being played back PL is displayed 3 The current title is repeated for a DVD VR 4 STEP is displayed during program playback or random playback NOTE You can also operate this function on the menu bar except when using this function with an MP3 WMA or JPEG disc page 34 The repeat mode will be automatically cancelled if there is a file that cannot be played back For details on A B repeat repea...

Page 37: ...playing time of current title group T REM Remaining time of current title group TIME Elapsed playing time of current chapter track REM Remaining time of current chapter track DVD VR TOTAL Elapsed playing time of original program play list T REM Remaining time of original program play list CD VCD SVCD TIME Elapsed playing time of current track REM Remaining time of current track TOTAL Elapsed playi...

Page 38: ... 5 Enter the time using the number buttons Example When you want to play back a disc from the position of 0 hour 23 minutes 45 seconds press the buttons in the order You can skip entering minutes and seconds If you enter wrong numbers press to delete the numbers and then enter the numbers again 6 Press To delete the menu bar press NOTE You may not be able to operate this function depending on the ...

Page 39: ...d back page 41 1 Insert a disc Example TV screen Example Display window 2 Press to select a group 3 Press to move to the track list Pressing returns to the group list Continued on next page Playback Elapsed playing time of the selected track only for MP3 WMA ASF disc Tag information of the selected track only for MP3 WMA disc Group list Track list Tracks con tained in the selected group This indic...

Page 40: ...er to page 36 Notes for creating files groups Use correct extensions Upper case letters and lower case letters can be mixed MP3 file MP3 mp3 WMA file WMA wma JPEG file JPEG JPG jpeg jpg Use only single byte alphanumeric characters for file names and group names Notes for creating CD R RW discs Disc format should be ISO 9660 Packet Write Method UDF format should not be used Make sure that the disc ...

Page 41: ... Mode When a multi chan nel signal is input with AUTO SUR ROUND setting this unit automati cally determines the correct format and turns the surround mode ON When a 2ch signal is input the unit automatically turns off the surround mode Selecting the Surround Mode Normally this mode should be turned on Select this mode when watching movies or using sound sources recorded with multi sounds This mode...

Page 42: ...n the balance is right it displays CENTER SUB WFR When a sub woofer is connected to the unit select ON When a sub woofer is not connected select OFF DEC1 2 This allows you to set to the decode mode when external equipment connected to Digital 1 or 2 uses Dolby Digital or DTS or when an equipment such as a BS digital tuner is connected to Digital 1 or 2 It is helpful in the following situations Whe...

Page 43: ... to LINE OUT 1 or 2 while listening with headphones as unexpected loud sounds can dam age your hearing Be sure to connect the line out cord before changing the setting While a line out cord is connected to the PHONES LINE OUT terminal the speakers do not produce any sound STANDBY MD IN DISC LOADING MECHANISM LINE SURROUND OUTPUT MODE PHONES LINE OUT VOLUME for Digital Audio Player REC MODE DVD CD ...

Page 44: ... to 16 9 when playing back a DVD VIDEO recorded at 4 3 this product automatically adjusts the screen width of the output signal Select this item when the aspect ratio of your TV is conventional 4 3 While viewing a wide screen picture the black bars appear on the top and bottom of the screen 4 3 PS 4 3 MULTI PS pan scan Select this item when the aspect ratio of your TV is conventional 4 3 While vie...

Page 45: ... kHz 16 20 24 bits Linear PCM DVD VIDEO 96 kHz linear PCM DVD VIDEO 48 kHz 16 bits stereo linear PCM 48 96 192 kHz 16 20 24 bits linear PCM DVD AUDIO 48 kHz 16 bits stereo linear PCM 44 1 88 2 176 4 kHz 16 20 24 bits linear PCM DVD AUDIO 44 1 kHz 16 bits stereo linear PCM DTS DVD VIDEO DVD AUDIO DTS bit stream 48 kHz 16 bits stereo linear PCM DOLBY DIGITAL DVD VIDEO DVD AUDIO DOLBY DIGITAL bit str...

Page 46: ...sh SG Sangho FJ Fiji SH Serbo Croatian FO Faroese SI Singhalese FY Frisian SK Slovak GA Irish SL Slovenian GD Scots Gaelic SM Samoan GL Galician SN Shona GN Guarani SO Somali GU Gujarati SQ Albanian HA Hausa SR Serbian HI Hindi SS Siswati HR Croatian ST Sesotho HU Hungarian SU Sundanese HY Armenian SV Swedish IA Interlingua SW Swahili IE Interlingue TA Tamil IK Inupiak TE Telugu IN Indonesian TG T...

Page 47: ...Introduction 44 Listening to Discs English Country Area Codes NX DD30 UB book Page 44 Friday November 25 2005 10 26 AM ...

Page 48: ...ck being played back does not belong to a group GR appears CAUTION Do not insert another MD while the MD indicator is lighting up or flashing Forcibly inserting an MD may damage the main unit Display while the MD is stopped When the MD title the disc title has been set to the MD the MD title appears first Long titles are scrolled Total number of groups appears next When no group belongs to the MD ...

Page 49: ... track Press or to select a group 1 Set the remote control mode selector to AUDIO 2 Press the number buttons or to select the track you want to listen to Refer to Using the number buttons page 18 Changing the Display in the Display Window Fast Reverse Fast Forward Search Display while an MD is being played back page 45 Track title display Group title display Clock display When no title has been se...

Page 50: ... press while playback is stopped Programmed tracks are erased one by one from the last track Holding down erases all programmed tracks When you try to program the 33rd track MEM ORY FULL appears in the display window to indicate that 33 or more tracks cannot be pro grammed When total time for program playback reaches 2 hours 31 minutes for an MD appears 4 Press While playback is stopped press or r...

Page 51: ...es as follows NOTE Ejecting the MD or turning off the main unit also cancels repeat playback This function allows you to search titles for tracks or groups in an MD While a disc is stopped 1 Set the remote control mode selector to AUDIO 2 Press repeatedly to select the search type 3 Press Example For the locations of remote control buttons refer to page 45 Random Playback of an MD Repeat Playback ...

Page 52: ... title search starts When the title is found playback of the track starts When playback finishes the next title search automatically starts NOTE A space is treated as a character However when no character exists after the space the space is ignored Capital letters and small letters are distinguished When no corresponding titles are found NOT FOUND appears Press or Press The title search is cancele...

Page 53: ...s refer to Basic Opera tions page 18 Press Each time you press the display tog gles as follows LINE To listen to sound from other equipment connected to the LINE IN terminals on the main unit LINE DIGITAL1 To listen to sound from other equipment connected to the DIGITAL 1 terminal on the main unit LINE DIGITAL2 To listen to sound from other equipment connected to the DIGITAL 2 terminal on the main...

Page 54: ... display changes as follows You can record up to 254 tracks to an MD If you try to record 255 or more tracks DISC FULL appears When you use a partially recorded MD this product searches for the blank portion and records the new tracks to that portion Unlike cassette tape recording you cannot record over old tracks on an MD Changing in sound volume and quality on this product during recording does ...

Page 55: ...und quality is the same for both high speed recording and normal speed recording You cannot listen to the sound during 5 high speed recording 6 Press Example Display while CD is recorded When HCMS CANNOT COPY appears refer to page 71 NOTE The recorded sound level is automatically adjusted The CD rotates at high speed during x5 high speed recording Therefore depending on the condition of the CD the...

Page 56: ...ding step 5 on page 52 When you select 5 SPEED and proceed to step 6 CANNOT REC 1 REC ONLY appears in the display window and record ing does not start Press Each time you press the display changes as follows NOTE The recorded sound level is automatically adjusted Sound synchronized recording is employed for recording sound from other equipment LINE With sound synchronized recording this product au...

Page 57: ... by pressing With this method even when sound from the connected equipment pauses for 30 or more seconds the main unit does not auto matically quit recording Press Press Each time you press the display changes as follows For the locations of remote control buttons refer to page 51 Sound source Operation Radio broadcast Select the radio station whose broad cast you want to record page 20 Sound from...

Page 58: ... editing an MD disc title or track titles Press to display the title editing mode To edit a disc title press repeatedly to display DISC TITLE You can also display DISC TITLE by pressing while the disc is stopped You can also select track number with or For editing group titles Press twice to display the group title editing mode You can also select a group number with or 3 Press The display is swit...

Page 59: ... F 1 Press repeatedly to select A as the character type 2 Press repeatedly to display F Several characters are assigned to one button Press the button repeatedly until the desired character is displayed For the available characters refer to Available Characters on the right To move the character entry position Press or When you want to enter NO TV or two char acters which are assigned to one butto...

Page 60: ...o be adjusted proceed to step 5 When you want to adjust the dividing point proceed to step 4 4 Press or You can adjust the dividing point within the range of 128 to 128 position approxi mately 8 to 8 seconds in SP mode 5 Press 6 Press NOTE During editing you can return to the previous step by pressing You can quit the editing operation by pressing You cannot divide a track in an MD containing 254 ...

Page 61: ... track you want to move track 2 in the example shown above is being played back 1 Press repeatedly to select MOVE 2 Press You can also select a track number with or the number buttons Refer to Using the number buttons page 18 3 Press 4 Press or to select the track number to which you want to move the specified track Track 5 is selected in the example shown above You can also select a track number ...

Page 62: ...5 tracks to be erased with or the number buttons and Refer to Using the number buttons page 18 4 Press 5 Confirm that you no longer need the tracks and then press NOTE During editing you can return to the previous step by pressing You can quit the editing operation by pressing CAUTION Once you erase a track you cannot retrieve it Before erasing a track confirm that you no longer need it 1 Press re...

Page 63: ...you want to specify as the last in the group Track number 3 is selected in the example shown on the left You can also select a track number with the number buttons Refer to Using the number buttons page 18 5 Press 6 Press NOTE During editing you can return to the previous step by pressing You can quit the editing operation by pressing If you select a track in another group GROUP TRACK appears and ...

Page 64: ...roceed to the next step Example Dividing group 1 into two groups While the track which you want to specify as the first in the second group track 4 in the example shown above is being played back 1 Press repeatedly to select DIVIDE GR 2 Press You can also select a track number with or the number buttons Refer to Using the number buttons page 18 You can also select a group number with or 3 Press 4 ...

Page 65: ...that have titles the title of the first group remains as the title of the joined group Example Moving group 2 While a track in the group you want to move group 2 in the example shown above is being played back 1 Press repeatedly to select MOVE GROUP 2 Press You can also select a group number with or 3 Press 4 Press or to select the group number to which you want to move the specified group Group 1...

Page 66: ...oup number with or 3 Press 4 Press NOTE During editing you can return to the previous step by pressing You can quit the editing operation by pressing Example Canceling all groups 1 Press repeatedly to select UNGROUP ALL 2 Press 3 Press NOTE You can quit the editing operation by pressing Canceling a Group UNGROUP UNGROUP ALL Canceling a specified group UNGROUP Group 1 Group 2 Group 1 Canceling all ...

Page 67: ...ple shown above is being played back 1 Press repeatedly to select ERASE GROUP 2 Press You can also select a group number with or 3 Press 4 Confirm that you no longer need the tracks and then press NOTE During editing you can return to the previous step by pressing You can quit the editing operation by pressing For the locations of remote control buttons refer to page 55 Erasing a Group ERASE GROUP...

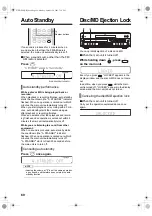
Page 68: ...s flashing when you press CLOCK ADJUST appears page 18 Press repeatedly to select the time again With the sleep timer activated press once 1 Set DAILY Timer page 67 2 Play the sound source you want to listen to 3 Press to set the sleep timer Once the specified time has been reached power is automatically turned off and it is turned on again at the time to which DAILY Timer has been set Set the clo...

Page 69: ...ons to select the preset number of the radio station whose broad cast you want to record Refer to Using the number buttons page 18 5 Press 6 Press or to select the MDLP mode page 52 7 Press The settings appear in the display window 8 When the main unit is on press to turn off the main unit While the recording timer is functioning the volume is set to 0 and no sound is pro duced from the speakers o...

Page 70: ...ain This operates at the same time every day like an alarm clock 1 Prepare the sound source you want to play back 2 Press four times to go to the start time setting display for DAILY TIMER 3 Press or to set the starting time and ending time You can use the number buttons to set the playback time Refer to Using the number buttons page 18 For setting the clock refer to Setting the Clock page 18 Ente...

Page 71: ...uttons to select the track number T to be played back Refer to Using the number buttons page 18 When you select LINE LINE DIGITAL1 or LINE DIGITAL2 just proceed to step5 5 Press 6 Press or to adjust the playback volume 7 Press The settings appear in the display window 8 When the main unit is turned on press to turn off the main unit The DAILY timer is available only when the main unit is turned of...

Page 72: ...e A STANDBY indicator flashes When no operation is carried out within 3 minutes the main unit automatically turns off A STANDBY starts to flash 20 seconds before the main unit is to turn off Press once again NOTE Leaving the volume at 0 is not the same as produc ing no sound and therefore does not start the auto standby function Disc MD Ejection Lock You can prohibit ejection of a disc and MD When...

Page 73: ...DVD 1 You can enjoy sound or video simply by starting playback on the main unit You do not have to select the input setting for the TV or turn on the TV beforehand 1 Turn on the main power to the TV 2 Insert a disc into the main unit 3 Press on the main unit The following operation is performed automatically The TV set will be turned on TV input will be switched to external input Video 1 2 or 3 of...

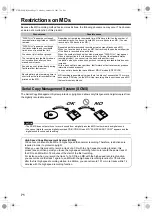
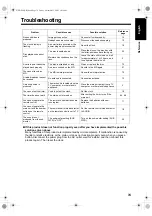
Page 74: ... function Phenomenon Possible cause DISC FULL appears even though recordable time as printed on the MD remains Regardless of remaining recordable time MDs have a limit on the number of recordable tracks You cannot record 255 or more tracks to an MD You can record up to 254 tracks to an MD DISC FULL appears even though the track numbers and recordable time have not reached the limit Repeated partia...

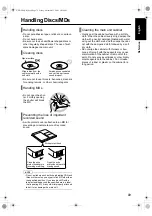
Page 75: ...the cabinet is very dirty dampen the cloth with a neutral detergent diluted with water wring out the cloth well and then wipe the cabi net with the dampened cloth followed by a soft dry cloth Do not wipe the cabinet with thinners or ben zenes Wiping it with these agents may cause discoloration of the cabinet or removal of the paint Do not spray insecticides or other highly volatile agents onto the...

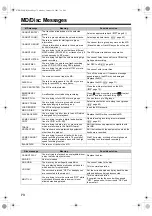
Page 76: ...eady belonging to another group Select tracks that do not belong to any groups page 60 LOAD ERROR The MD is not properly loaded Insert the MD properly MD NO DISC No MD is loaded PLAYBACK DISC You are trying to edit or record to an MD which is designed only for playback Replace the MD with a recordable MD SCMS CANNOT COPY You are trying to make a digital audio duplica tion of a CD R or CD RW Operat...

Page 77: ...perate the main unit 3 A certain point cannot be played back properly The disc is scratched or dirty Clean or replace the disc 72 An error occurred on the MD Record to the MD again 51 You cannot record an MD The MD is write protected Cancel the write protection 72 A radio broadcast cannot be received No antenna is connected Connect an antenna 13 A whirring noise is produced The main unit is locate...

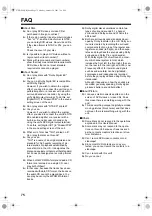
Page 78: ...ormat are recorded on a single CD can I play both of them A In that case because the tracks have been recorded with data CD format the tracks on the audio CD cannot be played back You can play back only the MP3 WMA format tracks Q Dolby digital discs sometimes contain two types of surround sounds 5 1 channel surround and Dolby surround What is the difference A Both are surround sound standards dev...

Page 79: ...o Layer 3 This is the international standard for sound information compression format that allows you to compress data to one tenth its original size without greatly impairing the original sound quality MPEG Audio This is a surround format that allows you to compress sound data It is capable of handling a maximum 7 1 channels NTSC This is the TV video format used in countries such as Japan and the...

Page 80: ...AM Loop antenna Timer Timer Format 1 Program behavior switch between ONCE REC and DAILY Sleep timer 10 20 30 60 90 120 150 minutes Auto dimmer Clock display 24 hour format DVD player Playable discs DVD VIDEO DVD AUDIO CD VCD SVCD CD R CD RW CD VCD SVCD MP3 WMA JPEG DivX ASF format DVD R DVD RW video format DVD VR format MP3 WMA JPEG DivX ASF format R RW video format MD recorder Audio playing MiniD...

Page 81: ... unit Center surround SP NXDD30S System 2 channel single unit system 1 way closed type magnetically shielded type Speaker 9 5 cm 1 cm slim direct drive speaker channel Powerhandling 30 W capacity Impedance 4 Ω Frequency range 140 Hz 20 kHz Sound pressure 79 dB W m level Dimensions 296 mm W 50 mm H 45 mm D including speaker stand Mass approx 0 7 kg including speaker stand and speaker cord U S and f...

Page 82: ...聆听广播 20 设置 AM 调谐器间隔 20 选择电台 20 保存电台 预设 21 调到预设电台 21 更改显示器窗口中的显示 21 DVD 播放机的基本操作 22 播放 22 更改显示器窗口中的显示 24 播放从 10 秒之前的位置开始 单触重播 24 停止播放 25 继续播放 RESUME 25 暂停播放 25 逐帧播放图像 25 快倒 快进搜索 25 慢动作播放 26 跳到曲目的开始位置 26 使用数字键跳到曲目的开始位置 26 从菜单屏幕选择曲目 26 跳过 5 分钟左右间隔 27 DVD 播放机的易用功能 28 选择音频语言 28 选择字幕语言 28 选择视角 29 放大图像 ZOOM 29 调节图像质量 VFP 29 欣赏更好的图像 SCAN MODE 30 播放赠送群组 30 可浏览的静止图像 B S P 31 按想要的顺序播放光盘 编程播放 31 随机播放 33 重复播放 ...

Page 83: ...的显示 53 录制电台或其他设备的声音 53 退出录制 54 添加 编辑 标题 55 编辑须知 55 添加 编辑 标题 55 输入标题 56 可用的字符 56 编辑曲目 57 将单首曲目分割为两首曲目 DIVIDE 57 合并曲目 JOIN 58 移动曲目 MOVE 58 删除单首曲目 ERASE 59 删除所有曲目 ALL ERASE 59 按群组编辑曲目 60 制作群组 FORM GROUP 60 将曲目添加到群组 ENTRY GROUP 61 将单个群组分割为两个群组 DIVIDE GR 61 合并群组 JOIN GROUP 62 移动群组 MOVE GROUP 62 取消群组 UNGROUP UNGROUP ALL 63 删除群组 ERASE GROUP 64 使用定时器 65 睡眠定时器 65 睡觉时使用睡眠定时器 起床时使用 DAILY 定时器 65 录制定时器 66 DAIL...

Page 84: ...小 避免打扰您的邻居 即使低音量也会传得很远 尤其是在夜晚 请关闭窗户或使用耳机 避免打扰您的邻 居 本机的适当放置 结露 经 Dolby Laboratories 授权制造 Dolby MLP Lossless 和双 D 标志是 Dolby Laboratories 的商标 DTS 和 DTS Digital Surround 是 Digital Theater Systems Inc 的注册商标 本产品的防止拷贝技术属 Macrovision Corporation 和其他权利所有者所有 并受美国专利法和其他知识产 权保护法的保护 任何使用本技术的行为必须经过 Macrovision Corporation 批准 未经 Macrovision Corporation 特别批准时 不可用于家用或其他私用之外的目的 使用本机时不可进行违规操作或分解 DVD 图标是 DVD Format L...

Page 85: ...性 录制条件 光盘上的擦伤和污垢 或镜头上的污垢或 结露等原因 造成光盘无法播放 使用光盘之前 请仔细阅读光盘的相关注 意事项 本产品不支持声音文件 如 MP3 的播放 或 CD 文本显示 如需在本产品上播放CD RW或DVD RW 如果CD RW 或DVD RW 以左侧说明格式 以外的其他格式录制 请清除所有曲目 使用未清除所有曲目的 CD RW 或 DVD RW时 可能会由于音量突然提高而导致 扬声器或其他部件的损坏 无法播放的光盘 下列光盘无法播放 DVD ROM MP3 WMA JPEG ASF DivX 格式除 外 DVD RAM CD ROM CD I CD I Ready 相片 CD SACD 等 播放这些光盘会产生噪声和损坏扬声器 损坏的光盘和特殊形状的光盘 除直径为 12 cm 或 8 cm 的光盘外 无法播放 JVC 并不保证未经 CD DA 一种 CD 规格 授权 的...

Page 86: ...能需要更 多的时间 消逝的时间从播放开始时显示 如果 播放开始 消逝的时间可能无法正确显示 对于 MP3 WMA 文件 推荐取样率为 44 1 kHz 数据传输率为 128 kbps 的光盘 本产品不兼容 MP3i 或 MP3PRO 本产品可以播放基线 JPEG 文件 不包括单色 JPEG 文件 本产品可以播放遵循 DCF Design Rule for Camera File System 标准拍摄的 JPEG 数据 运 用诸如数码相机的自动翻转功能时 数据超出 DCF 标准 因而无法显示图像 如果数据已经 PC 图像编辑软件处理 编辑和存 储 数据可能无法显示 本产品无法播放诸如 MOTION JPEG 的动画图 像 除 JPEG 以外的静止图像 TIFF 等 和带有 声音的图像数据 推荐 JPEG 文件使用 640 480 像素的分辨率 如果文件以超过 640 480 像素的分辨率录...

Page 87: ...理 文件夹 本产品可以识别单张光盘最多 4000 首曲目 文件 另外 本产品可以识别每个群组最多 150 首曲目 文 件 以及每张光盘最多 99 个群组 由于本机忽略超 过 150 的曲目 文件 号和超过 99 的群组号 这些 曲目 文件 和群组无法播放 如果光盘中存在除 MP3 WMA JPEG ASF DivX 文 件外的某种类型的文件 这些曲目 文件 也将 计入文件总数 关于 TV 模式 本产品适于 NTSC 使用 NTSC 以外其它 TV 模式 如 PAL 的光盘在播放前将被转换为 NTSC 模 式 注 某些光盘可能无法正确播放 例如 图像运动可能 会不流畅 或者宽高比 宽度和长度的比率 也可 能会发生改变 光盘结构 标题 1 标题 2 章节 1 章节 2 章节 3 章节 1 章节 2 群组 1 群组 2 曲目 1 曲目 2 曲目 3 曲目 1 曲目 2 曲目 1 曲目 2 曲目 ...

Page 88: ...和将本系统放置于加 热设备旁边 当您出门时 当您要出门旅行或者由于其他原因需要较长时间外 出时 请将电源线插头从墙上插座拔出 请勿堵塞通风口 堵塞通风口可能会损坏系统 机壳的保养 清洁系统时 请使用软布并遵循使用化学涂层软布 的有关指示说明 请勿使用苯 稀释剂或其他有机 溶剂 包括杀毒剂 否则 可能会导致变形或褪色 如果有水进入系统 关闭系统 将电源线插头从墙上插座拔出 然后联 络您购买本系统的商店 在这种情况下使用本系统 可能会引起火灾或触电 结露或水滴黏附在镜头上时 下列任何情况中 结露或水滴可能黏附在镜头上 导致系统工作不正常 房间加热开始后 系统安装在蒸汽多或潮湿的地方时 系统突然从冷的地方搬到暖的地方时 在上述情况情况下 请在使用前将系统电源打开 放置 1 至 2 个小时 使用须知 标签贴膜 标签 粘贴 本产品的防止拷贝技术属 Macrovision Corporation 和其...

Page 89: ...中 文 8 简 介 请查看以确保您拥有所有随机附件 括号内的数字是这些附件的数量 如果缺少任何附 件 请立刻和您的经销商联系 遥控器 1 电池 2 FM 天线 1 AM 环形天线 1 视频导线 1 电源线 1 扬声器导线 2 束 带插头 每束 3 米 随机附件 NX DD30 UB CS book Page 8 Monday November 21 2005 6 10 PM ...

Page 90: ...以人两耳间的平均距离分开 对中央信号和环绕信 号进行处理 同时添加了 LFE 低频声音效果 用以 稳定发送到位于左右两侧的主扬声器的 L 声道信号和 R 声道信号 用一个高品质的数字放大器以 30W x 4ch 对 扬声器进行驱动 4 声道前置环绕的特点 我们独创的扬声器布局和信号处理不仅节省了空间 而且保证了更加逼真的声场 由于使用基本的 2 声道立体声产生出高音质 播放音 乐非常理想 中央环绕扬声器可以使聆听者欣赏到逼真的语音定 位 本机产生出逼真的环绕效果 前后区域的监听点更加 宽广 显示窗口内的扬声器显示信息 重低音 当重低音被设为 OFF 第 39 页 或 者使用耳机时 该灯关闭 前置左扬声器信号输入时 该灯点亮 中置扬声器信号输入时 该灯点亮 前置右扬声器信号输入时 该灯点亮 LFE 信号输入时 该灯点亮 左环绕扬声器信号输入时 该灯点亮 单声道信号输入时 该灯点亮 右环绕扬声...

Page 91: ... Digital Audio Player STANDBY REC MODE OUTPUT MODE PHONES LINE OUT for Digital Audio Player LINE DVD CD MD FM AM 69 65 68 52 22 20 30 31 30 22 45 48 52 54 9 38 38 36 24 25 45 69 38 40 22 19 50 54 17 19 20 19 22 69 19 20 40 45 40 45 19 45 51 54 19 45 47 54 19 19 22 25 32 33 37 52 20 25 46 53 58 59 66 20 25 46 53 58 59 66 19 遥控传感器 31 33 NX DD30 UB CS 03 fm Page 10 Thursday November 24 2005 10 24 AM ...

Page 92: ...6 47 56 66 67 52 52 69 65 52 51 52 54 18 66 68 48 18 21 48 54 55 57 68 18 32 47 56 66 68 18 21 24 46 50 53 54 56 55 56 60 64 55 59 33 48 20 31 33 47 48 31 41 28 28 24 12 23 28 31 34 35 37 41 49 55 57 64 24 26 26 30 37 46 47 53 55 61 64 24 25 35 45 52 54 12 12 38 40 12 19 50 54 25 19 22 25 32 33 37 52 打开盖子 将电池插入遥控器 R6P SUM 3 AA 15F 类型的干电池 2 遥控器操作 18 23 28 31 34 36 39 41 56 18 20 25 46 49 53 55 57 5...

Page 93: ...作由 上述厂商制造的电视机 将遥控器指向电视机进行操作 1 请确保先将遥控模式选择器滑至 TV 侧 注 更换电池后 请重新进行厂商代码设置 本页介绍使用本产品的遥控器操作您的电视机 使用遥控器操作电视机 遥控模式选择器 数字键 设置厂商代码 厂商 代码 厂商 代码 JVC 01 Samsung 12 Hitachi 10 Sanyo 13 Magnavox 02 Sharp 06 Mitsubishi 03 Sony 07 Panasonic 04 11 Toshiba 08 Philips 14 Zenith 09 RCA 05 打开 关闭电源 改变频道 调节音量 选择频道 在先前所选的频道和当前频道之 间更改 在电视和视频输入之间更改 对于电视机操作 1 NX DD30 UB CS 03 fm Page 12 Monday November 21 2005 8 47 PM ...

Page 94: ...连接天线 连接 AM 天线 请将接头插 入插槽 黑 白 本机 后视图 绝缘体覆盖在天线末端时 请 扭动绝缘体并将其拔下 乙稀基塑料外皮的电线 3 5 m 未提供 将乙稀基塑料外皮的电线 和 AM 环形天线扭绞在一 起 水平拉伸乙稀基塑料 外皮的电线 最好在 较高的位置 如高于 窗户或位于户外 将 AM 环形天线和乙 稀基塑料外皮的电线 连接到本机 本机 后视图 请在收听实际的电台节目时定位天线 寻找收听的最佳位置 请参阅 聆听广播 第 20 页 连接 FM 天线 本机 后视图 FM 天线 随机附件 STANDBY MD IN DISC LOADING MECHANISM LINE SURROUND OUTPUT MODE PHONES LINE OUT VOLUME for Digital Audio Player REC MODE DVD CD MD FM AM 本机 后视图 天线 未提...

Page 95: ...形 1 安装扬声器之前请关闭电视机的主电源 再次打 开电视机之前请等待 30 分钟 2 如果图像产生色彩不规则性 请在电视机和扬声 器之间空出 10 cm 注 扬声器导线连接不当会影响立体声效果和音质 连接到本产品的扬声器的阻抗必须处于 4 Ω 到 16 Ω 的范围内 本机内置冷却风扇 用于排出产生的热量 内部冷 却风扇自动旋转并停止 为确保有效冷却 请在本 机和扬声器或其他物体之间预留多于1 cm 的空间 连接扬声器 连接扬声器后 轻拉扬声器导线 确认导线已牢固连 接 本机 后视图 将扬声器插头连接到颜色相同的扬声器端子 有黑线的导线连接到负端子上 前置扬声器 后视图 NX DD30 UB CS 03 fm Page 14 Thursday December 8 2005 10 14 AM ...

Page 96: ...输出信号的详情 请参阅第 42 页 连接电源插头之前 请连接所有必须的部件 连接其他设备 将其他音频设备连接到本产品时 请阅读本节 其他音频设备 音频导线 未提供 本机 后视图 连接数码设备 内置解码器的 AV 放 大器 未提供 到光纤数字输入端子 光纤数字电缆 未提供 光纤数字电缆 未提供 MD 播放机或 CS 调谐器 未提供 到光纤数字输出端子 本机 后视图 NX DD30 UB CS book Page 15 Monday November 21 2005 6 10 PM ...

Page 97: ... 为了使用逐行扫描模式 第 30 页 观看图像 电视机需要拥有逐行扫描视频输入 如果您电视机的分量视频输入插孔是 BNC 型 请 使用插头适配器 未提供 来转换插头 连接电视机 需要更为清晰的图像时 本机 后视图 VIDEO IN 电视机 随机提供的视频导线 STANDBY MD IN DISC LOADING MECHANISM LINE SURROUND OUTPUT MODE PHONES LINE OUT VOLUME for Digital Audio Player REC MODE DVD CD MD FM AM 直接连接 电视机 或显示器 录像机 本机 使用 S 视频导线连接 电视机 S 视频导线 未提供 请确保 S 视频导线的各端均匹配其兼容的 端子 然后连接 S 视频导线的各端 本机 后视图 使用分量视频导线连接 电视机 分量视频导线 未提供 本机 后视图 NX DD30...

Page 98: ...之后 请连接电源插 头 将电源线插入孔内时 本机上的 STANDBY 灯打开 注 在下列情况中 预设设置 如预设频道和声音调节 可能在若干天后被清除 拔下电源插头时 发生电源故障时 连接电源插头之前 请连接所有必须的部件 连接重低音设备 内置放大器 的重低音 至音频输出端子 本机 后视图 音频导线 未提供 如果音频导线随内置放大器的重低音一起提供 则 可以使用该导线 连接电源线 本机 后视图 AC 插座 电源线 NX DD30 UB CS 03 fm Page 17 Thursday December 8 2005 10 19 AM ...

Page 99: ... 2 设置小时 或 后 前 后 前 按住按键增加小时 用数字键可以指定小时 请参阅以下所示的 使用数字键 3 按 如需返回步骤 2 请按 4 以步骤 2 和 3 相同的方式设置分钟 按 5 次 显示时钟 然后从步骤 2 开始调节时 钟 反复按 注 本机的时间显示为 24 小时制 时钟每月误差约为 1 分钟 断开电源插头或发生断电后 请重新设置时钟 设置时钟 遥控模式选择器 数字键 使用数字键 例如 3 13 20 23 用数字键之前 请将遥控模式选择器设 为 AUDIO 选择 1 10 按相应的数字键 选择 11 按 10 和另一个数字键 调节时钟 使用本机时显示时钟 NX DD30 UB CS 03 fm Page 18 Thursday November 24 2005 10 27 AM ...

Page 100: ...容易 地理解 DVD 影片中的对话 按 每次按 清晰语音功能在 ON 和 OFF 之间转换 清晰语音功能启用时 出现在显示窗口中 注 收音机作为音源时 不能使用本功能 当中央声道信号存在于环绕声时 或者声音被设为 环绕时 乃至于中央声道信号存在于立体声时 第 38 页 本功能有效 进行录制操作将会解除对清晰语音功能的选定 1 重复按 选择 BASS 或 TREBLE 2 按 或 调节音质 可以在 5 到 5 的范围内调节音质 显示几秒钟后返回到音源显示 按 每按一次 显示变化如下 注 本机关闭时 显示在 DISPLAY OFF 和 DISPLAY ON 之间转换 有关遥控键的位置 请参阅 第 18 页 打开 关闭本机 调节音量 暂时关闭声音 FADE MUTING 增强重低音 AHB PRO MD DVD CD LINE FM AM MD VOLUME 使用清晰语音功能 调节低音 高音 更...

Page 101: ...选择 FM 或 AM 例如 接收 FM 广播时的显示 2 反复按 或 选择电台 频 率 用自动调谐也可以选择电台 本机接收到 FM 立体声广播时 ST 点亮 注 如果由于噪声导致收听 FM 立体声广播困难 则通过 按 将声音切换到单声道接收 可以比较容易地 收听 此时 MONO 点亮 如需将声音返回到立 体声接收 再次按 或选择另一个 FM 电台 设置 AM 调谐器间隔 数字键 遥控模式选择器 STANDBY MD IN DISC LOADING MECHANISM LINE SURROUND OUTPUT MODE PHONES LINE OUT VOLUME for Digital Audio Player REC MODE DVD CD MD FM AM FM AM 选择电台 预设数字 第 21 页 立体声指示 频率 自动调谐 按住 或 直到频率开始更改 然 后放开该键 本机接收到广...

Page 102: ...4 所选的数字闪烁时 按 出现 STORED 并保存所选的电台 注 将电台保存到预设号码而该预设号码先前已经保存 另一电台时 最新设置的电台将覆盖先前保存的电 台 正在接收 FM 或 AM 广播时 1 将遥控模式选择器设为 AUDIO 2 用数字键选择想要调到的电台的预设 号码 请参阅 使用数字键 第 18 页 按 或 也可以选择预设号码 按 每按一次 显示变化如下 有关遥控键的位置 请参阅 第 20 页 保存电台 预设 调到预设电台 更改显示器窗口中的显示 正在接收广播时的显示 第 20 页 时间显示 时钟显示 装载 MD 时 MD 录制剩余时间的显示 NX DD30 UB CS 03 fm Page 21 Thursday December 8 2005 10 19 AM ...

Page 103: ...DVD VIDEO 时的显示 DVD VIDEO 停止时的显示 当继续播放功能 第 25 页 开启时 当继续播放功能 第 25 页 关闭时 接下页 如何阅读本使用说明书 主要使用遥控器按键说明操作 如果本机上存在相 同的标记 也可使用本机上的按键 下列标记告诉您可读取的光盘类型 实际的图形和电视机屏幕可能与说明的不同 VCD 表示 视频 CD SVCD 表示 超级视频 CD 数字键 遥控模式选择器 STANDBY MD IN DISC LOADING MECHANISM LINE SURROUND OUTPUT MODE PHONES LINE OUT VOLUME for Digital Audio Player REC MODE DVD CD MD FM AM 播放 印字面 光盘托架 标题号 章节号 消逝的播放时间 标题总数 NX DD30 UB CS 03 fm Page 22 Th...

Page 104: ...示 VCD SVCD 的显示 播放 VCD SVCD 时的显示 激活 PBC 时 显示 PBC 指示 VCD SVCD 停止时的显示 1 光盘兼容 PBC 时 会出现 PBC 指示 注 DVD 播放开始后 显示器窗口中可能出现菜单 在 这种情况下 请使用遥控器上的下列键选择需要的 菜单项目 请使用 或 选择菜单项目 然 后按 请使用数字键选择菜单项目 操作可能不同于此处所述 视光盘类型而异 章节号 原来程序 播放列表号 消逝的播放时间 曲目号 消逝的播放时间 曲目总数 总播放时间 消逝的播放时间 群组号 曲目号 群组号 曲目号 群组号 曲目号 消逝的播放时间 群组号 曲目号 PBC 指示 第 24 页 曲目号 曲目总数 总播放时间 1 NX DD30 UB CS 03 fm Page 23 Thursday November 24 2005 4 06 PM ...

Page 105: ... 包含多字幕 第 28 页 光盘无法接受您的操作 播放 第 22 页 暂停 第 25 页 快倒 快进搜索 第 25 页 慢动作播放 倒退 前进 第 26 页 更改显示器窗口中的显示 播放从 10 秒之前的位置开始 单触重播 PBC 播放控制 PBC 是录制于 VCD 2 0 版 上的信号 用 于控制 VCD 的播放 使用录制于兼容 PBC 的 VCD 中的菜单显示可以操作具有互动和 搜索功能的软件 如需播放不带 PBC 的 VCD 请遵循下列操作 停止播放时 使用数字键选择所需的曲目号 停止播放时 请按 或 选择所需 的曲目号 然后按 如需播放带PBC 的 VCD 请遵循下列操作 播放期间按 或 或者 按 一次 继续播放功能开启时 请按两次 然后按 主机的显示窗口上出现 PBC 正在播放 VCD 或 SVCD 时 请按 返回 到上一级菜单群组 播放或停止播放光盘时 的显示 第 22 和 2...

Page 106: ...按 RESUME 将会消失 保存的 信息将会被清除 续播功能作为初始预设打开 可以将其关闭 第 42 页 播放光盘时 按 如需继续正常播放 请按 在 JPEG 光盘幻灯片显示期间按本机上的 无法暂停播放 暂停播放光盘时 按 每按一次 将会逐帧播放图像 无法使用本机上的 操作本功能 存在两种方法 播放光盘时 按 或 每按一次 或 速度如下增加 如需恢复正常速度 请按 按住 或 按该键可进行快倒 快进搜索 注 对于 DVD VIDEO SVCD 或 VCD 在快倒 快进 搜索期间无声音输出 对于 CD 或 DVD AUDIO 在快倒 快进搜索期间声 音间歇输出 停止播放 继续播放 RESUME 按 一次 按 关闭电源 将播放源改为 FM AM LINE 或 MD 按 暂停播放 逐帧播放图像 快倒 快进搜索 DVD CD 仅动态图像 DVD CD 2 5 10 20 60 NX DD30 UB ...

Page 107: ...曲目 章节 请参阅 使用数字键 第 18 页 注 停止播放光盘或关闭 PBC 播放光盘时 可以操作 VCD 或 SVCD 播放或停止播放光盘时 可以操作 DVD AUDIO CD MP3 WMA 或 JPEG 对于某些光盘 可能无法进行本操作 停止播放或播放光盘时 1 将遥控模式选择器设为 AUDIO 2 按 或 出现光盘的菜单屏幕 DVD AUDIO 仅可使用 3 按 仅 DVD VIDEO 或 DVD AUDIO 或数字键选择要聆听 的曲目 请参阅 使用数字键 第 18 页 如果菜单屏幕含有双页或多页 请按 或 改变页面 仅 VCD 和 SVCD 4 按 注 对于没有录制菜单屏幕的光盘 则无法操作本功 能 即使没有按 某些光盘可能也会开始播放 有关遥控键的位置 请参阅 第 22 页 慢动作播放 跳到曲目的开始位置 使用数字键跳到曲目的开始位置 仅动态图像 32 1 16 1 8 1 4...

Page 108: ...选播放列表 可以在单个文件内以 5 分钟左右的间隔进行跳跃 想要在长文件中进行跳跃时 本功能特别实用 播放光盘时 1 将遥控模式选择器设为 AUDIO 2 按 或 每次按该键 播放位置跳到上一个或下一个 间隔的开始位置 每个间隔约为 5 分钟 注 间隔自动从文件开头开始划分 只能在同一个文件中使用本功能 在某些光盘上不能使用本功能 有关遥控键的位置 请参阅 第 22 页 使用 DVD VR 的菜单屏幕 原来程序 录制日期 频道信息 标题录制的开始时间 标题名称 播放列表 录制日期 标题内所含章节的数量 标题的总播放时间 跳过 5 分钟左右间隔 NX DD30 UB CS 03 fm Page 27 Thursday December 22 2005 8 32 AM ...

Page 109: ...道声音以 1 2 录制和禁止向 下混音的多声道声音以 2 2 录制时 仅可以选择 1 2 对于 DivX 光盘 电视机屏幕上只显示语言号码 播放包含双字幕或多字幕的光盘时 1 按 例如 电视机屏幕 2 按 选择一个字幕 3 等待几秒或按 注 用菜单条也可以操作本功能 第 34 页 对于 SVCD 在步骤 1 中每按一次 将更改字 幕类型和 ON OFF 有关诸如 AA 的语言代码 请参阅 语言代码 第 43 页 显示字幕的方式可能因光盘而异 按 选择 OFF 选择音频语言 遥控模式选择器 数字键 AUDIO 选音频 音频总数 所选音频 AUDIO 选择字幕语言 仅动态图像 所选字幕 字幕总数 光盘中没有字幕时 出现 所选字幕 光盘中没有字幕 时 出现 断 取消字幕 NX DD30 UB CS book Page 28 Monday November 21 2005 6 10 PM ...

Page 110: ...像时 放大操作被 禁用 在某些光盘上 不能使用放大操作 播放或暂停播放光盘时 1 按 例如 电视机屏幕 2 按 选择 VFP 模式 标准 正常播放 无法调节图像质量 跳到步 骤 7 影剧院 适合于在黑暗的房间观看电影 无法调节图像质量 跳到步 骤 7 用户 1 用户 2 可以调节图像质量 跳到步骤 3 3 按 选择要调节的项目 设置项目 背景亮度 在保持明暗部分亮度的同时 控制灰 色的亮度 设置范围 3 3 亮度 控制显示器的亮度 设置范围 8 8 对比度 控制显示器的对比度 设置范围 7 7 饱和度 控制显示器的饱和度 设置范围 7 7 色调 控制显示器的色调 设置范围 7 7 清晰度 控制显示器的锐度 设置范围 8 8 4 按 选择视角 放大图像 ZOOM 仅动态图像 所选视角 视角总数 所选视角 仅动态图像 调节图像质量 VFP 0 0 0 0 0 0 当前 VFP 模式 用户 1 ...

Page 111: ...式 如 果设为逐行扫描模式 图像可能失真 停止播放光盘时 1 按住 2 秒钟或以上 2 按 或 选择 NTSC NTSC PROG PAL 或 PAL PROG 3 按 返回到音源显示 当选择逐行扫描模式时 显示窗口上出现 PROGRESSIVE 有些 DVD AUDIO 光盘录有特殊群组 称作 赠送 群组 本机的显示器窗口上点亮 BONUS 时 可进行本操作 播放光盘时 1 将遥控模式选择器设为 AUDIO 2 播放期间反复按 选择一个赠 送群组 KEY_ _ _ _ 出现在电视机屏幕上和本 机显示器窗口中 3 按数字键输入密码 4 位 获得密码的方式视光盘而异 4 按 输入正确的密码后 BONUS 消失 赠 送群组的播放开始 如果输入的密码错误 请再次尝试输入正 确的密码 有关遥控键的位置 请参阅 第 28 页 欣赏更好的图像 SCAN MODE 播放赠送群组 赠送指示 NX DD30...

Page 112: ...按 也可以更改图像 例如 电视机屏幕 2 等待几秒或按 注 可以在菜单条上操作本功能 第 34 页 最多可以编辑 99 个章节或曲目 可以多次编辑同一 章节或曲目 停止播放光盘时 1 将遥控模式选择器设为 AUDIO 2 按 选择 PROGRAM DVD VIDEO DVD AUDIO MP3 WMA CD VCD SVCD 的显示 例如 对于 DVD VIDEO 可浏览的静止图像 B S P B S P 指示 所选页面 页面 总数 所选页面 静止图像 按想要的顺序播放光盘 编程播放 编程指示 DVD DVDA MP3 WMA CD 或 VCD 电视机屏幕 编程屏幕 NX DD30 UB CS 04 fm Page 31 Thursday November 24 2005 11 46 AM ...

Page 113: ...放赠送群组 所述取消 BONUS 显示 试图输入 99 个以上的章节或曲目时 出现 MEMORY FULL 4 按 注 在编程播放设置中可以从光盘或 MD 设置曲目 停止播放时 反复按 或 进行本操作时 可以将一首曲目添加为编 程中的最后一首曲目 步骤 3 或 删除最后一首曲目 要删除最后一个曲 目 按 停止播放时 反复按 显示 程序 以外的项目 本操作并不删除编程的内容 停止播放时 按住 注 弹出光盘或关闭本机也会删除编程的内容 本操作 也会取消编程播放 有关遥控键的位置 请参阅 第 28 页 标题号 章节号 编程号 群组号 曲目号 编程号 曲目号 CD 或 VCD 编程播放的总时间 电视机屏幕 1 5 确认编程的内容 取消编程播放 删除整个编程 NX DD30 UB CS 04 fm Page 32 Thursday November 24 2005 11 46 AM ...

Page 114: ...编程播放或随机播放期间 显示 STEP 注 除将本功能用于 MP3 WMA 或 JPEG 光盘外 您也 可以在菜单条上操作本功能 第 34 页 如果存在无法播放的文件 重复模式将会自动取 消 有关 A B 重复播放 指定部分的重复播放 的详情 请参阅第 35 页 有关遥控键的位置 请参阅 第 28 页 随机播放 随机指示 取消随机播放 重复播放 电视机屏幕上 的显示 本机显示器窗口 中的显示 重复播放的 类型 TITLE REPEAT TITLE 重复播放当前 标题 ALL 或 REPEAT ALL REPEAT ALL 重复播放所有 曲目 1 GROUP 2 或 REPEAT GROUP REPEAT GROUP 2 重复播放当前 群组 3 CHAP 4 REPEAT CHAP 4 重复播放当前 章节 TRACK 4 或 REPEAT TRACK REPEAT TRACK 4 重复播放当...

Page 115: ...TIME 当前章节 曲目消逝的播放时间 REM 当前章节 曲目剩余的播放时间 DVD VR TOTAL 原来程序 播放列表消逝的播放 时间 T REM 原来程序 播放列表剩余的时间 CD VCD SVCD TIME 当前曲目消逝的播放时间 REM 当前曲目剩余的播放时间 TOTAL 光盘消逝的播放时间 T REM 光盘剩余的播放时间 重复播放模式 第 33 页 时间搜索 第 35 页 章节搜索 曲目搜索 DVD VIDEO DVD AUDIO 选择一个章节 曲目 按数字键输入章节 曲目号 然后按 例如 音频 DVD VIDEO DVD AUDIO VCD SVCD 第 28 页 字幕 DVD VIDEO DVD AUDIO SVCD 第 28 页 视角 DVD VIDEO DVD AUDIO 第 29 页 页面切换 DVD AUDIO 切换录制在 DVD AUDIO光盘上的静止图 像 B ...

Page 116: ...控模式选择器设为 AUDIO 2 按两次 出现菜单条 第 34 页 3 按 选择 4 按 5 用数字键 输入时间 例如 想要从 0 时 23 分 45 秒的位置播 放光盘时 依次按下列键 可以跳过输入 分 和 秒 如果输入错误的数字 按 删除数字 然后 重新输入数字 6 按 如需删除菜单条 请按 注 可能无法操作本功能 视光盘而异 本功能在编程播放或随机播放时不起作用 对于 CD 总是可以进行本操作 DVD VIDEO 的时间搜索从标题的开始位置开始 DVD AUDIO 的时间搜索从正在播放的曲目开始位置开始 VCD SVCD 和 CD 的时间搜索如下 光盘停止播放时 时间搜索从光盘开始位置开始 光盘正在播放时 可在当前播放的曲目范围内进行时 间搜索 有关遥控键的位置 请参阅 第 34 页 重复播放指定的部分 A B 重复播放 播放模式 VCD SVCD CD 当前曲目号 ASF DivX...

Page 117: ... 请选择要播放的文 件类型 第 41 页 1 插入光盘 例如 电视机屏幕 例如 显示器窗口 2 按 选择一个群组 3 按 移动到曲目列表 按 返回到群组列表 接下页 遥控模式选择器 数字键 播放 所选曲目消逝的播放时 间 仅 MP3 WMA ASF 光盘 所选曲目的标记信息 仅 MP3 WMA 光盘 群组列表 曲目列表 包含在所 选群组中的曲目 程序播放期间 该指示 点亮 第 31 页 程序播放期间 该指示 点亮 第 33 页 群组号 曲目号 装载 WMA 光盘时显示 WMA 装载 JPEG 光盘时显示 JPG 播放 ASF DivX 光盘时 不显示光盘类型指示 NX DD30 UB CS book Page 36 Monday November 21 2005 6 10 PM ...

Page 118: ...无需步骤 3 有关遥控键的位置 请参阅 第 36 页 群组号 曲目号 消逝的播放时间 装载 JPEG 光盘时不显示本指示 创建文件 群组时的注意事项 使用正确的扩展名 大写字母和小写字母可以 混用 MP3 文件 MP3 mp3 WMA 文件 WMA wma JPEG 文件 JPEG JPG jpeg jpg 文件名和群组名只能使用单字节字符 创建 CD R RW 光盘时的注意事项 光盘格式应为 ISO 9660 不应使用封包式写入方式 UDF 格式 确认光盘已终结 创建 DVD R RW 光盘时的注意事项 使用 UDF Bridge 格式 幻灯片显示播放 对于 JPEG 光盘 在步骤 5 按 时 从所 选的文件连续播放文件 幻灯片显示播放 按 时 仅播放所选的文件 在幻灯片显示播放中 单个文件显示约为 3 秒 播放完所有文件后 自动停止播放 NX DD30 UB CS book Page ...

Page 119: ...暂时取消环绕模式的选择 连接了耳机时 显示所选的耳机模式 第 40 页 关于环绕模式 在 AUTO SURROUND 设定条件下输入多声 道信号时 本机自动 决定正确的格式并且 将 环 绕 模 式 变 为 ON 输入 2 声道时 本机自动关闭环绕模式 选择环绕模式 正常情况下应该打开此模式 观赏影片或使用 multi sounds 录制 的音源时 请选择此模式 与使用多声道模式相比 此模式产生 较为宽广的声音 当使用 2 声道录 制的音源 如 CD 音源 时 请选 择此模式 此模式产生更为宽广的声音 关闭环绕效果 NX DD30 UB CS book Page 38 Monday November 21 2005 6 10 PM ...

Page 120: ... 要降低左扬声器的音量 按 L 1 L 21 每次按键 音量电平将改变 平衡正确时 显示 CENTER SUB WFR 将重低音连接到本机时 选择 ON 不连接重低音时 选择 OFF DEC1 2 当连接到Digital 1或2的外部设备使用Dolby Digital 或 DTS 或者诸如 BS 数字调谐器等设备连接到 Digital 1 或 2 时 可以让您设定解码模式 在下列情 况中非常有帮助 在播放开头听不到声音时 选择章节的过程中听到噪音时 AUTO PCM 正常情况下应该选择此模式 DTS 声音为DTS时应该选择此模式 不能听 到除 DTS 以外的其它声音 几秒钟后可以返回源 音源 显示 有关遥控键的位置 请参阅 第 38 页 调节每个扬声器的音量 其他设定 调节前置扬声器的音量平衡 设定是否使用重低音 设定 Digital 1 端子的解码模式 设定 Digital 2 端子的解...

Page 121: ...害听力 更改设定之前 请务必连接线性输出导 线 将线性输出导线连接至 PHONES LINE OUT 端子 时 扬声器不产生声音 STANDBY MD IN DISC LOADING MECHANISM LINE SURROUND OUTPUT MODE PHONES LINE OUT VOLUME for Digital Audio Player REC MODE DVD CD MD FM AM PHONES LINE OUT 端子 OUTPUT MODE 使用环绕耳机功能 正常情况下应打开此模式 对于multi sound 请选择H P SURROUND模式 对于立体声声音 请选择H P NORMAL 模式 观赏影片或收听multi sound音源时 请选择此模式 收听以 2 声道录制的音源 如 CD 或 其他 2 声道音源 时 请选择此模式 更改 PHONES LINE OUT 端子...

Page 122: ...幕类型 为电视机选择合适的显示模式 16 9 16 9 多制式 宽屏幕电视机 宽屏幕电视机的宽高比固定为 16 9 时 选择本项目 播放以 4 3 录制的 DVD VIDEO 时 本产品自动调 节输出信号的屏幕宽度 4 3 多制式信箱屏幕 电视机宽高比为传统 4 3 时 选择本项目 浏览宽屏 幕图像时 黑条出现在屏幕的上下边缘 4 3 全景屏幕 4 3 多制式全景屏幕 电视机宽高比为传统 4 3 时 选择本项目 浏览宽屏 幕图像时 图像的左右边缘将不会出现在屏幕上 如果光盘不兼容全景屏幕 图像将不会以信箱比率 显示 图像来源 选择适合视频源的项目 自动选择视频源类型 视频或电影 电影 想要观看电影或以逐行扫描方式录制的视频时选择 本项目 视频 想要观看正常视频时选择本项目 映像 储存器 在 断之间选择屏幕保护模式 从静止图像最后 显示开始 5 分钟未进行操作时 屏幕保护启动 文件类型 如果...

Page 123: ... DVD 播放机拥有自己的注册码 需要时 可以 对注册码进行确认 播放录有注册码的光盘 时 将会覆盖 DVD 播放机的注册码以保护版 权 通 通 DVD1 注 有内容保护设置的 DVD AUDIO 无输出 对于无内容保护设置的 DVD VIDEO 在数字音频输出端子存在 20 位或 24 位输出 播放光盘 DIGITAL AUDIO OUTPUT 个人偏好 光束 PCM DOLBY DIGITAL PCM PCM 48 kHz 16 20 24 位 线性 PCM DVD VIDEO 96 kHz 线性 PCM DVD VIDEO 48 kHz 16 位线性立体声 PCM 48 96 192 kHz 16 20 24 位线性 PCM DVD AUDIO 48 kHz 16 位线性立体声 PCM 44 1 88 2 176 4k Hz 16 20 24 位线性 PCM DVD AUDIO 44...

Page 124: ... 佛兰卡国际混合语 FJ 斐济语 SH 塞尔维亚克罗地亚语 FO 法罗语 SI 僧伽罗语 FY 弗里斯兰语 SK 斯洛伐克语 GA 爱尔兰语 SL 斯洛文尼亚语 GD 苏格兰盖尔语 SM 萨摩亚语 GL 加利西亚语 SN 修纳语 GN 瓜拉尼语 SO 索马里语 GU 古吉拉特语 SQ 阿尔巴尼亚语 HA 豪撒语 SR 塞尔维亚语 HI 印地语 SS 希斯瓦梯语 HR 克罗地亚语 ST 塞索托语 HU 匈牙利语 SU 巽他语 HY 亚美尼亚语 SV 瑞典语 IA 拉丁国际语 SW 斯瓦希里语 IE 拉丁国际语 TA 泰米尔语 IK 伊努皮克语 TE 泰卢固语 IN 印度尼西亚语 TG 塔吉克语 IS 冰岛语 TH 泰国语 IW 希伯来语 TI 蒂格尼亚语 JI 依地语 TK 土库曼语 JW 爪哇语 TL 塔加拉语 KA 格鲁吉亚语 TN 茨瓦纳语 KK 哈萨克语 TO 汤加语 KL 格陵兰语...

Page 125: ...K ୩Ԏִᓃॱ BO ᄚջᑢЋ GY ޛ Ћᩤ MW ᳮடᑢ TM ޕ ഞರ BR ূᠲ HK ᳫྞ MX ᠲ ۋ TN ፇॆರ BS ূ ڸ ᳮ HM ᥇ੱॱ ڔ Ԏ ᐧᓃॱ MY ᳮൌᠲЋ TO ᢣ BT νϚ HN ༨ டರ MZ ᚃමຈԎ TP ω BV ᑢႯॱ HR Ԏᒪ ޞ Ћ NA ᐧᏘຈЋ TR ޕ ᓼԢ BW ᙄᅤᐧ HT ཏ ޞ NC ಱ ॆЋ TT Ⴏ ॆ ۋূ ڔ BY ሄҦᒪರ HU Ⴂջ NE ॆೃऴ TV ތ ᅤ BZ ѡջԥ ID ॆᠲЋ NF ᢰጆԎॱ TW ྯع CA IE ႓ऴԝ NG ॆೃջЋ TZ මॆЋᔌ ى Ԟ ދڔ CC ظظ ᓃॱ IL мᗡղ NI ॆ டᅞ UA ϦԎԝ CF ϔᱡԞ ދڔ IN NL ᙰԝ UG Ϧ৭ CG յ IO ᘫक़ ךޞ NO ࢌ UM ᒼक़ळಚ ॣॱއ CH ᅉࠠ IQ ьடԎ NP ॆ ऴ US ᒼ ދ C...

Page 126: ...入 MD 可能损坏本机 MD 停止播放时的显示 MD 已经设置 MD 标题 光盘标题 时 首 先出现 MD 标题 长标题会滚动 接下来出现群组总数 没有群组属于 MD 时 出现 GR Listening to MDs 操作 停止 按 暂停 在播放期间按 再次按 继 续播放 弹出 按本机上的 右 遥控模式选择器 数字键 MD MD STANDBY MD IN DISC LOADING MECHANISM LINE SURROUND OUTPUT MODE PHONES LINE OUT VOLUME for Digital Audio Player REC MODE DVD CD MD FM AM 聆听 MD 标记 MD 曲目号 消逝的播放时间 MDLP 模式 第 52 页 曲目总数 总播放时间 NX DD30 UB CS book Page 45 Monday November 21 20...

Page 127: ...始位 置 每按一次 当前曲目跳到下一曲目的开始位 置 按 或 选择群组 1 将遥控模式选择器设为 AUDIO 2 按数字键 或 选择 想要聆听的曲目 请参阅 使用数字键 第 18 页 更改显示器窗口中的显示 快倒 快进搜索 播放 MD 时的显示 第 45 页 曲目标题显示 群组标题显示 时钟显示 曲目没有设置标题时 出现 TR NO TITLE 正在播放的曲目不属于 群组时 不出现群组标 题显示 群组没有设置 标题时 出现 GR NO TITLE MD 停止播放时的显示 第 45 页 光盘标题显示 时钟显示 MD 没有设置标题时 出 现 DISC NO TITLE 曲目和群组总数显示 MD 跳到曲目的开始位置 指定曲目 直接选择曲目 NX DD30 UB CS book Page 46 Monday November 21 2005 6 10 PM ...

Page 128: ...请参阅 使用数字键 第 18 页 注 如需删除编程 请在停止播放时按 从最后一 首曲目逐个删除编程的曲目 按住 删除所有编 程的曲目 试 图 编 程 第 33 首 曲 目 时 显 示 器 窗 口 中 出 现 MEMORY FULL 表示无法编程 33 首或更多的 曲目 MD 编程播放的总时间达到 2 小时 31 分钟时 出现 4 按 暂停播放时 反复按 或 可以将一首曲目添加为编程中的最后一首曲 目 或删除最后一首曲目 步骤 3 停止播放时 反复按 显示 PROGRAM 以外的项目 本操作并不删除编程 暂停播放时 按住 注 弹出 MD 或关闭本机也会删除编程的曲目 本操作 也会取消编程播放 Listening to MDs MD 的群组播放 MD 的编程播放 群组指示 MD 取消群组播放 编程指示 曲目号 编程号 MD 确认编程曲目顺序 取消编程播放 删除所有编程的曲目 NX DD30 U...

Page 129: ...复聆听同一曲目 播放 MD 期间 反复按 选择重复播放 模式 例如 每按一次 显示变化如下 注 弹出 MD 或关闭本机也会取消重复播放 本功能用于搜索 MD 中的曲目标题或群组标题 停止播放光盘时 1 将遥控模式选择器设为 AUDIO 2 反复按 选择搜索类型 3 按 例如 接下页 有关遥控键的位置 请参阅 第 45 页 MD 的随机播放 MD 的重复播放 随机指示 MD 取消随机播放 MD 的搜索标题 重复播放 MD 中的所有曲目 用于 选择 MD 群组播放时重复所选群组 中的所有曲目 重复单首曲目 取消重复播放 用于搜索曲目标题 用于搜索群组标题 本功能仅存在群组时可用 NX DD30 UB CS book Page 48 Monday November 21 2005 6 10 PM ...

Page 130: ...搜索没有标题的曲目或群组时 无需输入任 何字符 然后跳到步骤 5 5 按 出现 SEARCH 然后开始标题搜索 搜索 到标题时 开始播放该曲目 播放结束时 自 动开始下一标题搜索 注 空格被视为字符 但是 空格后没有任何字符时 该空格被忽略 字母区分大小写 没有搜索到相关标题时 出现 NOT FOUND 按 或 按 标题搜索被取消 播放返回到当前曲目开头 Listening to MDs Listening to Other Equipment 有关遥控键的位置 请参阅 第 45 页 搜索另一曲目标题或群组标题 退出标题搜索 NX DD30 UB CS book Page 49 Monday November 21 2005 6 10 PM ...

Page 131: ...进行其他必须的设置 请参 阅 基本操作 第 18 页 按 每按一次 显示变化如下 Recording Sound LINE 从连接到本机 LINE IN 端 子的其他设备聆听声音 LINE DIGITAL1 从连接到本机 DIGITAL 1 端 子 的 其 他 设 备 聆 听 声 音 LINE DIGITAL2 从连接到本机 DIGITAL 2 端 子 的 其 他 设 备 聆 听 声 音 更改显示器窗口中的显示 时间显示 时钟显示 音源名称 装载 MD 时 MD 录 制剩余时间的显示 NX DD30 UB CS book Page 50 Monday November 21 2005 6 10 PM ...

Page 132: ...消 LP 指示 请按 如下 按 每按一次 显示变化如下 单张 MD 最多可以录制 254 首曲目 如果试图录 制 255 首或更多的曲目 出现 DISC FULL 使用已经部分录制的 MD 时 本产品搜索空白部 分并将新的曲目录制到该部分 不同于磁带录制 录制时 无法覆盖 MD 上的旧 曲目 本产品在录制时更改音量或音质并不影响录制的 声音 CD 的声音以数字信号录制到 MD 录制时 电台 或 LINE 的声音从模拟信号转换到数字信号 录制光盘时 曲目间自动插入曲目标记 但是 录 制 DVD VIDEO 或 DVD AUDIO 时 可能无法插入 曲目标记 MD 录制须知 LP 指示设置 将 LP 从曲目标题删除 将 LP 添加到曲目标题 CD R CD RW 录制 将 CD R 或 CD RW 的声音录制到 MD 时 按 可能在显示器窗口中显示 SCMS CANNOT COPY 并可能无法...

Page 133: ...ED 并按 下 显示窗口内出现 CANNOT REC x1 REC ONLY 不能开始录制 高速录制和正常速度录制所录制的音质相 同 在 5 高速录制时 无法聆听声音 6 按 例如 录制 CD 时的显示 出现 HCMS CANNOT COPY 时 请参阅 第 71 页 注 自动调节录制的声音电平 5 高速录制时 CD 高速旋转 因此 声音可能录 制错误并受噪音的影响 视 CD 状况而异 如果声 音录制错误 请选择常速录制 录制的剩余时间视所选 MDLP 模式而异 启用重复播放功能时 无法录制声音 启动录制功 能将自动取消重复播放 录制 DVD 影片时 不能对 DVD 进行设定 包括声 音 字幕 视角 图像放大和环绕模式选择 进 行 录 制 操 作 时 环 绕 模 式 的 选 定 自 动 解 除 第 38 页 按 将光盘上的所有曲目录制到 MD 标准立体声录制 MD 80 最长录制时间为 8...

Page 134: ... 然后执行第 52 页的 步骤 1 第 47 页 选择常速录制 第 52 页的步骤 5 选择 5 SPEED 并跳到步骤 6 时 显示 器窗口中出现 CANNOT REC 1 REC ONLY 而录制并未开始 按 每按一次 显示变化如下 注 自动调节录制的声音电平 声音同步录制用于录制其他设备 LINE 的声音 声音 同步录制时 本产品自动识别音源的声音信号 然后 开始录制 音源的声音暂停 30 秒或以上时 本产品 自动退出录制 最后录制的曲目和下一录制的曲目之 间的空白时间约为 2 秒 仅录制光盘的单首曲目 录制光盘的第 2 首或随后的曲 目到最后一首曲目 光盘的编程录制 更改录制时显示器窗口中的 显示 录制电台或其他设备的声音 剩余 MD 录制时间 录制光盘曲目号 录制 MD 曲目号 录制 MD 曲目号 录制 MD 群组号 曲目没有录制在群组中 时 出现 GR 录制光盘曲目号 正在被录...

Page 135: ...开始录制 使用该方法时 即使所连设备的声音暂停 30 秒或以上 本机也不会自动退出录制 按 按 每按一次 显示变化如下 有关遥控键的位置 请参阅 第 51 页 音源 操作 广播 选择想要录制的广播电台 第 20 页 其他设备 LINE LINE DIGITAL1 2 的声音 反复按 选择 LINE 或 LINE DIGITAL 1 2 然后准备其他设备的播 放 第 50 页 REC 3 秒或以上没有发出声音时 自动 设置曲目标记 按 也可插入 曲目标记 录制时 每按一次 设置 1 个曲目标记 初始设置 以 5 分钟间隔自动设置曲目标记 REC 退出录制 MD 更改录制时显示器窗口中的显示 录制音源名称 录制 MD 曲目号 时钟显示 录制音源名称 录制的剩余时间 录制 MD 群组号 曲目没有录制在群组中 时 出现 GR 录制 MD 曲目号 NX DD30 UB CS book Page 54...

Page 136: ...加标题的曲目或群组正在播放时 1 将遥控模式选择器设为 AUDIO 2 显示标题编辑模式 对于编辑 MD 光盘 标题或曲目标题 按 显示标题编辑模式 如需编辑光盘标题 请反复按 显示 DISC TITLE 停止播放光盘时 按 也可以显示 DISC TITLE 也可以用 或 选择曲目号 对于编辑群组标题 按两次 显示群组标题编辑模式 也可以用 或 选择群组号 3 按 显示切换至标题输入模式 如果已经输入标题 该标题显示在字符输入 位置 4 用数字键输入标题 有关输入标题 请参阅 输入标题 第 56 页 5 按 输入的标题被添加到 MD 曲目或群组 编辑须知 添加 编辑 标题 遥控模式选择器 数字键 字符输入位置 闪烁 所选字符类型 A 大写字符或符号 a 小写字符或符号 1 数字字符 如需退出标题编辑 如需添加下一标题 按 按 跳到步骤 4 NX DD30 UB CS 05 fm Page ...

Page 137: ...保存输入 的标题 群组录制时 可以输入群组的标题 例如 如需输入 F 1 反复按 选择 A 作为字符类型 2 反复按 显示 F 单个键分配了若干个字符 反复按该键 直到显 示所需的字符 有关可用的字符 请参阅 可用的字符 右页 如需移动字符输入位置 按 或 想要输入 NO TV 或两个分配到同一个键 的字符时 请首先输入第 1 个字符 然后按 将字符输入位置移到右边 接着输入第 2 个字 符 如需删除字符 将字符输入位置移到想要删除的字符 然后按 如需输入空格 从 符号 下表 中选择空格 也可以按 在标题末尾输入空格 如需退出标题输入 按 或 不保存输入的标题 可用的符号 输入标题 所选字符类型 A 大写字符或符号 a 小写字符或符号 1 数字字符 字符输入位置 闪烁 可用的字符 键 符号 数字字符 大写 字符 小写 字符 符号 ABC DEF GHI JKL MNO PQRS TUV W...

Page 138: ...本产品反复播放紧接分割点之后的 4 秒钟声 音 无需调节分割点时 请跳到步骤 5 想要调节分割点时 跳到步骤 4 4 按 或 可以在 128 到 128 位置 SP 模式约为 8 到 8 范围内调节分割点 5 按 6 按 注 编辑期间 可以按 返回到上一步 按 可以退出编辑操作 无法分割包含 254 首或更多曲目的 MD 中的曲目 在步骤 3 按 时 出现 DISC FULL 分割带标题的曲目时 该标题被同时添加到被分割 的曲目 将单首曲目分割为两首曲目 DIVIDE 曲目号 POSI 代表 POSITION NX DD30 UB CS book Page 57 Monday November 21 2005 6 10 PM ...

Page 139: ...曲目 如 果试图合并此类曲目 出现 CANNOT JOIN 合并带有标题的两首曲目时 第 1 首曲目的标题将 保留为合并后曲目的标题 例如 移动曲调 B 想要移动的曲目 如上所示的曲目 2 正在 播放时 1 反复按 选择 MOVE 2 按 也可以用 或数字键选择曲目 号 请参阅 使用数字键 第 18 页 3 按 4 按 或 选择想要移动指定曲 目的曲目号 选择如上所示的曲目 5 也可以用数字键选择曲目号 请参阅 使用 数字键 第 18 页 将曲目移动到群组中登记的曲目号时 该曲 目被登记在群组中 将群组中登记的曲目移 动到群组中没有登记的曲目号时 该曲目从 群组登记中删除 5 按 6 按 注 编辑期间 可以按 返回到上一步 按 可以退出编辑操作 有关遥控键的位置 请参阅 第 55 页 合并曲目 JOIN 曲目号 移动曲目 MOVE NX DD30 UB CS 05 fm Page 58 T...

Page 140: ...页 3 按 在所选曲目号之前添加 选择曲目错误时 请按 删除 可以用 或数字键和 选择最 多 15 首要删除的曲目 请参阅 使用数字 键 第 18 页 4 按 5 确定已经不再需要这些曲目 然后按 注 编辑期间 可以按 返回到上一步 按 可以退出编辑操作 注 意 删除曲目后 无法恢复该曲目 删除曲目之前 请 确定已经不再需要该曲目 1 反复按 选择 ALL ERASE 2 按 3 确定已经不再需要所有曲目 然后按 注 按 可以退出编辑操作 有关遥控键的位置 请参阅 第 55 页 删除单首曲目 ERASE 删除所有曲目 ALL ERASE 所有曲目都被删除 NX DD30 UB CS book Page 59 Monday November 21 2005 6 10 PM ...

Page 141: ...用 或数字键选择曲目号 请参阅 使用数字键 第 18 页 3 按 4 按 或 选择想要指定为群组 最后一首曲目的曲目号 选择如左所示中的曲目号 3 也可以用数字键选择曲目号 请参阅 使用 数字键 第 18 页 5 按 6 按 注 编辑期间 可以按 返回到上一步 按 可以退出编辑操作 如果选择另一群组中的某首曲目 则出现 GROUP TRACK 并无法跳到下一步 如果选择的连续曲目包括已经登记到另一群组中的 某首曲目 则出现 CANNOT FORM 并无法跳 到下一步 制作群组 FORM GROUP 群组 1 群组中的第 1 首曲目号 群组中的最后一首曲目 第 1 首曲 群组 1 最后一首曲目 NX DD30 UB CS book Page 60 Monday November 21 2005 6 10 PM ...

Page 142: ...已 经 属 于 群 组 的 某 首 曲 目 则 出 现 CANNOT ENTRY 并无法跳到下一步 例如 将群组 1 分割为两个群组 想要指定为第 2 个群组第 1 首的曲目 如上 所示的曲目 4 正在播放时 1 反复按 选择 DIVIDE GR 2 按 也可以用 或数字键选择曲目号 请参阅 使用数字键 第 18 页 也可以用 或 选择群组号 3 按 4 按 注 编辑期间 可以按 返回到上一步 按 可以退出编辑操作 如果选择群组中的第 1 首曲目或不属于该群组的某 首曲目 则无法跳到下一步 分割带标题的群组时 相同的标题被同时添加到被 分割的群组 将曲目添加到群组 ENTRY GROUP 群组 1 群组 2 群组 1 群组 2 曲目号 将单个群组分割为两个群组 DIVIDE GR 群组 1 群组 1 群组 2 群组号 曲目号 NX DD30 UB CS book Page 61 Monda...

Page 143: ...分割的两个群 组 出现 CANNOT JOIN 然后显示返回到上一 步 合并带有标题的两个群组时 第 1 个群组的标题将 保留为合并后群组的标题 例如 移动群组 2 想要移动的群组中的某首曲目 如上所示的 群组 2 正在播放时 1 反复按 选择 MOVE GROUP 2 按 也可以用 或 选择群组号 3 按 4 按 或 选择指定群组 所要移动到的群组号 选择如上所示的群组 1 5 按 6 按 注 编辑期间 可以按 返回到上一步 按 可以退出编辑操作 有关遥控键的位置 请参阅 第 55 页 合并群组 JOIN GROUP 群组 1 群组 2 群组 1 群组 1 群组 2 不属于任何群组的曲目 移动群组 MOVE GROUP 群组 1 群组 2 群组 1 群组 2 NX DD30 UB CS 05 fm Page 62 Thursday November 24 2005 2 19 PM ...

Page 144: ...GROUP 2 按 例如 想要取消群组 1 时 也可以用 或 选择群组号 3 按 4 按 注 编辑期间 可以按 返回到上一步 按 可以退出编辑操作 例如 取消所有群组 1 反复按 选择 UNGROUP ALL 2 按 3 按 注 按 可以退出编辑操作 取消群组 UNGROUP UNGROUP ALL 取消指定的群组 UNGROUP 群组 1 群组 2 群组 1 取消所有群组 UNGROUP ALL 群组 1 群组 2 NX DD30 UB CS book Page 63 Monday November 21 2005 6 10 PM ...

Page 145: ... 无法恢复该曲目 删除曲目之前 请 确定已经不再需要该曲目 想要删除的群组中的某首曲目 如上所示的 群组 2 正在播放时 1 反复按 选择 ERASE GROUP 2 按 也可以用 或 选择群组号 3 按 4 确定已经不再需要这些曲目 然后按 注 编辑期间 可以按 返回到上一步 按 可以退出编辑操作 有关遥控键的位置 请参阅 第 55 页 删除群组 ERASE GROUP 群组 1 群组 2 群组 1 NX DD30 UB CS book Page 64 Monday November 21 2005 6 10 PM ...

Page 146: ...设置时钟之前 0 00 正在闪烁时 如果按 出现 CLOCK ADJUST 第 18 页 反复按 再次选择时间 激活睡眠定时器时 按 一次 1 设定 DAILY 定时器 第 67 页 2 播放想听到的音源 3 按 设定睡眠定时器 每当到达指定的时间时 电源自动关闭 到达 DAILY 定时器设定的时间时 电源将再次打 开 预先设置时钟 第 18 页 睡眠定时器 数字键 遥控模式选择器 取消 睡眠指示 消失 睡觉时使用睡眠定时器 起床时 使用 DAILY 定时器 睡眠指示 更改睡眠定时器设置 确认睡眠定时器设置 剩余时间 NX DD30 UB CS book Page 65 Monday November 21 2005 6 10 PM ...

Page 147: ...TUNER FM AM LINE 或 LINE DIGITAL1 2 以选定要录制的音源 想要录制 FM AM 广播时 按 然后按 或数字键选 择想要录制的广播的电台预设号码 请参 阅 使用数字键 第 18 页 5 按 6 按 或 选择 MDLP 模式 第 52 页 7 按 显示器窗口中出现设置 8 本机打开时 按 关闭本机 录制定时器正在工作时 音量被设为 0 扬声器或耳机没有发出任何声音 录制定时器仅在本机关闭时可用 注 操作期间 可以按 返回到上一步 按 可 以退出录制定时器设置 设置不被保存 想要更改曲目标记选项时 请在设置录制定时器之 前或之后进行更改 第 54 页的步骤 3 和 4 录制定时器 广播 预设想要录制的广播电台 第 20 页 其他设备 请参阅设备的操作说明书 MD 录制 插入 MD 第 45 页 NX DD30 UB CS 05 fm Page 66 Thursda...

Page 148: ...或断电时 录制定时器设置可能丢 失 如果设置丢失 请再次设置时钟和录制定时器 在每天的同一时间进行操作 类似于闹钟 1 准备想要播放的音源 2 按 四次转至 DAILY 定时器的开 始时间设定显示 3 按 或 设置开始时间 和结束时间 用数字键可以设置播放时间 请参阅 使用 数字键 第 18 页 有关设置时钟 请参阅 设置时钟 第 18 页 输入 小时 输入 分钟 取消录制定时器 再次激活录制定时器 DAILY 定时器 闹钟定时器 光盘 确保已经装载光盘 第 22 页 MD 插入 MD 第 45 页 广播 预设想要聆听的广播电台 第 20 页 其他设备 请参阅设备的操作说明书 NX DD30 UB CS book Page 67 Monday November 21 2005 6 10 PM ...

Page 149: ...ISC 时 按 然后按 或数字键选择要播放的群组 号 G 接着按 然后按 或数字键选择要播放的曲目号 T 请参阅 使用数字键 第 18 页 选择 LINE LINE DIGITAL1 或 LINE DIGITAL2 时 直接进行步骤 5 5 按 6 按 或 调节播放音量 7 按 显示器窗口中出现设置 8 本机打开时 按 关闭本机 DAILY 定时器仅在本机关闭时可用 注 操作期间 可以按 返回到上一步 按 可以退出播放定时器设置 设置不被保存 播放定时器开始工作时 音量逐步增加到所选的电 平 按 三次显示 DAILY TIMER 然后按 和 DAILY 将在显示窗口消失 DAILY 定时器的设定被记录在存储器中 按 三次显示 REC TIMER 然后按 设定的详 细内容将逐个显示 随后将显示 和 DAILY 注 电源插头断开或断电时 播放定时器设置可能丢 失 如果设置丢失 请再次设置时钟和...

Page 150: ...3 分钟内没有进行任何操 作时 本机自动关闭 关闭本机前 20 秒 A STANDBY 开始闪烁 再次按 注 将音量保持在 0 并不等同于没有发出声音 因 此 不会启动自动待机功能 光盘 MD 弹出锁定 可以禁止光盘和 MD 的弹出 本机关闭时 按住 的同时 按本机上的 即使按 显示器窗口中也会出现 LOCKED 光盘或 MD 不会弹出 此外 本机关闭时 如果按 显示器窗口中出 现 LOCKED 且本机不会打开 本机关闭时 再次进行上述操作 数字键 A STANDBY 代表 Auto Standby 自动待机指示 自动待机性能 取消自动待机 STANDBY MD IN DISC LOADING MECHANISM LINE SURROUND OUTPUT MODE PHONES LINE OUT VOLUME for Digital Audio Player REC MODE DVD CD...

Page 151: ...接到电视机的 VIDEO 3 输入端子时 DVD 1 只需在本机开始播放即可欣赏声音或视频 无需选 择电视机的输入设置 或预先打开电视机 1 打开电视机的主电源 2 将光盘插入本机 3 按本机上的 自动进行以下操作 电视机将会打开 电视机输入将会切换到本机的外部输入 视 频 1 2 或 3 关闭本机时 电视机的电源不会关闭 连接和设置 STANDBY MD IN DISC LOADING MECHANISM LINE SURROUND OUTPUT MODE PHONES LINE OUT VOLUME for Digital Audio Player REC MODE DVD CD MD FM AM AV COMPU LINK 带单声道微型插 头的音频导线 未提供 AV 电脑连动 II 或 III 本机 JVC 牌电视机 操作 NX DD30 UB CS 05 fm Page 70 Th...

Page 152: ...录制功能录制 101 首 或更多的曲目 现象 可能的原因 即使 MD 上显示的可录制时间存在剩 余 仍然出现 DISC FULL 无论可录制时间是否有剩余 MD 都将限制可录制曲目的数目 无法将 255 首或 更多曲目录制到单张 MD 单张 MD 最多可以录制 254 首曲目 即使曲目数量和可录制时间都没有达 到限制 仍然出现 DISC FULL 反复进行片断删除和录制将在 MD 上造成许多空白 将曲目录制到该 MD 时 曲目被分割 曲目的小片断将被录制到各个空白 此类分割片断的数量增加时 可能出现 DISC FULL 在 SP 模式 标准立体声录制模式 下 分割片断为 8 秒或以下时 无法将 该片断合并到另一曲目 此外 删除该片断时 剩余可录制时间不会增加 对于分割到许多空白中的曲目 快进或快倒可能产生断断续续的声音丢失 无法合并具有不同 MDLP 模式 SP LP2 LP4 的曲目 无...

Page 153: ...的任何部位 在标签超出指 定区域 剥落 或者粘贴不正确的情况下插入 MD 可能损坏本机 使用柔软的干布轻轻掸掉机壳表面的灰尘 机壳 非常脏时 请用水稀释的中性洗涤剂润湿布 拧 干润湿的布 然后使用该布擦拭机壳 最后使用 柔软的干布擦拭 请勿使用稀释剂或苯擦拭机壳 使用上述物品擦 拭机壳可能导致机壳褪色或油漆剥落 请勿将杀 虫剂或其他易挥发的物品喷洒到机壳上 请勿将 橡胶或塑料长时间遗留在机壳上 使用光盘 清洁光盘 信号面 使用软布自中心向外擦 拭光盘 集中于某部分的擦伤导致 声音丢失 使用 MD 请勿打开挡板 强行打 开挡板将损坏 MD 防止丢失重要的录音 防写片 录制或编辑之前 请关闭防写片 打开防写片防止删 除声音 清洁本机机壳 NX DD30 UB CS book Page 72 Monday November 21 2005 6 10 PM ...

Page 154: ...弹出 MD 接着 重新开始录制 GROUP FULL 试图制作 100 个或更多的群组 可以最多制作 99 个群组 GROUP TRACK 试图使用包含于另一群组中的曲目制作群组 选择未属于任何群组的曲目 第 60 页 LOAD ERROR MD 没有正确装载 请正确插入 MD MD NO DISC 没有装载 MD PLAYBACK DISC 试图编辑或录制到仅限于播放的 MD 请用可录制的 MD 更换该 MD SCMS CANNOT COPY 试图进行 CD R 或 CD RW 的数字音频复制 以常速操作模拟录制 第 51 页 TRACK PROTECTED 试图分割 合并或删除以 Net MD 格式录制的曲 目 请在兼容 Net MD 的设备上编辑曲目 曲目在本产品以外的设备上处于写保护状态 在录制这些曲目的设备上编辑曲目 HCMS CANNOT COPY 使用高速录制功能开始录制某首...

Page 155: ...盘放置到光盘托架 上 22 镜头结露 打开本机电源 约等待 1 或 2 小时 然后操作本机 3 某处无法正确播放 光盘被擦伤或脏了 请清洁或更换光盘 72 MD 上发生错误 再次录制到 MD 51 无法录制 MD MD 写保护 请取消写保护 72 无法接收广播 没有连接天线 连接天线 13 产生啸声 本机放置在电视机 电脑或其他 电器附近 将本机远离电视机 电脑或其他电器 放置 3 无法设置定时器 没有设置时钟 请设置时钟 18 定时器不工作 本机被打开 设置定时器后 请关闭本机 66 68 无法操作遥控器 遥控器电池电量较低 请用新电池予以更换 11 无法使用遥控器上数字键 操作本机 将遥控器上的遥控模式选择器拨 到 TV 侧 将遥控模式选择器设为 AUDIO 18 重低音不发声 重低音设定 SUB WFR 设为 OFF 开启重低音设定 SUB WFR 39 NX DD30 UB CS ...

Page 156: ...是的 您可以播放 THX 是由美国的 Lucasfilm Ltd 建立的关 于高质量图像录制或播放的区分和标准的名 称 它指定达标的光盘和设备 但并不指定录 制格式类型 问 当 MP3 WMA 格式和音频 CD 格式被录制在 一张 CD 上时 我能播放这两种格式吗 答 在这种情况下 由于曲目以数据 CD 格式录 制 音频 CD 上的曲目无法播放 您只能播放 MP3 WMA 格式的曲目 问 Dolby 数字光盘有时包含两种类型的环绕声 5 1 声道环绕和 Dolby 环绕 它们有什么区 别 答 两者都是美国 Dolby Institute 建立的环绕声标 准 Dolby 环绕是通过在常规模拟立体声 左 右 顶端的录制环绕声分量 2ch 创造而成 的 然后用 Dolby 环绕和 Dolby Pro Logic 解 码器对这些声音进行分离和播放 Dolby 数字 5 1 声道 环绕 是一种最多总...

Page 157: ...节 根 据 您 对软 件 和 房间 条 件 的偏 好 可 以 调 节诸 如 gamma correction 等项目 以选择图像的亮度 对比 度以及中间亮度 甚至于可以显示深色调的平滑图像 从而达到目前还难以达到的电影图像品质的水准 WMA Windows MediaR Audio 的缩写 美国微软公司开发的声音压缩格式 动态范围 指声音电平的最大点和最小点之间的差额 地区代码 可播放曲目的管理区域 指光盘上的曲目只能在特定的地区播放的系统 如果 光盘上的地区代码和 DVD 播放机上的地区代码不相 符 则不能播放该光盘上的曲目 杜比环绕 一种环绕模式 将前置环绕的 4 声道声音信号录制为 2 声道信号 然后在播放时通过专门的解码器再将其转 换回 4 声道信号 由于声音以 2 声道录制 因此即使在 连接立体声设备时也可以产生自然的声音 杜比数字 一种环绕模式 总共能够处理多达 5 1 声道 ...

Page 158: ...0 kHz 9 kHz 间隔 530 kHz 1710 kHz 10 kHz 间隔 天线 FM 75 Ω 非平衡 AM 环形天线 定时器 定时器格式 1 种程序动作 在 ONCE REC 与 DAILY 之 间切换 睡眠定时器 10 20 30 60 90 120 150 分钟 自动调光器 时钟显示 24 小时格式 DVD 播放机 可播放的光盘 DVD VIDEO DVD AUDIO CD VCD SVCD CD R CD RW CD VCD SVCD MP3 WMA JPEG DivX ASF 格式 DVD R DVD RW 视频格式 DVD VR 格式 MP3 WMA JPEG DivX ASF 格 式 R RW 视频格式 MD 录制机 音频播放系统 微型光盘数字音频系统 录制系统 磁光覆写系统 读取系统 无接触 半导体激光拾音 录制 播放时间 使用单张 80 分钟 MD 时 SP 8...

Page 159: ... 尺寸 127 mm 宽 273 mm 高 218 mm 深 质量 约 2 6 kg 单个 中置环绕 SP NXDD30S 系统 2 声道单机系统 1 路封闭 式 磁屏蔽型 扬声器 9 5 cm 1 cm 超薄直驱式 扬声器 声道 最大输出功率 30 W 阻抗 4 Ω 频率范围 140 Hz 20 kHz 声压级 79 dB W m 尺寸 296 mm 宽 50 mm 高 45 mm 深 包括 扬声器底座 质量 约 0 7 kg 包括扬声器底座和扬声器导 线 经 Dolby Laboratories 许可的美国和其他国家的 专利 NX DD30 UB CS 05 fm Page 78 Thursday December 8 2005 10 21 AM ...

Page 160: ...1205KMMMODJEM NX DD30 COMPACT COMPONENT MD SYSTEM 2005 Victor Company of Japan Limited EN CS c NX DD30 UB BackCov fm Page 79 Friday December 9 2005 3 29 PM ...

Page 161: ...Instructions COMPACT COMPONENT MD SYSTEM NX DD30 ...

Reviews: