


CAUTION:
If you meet strong resistance when attempting to seat the module using
the ejectors, remove it from the chassis, and confirm that the slot is designed to
hold the component. Also, be sure that you have aligned the left and right edges
in the correct matching tracks.
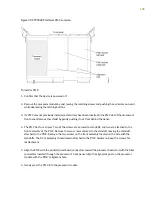
7. Insert the module into the midplane by simultaneously pressing both ejectors inward and exerting
forward pressure on the module. The small red release buttons should click into place.
8. Tighten the module's captive screws using a Phillips screwdriver.
NOTE:
Tighten the captive screws completely before installing an adjacent module so that
proper electromagnetic interference (EMI) gasket compression occurs. Failure to do this can
make it difficult to install adjacent modules.
9. Go to
“Cabling the CTP2000 Platform Overview” on page 108
.
RELATED DOCUMENTATION
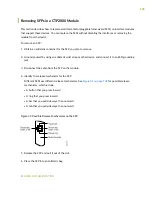
Removing a CTP Interface Module, Processor Module, or Clock Module | 96
Installing or Removing a CTP2000 Series CompactFlash Card | 98
107
Summary of Contents for CTP2000 Series
Page 1: ...CTP2000 Series Circuit to Packet Platforms Hardware Guide Published 2020 08 31 ...
Page 8: ...1 PART Overview CTP2000 Series Platform Overview 2 CTP2000 Series Interface Modules 11 ...
Page 112: ...Installing SFPs in a CTP2000 Module 102 105 ...
Page 127: ...5 PART Configuration Accessing the CTP2000 Platform 121 ...
Page 144: ...7 PART Troubleshooting Troubleshooting Power Failures 138 Contacting Customer Support 140 ...


