B
Dear Customer!
The assembly of your new house requires
a bit of technical knowledge. However, it is
important that the assembly instructions are
followed strict-ly. The assembly instruction
is a combination of text and illustrations. The
profiles are packed in separate numbered packs
corresponding to the order in the assembly
instruction. Erect one pack at a time. All nuts
and bolts and fittings are found in bag No. 0
(specified on page 12). Each pack is specified in
separate lists of components.
All detailed illustrations are marked with
symbols:
Seen from inside Seen from outside.
Precautions.
t
Assembly must only be carried out in dry
and calm weather.
t
Always use working gloves while glazing.
Greenhouse glass has sharp edges,
especially if the glass breaks.
t
Assistants and especially children must be
warned that broken glass is an element of
danger. Pick up broken glass at once and
remove it with care.
t
We recommend to use protective glasses
while fixing the spring wire clips.
t
Place the ladder on a level support.
t
It is essential to have an assistant.
References
The column marked indicates the
page(s) on which the component is used.
Page 13:
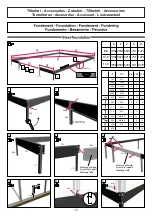
Foundation
The base is not included in this delivery.
However, an original base can be bought
separately. It ensures you a stable and easy to
build base.
If you make your own base the measurements
indicated must be external measurements.
If you buy an original base you furthermore
need about 75 litres of concrete and 6/8
plastic-/concrete pipes of about 800 mm which
are placed in a non-freezing depth for the
fastening of the corner and middle anchors.
The base must be 100% level and square; the
latter is ensured by checking that the two
diagonal measurements are equal.
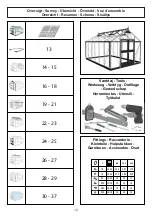
Tools
The mounting of the greenhouse requires the
tools shown on page 12.
Page 14-27:
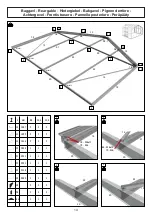
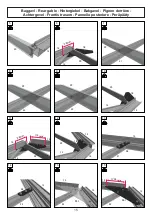
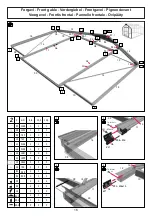
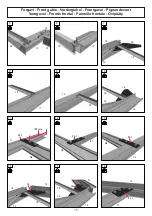
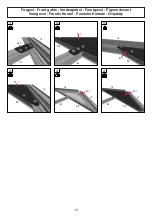
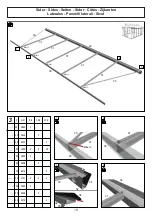
Place the components as shown on the
illustration and assemble in the order shown
in the pictures. Do not tighten the nuts
completely until the front gable construction
has been assembled.
Page 13:
(Fastening to the base).
When constructing your own base you have
to drill holes (7 mm) in the ground frame
between all the vertical frames, the greenhouse
is then fastened to the base with screws (A).
Using an original base the greenhouse is
fastened to each vertical bar as shown on
drawing B/C.
Page 24-27:
For an easier assembly we recommend that you
oil the screws for the doors.
Fitting of glass/polycarbonate
Important before glazing!
Make sure that gables and sides are level and
square, and that door(s) and window(s) are
functioning perfectly.
Best order of assembly:
1) Windows – 2) Roof – 3) Doors – 4) Gables
– 5) Sides
Page 30-33:
Glazing (illustration 1 to 8)
Degrease the sheets and frames with spirit.
Start glazing from below, one glass at a time.
Apply a 3 mm silicone line on the vertical
frames where indicated (dotted lines on
the illustration). (A 3 mm line of silicone is
sufficient to obtain maximum attachment). If
you do use more than recommended, you can
buy extra tubes.
Spring wire clips and glassholders are to be
fitted as shown.
X = Spring wire clips, > = Glassholders
In case of broken glass carefully pull it
outwards and loosen the silicone by means of a
sharp craft knife.
Clean the profile completely before inserting a
new pane of glass.
Page 34-37:
Mounting of polycarbonate
The illustrations at the bottom of page 34/36
show where to mount the polycarbonate plates
and lists. The type indication states the length
in mm. A possible adjustment is made by
means of a fine-tooth saw.
NB! To avoid the formation of algae the
polycarbonate sheets must not come into
contact with the ground. Rest them on a piece
of cardboard.
A-lists are mounted as shown on page 35/37.
Put the sheet into the bottom list, bend the
sheet slightly outwards and put it in the top list.
M-lists are mounted as shown on page 35/37.
Place the upper part of the list under the alu.
profile in the whole length of the sheet and
hereafter click on the list from above.
Sealing of the polycarbonate sheets
The sheets may be sealed against insects.
Close the top end off with alu-tape or silicone.
The bottom only with airstrip tape to let
condensation out (available at your local
dealer).
Now your greenhouse is completely assembled.
However, please notice the following:
Maintenance
t
Grease doors (hinges and lock).
t
Clean the gutter for leaves, etc.
t
Adjustment of windows.
t
Replacement of broken glass.
t
Clean the house with disinfectant before
and after the growing season.
Winter Protection
In areas with occurrence of snow we
recommend the following winter protection:
t
Support the roof ridge at the centre of the
house.
t
Remove greater snow loads from the roof.
t
Take precautions against snow falling
down from for instance a tree or a roof.
t
Dismount the cylinders for the automatic
window openers, if any (optional extras).
t
Secure door(s) and window(s) preventing
wind damage to the house.
Insurance
Please note that not all insurance companies
cover glasshouses automatically. Please
contact your insurance company to ensure an
insurance coverage.
Guarantee
Juliana grants a guarantee of 12 years which
covers replacement of faulty parts. The
guarantee does not cover polycarbonate, glass,
transport, assembly, freight etc.
Juliana grants a guarantee of 2 years on painted
parts, if any. Note that marks in the painting
may occur due to suspension of the profiles.
The guarantee is invalid if the greenhouse is
not assembled according to these instructions.
Complaints
All our greenhouses are built to high standards
of quality. However, should a complaint
occur please contact your dealer at once.
Remember to specify the defect by indicating
the greenhouse model and number of the
component and the quality control number.
May we congratulate you on your new greenhouse
GB
USA
DEAR CUSTOMER
ŽŶŐƌĂƚƵůĂƟŽŶƐŽŶƉƵƌĐŚĂƐŝŶŐLJŽƵƌŶĞǁ
ŐƌĞĞŶŚŽƵƐĞ͘/ƚŝƐŝŵƉŽƌƚĂŶƚƚŚĂƚLJŽƵĨŽůůŽǁƚŚĞƐĞ
ĂƐƐĞŵďůLJŝŶƐƚƌƵĐƟŽŶƐƐƚĞƉͲďLJͲƐƚĞƉ͘
dŚĞĂƐƐĞŵďůLJŝŶƐƚƌƵĐƟŽŶƐĂƌĞĂĐŽŵďŝŶĂƟŽŶŽĨƚĞdžƚ
ĂŶĚŝůůƵƐƚƌĂƟŽŶƐ͘dŚĞƉƌŽĮůĞƐĂƌĞƉĂĐŬĞĚŝŶƐĞƉĂƌĂƚĞ͕
ŶƵŵďĞƌĞĚƉĂĐŬƐĐŽƌƌĞƐƉŽŶĚŝŶŐƚŽƚŚĞŝƌŽƌĚĞƌŽĨƵƐĞ
ŝŶƚŚĞŝŶƐƚƌƵĐƟŽŶƐ͘ƐƐĞŵďůĞŽŶĞƉĂĐŬĂƚĂƟŵĞ͘
ůůŶƵƚƐ͕ďŽůƚƐĂŶĚĮƫŶŐƐĂƌĞĐŽŶƚĂŝŶĞĚŝŶďĂŐEŽ͘
Ϭ;ƐƉĞĐŝĮĞĚŽŶƉĂŐĞϭϮͿ͘ĂĐŚƉĂĐŬŝƐƐƉĞĐŝĮĞĚŝŶ
ƐĞƉĂƌĂƚĞůŝƐƚƐŽĨĐŽŵƉŽŶĞŶƚƐ͘
ůůĚĞƚĂŝůĞĚŝůůƵƐƚƌĂƟŽŶƐĂƌĞŵĂƌŬĞĚǁŝƚŚƚŚĞ
ĨŽůůŽǁŝŶŐƐLJŵďŽůƐ͗
Seen from the inside Seen from the outside
SOME SAFETY PRECAUTIONS
ͻ
ƐƐĞŵďůLJŵƵƐƚŽŶůLJďĞĐĂƌƌŝĞĚŽƵƚŝŶĚƌLJĂŶĚ
ĐĂůŵǁĞĂƚŚĞƌ͘
ͻ
ůǁĂLJƐǁĞĂƌǁŽƌŬŐůŽǀĞƐǁŚĞŶŝŶƐƚĂůůŝŶŐƚŚĞ
glazing. Greenhouse glass has sharp edges,
ĞƐƉĞĐŝĂůůLJŝĨŝƚďƌĞĂŬƐ͘
ͻ
ƐƐŝƐƚĂŶƚƐĂŶĚĞƐƉĞĐŝĂůůLJĐŚŝůĚƌĞŶŵƵƐƚďĞ
ǁĂƌŶĞĚƚŚĂƚďƌŽŬĞŶŐůĂƐƐŝƐĚĂŶŐĞƌŽƵƐ͘WŝĐŬ
ƵƉĂůůďƌŽŬĞŶŐůĂƐƐĂƚŽŶĐĞĂŶĚƌĞŵŽǀĞŝƚǁŝƚŚ
ĐĂƌĞ͘
ͻ
tĞƌĞĐŽŵŵĞŶĚƚŚĂƚLJŽƵǁĞĂƌƉƌŽƚĞĐƟǀĞ
ŐůĂƐƐĞƐǁŚŝůĞĮdžŝŶŐƚŚĞƐƉƌŝŶŐǁŝƌĞĐůŝƉƐ͘
ͻ
ŶLJůĂĚĚĞƌƐƚŚĂƚĂƌĞƵƐĞĚŵƵƐƚďĞƉůĂĐĞĚŽŶĂ
ůĞǀĞůƐƵƌĨĂĐĞ͘
ͻ
/ƚŝƐĞƐƐĞŶƟĂůƚŽŚĂǀĞĂŶĂƐƐŝƐƚĂŶƚĂǀĂŝůĂďůĞ͘
PAGE 12: TOOLS
Assembling the greenhouse requires the tools
ƐŚŽǁŶŽŶƉĂŐĞϭϮ͘
PAGE 13: FOUNDATIONS
EŽďĂƐĞŝƐŝŶĐůƵĚĞĚǁŝƚŚƚŚŝƐƉƌŽĚƵĐƚ͘,ŽǁĞǀĞƌ͕ĂŶ
original base is available separately. This base is easy
ƚŽĐŽŶƐƚƌƵĐƚĂŶĚǁŝůůŐƵĂƌĂŶƚĞĞLJŽƵĂƐƚĂďůĞďĂƐĞĨŽƌ
your greenhouse.
/ĨLJŽƵĐŽŶƐƚƌƵĐƚLJŽƵƌŽǁŶďĂƐĞ͕ƚŚĞƐƉĞĐŝĮĞĚ
ŵĞĂƐƵƌĞŵĞŶƚƐŵƵƐƚďĞĞdžƚĞƌŶĂůŵĞĂƐƵƌĞŵĞŶƚƐ͘
/ĨLJŽƵƉƵƌĐŚĂƐĞĂŶŽƌŝŐŝŶĂůďĂƐĞ͕LJŽƵǁŝůůĂůƐŽƌĞƋƵŝƌĞ
ĂďŽƵƚϳϱůŝƚƌĞƐŽĨĐŽŶĐƌĞƚĞĂŶĚƐŝdžƚŽĞŝŐŚƚƉůĂƐƟĐͬ
ĐŽŶĐƌĞƚĞƉŝƉĞƐŽĨĂďŽƵƚϴϬϬŵŵ͘dŚĞƐĞƉŝƉĞƐ͕ǁŚŝĐŚ
ŵƵƐƚďĞďƵƌŝĞĚĂƚĂƐƵĸĐŝĞŶƚĚĞƉƚŚƚŽĞŶƐƵƌĞƚŚĂƚ
ƚŚĞLJĚŽŶŽƚĨƌĞĞnjĞ͕ƐĞĐƵƌĞƚŚĞĐŽƌŶĞƌĂŶĚŵŝĚĚůĞ
ĂŶĐŚŽƌƐ͘
dŚĞďĂƐĞŵƵƐƚďĞĐŽŵƉůĞƚĞůLJůĞǀĞůĂŶĚƐƋƵĂƌĞ͖
ƚŚĞůĂƩĞƌĐĂŶďĞĞŶƐƵƌĞĚďLJĐŚĞĐŬŝŶŐƚŚĂƚƚŚĞƚǁŽ
diagonal measurements are equal.
ATTACHMENT TO THE BASE
/ĨLJŽƵĐŽŶƐƚƌƵĐƚLJŽƵƌŽǁŶďĂƐĞ͕LJŽƵŵƵƐƚĚƌŝůůŚŽůĞƐ
;ϳŵŵͿŝŶƚŚĞŐƌŽƵŶĚĨƌĂŵĞďĞƚǁĞĞŶĂůůƚŚĞǀĞƌƟĐĂů
ƉƌŽĮůĞƐ͘dŚĞŐƌĞĞŶŚŽƵƐĞŵƵƐƚƚŚĞŶďĞƐĞĐƵƌĞĚƚŽ
ƚŚĞďĂƐĞƵƐŝŶŐƐĐƌĞǁƐ;Ϳ͘
If you use an original base, the greenhouse must be
ƐĞĐƵƌĞĚƚŽĞĂĐŚǀĞƌƟĐĂůďĂƌĂƐƐŚŽǁŶŽŶĚƌĂǁŝŶŐƐ
ͬ͘
W'ϭϰͳϮϳ͗KZZK&^^D>z
WůĂĐĞƚŚĞĐŽŵƉŽŶĞŶƚƐĂƐƐŚŽǁŶŽŶƚŚĞŝůůƵƐƚƌĂƟŽŶ
ĂŶĚĂƐƐĞŵďůĞŝŶƚŚĞŽƌĚĞƌƐŚŽǁŶŝŶƚŚĞƉŝĐƚƵƌĞƐ͘Ž
ŶŽƚƟŐŚƚĞŶƚŚĞŶƵƚƐĨƵůůLJƵŶƟůƚŚĞĞŶƟƌĞƐƵďͲĨƌĂŵĞ
has been assembled.
W'ϮϰͳϮϳ͗KKZ^Et/EKt^
&ŽƌĞĂƐŝĞƌĂƐƐĞŵďůLJ͕ǁĞƌĞĐŽŵŵĞŶĚƚŚĂƚLJŽƵŽŝůƚŚĞ
ƐĐƌĞǁƐĨŽƌƚŚĞĚŽŽƌƐ͘dŚĞŐůĂƐƐŽƌƉŽůLJĐĂƌďŽŶĂƚĞĨŽƌ
ƚŚĞĚŽŽƌ;ƐͿĂŶĚǁŝŶĚŽǁƐŵƵƐƚďĞĮƩĞĚĂƚƚŚĞƐĂŵĞ
ƟŵĞĂƐƚŚĞƉƌŽĮůĞƐ͘
W'^ϯϬͳϯϳ͗&/dd/E'K&'>^^ͬ
POLYCARBONATE
/ŵƉŽƌƚĂŶƚďĞĨŽƌĞĂƐƐĞŵďůLJ͊
Make sure that the gables and sides are level
ĂŶĚƐƋƵĂƌĞĂŶĚƚŚĂƚĚŽŽƌ;ƐͿĂŶĚǁŝŶĚŽǁ;ƐͿĂƌĞ
ĨƵŶĐƟŽŶŝŶŐƉĞƌĨĞĐƚůLJ͘
The best order of assembly for the glass or
ƉŽůLJĐĂƌďŽŶĂƚĞŝƐĂƐĨŽůůŽǁƐ͗
tŝŶĚŽǁƐͲZŽŽĨͲŽŽƌƐͲ'ĂďůĞƐͲ^ŝĚĞƐ
W'ϯϬͳϯϯ͗'>^^/E^d>>d/KE
'ůĂƐƐŝŶƐƚĂůůĂƟŽŶ;ŝůůƵƐƚƌĂƟŽŶƐϭƚŽϴͿ
ĞŐƌĞĂƐĞƚŚĞƐŚĞĞƚƐĂŶĚĨƌĂŵĞƐǁŝƚŚƐƉŝƌŝƚ͘
^ƚĂƌƚŐůĂnjŝŶŐĨƌŽŵƚŚĞďŽƩŽŵ͕ŽŶĞƉĂŶĞĂƚĂƟŵĞ͘
ƉƉůLJĂϯŵŵƐŝůŝĐŽŶĞďĞĂĚĂƌŽƵŶĚƚŚĞǀĞƌƟĐĂů
ĨƌĂŵĞƐĂƐŝŶĚŝĐĂƚĞĚ;ƚŚĞĚŽƩĞĚůŝŶĞƐŽŶƚŚĞ
ŝůůƵƐƚƌĂƟŽŶͿ͘;ϯŵŵďĞĂĚŽĨƐŝůŝĐŽŶĞŝƐƐƵĸĐŝĞŶƚƚŽ
ĞŶƐƵƌĞŵĂdžŝŵƵŵĂĚŚĞƐŝŽŶͿ͘/ĨLJŽƵƵƐĞŵŽƌĞƐŝůŝĐŽŶĞ
ƚŚĂŶƌĞĐŽŵŵĞŶĚĞĚ͕ĞdžƚƌĂƚƵďĞƐĐĂŶďĞƉƵƌĐŚĂƐĞĚ͘
^ƉƌŝŶŐǁŝƌĞĐůŝƉƐĂŶĚŐůĂƐƐͲŚŽůĚĞƌƐŵƵƐƚďĞĮƩĞĚĂƐ
ƐŚŽǁŶ͘
yс^ƉƌŝŶŐǁŝƌĞĐůŝƉƐ͕хс'ůĂƐƐͲŚŽůĚĞƌƐ
/ĨLJŽƵĂĐĐŝĚĞŶƚĂůůLJďƌĞĂŬĂƉĂŶĞ͕ĐĂƌĞĨƵůůLJƉƵůůƚŚĞ
ďƌŽŬĞŶŐůĂƐƐŽƵƚǁĂƌĚƐĂŶĚůŽŽƐĞŶƚŚĞƐŝůŝĐŽŶĞƵƐŝŶŐ
ĂƐŚĂƌƉĐƌĂŌŬŶŝĨĞ͘
ůĞĂŶƚŚĞƉƌŽĮůĞĐŽŵƉůĞƚĞůLJďĞĨŽƌĞŝŶƐĞƌƟŶŐĂŶĞǁ
pane of glass.
W'ϯϰͳϯϳ͗WK>zZKEd/E^d>>d/KE
dŚĞŝůůƵƐƚƌĂƟŽŶƐĂƚƚŚĞďŽƩŽŵŽĨƉĂŐĞƐϯϰͬϯϲƐŚŽǁ
ǁŚĞƌĞƚŽĮƚƚŚĞƉŽůLJĐĂƌďŽŶĂƚĞƐŚĞĞƚƐĂŶĚƐƚƌŝƉƐ͘dŚĞ
ƚLJƉĞĚĞƐŝŐŶĂƟŽŶƐƚĂƚĞƐƚŚĞůĞŶŐƚŚŝŶŵŝůůŝŵĞƚƌĞƐ͘/Ĩ
ĂĚũƵƐƚŵĞŶƚŝƐŶĞĐĞƐƐĂƌLJ͕ƵƐĞĂĮŶĞͲƚŽŽƚŚƐĂǁ͘
E͊dŽĂǀŽŝĚƚŚĞŐƌŽǁƚŚŽĨĂůŐĂĞ͕ƉƌĞǀĞŶƚƚŚĞ
ƉŽůLJĐĂƌďŽŶĂƚĞƐŚĞĞƚƐĨƌŽŵĐŽŵŝŶŐŝŶƚŽĐŽŶƚĂĐƚǁŝƚŚ
ƚŚĞŐƌŽƵŶĚďLJƌĞƐƟŶŐƚŚĞŵŽŶĂƐŚĞĞƚŽĨĐĂƌĚďŽĂƌĚ͘
ͲƐƚƌŝƉƐĂƌĞĮƩĞĚĂƐƐŚŽǁŶŽŶƉĂŐĞƐϯϱͬϯϳ͘/ŶƐĞƌƚ
ƚŚĞƐŚĞĞƚŝŶƚŽƚŚĞďŽƩŽŵƐƚƌŝƉ͕ďĞŶĚƚŚĞƐŚĞĞƚ
ƐůŝŐŚƚůLJŽƵƚǁĂƌĚƐĂŶĚŝŶƐĞƌƚŝƚŝŶƚŽƚŚĞƚŽƉƐƚƌŝƉ͘
DͲƐƚƌŝƉƐĂƌĞĮƩĞĚĂƐƐŚŽǁŶŽŶƉĂŐĞƐϯϱͬϯϳ͘WůĂĐĞ
the upper part of the strip under the aluminium
ƉƌŽĮůĞĂůŽŶŐƚŚĞĨƵůůůĞŶŐƚŚŽĨƚŚĞƐŚĞĞƚĂŶĚƚŚĞŶ
ĐůŝĐŬƚŚĞƐƚƌŝƉŝŶƚŽƉŽƐŝƟŽŶĨƌŽŵĂďŽǀĞ͘
hͲƐƚƌŝƉƐĂƌĞĮƩĞĚĂƐƐŚŽǁŶŽŶƉĂŐĞƐϯϱͬϯϳ͘
Fit the strip to the sheet and adjust the length.
/ĨĚĞƐŝƌĞĚ͕ƚŚĞƐŚĞĞƚƐŵĂLJďĞƐĞĂůĞĚĂŐĂŝŶƐƚŝŶƐĞĐƚƐ͘
^ĞĂůƚŚĞƚŽƉƵƐŝŶŐĂůƵŵŝŶŝƵŵƚĂƉĞŽƌƐŝůŝĐŽŶĞ͘dŚĞ
ďŽƩŽŵƐŚŽƵůĚŽŶůLJďĞƐĞĂůĞĚǁŝƚŚĂŝƌͲƐƚƌŝƉƚĂƉĞƚŽ
ĂůůŽǁĐŽŶĚĞŶƐĂƟŽŶƚŽĞƐĐĂƉĞ;ĂǀĂŝůĂďůĞĨƌŽŵLJŽƵƌ
ůŽĐĂůĚĞĂůĞƌͿ͘
zŽƵƌŐƌĞĞŶŚŽƵƐĞŝƐŶŽǁĨƵůůLJĂƐƐĞŵďůĞĚ͘,ŽǁĞǀĞƌ͕
ƉůĞĂƐĞŶŽƚĞƚŚĞĨŽůůŽǁŝŶŐ͗
MAINTENANCE
ͻ
'ƌĞĂƐĞƚŚĞĚŽŽƌƐ;ŚŝŶŐĞƐĂŶĚůŽĐŬƐͿ͘
ͻ
<ĞĞƉƚŚĞŐƵƩĞƌƐĨƌĞĞĨƌŽŵůĞĂǀĞƐ͕ĞƚĐ͘
ͻ
ĚũƵƐƚƚŚĞǁŝŶĚŽǁƐĂƐŶĞĐĞƐƐĂƌLJ͘
ͻ
ZĞƉůĂĐĞĂŶLJďƌŽŬĞŶŐůĂƐƐ͘
ͻ
ůĞĂŶƚŚĞŐƌĞĞŶŚŽƵƐĞǁŝƚŚĚŝƐŝŶĨĞĐƚĂŶƚďĞĨŽƌĞ
ĂŶĚĂŌĞƌƚŚĞŐƌŽǁŝŶŐƐĞĂƐŽŶ͘
t/EdZWZKdd/KE
/ĨLJŽƵĂŶƟĐŝƉĂƚĞƐŶŽǁĚƵƌŝŶŐƚŚĞǁŝŶƚĞƌ͕ǁĞ
ƌĞĐŽŵŵĞŶĚƚŚĞĨŽůůŽǁŝŶŐǁŝŶƚĞƌƉƌĞĐĂƵƟŽŶƐ͗
ͻ
^ƵƉƉŽƌƚƚŚĞĂƉĞdžŽĨƚŚĞƌŽŽĨŝŶƚŚĞŵŝĚĚůĞ͘
ͻ
ZĞŵŽǀĞĂŶLJĚĞĞƉƐŶŽǁĨƌŽŵƚŚĞƌŽŽĨ͘
ͻ
dĂŬĞƉƌĞĐĂƵƟŽŶƐƚŽƉƌĞǀĞŶƚƐŶŽǁĨĂůůŝŶŐĨƌŽŵ
ĂƚƌĞĞŽƌƌŽŽĨ͕ĨŽƌĞdžĂŵƉůĞ͘
ͻ
ZĞŵŽǀĞƚŚĞĐLJůŝŶĚĞƌƐĨŽƌƚŚĞĂƵƚŽŵĂƟĐ
ǁŝŶĚŽǁŽƉĞŶĞƌƐ͕ŝĨĮƩĞĚ;ŽƉƟŽŶĂůĞdžƚƌĂƐͿ͘
ͻ
^ĞĐƵƌĞƚŚĞĚŽŽƌ;ƐͿĂŶĚǁŝŶĚŽǁ;ƐͿƚŽƉƌĞǀĞŶƚ
ǁŝŶĚĚĂŵĂŐĞƚŽƚŚĞŐƌĞĞŶŚŽƵƐĞ͘
tdZEKEE^d/KE
WůĞĂƐĞŶŽƚĞƚŚĂƚLJŽƵƌŐƌĞĞŶŚŽƵƐĞŝƐŶŽƚůŝŬĞĂ
ĐŽŶƐĞƌǀĂƚŽƌLJ͕ĨŽƌĞdžĂŵƉůĞ͕ĂŶĚƚŚĂƚLJŽƵƐŚŽƵůĚ
ƚŚĞƌĞĨŽƌĞďĞĂǁĂƌĞƚŚĂƚƚŚĞŐƌĞĞŶŚŽƵƐĞŵĂLJůĞĂŬ
ĚƵƌŝŶŐŽƌĂŌĞƌƉƌĞĐŝƉŝƚĂƟŽŶĂŶĚƚŚĂƚĐŽŶĚĞŶƐĂƟŽŶ
ǁŝůůŽĐĐƵƌŽŶƚŚĞŝŶƐŝĚĞŽĨƚŚĞŐƌĞĞŶŚŽƵƐĞ͘'ŽŽĚ
ǀĞŶƟůĂƟŽŶǁŝůůŚĞůƉƉƌĞǀĞŶƚĐŽŶĚĞŶƐĂƟŽŶ͘
INSURANCE
WůĞĂƐĞŶŽƚĞƚŚĂƚŶŽƚĂůůŝŶƐƵƌĂŶĐĞĐŽŵƉĂŶŝĞƐĐŽǀĞƌ
ŐƌĞĞŶŚŽƵƐĞƐĂƵƚŽŵĂƟĐĂůůLJ͘WůĞĂƐĞĐŽŶƚĂĐƚLJŽƵƌ
ŝŶƐƵƌĂŶĐĞĐŽŵƉĂŶLJƚŽĞŶƐƵƌĞƚŚĂƚLJŽƵƌŐƌĞĞŶŚŽƵƐĞ
ŝƐĐŽǀĞƌĞĚ͘
GUARANTEE
:ƵůŝĂŶĂŐƌĞĞŶŚŽƵƐĞƐĂƌĞĐŽǀĞƌĞĚďLJĂϭϮͲLJĞĂƌ
ŐƵĂƌĂŶƚĞĞ͕ǁŚŝĐŚĐŽǀĞƌƐƚŚĞƌĞƉůĂĐĞŵĞŶƚŽƌƌĞƉĂŝƌ
ŽĨĨĂƵůƚLJƉĂƌƚƐ͘dŚĞŐƵĂƌĂŶƚĞĞĚŽĞƐŶŽƚĐŽǀĞƌ
ƉŽůLJĐĂƌďŽŶĂƚĞ͕ŐůĂƐƐ͕ƚƌĂŶƐƉŽƌƚ͕ĂƐƐĞŵďůLJ͕ĨƌĞŝŐŚƚ͕
ĞƚĐ͘
:ƵůŝĂŶĂŐƌĞĞŶŚŽƵƐĞƐĂƌĞĐŽǀĞƌĞĚďLJĂƚǁŽͲLJĞĂƌ
ǁĂƌƌĂŶƚLJŽŶƉĂŝŶƚĞĚƉĂƌƚƐ͕ǁŚĞƌĞĮƩĞĚ͘EŽƚĞƚŚĂƚ
ŵĂƌŬƐŽŶƚŚĞƉĂŝŶƚŵĂLJŽĐĐƵƌĚƵĞƚŽƐƵƐƉĞŶƐŝŽŶŽĨ
ƚŚĞƉƌŽĮůĞƐ͘
dŚĞŐƵĂƌĂŶƚĞĞǁŝůůďĞǀŽŝĚŝĨƚŚĞŐƌĞĞŶŚŽƵƐĞŝƐŶŽƚ
ĂƐƐĞŵďůĞĚŝŶĂĐĐŽƌĚĂŶĐĞǁŝƚŚƚŚĞƐĞŝŶƐƚƌƵĐƟŽŶƐ͘
COMPLAINTS
All our greenhouses are built to the highest quality
ƐƚĂŶĚĂƌĚƐ͘,ŽǁĞǀĞƌ͕ƐŚŽƵůĚLJŽƵĞdžƉĞƌŝĞŶĐĞĂŶLJ
ƉƌŽďůĞŵƐ͕ƉůĞĂƐĞĐŽŶƚĂĐƚLJŽƵƌĚĞĂůĞƌĂƚŽŶĐĞ͘tŚĞŶ
ĚĞƐĐƌŝďŝŶŐƚŚĞĚĞĨĞĐƚ͕ƉůĞĂƐĞƐƚĂƚĞƚŚĞŐƌĞĞŶŚŽƵƐĞ
ŵŽĚĞů͕ƚŚĞĐŽŵƉŽŶĞŶƚŶƵŵďĞƌĂŶĚƚŚĞƋƵĂůŝƚLJ
ĐŽŶƚƌŽůŶƵŵďĞƌ͘
ŽŶŐƌĂƚƵůĂƟŽŶƐŽŶLJŽƵƌŶĞǁŐƌĞĞŶŚŽƵƐĞ͕ǁŚŝĐŚǁĞ
ŚŽƉĞǁŝůůďƌŝŶŐLJŽƵĂůŽƚŽĨƉůĞĂƐƵƌĞĨŽƌŵĂŶLJLJĞĂƌƐ
ƚŽĐŽŵĞ͘
zŽƵƌƐƐŝŶĐĞƌĞůLJ͕
Juliana Drivhuse A/S


