Group II, III Installation Method
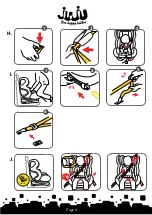
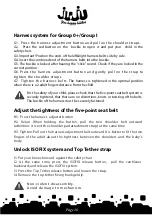
J1. Rotate the chair forward, adjust the angle of the chair to 1st-gear, and install
the ISOFIX
system
.
J2. Let the child sit in the chair, pass the seat belt through the three points above,
and fasten it.
J3. Tighten the three-point seat belt to ensure that the seat belt is not distorted.
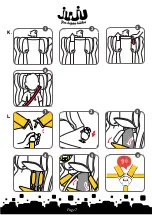
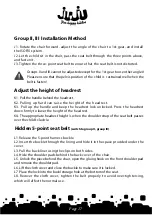
Adjust the height of headrest
K1. Pull the handle behind the headrest.
K2. Pulling up hard can raise the height of the headrest.
K3. Pull up the handle and keep the headrest lock unlocked. Press the headrest
down firmly to lower the height of the headrest.
K4. The appropriate headrest height is when the shoulder strap of the seat belt passes
over the child's clavicle.
Hidden 5-point seat belt
(switch to group II, group III)
L1. Release the 5-point
harness
buckle
L2.
Insert the buckle through the lining and hide it in the space provided under the
cover.
L3.
Pull the back liner using the clips on both sides.
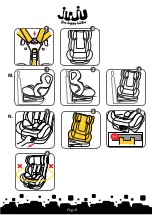
L4. Hide the shoulder pads
behind the back cover of the chair.
L5. Unlock the piece behind the chair, open the gluing hook on the front shoulder pad
and remove the shoulder pad.
L6. Lift the cloth cover and close the buckle to make sure it is locked.
L7.
Place the lock into the buckl storage hole at the bottom of the seat.
L8. Recover the cloth cover, tighten the belt properly to avoid over-tighten-ing,
which will affect the normal use.
Groups II and III cannot be adjusted except for the 1st gear to use other angles!
Please ensure that the pelvis position of the child is restrained well when the
belt is fasten!
Page 17
Summary of Contents for Complete 360
Page 1: ...Car eat User Manual EN EN EN RO EN BG EN HU EN PL Complete 360 Group 0 I II III 0 36kg ...
Page 2: ...13 11 12 14 7 5 4 2 9 6 3 1 8 10 A C B 3 1 2 ...
Page 4: ...E F 1 Reverse R gear 2 3 4 2 3 1 ISO FIT 4 5 6 嗒 Page 4 ...
Page 5: ...7 2 1 3 4 6 5 7 G Page 5 ...
Page 6: ...2 1 3 H I 1 3 4 2 2 J 2 3 1 ISO FIT 嗒 Page 6 ...
Page 7: ...2 1 K 1 3 4 2 2 2 1 5 3 4 6 L Page 7 ...

