background image


6-19 

6 Operation Settings 


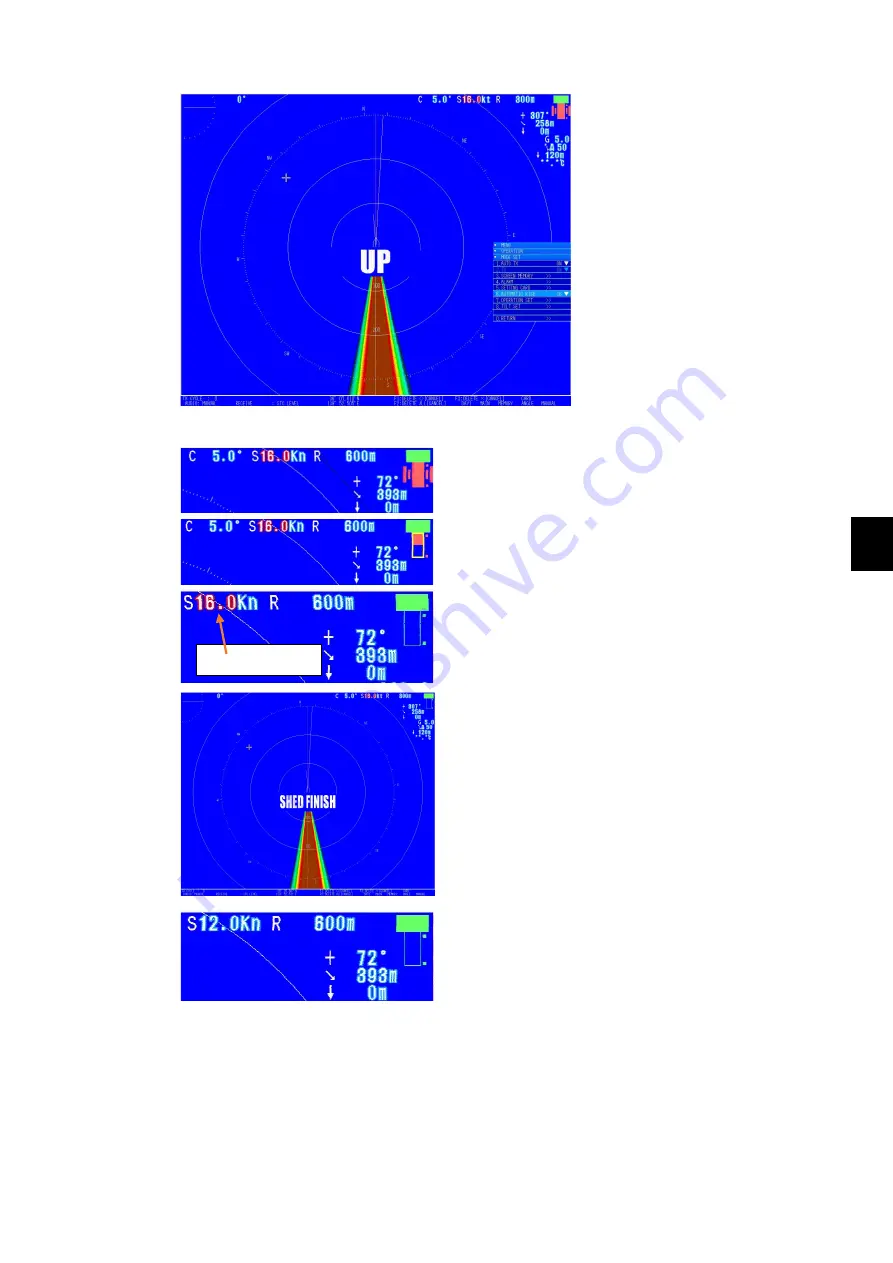
1. If the ship's speed exceeds 16 
knots, the ship's speed display turns 
red. 
2. "UP" appears in the middle of the 
screen. At the same time, the 
hoisting device buzzer starts 
sounding and storage operations 
start after two seconds. As soon as 
the buzzer sounds, move away from 
the hoisting device. 


3. After a few seconds storage is complete and the 
hoisting device's buzzer turns off, and a storage 
complete message appears on screen. 
4. It is not possible to do extension operations until the 
ship's speed is below the set speed.  Also, the ship's 
speed continuous to be displayed in red. 


Storage starts 2 seconds after "UP" is displayed 


Storage complete 


The storage complete display appears on the screen. 


When the ship's speed falls below the set value, the 
ship's speed display changes to its normal color. 
Extension is now possible. 


Displayed in red 

Summary of Contents for JFS-280

Page 1: ...ONAR ISO 9001 ISO 14001 Certified MAY 2019 Edition 5 CODE No 7ZPNA2401 Not use the asbestos For further information contact URL Head office http www jrc co jp eng Marine Service Department 1 7 32 Tats...

Page 2: ......

Page 3: ...A General Information Before you begin 7ZPNA2401...

Page 4: ......

Page 5: ...ed volts may sometimes lead to a death from electric shock When you touch any parts inside these devices before doing so you should make it a rule to turn off the power switch to prevent such an accid...

Page 6: ...inued rhythmically 1 Tell the accident to persons near there loudly and ask them to gather 2 Do not touch the victim confusedly as result of the accident or rescuer may also get an electric shock 3 Tu...

Page 7: ...into one of the victim s nostrils and take a deep breath and blow into it blocking the victim s other nostril and mouth completely 6 When the victim recovers consciousness the victim may try to stand...

Page 8: ...his beast 50 times minute or so Cardiac massage 2 In case of one rescuer Repeat cardiac massages about 15 times and blow into his mouth 2 times quickly and repeat his combination 3 In case of two res...

Page 9: ...for breathing Give CPR 30 Chest compressions Give 2 rescue breaths omittable Arrival of an AED Turn on the power Use the AED by following its voice pompts Fitting of the electrode pads etc Automatic...

Page 10: ...It the person opens his her eyes or there is some response or gesture determine it as responding But if there is no response or gesture determine it as not responding 3 If responding a Give first aid...

Page 11: ...y position in the opposite direction every 30 minutes 7 Give 2 rescue breaths omittable a If opening the airway does not cause the injured or ill person to begin to breathe normally give rescue breath...

Page 12: ...cking your elbows positioning yourself vertically above your hands With each compression depress the chest wall to a depth of approximately 4 to 5 cm b Combination of 30 chest compressions and 2 rescu...

Page 13: ...om the chest abdomen and arms male or emale b Open the package of electrode pads peel the pads off and securely place them on the chest of the injured or ill person with the adhesive side facing the c...

Page 14: ...ck is delivered the body of the injured or ill person may jerk 14 Resume cardiopulmonary resuscitation CPR Resume CPR consisting of 30 chest compressions and 2 rescue breaths by following the voice Pr...

Page 15: ...pyards or customer s yards etc 6 Work at high places Use a safety belt surely Be careful enough not to drop your tools below 7 Transportation Do not lift heavy equipment etc over 30 kg alone While tra...

Page 16: ...uipment Use a camera after obtaining permission In particular onboard ships carrying dangerous cargos use flash after obtaining permission While downloading data from VDR etc and updating software of...

Page 17: ...should be carried out under observation of ship s qualified persons 8 3 Dummy antenna may be used during adjustment of transmitters if possible 8 4 Whatever equipment may be operated distress signals...

Page 18: ...ruction manual in a safe place so you can refer to it as needed It will be useful should you happen to not understand while you are using the system or if problems occur Thank you for purchasing our J...

Page 19: ...ed if this indication is neglected and this equipment is not operated correctly This indication is shown where any person is supposed to be injured or any property damage is supposed to occur if this...

Page 20: ...or it begins must to help by cutting the board and it must revive afterwards when you discover the person who got an electric shock by any chance by artificial respiration and a general technique Do...

Page 21: ...ight cause the leak doing and the breakdown by the dewfall Use it after leaving about 30 minutes for this case Caution of a ship bottom and equipment check 1 Connect the ground lead with the ground te...

Page 22: ...30m STD 10m Fix 10m Fix Hoisting device NKF 2800 Keyboard NCH 578 Processor NJC 31 24V DC AC DC Rectifier Display NWZ 207 TX RX unit NTB 23 24V DC 24V DC 24V DC 100V AC Storage tank Speaker Transduce...

Page 23: ...nd the current meter Log Short form of speed log TX PRR Transmission pulse repetition rate Clutter Various noises from under the sea and the surface of the sea that should be removed ADC Acronym for a...

Page 24: ...ar may become inoperable which may pose a problem for work and safety aboard ship Also repairs and replacement of the transducer or hoisting device is very expensive and time consuming To prevent this...

Page 25: ...the image range RANGE Tilt angle and GAIN 3 6 3 1 2 Storing the transducer and turning off the power 3 7 3 1 3 Menu Configuration 3 8 3 2 About Menus 3 8 3 2 1 Basic Menu Operations 3 14 3 2 2 Selecti...

Page 26: ...h 5 4 5 1 3 Images and Effects of Own Ship s Wake and the Wakes of Other Ships 5 5 5 2 Settings for Fish Echoes 5 6 5 2 1 Signal Reception Settings 5 6 5 2 1 1 Clutter Settings 5 6 5 2 1 2 STC LEVEL 5...

Page 27: ...al Reception Clutter 5 26 5 2 4 3 2 RX WIDTH 5 26 5 2 4 3 3 STC RANGE 5 27 5 2 4 3 4 Range of the Time Varied Gain 5 27 5 2 4 4 Settings for Signal Transmission and Reception Calibration 5 28 5 2 4 4...

Page 28: ...e of Motion 6 20 6 1 7 2 Knob Operations 6 21 6 1 8 Setting the Tilt 6 21 6 1 8 1 Tilt Step Settings 6 22 6 1 8 2 Long Distance Tilt Adjustments 6 22 6 2 Display Mode Settings 6 23 6 2 1 Information D...

Page 29: ...School Information 6 49 6 4 4 1 1 Detection Area 6 50 6 4 4 1 2 Mark Size 6 50 6 4 4 2 Display Settings for the Water Temperature Graph 6 51 6 4 4 3 Displays 6 52 6 4 4 3 1 Display time 6 53 6 4 4 3...

Page 30: ...1 9 Settings for the Display of the Cursor Direction 6 72 6 6 2 Selecting What Marks to Display 6 73 6 6 2 1 Settings for the Audio Mark 6 73 6 6 2 2 Settings for the Heading Mark 6 74 6 6 2 3 Settin...

Page 31: ...settings 7 10 7 2 2 5 GPS 7 10 7 2 2 6 Log Settings 7 10 7 2 2 7 Sensor Set Settings 7 11 7 2 2 8 Course Settings 7 11 7 2 2 9 Speed Settings 7 11 7 2 2 10 Direction Mark Settings 7 12 7 2 2 11 Lat L...

Page 32: ...s 7 27 7 2 7 4 Range Special Settings 7 27 7 3 System Select Settings 7 28 7 4 Cancelling Registrations 7 29 7 4 1 User Menus 7 30 7 4 2 User Defined Keys 7 31 7 4 3 Multi Knob Key 7 31 7 5 Maintenanc...

Page 33: ...R MAINTENANCE 9 5 Checking OK MONITOR 9 5 Checking the Test Pattern 9 5 10 Disposal 10 1 10 1 Disposing of the Device 10 3 10 2 Disposing of the Battery 10 3 11 Specifications 11 1 11 1 Specifications...

Page 34: ......

Page 35: ...uipment 2 Names and Functions of Parts 3 Operating procedures 4 Operations 5 Adjusting how images appear 6 Operation settings 7 Other items 8 Maintenance and inspections 9 Malfunctions and after sales...

Page 36: ......

Page 37: ...equipment 1Overview of the equipment Contents 1 Overview of the equipment 1 1 Functions 1 3 1 1 System functions 1 3 1 1 1 Features 1 4 1 2 Configuration 1 5 1 3 Structural diagrams 1 6 1 4 Overall sy...

Page 38: ...1 Overview of the equipment 1 2 1...

Page 39: ...ves detection performance This sonar operates on 24 VDC and is built for small boats with an all directional stabilizer function System functions 1 1 1 Major functions of the JFS 280 series All direct...

Page 40: ...ay unit runs on DC so it can be installed on small boats that do not have AC power with no added equipment Super luminous and high resolution large screen is easy to see New model LCD display unit pro...

Page 41: ...A 600 mm stroke Commu cable CFQ 5546 1 30 m from processor to transmitter receiver unit Hoist cable CFQ 5552 1 10 m from hoist to transmitter receiver unit Installation materials 1 Spare parts 1 Instr...

Page 42: ...grams 1 4 Display NWZ 207 Exterior view Diagram 1 1 Keyboard NCH 578 Exterior view Diagram 1 2 Processor NJC 31 Exterior view Diagram 1 3 Transmitter receiver unit NTB 23 Exterior view Diagram 1 4 Hoi...

Page 43: ...1 7 1 Overview of the equipment 1 Diagram 1 1 Exterior view of the NWZ 207 display unit...

Page 44: ...1 Overview of the equipment 1 8 1 Diagram 1 2 Exterior view of the NCH 578 keyboard...

Page 45: ...1 9 1 Overview of the equipment 1 Weight Approximately 15 kg Units mm Diagram 1 3 Exterior view of the NJC 31 processor...

Page 46: ...1 Overview of the equipment 1 10 1 Diagram 1 4 Exterior view of NTB 23 transmitter receiver unit Weight Approximately 34 kg Units mm...

Page 47: ...1 11 1 Overview of the equipment 1 Diagram 1 5 Exterior view of the NKF 2800 hoisting device...

Page 48: ...VDC 3A DPYC 2 5 24VDC 13A DPYC 6 0 Hoisting device NKF 2800 CFQ 5552 CFQ 5546 24VDC 5A DPYC 2 5 Max 30A at start SHED and FALL CN1 CN4 CN5 CN8 CN9 CN12 CN13 CN16 Yard supply CFQ 5553 1 CFQ 5553 2 CFQ...

Page 49: ...Parts Contents 2 Names and Functions of Parts 2 1 Names of On screen Functions 2 3 2 1 Full screen Information display OFF 2 3 2 1 1 Normal screen Information display ON 2 4 2 1 2 Transducer status di...

Page 50: ...2 Names and Functions of Parts 2 2 2...

Page 51: ...ship s speed sensor 3 There are three types of direction displays relative north direction and relative north direction Refer to section 6 6 1 5 4 A maximum of eight MULTI knobs can be registered Refe...

Page 52: ...LTI knobs can be registered Refer to item 4 3 4 for how to register and clear them 5 Three user keys can be registered F1 F2 and F3 Refer to item 4 3 3 for how to register and clear them 6 Normally it...

Page 53: ...Stored Extended On screen display No display DOWN DOWN FALL FINISH Operation status Extending Storage operation starts Storing Storage complete Hoisting buzzer OFF ON ON OFF Extended Stored On screen...

Page 54: ...peration starts automatically If the retraction limit does not change to Connected within 45 seconds the top and bottom frames flash which indicates hoisting is abnormal Retraction starts automaticall...

Page 55: ...2 7 2 Names and Functions of Parts 2 Names and Functions of the Keyboard 2 2 Diagram 2 Controls...

Page 56: ...m the hoisting device PANEL key Every time this key is pressed the panel lighting gets incrementally brighter When the brightest level is reached the setting returns to the dimmest setting There are f...

Page 57: ...e width and center when doing automatic sound detection Menu key Press this key to open the menu When the menu is open press this button again to close the menu regardless of the current menu level RA...

Page 58: ...y displayed but the marks in the graph also disappear Use the number 5 key while the menu is open to do operations 6 buoy key Press this key to display a mark at the ship s position A maximum of 10 ca...

Page 59: ...ng By setting the menus you can display the directions as relative north direction or relative north direction For details refer to the Operation settings and the Screen settings sections A maximum of...

Page 60: ...psed since the OFF CENT key was pressed you can change the Tx pulse repetition rate The Tx pulse repetition rate increases by 20 each time it is pressed It moves an item or a selection up one level wh...

Page 61: ...ion use REGISTRATION CANCEL for menus and other items For details refer to the Operation and registration and MULTI knob registration sections Refer to the section about the list of menus for details...

Page 62: ...s are open Every time you press this key the information screen changes from displayed to hidden Trackball Use the trackball to move the cursor to any position Use it to do settings in all the modes I...

Page 63: ...3 7 3 1 3 Menu Configuration 3 8 3 2 About Menus 3 8 3 2 1 Basic Menu Operations 3 14 3 2 2 Selecting Items 3 15 3 2 3 Entering values 3 20 3 2 4 Getting Started 3 23 3 3 Adjusting the screen brightn...

Page 64: ...3 Operating procedures 3 2 3 TRACK LINE 3 26 3 3 8 Sonar range setting 3 26 3 3 9 Stabilize 3 27 3 3 10...

Page 65: ...nything on the controls Especially do not put anything hot on the controls as it may deform them Do not hit the controls trackball or knobs Doing so may damage them Precautions Turning on the power an...

Page 66: ...econds and then the buzzer stops The transducer mark is completely red and at the same time transmissions are started automatically by the AUTO TX operation Refer to 2 1 3 Examples of transducer statu...

Page 67: ...ions The sonar s hoisting device cannot be stopped while extending or storing To prevent accidental operations it does not extend if the button is pressed only briefly The storage up operation starts...

Page 68: ...angle shallower toward the sea s surface Turn it to the right clockwise to make the sonic beam s tilt angle deeper toward the sea floor The tilt angle can be incremented in steps of 1 from 5 to 60 Cha...

Page 69: ...g the POWER key and the PANEL key at the same time stores the transducer and after it is stored automatically turns off the power However to be safe store the transducer before turning off the power I...

Page 70: ...ry of the titles of submenus that have been accessed Menu item Functions on menus that can be selected Item name Description of menu items Item value Values set for menu items Pulldown list List used...

Page 71: ...wn below Move between menus up or down the hierarchy or within levels Selecting pulldown lists Input window display N A Menu title The title of the menu that is currently open is displayed Menu histor...

Page 72: ...n met depending on the items selected for the menu item For example the display shown below is when a fish finder is not connected In the above case the fish finder device for finding fish is connecte...

Page 73: ...ves you to a submenu or returns you to the menu from which you accessed it Press the MENU key to open the menus When there is a mark in the item value it moves you to the next menu In the example on t...

Page 74: ...e 3 key or the MULTI knob opens the pull down menu The number of menus varies depending on the item In this example 1 OMNI is currently selected To change it press the 2 key or select it and then pres...

Page 75: ...3 13 3 Operating procedures 3 Input screen example Time setting input screen Range setting input screen Color setting input screen...

Page 76: ...om any position in the menu hierarchy Closing menus Return to the first menu select RETURN and set it to close the menus If you are in the menu hierarchy to return to the first menu repeatedly select...

Page 77: ...bottom and then back to the top The following is an example of the first menu screen when the MENU key is pressed You can add from 1 to 6 menus with the user settings 2 To select a value or item from...

Page 78: ...ULTI knob again to display the RECEIVE hierarchy The hierarchy for RECEIVE is displayed Next if you press the MULTI knob the CLUTTER menu item appears If you turn the MULTI knob to the right and left...

Page 79: ...on the menu item the setting is reflected on the screen if the cursor is positioned on the menu item 4 To change the item you have just set move the cursor again Because the item is selected when the...

Page 80: ...ey or the number key for the item number while it is still selected to open a pulldown menu The following is an example of inputting changes to numerical values that are set from pulse length selectio...

Page 81: ...e ENT key to set the selected value 5 The setting is reflected on the screen while the selection is selected depending on the menu item 6 When changing an item that you just selected that is still sel...

Page 82: ...Turn the MULTI knob to the right to increase the value one step Turn it to the left to decrease the value one step 3 If the number exceeds the upper or lower limits a buzzer sounds and the value does...

Page 83: ...value exceeds the decimal places that can be input the extra numbers are invalid If a value has already been entered input a 0 if you want to input a value that has fewer digits than the maximum Exam...

Page 84: ...rrow keys 1 You can increase or decrease the value of items with the and keys by moving to a screen in which item values can be changed while a Menu is displayed Set the value that you want to set and...

Page 85: ...rightness 3 3 2 Operating procedure Press the PANEL key Press the PANEL key up to five times to increase the brightness through five levels Press it again to return to the least bright setting Note th...

Page 86: ...usting the Volume Option 3 3 4 Operating procedure Speakers are options 6USFD00010 Turn the VOL knob to the left or right to adjust the volume Turn it to the right to increase the volume and turn it t...

Page 87: ...e You can set the sonar display to a maximum of 32 colors and the fish finder to a maximum of 16 colors It is possible to select color patterns and colors for the text from the available colors You ca...

Page 88: ...E and press the MULTI knob to select 1 Hide 2 1H or 3 2H from the pulldown menu The initial value set for the track line is 2H two hours Sonar range setting 3 3 9 Operating procedure The sonar range h...

Page 89: ...SH IMAGE and press the MULTI knob to open the submenu Turn the MULTI knob to move to 4 TECHNOLOG SET and press the MULTI knob to open the submenu Turn the MULTI knob to move to 4 TX RX CALIB and press...

Page 90: ...3 Operating procedures 3 28 3...

Page 91: ...ual Sound Detection 4 5 4 1 4 Automatic Sound Detection 4 5 4 1 5 Transmission pulse repetition rate 4 7 4 1 6 Cursor Movements and Operations 4 8 4 1 7 Off Center Display 4 9 4 1 8 Operating and Clea...

Page 92: ...4 Operations 4 2 4 4 3 Registration 4 18 4 3 1 Registering a user menu 1 to 6 4 18 4 3 2 Registering the user defined keys F1 F2 and F3 4 20 4 3 3 Registering the MULTI knob 1 to 6 4 21...

Page 93: ...make the tilt angle deeper The sound waves that are emitted from the sonar have a tendency to spread You can search a wider range because the width of the emitted sound waves expand as they move away...

Page 94: ...settings for automatic centering center tilt In Auto Centering Turning the Tilt Angle knob to the right clockwise lowers the center value of the auto tilt angle by 1 towards the sea floor Also automat...

Page 95: ...LIT DISPLAY SET and AUDIO sections To adjust the volume of the audio turn the VOL knob on the controls to the left or right 4 1 4 Automatic Sound Detection Set the direction range of the screen and mo...

Page 96: ...hange the steps to 1 2 3 4 5 10 Sound detection direction moves automatically Maximum range 180 left to right of automatic sound detection Shows the range Direction moves automatically Sound detection...

Page 97: ...ssion pulse repetition rate Example Image of interference Example False echo image of the sea floor in shallow waters Ring shaped interference wave from other ships Example of changing the transmissio...

Page 98: ...u can input values in steps of 1 from MENU 4 1 6 Cursor Movements and Operations The cursor mark is used to specify positions in various operations The cursor mark is moved to positions by moving the...

Page 99: ...hange the position of your own ship There are three types of off center function Pressing the OFF CENT key gives 30 steps off center pressing and holding the OFF SET key moves the CURSOR and MEMORY PO...

Page 100: ...the key within 10 seconds after pressing the OFF CENT key your own ship s position moves in 30 steps in a clockwise direction If you press the key your own ship s position moves in 30 steps in a count...

Page 101: ...t the setting for 4 OFF CENTER is CURSOR POSITION The initial value is set to CURSOR POSITION Procedure to move off center to the cursor position Move the cursor to the position you want to move your...

Page 102: ...TI key to open the pulldown list Select 2 MEMORY POINT from the menu and press the MULTI knob to set it Procedure to register off center and procedure to move off center Move the cursor to the positio...

Page 103: ...ing Procedure Press the keys 8 1 4 1 to go to ALARM settings Press the MENU key to open the menus Turn the MULTI key to move to 8 OPERATION and press the MULTI knob to open the submenu Turn the MULTI...

Page 104: ...nd from position A cannot be found from position B as the ship moves forward because the fish are outside the sonic beam While the automatic tracking function is operating the tilt angle is changed as...

Page 105: ...to AUDIO settings Press the MENU key The menu opens Turn the MULTI knob to move to 8 OPERATION and press the MULTI knob to open the submenu Turn the MULTI knob to move to 2 DISPLAY MODE and press the...

Page 106: ...able the scales in AUDIO Press the MODE key to open the AUDIO screen 4 2 2 Fish finder display When lower left is selected When lower right is selected Display size Large Example When PARTITION SIZE i...

Page 107: ...key The menu opens Turn the MULTI knob to move to 8 OPERATION and press the MULTI knob to open the submenu Turn the MULTI knob to move to 2 DISPLAY MODE and press the MULTI knob to open the submenu T...

Page 108: ...to 6 There are 18 types of menu items that you can register to the user defined menus This allows you to easily open submenus Refer to the list of other menu items regarding the items that can be reg...

Page 109: ...er it to the first one turn the MULTI knob to move to 1 USER SET No 1 You can register a menu to any of the positions from 1 to 6 Press the MULTI knob to set it to 1 1 RECEIVE has been set Registratio...

Page 110: ...rn the MULTI knob to move to 8 OPERATION and press the MULTI knob to open the submenu Turn the MULTI knob to move to 3 DELETE MARK and press the MULTI knob to open the submenu Turn the MULTI knob to m...

Page 111: ...ms regarding the items that can be registered Operating Procedure This section explains the operations for the MULTI knob Registration procedure The procedures for registering RECEIVE CLUTTER and STC...

Page 112: ...screen Next register STC LEVEL The registration procedure is the same as for CLUTTER Press the MENU key to open the menu Turn the MULTI knob to move to 7 FISH IMAGE and press the MULTI knob to open t...

Page 113: ...s closed the items registered to the MULTI knob appear in their registered order If only one item is registered it does not change When the item you want to operate appears in the registered items pre...

Page 114: ...alue press the MULTI knob If you do not set it the value in the center of the screen disappears and the MULTI knob registration area returns to the registration item selection screen If you do not set...

Page 115: ...Ships 5 5 5 2 Settings for Fish Echoes 5 6 5 2 1 Signal Reception Settings 5 6 5 2 1 1 Clutter Settings 5 6 5 2 1 2 STC LEVEL 5 7 5 2 1 3 Settings for the Horizontal Beam 5 7 5 2 1 4 Settings for the...

Page 116: ...the Automatic Gain Control Mode 5 22 5 2 4 2 2 RCG LEVEL 5 22 5 2 4 2 3 SCAN AGC LEVEL 5 23 5 2 4 2 4 SLOW AGC ON OFF 5 23 5 2 4 2 5 FAST AGC ON OFF 5 24 5 2 4 2 6 SLOW AGC LEVEL 5 24 5 2 4 2 7 FAST A...

Page 117: ...The width of the sea floor is displayed as wide and the strength of the color of the sea floor is displayed as weak 2 Characteristics of the image of the sea floor when the tilt angle is lower than 20...

Page 118: ...n the sea floor Adjust the tilt angle according to the depth of the distribution of the school of fish and the depth of the sea floor and then search When searching for schools of fish in the middle l...

Page 119: ...3 Images and Effects of Own Ship s Wake and the Wakes of Other Ships 1 Example of an image of own ship s wake and the wakes of another ship Your own ship s wake and the wakes of other ships have char...

Page 120: ...nus for details 5 2 1 Signal Reception Settings RX is a submenu that is mainly used to suppress the reflection of the sea surface during inclement weather or when there is clutter in the sea 5 2 1 1 C...

Page 121: ...within 160 m of your own ship is stronger you can suppress the clutter by increasing this value It is normally used at around 3 0 The setting range for STC LEVEL is 0 0 to 10 0 Although this normally...

Page 122: ...Press the keys 7 1 4 to go to V BEAM settings Press the MENU key to display the menus Turn the MULTI knob to move to the 7 FISH IMAGE position Press the MULTI knob to open the submenu Turn the MULTI k...

Page 123: ...ust the power of transmissions For normal operations always use a maximum value of 10 Decreasing this value lowers detection performance Do not set TX POWER to 0 Doing so disables transmissions For no...

Page 124: ...POWER setting at 10 5 2 2 2 Settings for the Pulse Length You can set the pulse length of transmission waves Decrease this value to shorten pulse length Increase this value to lengthen it By shortenin...

Page 125: ...etting to 20 5 2 2 3 Transmission Mode Settings Transmission mode is an item that is set for scalability It is normally used at OMNI Operating Procedure Press the keys 7 2 3 to go to TX MODE settings...

Page 126: ...and adjusting this value between 1 and 2 is effective when it is hard to judge the distinction between images and the reflection of the sea surface even if you lower the tilt angle during inclement we...

Page 127: ...eys 7 2 6 to go to TX PRR settings Press the MENU key to display the menus Turn the MULTI knob to move to 7 FISH IMAGE Press the MULTI knob to open the submenu Turn the MULTI knob to move to 2 TX Pres...

Page 128: ...und equipment and interference from the sonars and various ultrasound equipment of other ships Make adjustments according to the types of fish fishing method condition of the sea port congestion etc O...

Page 129: ...tering values The initial value is set to 5 You can set the values from 0 to 20 in steps of 1 by turning the MULTI knob 5 2 3 3 Settings for Signal Processing R Process the correlations of received si...

Page 130: ...fish fishing method condition of the sea port congestion etc Operating Procedure Press the keys 7 3 4 to go to SIG PROCESS D settings Turn the MULTI knob to move to 4 SIG PROCESS D Press the MULTI kno...

Page 131: ...the MENU key to display the menus Turn the MULTI knob to move to 7 FISH IMAGE Press the MULTI knob to open the submenu Turn the MULTI knob to move to 4 TECHNOLOG SET Press the MULTI knob to open the s...

Page 132: ...ge is between 0 and 255 and can be set in steps of 1 The variable range for the volume of sensitivity becomes narrower by increasing this value It is normally set to the initial value 5 2 4 1 2 GOS Al...

Page 133: ...narrower by increasing this value It is normally set to the initial value 5 2 4 1 4 MAX GAIN This is a menu for doing settings for regulating the value for the maximum gain Normally use the standard...

Page 134: ...s set to the initial value 5 2 4 1 6 Settings for Time Varied Gain Medium Distance This is a menu for setting the slope of the ABS ATT curve the diffusion loss over medium distances Operating Procedur...

Page 135: ...ng differs in the fish image settings This value is normally set to 3 20 You can select the setting value from 1 0 2 10 3 20 4 30 and 5 40 Change this according to the types of fish and your method of...

Page 136: ...is normally set to RCG You can select the settings value from 1 OFF 2 RCG 3 AGC and 4 RCG AGC Change this according to the types of fish and your method of fishing 5 2 4 2 2 RCG LEVEL This is a menu i...

Page 137: ...0 and 255 and can be changed in steps of 1 Change this according to the types of fish and your method of fishing 5 2 4 2 4 SLOW AGC ON OFF This is a menu item for doing ON OFF settings for SLOW AGC T...

Page 138: ...differs in the fish image settings This value is normally set to ON Change this according to the types of fish and your method of fishing 5 2 4 2 6 SLOW AGC LEVEL This is a menu item for doing level s...

Page 139: ...is set to 64 This differs from the fish image settings The setting range of the value is between 0 and 255 and can be changed in steps of 1 Change this according to the types of fish and your method o...

Page 140: ...initial setting is set to 0 The setting range of the value is between 0 and 255 and can be changed in steps of 1 5 2 4 3 2 RX WIDTH This is a menu item that sets the beam control within the receiver...

Page 141: ...the value is between 0 and 1000 m and can be changed in steps of 1 m 5 2 4 3 4 Range of the Time Varied Gain This is a menu item that sets the distance of the TVG MID and FAR changeover points Operat...

Page 142: ...HNOLOG SET menu and turn the MULTI knob to move to 4 TX RX CALIB Press the MULTI knob to open the submenu Do the settings for submenus 1 through 7 5 2 4 4 1 Settings for Stabilize This is a menu item...

Page 143: ...alues The initial setting is set to 8 The setting range of the value is between 0 and 15 and can be changed in steps of 1 This equipment is set to 8 5 2 4 4 3 Settings for Gain Mode SW This is a menu...

Page 144: ...changed in steps of 1 It is normally always set to 0 5 2 4 4 5 Settings for Filter Shift Filter shift is an item that is set for scalability Operating Procedure Press the keys 7 4 4 5 to go to FILTER...

Page 145: ...the screen Operating Procedure Press the keys 7 4 5 to go to ADC settings Move to the TECHNOLOG SET menu and turn the MULTI knob to move to 5 ADC Press the MULTI knob to open the menu for entering va...

Page 146: ...C50 Squids sauries etc Wide weak echoes 3 0 400 to 200 20 Long 2 Medium 2 Weak RCG 20 30 D50 You want to move away from the sea floor Echoes from bottom fish 7 0 600 to 300 3 Short 3 Medium 2 Weak RC...

Page 147: ...ing How Images Appear 5 E Before pressing Turning the IMAGE knob while the value is displayed in red changes the value Increasing this value increases noise and decreasing it decreases noise After pre...

Page 148: ...5 Adjusting How Images Appear 5 34 5...

Page 149: ...4 6 1 4 Alarms 6 9 6 1 5 Setting Card 6 15 6 1 6 Automatic Storage Function 6 18 6 1 7 Operation Settings 6 20 6 1 8 Setting the Tilt 6 21 6 2 Display Mode Settings 6 23 6 2 1 Information Display Sett...

Page 150: ...y Settings 6 59 6 5 1 Split Mode Settings 6 59 6 5 2 Audio Display Settings 6 61 6 5 3 Display Settings for Fish Finder 6 64 6 6 Screen Settings 6 66 6 6 1 Settings for the Display of Numbers 6 66 6 6...

Page 151: ...go to AUTO TX settings Press the MENU key to open the menu Turn the MULTI knob to move to OPERATION Press the MULTI knob to open the submenu Turn the MULTI knob to move to MODE SET Press the MULTI kno...

Page 152: ...TI knob to move to the 2 TX menu Press the MULTI knob to display the pulldown menu Turn the MULTI knob and select On or Off 6 1 3 Screen Memory Card You can save or read the entire screen to and from...

Page 153: ...ILE from the pulldown menu and then press the MULTI knob to start saving When you start to write the screen WRITE appears in the lower right part of the screen as shown in the diagram on the left so y...

Page 154: ...ayed as shown in the diagram on the left In the example in the diagram on the left two files have been saved The file names list the last two digits of the year the month date hour minutes and seconds...

Page 155: ...knob to move to the 3 SCREEN MEMORY menu Press the MULTI knob to open the 3 SCREEN MEMORY submenu Turn the MULTI knob to select 3 DELETE FILE In the example in the diagram on the left you can see that...

Page 156: ...Turn the MULTI knob to move to MODE SET Press the MULTI knob to open the submenu Turn the MULTI knob to move to the 3 SCREEN MEMORY menu Press the MULTI knob to open the 3 SCREEN MEMORY submenu Turn...

Page 157: ...e submenu Turn the MULTI knob to move to 4 ALARM Press the MULTI knob to open the submenu for 4 ALARM 6 1 4 1 1 Alarm Operations You can turn the alarm operations on or off The initial value is set to...

Page 158: ...pen the submenu for ALARM to do ALARM operations Turn the MULTI knob to move to 2 ANGLE Press the MULTI knob to open the pulldown menu Turn the MULTI key to select the angle you want to use from 1 30...

Page 159: ...to open the submenu for ALARM to do ALARM operations Turn the MULTI knob to move to 3 DISTANCE Press the MULTI knob to open the menu for inputting values The initial value is set to 300 m The diagram...

Page 160: ...or ALARM to do ALARM operations Turn the MULTI knob to move to 4 AREA SIZE Press the MULTI knob to open the pulldown menu The initial value is set to Medium The area size is set to 10 20 or 30 for eac...

Page 161: ...1 Change the settings according to the conditions of the sea and the type of fish school 6 1 4 6 Amount Settings This section explains how to set the amount that must be within the alarm range that i...

Page 162: ...initial setting is set to Low This also changes depending on the range used for this function Setting values can be selected from Low Mid High and Continuous Operating Procedure Press the keys 8 1 4...

Page 163: ...hat have been stored on the card You can easily change settings by accessing and using setting values that have been stored in advance If you need to change the settings such as when changing the type...

Page 164: ...the MULTI knob displays the 1 SETTING WRITE FILE menu Press the MULTI knob again to open the pulldown menu Turn the MULTI knob to select 2 WRITE Press the MULTI knob to set it and start writing The pu...

Page 165: ...e the menu closes and the Delete selection screen opens As shown in the example diagram on the left you can see that the file has been deleted Press the MENU key to close all the menus and finish 6 1...

Page 166: ...OMATIC RISE settings Press the MENU key to display the menus Turn the MULTI knob to select 8 MODE SET Press the MULTI knob to open the submenu Turn the MULTI knob to select 6 AUTOMATIC RISE Press the...

Page 167: ...seconds storage is complete and the hoisting device s buzzer turns off and a storage complete message appears on screen 4 It is not possible to do extension operations until the ship s speed is below...

Page 168: ...ATION SET Press the MULTI knob to open the submenu The diagram on the left is the submenu of OPERATION SET 6 1 7 1 Pointer Cursor Mark Distance of Motion Set the speed of the motion of the pointer cur...

Page 169: ...he MULTI knob to select one and press the MULTI knob to set it Close the menu to complete the settings 6 1 8 Setting the Tilt This section explains how to set the tilt step step angle when doing autom...

Page 170: ...a distance approaches your own ship At a distance the vertical beam is wide if for example the tilt angle is set to 0 when a nearby fish school is detected 800 m ahead at a depth of 50 m the person op...

Page 171: ...MULTI knob to select an item from 1 to 4 Press the MULTI knob to open the submenu and do the settings 6 2 1 Information Display Settings This section explains the settings to always display the infor...

Page 172: ...6 Area Top Middle Bottom In the information display area you can split the area to show 3 of the following 5 items from 2 to 6 If the information is displayed 1 SHIP INFO is fixed in the top position...

Page 173: ...ess the keys 8 2 2 to go to RM settings Turn the MULTI key to select 2 RM Press the MULTI knob to select 1 Hup or 2 Nup from the pulldown menu 1 Hup is the own ship heading 2 Nup is the north directio...

Page 174: ...connected the fish finder in the INITIAL SENSOR CONNECTION settings 6 2 3 1 Audio You can also display the image of the direction of the sound you are hearing To display it you need to press the DISPL...

Page 175: ...lldown menu Turn the MULTI key to select 2 OK Press the MULTI key to set 2 OK After doing the above settings press the DISPLAY MODE key to display the split display as shown in the diagram on the left...

Page 176: ...g the OFF CENT key while this menu is open Operating Procedure Press the keys 8 2 4 to go to OFF CENTER settings Open the DISPLAY MODE menu Turn the MULTI key to select 4 OFF CENTER Press the MULTI ke...

Page 177: ...o register a function key F1 to F3 to delete marks that you often use Operating Procedure Press the keys 8 3 to go to DELETE MARK settings Press the MENU key to display the menus Turn the MULTI knob t...

Page 178: ...edure Press the keys 8 3 1 to go to DELETE TRACK settings Follow the operations for deleting marks Open the DELETE MARK menu Turn the MULTI knob to select 1 DELETE TRACK Press the MULTI knob to open t...

Page 179: ...this menu you can delete all the marks If you often use the fish school mark we recommend registering this function to one of the F1 to F3 keys Operating Procedure Press the keys 8 3 2 to go to DELET...

Page 180: ...d direction from your own ship With this menu you can delete the X marks Operating Procedure Press the keys 8 3 3 to go to DELETE X MARKS settings Follow the operations for deleting marks Open the DEL...

Page 181: ...ys 8 3 4 to go to DELETE BUOY settings Follow the operations for deleting marks Open the DELETE MARK menu Turn the MULTI knob to select 4 DELETE BUOY Press the MULTI knob to display the pulldown menu...

Page 182: ...quantity marks Operating Procedure Press the keys 8 3 5 to go to DELETE FISH SCHOOL MARKS settings Follow the operations for deleting marks Open the DELETE MARK menu Turn the MULTI knob to select 5 D...

Page 183: ...hen you want to delete everything at the same time Operating Procedure Press the keys 8 3 6 to go to DELETE ALL settings Follow the operations for deleting marks Open the DELETE MARK menu Turn the MUL...

Page 184: ...event mark information display whether to show or hide the display display position and priority position Operating Procedure Press the keys 8 4 to go to INFORMATION settings Press the MENU key to di...

Page 185: ...6 37 6 Operation Settings 6 The following images are examples of the information that is displayed Own ship s information Fish School Information Water Temperature Graph Current Net Depth Event Marks...

Page 186: ...depth and event marks If the information displays are hidden you can press the Delete Information key on the controls to display them Operating Procedure Press the keys 8 4 1 to go to STATUS settings...

Page 187: ...t is input select 3 AUTO If the 8 OPERATION 2 DISPLAY MODE or 1 INFORMATION menu settings are set to display SHIP INFO is always displayed in the top position regardless of this setting 6 4 1 2 Fish S...

Page 188: ...the MULTI knob to display the pulldown menu If you want to display the water temperature graph set 2 ON Or select 3 AUTO if you want to display it when a signal is received 6 4 1 4 Current This secti...

Page 189: ...to display the pulldown menu If you want to display the net depth set 2 ON Or select 3 AUTO if you want to display it when a signal is received 6 4 1 6 Event Marks This section explains how to set eve...

Page 190: ...OSITION settings Follow the menu operations for information display to display the INFORMATION submenu Turn the MULTI knob to select 2 POSITION Press the MULTI knob to open the submenu You can set the...

Page 191: ...knob to set it 6 4 2 2 Fish School Information This is the menu item for setting the position to display fish school information Operation Procedure Press the keys 8 4 2 2 to go to FISH HISTOGRAM sett...

Page 192: ...s for position display to display the POSITION submenu Turn the MULTI knob to select 4 CURRENT INFO Press the MULTI knob to display the pulldown menu Turn the MULTI knob to select the position to disp...

Page 193: ...Press the keys 8 4 2 6 to go to EVENT MARK settings Follow the menu operations for position display to display the POSITION submenu Turn the MULTI knob to select 6 EVENT MARK Press the MULTI knob to...

Page 194: ...Press the MULTI knob to open the submenu You can set the priority from 1 to 6 If the INFORMATION settings are set to ON 1 SHIP INFO is masked and shown in the top position regardless of the settings 6...

Page 195: ...setting the priority at which to display water temperature graph Operating Procedure Press the keys 8 4 3 3 to go to TEMP DEPTH settings Follow the menu operations for priority display to display the...

Page 196: ...ss the MULTI knob to display the pulldown menu Turn the MULTI knob to select the priority at which to display the net depth Press the MULTI knob to set it The initial setting is set to 1 6 4 3 6 Event...

Page 197: ...mation display to display the INFORMATION submenu Turn the MULTI knob to select 4 SETTING Press the MULTI knob to open the submenu You can change the display settings from 1 to 4 6 4 4 1 Display Setti...

Page 198: ...just the detection area according to the type of fish and the fishing method 1 Small 10 2 Medium 20 3 Large 40 The initial setting is set to 1 S It is normally set to the initial setting value 6 4 4 1...

Page 199: ...menu operations for setting display to display the SETTING submenu Turn the MULTI knob to select 2 TEMP DEPTH Press the MULTI knob to display the submenu Do the settings for submenus 1 through 6 Upper...

Page 200: ...the MULTI knob to select the connected sensor Press the MULTI knob to set it Display examples Water temperature display Water depth display Water temperature water depth display If only the water temp...

Page 201: ...e upper limit value for the water temperature graph Operating Procedure Press the keys 8 4 4 2 3 to go to TEMP UPPER LIM settings Turn the MULTI knob to select 3 TEMP UPPER LIM Press the MULTI knob to...

Page 202: ...the MULTI knob to display the menu for inputting values You can set the depth from 0 m to 2000 m Turn the MULTI knob to set an appropriate value and press the MULTI knob to set it 6 4 4 3 5 Lower limi...

Page 203: ...settings for submenus 1 through 3 6 4 4 4 1 Displays This menu item is for setting the screen configuration for the current information settings Operating Procedure Press the keys 8 4 4 3 1 to go to...

Page 204: ...CALE settings Turn the MULTI knob to select 2 CURRENT SCALE Press the MULTI knob to display the pulldown menu Display example Numerical Value Graph Numerical Value Numerical Value Net Depth Numerical...

Page 205: ...3 Depth Range This is the menu item for setting the values on the current measurement depth graph axis of the Numerical Value Graph display Operating Procedure Press the keys 8 4 4 3 3 to go to DEPTH...

Page 206: ...the settings for the 1 NET DISP submenu 6 4 4 5 1 NET DISP This is the menu item for setting the configuration to display the net depth display Operating Procedure Press the keys 8 4 4 1 to go to NET...

Page 207: ...open the submenu In the submenu turn the MULTI knob to select 5 SPLIT DISPLY SET Press the MULTI knob to open the submenu Set 1 through 3 6 5 1 Split Mode Settings This is the menu item for setting t...

Page 208: ...2 Position of Split Display This is the menu item for setting the position to display the split screens Operating Procedure Press the keys 8 5 1 2 to go to SPLIT POSITION settings Turn the MULTI knob...

Page 209: ...y the submenu When the submenu is displayed do the settings for items 1 through 4 6 5 2 1 Distance Scale This is the menu item for setting whether to show or hide the distance scale Operating Procedur...

Page 210: ...ial setting is set to STOP 6 5 2 3 Scrolling Direction This is the menu item for setting the direction for scrolling in the audio split screen Operating Procedure Press the keys 8 5 2 3 to go to DIREC...

Page 211: ...teps when the direction knob is turned Operating Procedure Press the keys 8 5 2 4 to go to AUDIO STEP settings Turn the MULTI knob to select 4 AUDIO STEP Press the MULTI knob to display the pulldown m...

Page 212: ...the submenu When the submenu is displayed do the settings for items 1 through 3 6 5 3 1 Split Screen This is the menu item for setting the method to display the fish finder split screens Operating Pro...

Page 213: ...Press the MULTI knob to set it The initial setting value is 1 LEFT RIGHT 6 5 3 3 Scrolling Steps This is the menu item for setting the steps for scrolling in the fish finder split screen Operating Pro...

Page 214: ...enu turn the MULTI knob to select 6 SCREEN SETTING Press the MULTI knob to open the submenu Set 1 through 3 6 6 1 Settings for the Display of Numbers These are the menu items for setting the numbers t...

Page 215: ...select the item you chose Press the MULTI knob to set The initial setting value is set to 2 ON 3 AUTO displays the latitude and longitude if it is received Display example Ship info 6 6 1 2 Settings f...

Page 216: ...etting whether to show or hide the display of the compass points in the form of a range ring Operation Procedure Press the keys 8 6 1 3 to go to COMPASS POINT settings Turn the MULTI knob to select 3...

Page 217: ...et The initial setting value is set to 3 COURSE Auto displays COURSE if the speed is relative to land If the speed relative to water Auto displays HEADING 6 6 1 5 Settings for the Display of Fish Spee...

Page 218: ...P settings Turn the MULTI knob to select 6 TEMP Press the MULTI knob to display the pulldown menu Choose one item out of 1 OFF 2 ON or 3 AUTO from the pulldown menu Turn the MULTI knob to select the i...

Page 219: ...ing value is set to 3 AUTO If you set this setting to 3 AUTO the depth of the water is displayed when a signal is input 6 6 1 8 Settings for the Display of the Cursor Position This is the menu item fo...

Page 220: ...Operation Procedure Press the keys 8 6 1 9 to go to CURSOR POSITION settings Turn the MULTI knob to select 9 CURSOR DIRECTION Press the MULTI knob to display the pulldown menu Choose one item out of 1...

Page 221: ...for each of the items 1 through 7 in the submenu 6 6 2 1 Settings for the Audio Mark This is the menu item for setting whether to show or hide the audio mark Operation Procedure Press the keys 8 6 2 1...

Page 222: ...to set The initial setting value is set to 2 ON 6 6 2 3 Settings for the North Mark This is the menu item for setting whether to show or hide the north mark Operation Procedure Press the keys 8 6 2 3...

Page 223: ...ob to select the item you chose Press the MULTI knob to set The initial setting value is set to 2 ON 6 6 2 5 Settings for the Track Line This is the menu item for setting whether to show or hide the t...

Page 224: ...SOR settings Turn the MULTI knob to select 6 CURSOR Press the MULTI knob to display the pulldown menu Select 1 2 FRAME or 3 VRM EBL from the pulldown menu Turn the MULTI knob to select the item you ch...

Page 225: ...settings Turn the MULTI knob to select 7 COLOR SAMPLE Press the MULTI knob to display the pulldown menu Select 1 OFF or 2 ON from the pulldown menu Turn the MULTI knob to select the item you chose Pr...

Page 226: ...in the submenu 6 6 3 1 Color Pattern Settings This is the menu item for setting the display color of sonar images Operation Procedure Press the keys 8 6 3 1 to go to COLOR PATTERN settings Turn the M...

Page 227: ...gh 4 BLACK from the pulldown menu Turn the MULTI knob to select the item you chose Press the MULTI knob to set The initial setting value is set to 1 WHITE 6 6 3 3 Setting the Colors of the Sonar Displ...

Page 228: ...the colors At first the border moves to the COLOR of LEVEL 1 in the diagram to the left Next each time you press the MULTI knob the border moves to SATURATION to BRIGHTNESS and then to LEVEL If you ar...

Page 229: ...evel MO through U4 for the colors of the fish finder display Operating Procedure Press the keys 8 6 3 4 to go to F F COLOR settings Turn the MULTI knob to select 4 F F COLOR Press the MULTI knob to di...

Page 230: ...wise set the next 1 through 6 as well 6 7 1 Trigger Selection This menu item sets whether to alternate or scroll images from fish finder 1 and fish finder 2 at the same time at the trigger that was in...

Page 231: ...wing table is a table of the initial settings for the fish finder range settings Refer to the list of other menus for details 6 7 3 Setting the Gain for Fish Finder 1 This is the settings menu for adj...

Page 232: ...Clutter for Fish Finder 1 This is the settings menu for adjusting the clutter for fish finder 1 Operating Procedure Press the keys 8 7 5 to go to F F CLUTTER 1 settings Turn the MULTI knob to select 5...

Page 233: ...ob to select 6 NEXT Press the MULTI knob to move to the menus in NEXT Turn the MULTI knob to select 2 ADC Turn the MULTI knob to display the menu for inputting values Set the values according to the f...

Page 234: ...7 6 5 to go to INTERFERENCE settings Turn the MULTI knob to select 6 NEXT Press the MULTI knob to move to the menus in NEXT Turn the MULTI knob to select 5 INTERFERENCE Press the MULTI knob to display...

Page 235: ...3 Connection Settings 7 16 7 2 4 Fish Finder Settings 7 18 7 2 5 Fish Image Settings 7 20 7 2 6 Adjust Settings 7 21 7 2 7 Unit Set Settings 7 26 7 3 System Select Settings 7 28 7 4 Cancelling Regist...

Page 236: ...5 5 TVG Curve 7 37 7 6 Checks 7 39 7 6 1 Check Mode 7 39 7 6 2 Test Ring Number 7 40 7 6 3 Reservation Settings 7 40 7 7 Language Selection 7 41 7 8 Gyro Settings 7 43 7 9 Time Setting 7 44 7 9 1 Time...

Page 237: ...o to INITIAL settings Press the MENU key to open the menu Turn the MULTI knob to move to 9 OTHER Press the MULTI knob to open the submenu Turn the MULTI knob to move to 1 INITIAL Press the MULTI knob...

Page 238: ...1 to go to RANGE settings Open the 1 INITIAL menu Turn the MULTI knob to move to 1 RANGE and then press the MULTI knob to open the submenu Set submenus 1 SONAR RANGE 2 F F RANGE and 3 RANGE SETTING 7...

Page 239: ...TI knob to select 2 F F RANGE Press the MULTI knob to display the pulldown menu Match and assign1 through 4 of the pulldown menu to the fish finder that is connected Turn the MULTI knob to select Pres...

Page 240: ...9 1 1 3 1 to go to SONAR settings In the 3 RANGE SETTING menu turn the MULTI knob to select 1 SONAR Press the MULTI knob to accept The menu for changing the sonar range is displayed The following SON...

Page 241: ...ugh 16 that you want to change Turn the MULTI knob to move to the frame for Level Turn the MULTI knob to select the range you want from 1 through 16 Example 10 3 Turn the MULTI knob to move to Range B...

Page 242: ...displayed The menus and operations to change the range are the same as those for SONAR 7 2 2 Sensor Set Settings This is a menu for setting how to use sensors that are connected and sensors to be con...

Page 243: ...PASS settings In the INPUT menu turn the MULTI knob to select 1 COMPASS Press the MULTI knob to display the pulldown menu Select from 1 OFF to 5 NAV4 Confirm and set the input terminal that is connect...

Page 244: ...rom 1 OFF to 5 NAV4 Confirm and set the input terminal that is connected to the terminal board Normally turn the MULTI knob to select 2 NAV1 Press the MULTI knob to accept Because a one second pulse i...

Page 245: ...Procedure Press the keys 9 1 2 2 1 to go to COURSE settings In the SENSOR SET menu turn the MULTI knob to select 1 COURSE Press the MULTI knob to display the pulldown menu Select from 1 COMPASS to 4 L...

Page 246: ...enu turn the MULTI knob to select 4 LAT LON Press the MULTI knob to display the pulldown menu Select from 1 COMPASS to 2 GPS Example From the previous input sensor connection Turn the MULTI knob to se...

Page 247: ...settings These are the settings for DISTANCE 1 through DISTANCE 4 In the NET RECORDER menu turn the MULTI knob to select 1 DISTANCE 1 Press the MULTI knob to display the menu for inputting values Whe...

Page 248: ...match the connected sensors and select with the MULTI knob Press the MULTI knob to assign it 7 2 2 17 Line Monitor Settings Use this to check signals from the outer sensors and to confirm communicatio...

Page 249: ...he outer signal of NAV1 to NAV4 it repeatedly searches for the baud rate in the order of 1200 bps for JRC 4800 NMEA 9800 JRC Gyro I F 2 If you want to stop signals to confirm move the MULTI knob to th...

Page 250: ...u Turn the MULTI knob to move to 3 CONNECTION and then press the MULTI knob to open the submenu Do the settings displayed by the submenu 1 PROCESSOR 2 SENSOR CONNECTION 7 2 3 1 Settings for Connection...

Page 251: ...SENSOR CONNECTION menu turn the MULTI knob to select 1 F F 1 Press the MULTI knob to display the pulldown menu From 1 NO CONNECT and 2 CONNECT match the connected sensors and select with the MULTI kn...

Page 252: ...n the left The menu is masked if SENSOR CONNECTION is not connected 7 2 4 1 Amplifier Settings Set the signal form for the received signal output of the connected fish finder Operating Procedure Press...

Page 253: ...L the same way as you set FREQ H 7 2 4 3 Trig Mode Settings Operating Procedure Press the keys 9 1 4 4 to go to TRIG MODE settings Open the 4 FISH FINDER menu Turn the MULTI knob to select 4 TRIG MOD...

Page 254: ...s Open the 1 INITIAL menu Turn the MULTI knob to move to 5 FISH IMAGE and then press the MULTI knob to open the pulldown menu Turn the MULTI knob to select 1 ON or 2 OFF from the pulldown menu Press t...

Page 255: ...1 to go to MARK TILTING settings In the 6 ADJUST menu turn the MULTI knob to select 1 MARK TILTING Press the MULTI knob to display the pulldown menu If you do not turn the MULTI knob from 1 OFF to 2 O...

Page 256: ...I knob to input a draft value of 5 m for this ship Press the MULTI knob to assign it 7 2 6 3 Furnished Angle Adjustment Settings This is a menu for inputting angles that deviate from the heading mark...

Page 257: ...tion turn the MULTI knob counterclockwise and set to 355 Press the MULTI knob to assign it 7 2 6 4 Tilt to Bow Settings Operating Procedure Press the keys 9 1 6 4 to go to TILT TO BOW settings In the...

Page 258: ...the keys 9 1 6 6 to go to DISP ANGLE settings In the 6 ADJUST menu turn the MULTI knob to select 6 DISP ANGLE Press the MULTI knob to display the menu for inputting values Be sure to do this after ex...

Page 259: ...corrected values for 3 FURNISHED ANGLE be sure to set the corrected 3 FURNISHED ANGLE if there are changes to the furnished position of the transducer 7 2 6 8 A D Offset Settings A D OFFSET is used w...

Page 260: ...s the MULTI knob to open the submenu The following submenu is displayed 7 2 7 1 RANGE UNIT Operating Procedure Press the keys 9 1 7 1 to go to RANGE UNIT settings In the 7 UNIT SET menu turn the MULTI...

Page 261: ...IT settings In the 7 UNIT SET menu turn the MULTI knob to select 3 SPEED UNIT Press the MULTI knob to display the pulldown menu Turn the MULTI knob to select the unit you want to use Press the MULTI k...

Page 262: ...ss the MENU key to open the menu Turn the MULTI knob to move to 9 OTHER Press the MULTI knob to open the submenu Turn the MULTI knob to move to 2 SYSTEM SELECT Press the MULTI knob to display the pull...

Page 263: ...gistering operations in chapter 4 Operating Procedure Press the keys 9 3 to go to REGISTRATION CANCEL settings Press the MENU key to open the menu Turn the MULTI knob to move to 9 OTHER Press the MULT...

Page 264: ...us have been registered This section explains how to cancel the registration for 3 SIG PROCESS Turn the MULTI knob to select 3 SIG PROCESS Press the MULTI knob to set it As shown in the diagram on the...

Page 265: ...set it Press the MENU key to close the menu The registration of F1 as a user defined key is cancelled 7 4 3 Multi Knob Key Operating Procedure Press the keys 9 3 3 to go to MULTI KEY settings Open th...

Page 266: ...rn the MULTI knob to move to 9 OTHER Press the MULTI knob to open the submenu Turn the MULTI knob to move to 4 MAINTENANCE The submenu in the diagram on the left is displayed 7 5 1 OK Monitor This is...

Page 267: ...7 33 7 Other Items 7...

Page 268: ...I knob to move to 4 MAINTENANCE Turn the MULTI knob to select 2 TEST PATTERN Press the MULTI knob to open the submenu The setting method for doing regular tests is shown below 1 CLOCK is set to intern...

Page 269: ...knob to move to 4 MAINTENANCE Turn the MULTI knob to select 3 COLOR PATTERN Press the MULTI knob to open the submenu Turn the MULTI knob to select a color pattern from 1 through 5 You can confirm the...

Page 270: ...U key to open the menu Turn the MULTI knob to move to 9 OTHER Press the MULTI knob to open the submenu Turn the MULTI knob to move to 4 MAINTENANCE Turn the MULTI knob to select 4 PANEL TEST Press the...

Page 271: ...s the MENU key to open the menu Turn the MULTI knob to move to 9 OTHER Press the MULTI knob to open the submenu Turn the MULTI knob to move to 4 MAINTENANCE Turn the MULTI knob to move to 5 TVG CURVE...

Page 272: ...7 The TVG curve is used to adjust the optimum curve from far distances to close distances To close this menu open the menu for TVG curve and set HIDE Distance Settings Vertical axis Level dB Current c...

Page 273: ...7 39 7 Other Items 7 7 6 Checks 7 6 1 Check Mode The CHECK item is an item that is set for scalability Do not operate this item Precautions...

Page 274: ...7 Other Items 7 40 7 7 6 2 Test Ring Number 7 6 3 Reservation Settings...

Page 275: ...ing the MULTI knob displays the pulldown menu The 1 ENGLISH 2 SPANISH 3 4 5 6 7 and 8 NEXT menus appear Diagram No language is set at the factory The menu that is set in the LANGUAGE SET menu at start...

Page 276: ...7 Other Items 7 42 7 Startup Menu after Shipping from Factory Align the cursor and press the ENT key You can select Japanese by pressing the 2 key...

Page 277: ...wer to the gyro that is connected If slippage occurs do the settings on this menu Operating Procedure Press the keys 9 7 to go to GYRO SET settings Press the MENU key to open the menu Turn the MULTI k...

Page 278: ...en the submenu and do time and date settings 7 9 1 Time Setting Operating Procedure Press the keys 9 8 1 to go to TIME SET settings Move to DATE TIME Press the MULTI knob to open the submenu Turn the...

Page 279: ...ENT key to set it 7 9 2 Date Settings Operating Procedure Press the keys 9 8 2 to go to DATE SET settings Move to DATE TIME Press the MULTI knob to open the submenu Press the MULTI knob to select 2 DA...

Page 280: ...ormation Operating Procedure Press the keys 9 9 to go to VERSION INFO settings Press the MENU key to open the menu Turn the MULTI knob to move to 9 OTHER Press the MULTI knob to open the submenu Turn...

Page 281: ...enance and inspections 8 1 8 1 General Maintenance 8 3 8 2 Handling and Maintenance of the Hoisting Device 8 4 8 2 1 Explanation of the Parts of the Hoisting Device 8 4 8 2 2 Explanation of the Parts...

Page 282: ...8 Maintenance and inspections 8 2 8...

Page 283: ...transparency will worsen and images will be dark When cleaning wipe with a soft cloth flannel or cotton Do not wipe it hard with a dry cloth or use gasoline or thinners Absolutely do not inspect or re...

Page 284: ...enance of the Hoisting Device 8 2 1 Explanation of the Parts of the Hoisting Device Relay box Slot for the manual handle Hoisting motor Hoisting pipe Gland clamp Brake knob Insertion cap for the manua...

Page 285: ...tightened height by removing spacers for adjusting the height and then tighten the gland tightening bolt Be aware that overtightening causes hoisting operations to drag Remove the same number and typ...

Page 286: ...the transducer This is a cable that sends and receives signals to and from the transducer Be careful not to damage it Power switch This is the main power supply for the hoisting device Use it as an e...

Page 287: ...then tighten the V packing Note Remove the shims uniformly Periodically clean the hoisting shaft otherwise the effectiveness of waterproofing declines if it is dirty Greasing Periodically about every...

Page 288: ...8 Maintenance and inspections 8 8 8...

Page 289: ...Malfunctions and after sales service 9 Malfunctions and after sales service Contents 9 Malfunctions and after sales service 9 1 9 1 Checklist of Hoisting Device Troubles 9 3 9 2 Warning Display Settin...

Page 290: ...9 Malfunctions and after sales service 9 2 9...

Page 291: ...oisting also does not work 1 Is the power on 1 24 VSC Check on the terminal block Turn on the power 2 Does the CD relay for hoisting on the control board work Yes Coil side of the electromagnetic swit...

Page 292: ...ar rusted or extremely bent Does the motor rotate by itself without the gear Does not rotate Replace motor 3 Does the manual handle move While ship is stopped Refer to Procedure for Operating the Manu...

Page 293: ...9 5 9 Malfunctions and after sales service 9 9 2 Warning Display Settings You can check if there are any abnormalities by going to OTHER MAINTENANCE Checking OK MONITOR Checking the Test Pattern...

Page 294: ...9 Malfunctions and after sales service 9 6 9...

Page 295: ...10 1 10 Disposal 10 Disposal Contents 10 Disposal 10 1 10 1 Disposing of the Device 10 3 10 2 Disposing of the Battery 10 3...

Page 296: ...10 Disposal 10 2 10...

Page 297: ...you bought the device our office nearest you or your local government 10 2Disposing of the Battery When disposing of the lithium battery built into this device cover the battery s and terminal ends u...

Page 298: ...10 Disposal 10 4 10...

Page 299: ...11 1 11 Specifications 11 Specifications Contents 11 Specifications 11 1 11 1 Specifications 11 3 11 1 1 Fundamental Abilities 11 3 11 1 2 Machine Specifications 11 5 11 2 Input Output Signals 11 6...

Page 300: ...11 Specifications 11 2 11...

Page 301: ...lative to water date and time Water temperature and water depth information graph Current display 5 layers graph values Net depth meter 4 points graph values Fish school information histogram Event in...

Page 302: ...g device 1 Stroke 600 mm 2 Time for vertical operations Under 20 seconds 3 Resistance to the speed of the ship Maximum 18 KN 16 KN during vertical operations Function for auto retraction triggered by...

Page 303: ...l Exterior 360 132 59 mm width height depth weight 1 3 kg mount installation type Standard Processor Exterior 396 488 264 5 mm width height depth weight 15 kg mount installation type Standard Transmit...

Page 304: ...order indicates the order of priority to be selected Direction 1 second pulse __HDT __HDG __HDM __VHW JRC specific format when optional Gyro I F is connected Course 1 second pulse __RMC __RMA __VTG D...

Page 305: ...ond pulse __ZDA __RMC __GNC __GLL Correction for time 1 second pulse __ZDA Fish Finder 2 channels Trigger unipolar bipolar edge sense 5 V 15 mA Fish finder signal 0 to 5 V 0 to P Net depth meters max...

Page 306: ...11 Specifications 11 8 11...

Page 307: ...of Menus 12 3 12 2 Setting the Colors of the Sonar Display 12 14 12 3 Setting the Colors of the Fish Finder Display 12 16 12 4 Sonar Range and Initial Setting Values for the Fish Finder Range 12 17 12...

Page 308: ...12 Other 12 2 12...

Page 309: ...12 3 12 Other 12 12 1 List of Menus...

Page 310: ...12 Other 12 4 12...

Page 311: ...12 5 12 Other 12...

Page 312: ...12 Other 12 6 12...

Page 313: ...12 7 12 Other 12...

Page 314: ...12 Other 12 8 12...

Page 315: ...12 9 12 Other 12...

Page 316: ...12 Other 12 10 12...

Page 317: ...12 11 12 Other 12...

Page 318: ...12 Other 12 12 12...

Page 319: ...12 13 12 Other 12...

Page 320: ...12 Other 12 14 12 12 2 Setting the Colors of the Sonar Display...

Page 321: ...12 15 12 Other 12...

Page 322: ...12 Other 12 16 12 12 3 Setting the Colors of the Fish Finder Display...

Page 323: ...12 17 12 Other 12 12 4 Sonar Range and Initial Setting Values for the Fish Finder Range...

Page 324: ...NAV4_TX NAV4_TX TRIG1 FKH TRIG1 FKH TRIG2 FKL TRIG2 FKL 1 2 3 4 5 6 7 8 9 10 11 12 13 14 15 16 TB107 SIG1 FSH SIG1 FSH GND GND RESERVE1 RESERVE1 SIG2 FSL SIG2 FSL GND GND RESERVE2 RESERVE2 CN14 CN13...

Page 325: ...ARE DESCRIPTION SUB MARK OF BOX NO PER SET PER VESS JRC CODE NO 1 Fuse 1 1 MF60NR250V5 5ZFGD00208 2 3 4 5 6 7 8 9 10 MFR S NAME JAPAN RADIO CO LTD DRW NO 7ZXNA2006 Note Spare Part Description or JRC c...

Page 326: ...12 Other 12 20 12...

Page 327: ......

Page 328: ...ONAR ISO 9001 ISO 14001 Certified MAY 2019 Edition 5 CODE No 7ZPNA2401 Not use the asbestos For further information contact URL Head office http www jrc co jp eng Marine Service Department 1 7 32 Tats...

Reviews: